Desktop and Application Streaming
Use Elastic fleets and Linux for inexpensive, secure bastion hosts in Amazon AppStream 2.0
We’ve previously written about the security benefits of using AppStream 2.0 instances as bastion hosts. Bastion hosts (also called “jump boxes”) provide secure access to internal, protected network resources via RDP, SSH, VNC or web browser clients.
Now, Elastic fleets combined with Linux instances provide several new advantages for bastion host use cases:
- Improved cost optimization. Customers can avoid incurring RDS SAL fees (required for Microsoft Windows) by instead selecting Linux instances for their AppStream 2.0 fleets.
- Less maintenance and overhead. Administrators no longer have to configure scaling policies in order to achieve cost optimization while maintaining availability.
- Simple, elastic pricing. Now, customers pay only when users are connected to their applications and not for idle instances.
In this blog, I’ll cover the steps required to stream RDP and SSH client applications using Elastic fleets and Linux instances in AppStream 2.0.
Note: The steps in this blog utilize the AWS Command Line Interface. If you’d prefer to create and manage Elastic fleets using the AppStream 2.0 console, see Create and Manage App Blocks and Applications for Elastic Fleets in the Administration Guide.
Pricing Example:
Let’s consider an example in which an organization has 100 unique users each month who need to access RDP. Each user accesses an RDP client application on AppStream 2.0 in N. Virginia region using a stream.standard.small instance for an average of 2 hours per month.
With Elastic fleets, the cost calculation for this scenario is simple: there is a per second charge for each user connected to an application in your Elastic fleet. For the scenario described, this is 2 hours (7200 seconds) * $ 0.059 per hour * 100 users = a total of $11.80 per month or about $0.12 per user for the entire month.
Prerequisites:
- An Elastic fleet configured to use the “Amazon Linux 2” platform type in AppStream 2.0
- Administrator access to an Amazon Linux AppStream 2.0 image builder, Amazon Linux WorkSpaces, or Amazon Linux 2 EC2 instance. This instance must have outbound Internet access.
- An Amazon S3 bucket. The S3 bucket must have a bucket policy which allows access to the AppStream 2.0 service. See S3 Bucket Permissions for more details. NOTE: Currently, S3 buckets configured to use server-side encryption with customer-provided encryption keys (SSE-C) are not supported for Elastic fleets. If you require encryption at rest for your S3 objects, server-side encryption with Amazon S3-managed encryption keys (SSE-S3) is an option that will work for Elastic fleets.
- An AWS Identity and Access Management (IAM) user or role with sufficient permission to upload objects to your S3 bucket, create app blocks, applications and to associate an application with your Elastic fleet in AppStream 2.0. See Using AWS Managed Policies and Linked Roles to Manage Administrator Access to AppStream 2.0 Resources in the Administration Guide.
- Access to an environment with the AWS Command Line Interface and the required IAM credentials.
Remote Desktop Protocol (RDP)
RDP is a popular protocol which provides systems administrators with a graphical user interface for accessing a remote server (typically a Windows server) over a network. We’ll walk through all the steps required to configure Remmina, a free and open source RDP client for Linux, as an application and then associate it with your Elastic fleet in AppStream 2.0.
- Follow the instructions in Create the VHD to create, initialize and mount your virtual hard disk (VHD) file. You’ll need to perform these steps from an Amazon Linux 2 EC2 instance, Amazon Linux AppStream 2.0 image builder, or Amazon Linux WorkSpaces. Use the following parameters while completing these steps:
- File name: vhd.img
- VHD size: 120 megabytes (120M)
- Mounting location: /mnt
- When your VHD is mounted, download the Remmina package and its dependencies into the folder /mnt/remmina-install. Run the following in a bash terminal:
wget http://dl.fedoraproject.org/pub/epel/epel-release-latest-7.noarch.rpm sudo rpm -ivh epel-release-latest-7.noarch.rpm sudo yum update sudo yum install yum-plugin-downloadonly -y sudo mkdir /mnt/remmina-install sudo yum install --downloadonly --downloaddir=/mnt/remmina-install remmina -y - Follow the steps to detach your VHD in Linux.
- Download the Remmina logo here and create a file called mount-script.sh with the following content. When a user starts a session in your Elastic fleet, AppStream 2.0 will use this script to mount your VHD file and then install Remmina and its dependencies (located in /mnt/remmina-install/ ):
#!/bin/bash sudo mount -t auto -o loop /opt/appstream/AppBlocks/RDP-AppBlock/vhd.img /mnt sudo yum localinstall /mnt/remmina-install/*.rpm -y - Upload your VHD file, mount script and logo file to an S3 bucket in your AWS account. The bucket must be located in the same account and region where your AppStream 2.0 Elastic fleet will be deployed. Create all three objects with the prefix “Apps/RDP”, so that your objects look like this·
- s3://<BUCKET_NAME>/Apps/RDP/remmina-icon.png
- s3://<BUCKET_NAME>/Apps/RDP/mount-script.sh
- s3://<BUCKET_NAME>/Apps/RDP/vhd.img
- Create a file called CreateAppBlock-RDP.json with the following JSON contents. Replace <BUCKET-NAME> with your own S3 bucket name.
{ "Name": "RDP-AppBlock", "SourceS3Location": { "S3Bucket": <BUCKET_NAME>, "S3Key": "Apps/RDP/vhd.img" }, "SetupScriptDetails": { "ScriptS3Location": { "S3Bucket":<BUCKET_NAME>, "S3Key": "Apps/RDP/mount-script.sh" }, "ExecutablePath": "/usr/bin/bash", "ExecutableParameters": "/opt/appstream/AppBlocks/RDP-AppBlock/mount-script.sh", "TimeoutInSeconds": 60 } } - Create your app block with the following AWS CLI command:
aws appstream create-app-block --cli-input-json file://CreateAppBlock-RDP.json - Create a file called CreateApplication-RDP.json with the following contents. Replace APPBLOCK-ARN with the ARN value that was output when you created your app block in step 7.
{ "Name": "RDP", "DisplayName": "RDP client", "Description": "RDP client (Remmina)", "IconS3Location": { "S3Bucket": <BUCKET_NAME>, "S3Key": "Apps/RDP/remmina-icon.png" }, "LaunchPath": "/usr/bin/remmina", "LaunchParameters": "--new --protocol=RDP", "Platforms": ["AMAZON_LINUX2"], "InstanceFamilies": ["GENERAL_PURPOSE"], "AppBlockArn": <APPBLOCK-ARN> } - Create your application with the following AWS CLI command:
aws appstream create-application --cli-input-json file://CreateApplication-RDP.json - Associate your new application with your existing Elastic fleet. Replace APPLICATION-ARN with the ARN that was output when you created your application in step 9.
aws appstream associate-application-fleet --fleet-name "MyElasticFleet" --application-arn <APPLICATION-ARN> - Finally, associate your Elastic fleet with a stack and provide users with access to the stack. When users authenticate, they will see the Remmina RDP client icon in their application catalog.
- When users launch the RDP client application, it will take approximately 45 seconds for their session to start. Once the session is started, the user will be prompted to enter information required to start the RDP connection including target server IP, username, password and domain. For a full list of features available, see Remmina Features.
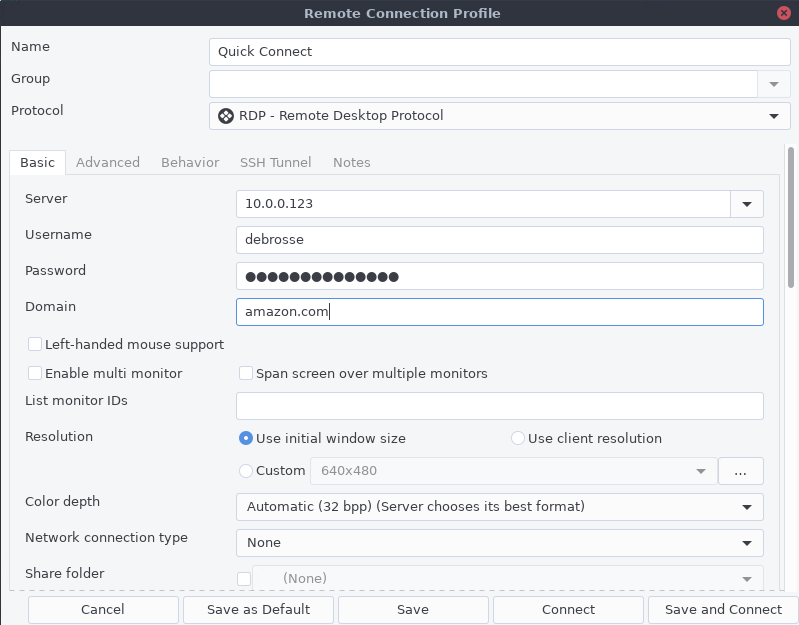
In the Remmina RDP client, the user is prompted to enter information to start the connection including target server IP, username, password and domain.
Secure Shell (SSH)
SSH is a popular protocol used for securely accessing remote systems (typically Unix-based systems) over a network. In the following steps, we’ll walk through all the steps required to configure an SSH application and associate it with your Elastic fleet in AppStream 2.0.
- Follow the instructions in Create the VHD to create, initialize and mount your virtual hard disk (VHD) file. You’ll need to perform these steps from an Amazon Linux 2 EC2 instance, Amazon Linux AppStream 2.0 image builder, or Amazon Linux WorkSpaces. Use the following parameters while completing these steps:
- File name: vhd.img
- VHD size: 1 megabyte (1M)
- Mounting location: /mnt
- Because Linux instances in AppStream 2.0 provides a built-in SSH client, we don’t need to install anything onto the VHD. If you mounted your VHD file, follow the steps to detach your VHD in Linux.
- Download an SSH logo here and create a file called mount-script.sh with the following content. When a user starts a session in your Elastic fleet, AppStream 2.0 will use this script to mount your VHD file:
#!/bin/bash sudo mkdir /mnt sudo mount -t auto -o loop /opt/appstream/AppBlocks/SSH-AppBlock/vhd.img /mnt - Upload your VHD file, mount script and logo file to an S3 bucket in your AWS account. The bucket must be located in the same account and region where your AppStream 2.0 Elastic fleet will be deployed. Create all three objects with the prefix “Apps/SSH”, so that your objects look like this:
- s3://<BUCKET_NAME>/Apps/SSH/ssh-icon.png
- s3://<BUCKET_NAME>/Apps/SSH/mount-script.sh
- s3://<BUCKET_NAME>/Apps/SSH/vhd.img
- Create a file called CreateAppBlock-SSH.json with the following contents. Replace <BUCKET-NAME> with your own S3 bucket name.
{ "Name": "SSH-AppBlock", "SourceS3Location": { "S3Bucket": <BUCKET_NAME>, "S3Key": "Apps/SSH/vhd.img " }, "SetupScriptDetails": { "ScriptS3Location": { "S3Bucket":<BUCKET_NAME>, "S3Key": "Apps/SSH/mount-script.sh" }, "ExecutablePath": "/usr/bin/bash", "ExecutableParameters": "/opt/appstream/AppBlocks/SSH-AppBlock/mount-script.sh", "TimeoutInSeconds": 60 } } - Create your app block with the following AWS CLI command:
aws appstream create-app-block --cli-input-json file://CreateAppBlock-SSH.json - Create a file called CreateApplication-SSH.json with the following contents. Replace APPBLOCK-ARN with the ARN value that was output when you created your app block in the previous step.
{ "Name": "SSH", "DisplayName": "SSH client", "Description": "SSH client", "IconS3Location": { "S3Bucket": <BUCKET_NAME>, "S3Key": "Apps/SSH/ssh-icon.png" }, "LaunchPath": "/usr/bin/gnome-terminal", "LaunchParameters": "--working-directory=$HOME", "Platforms": ["AMAZON_LINUX2"], "InstanceFamilies": ["GENERAL_PURPOSE"], "AppBlockArn": <APPBLOCK-ARN> } - Create your application with the following AWS CLI command:
aws appstream create-application --cli-input-json file://CreateApplication-SSH.json - Associate your new application with your existing Elastic fleet. Replace APPLICATION-ARN with the ARN that was output when you created your application in the previous step.
aws appstream associate-application-fleet --fleet-name "MyElasticFleet" --application-arn <APPLICATION-ARN> - Finally, assign users to the Stack associated with your Elastic fleet. When users authenticate, they will see the SSH client in their application catalog.
- When users launch the SSH client application, it will take approximately 45 seconds for their session to start and a terminal window to appear. If users require key-based authentication (.pem files) to initiate SSH connections, they can upload them into the AppStream 2.0 session using the native upload functionality. The .pem file would then be accessible in Temporary Files and can be referenced in the SSH client terminal session:
ssh -i ~/MyFiles/TemporaryFiles/my-key.pem user-name@IPv4-addressAlternatively, the AppStream 2.0 administrator can attach a network file share (for example, using a session script) to the instance so that the user can access the necessary .pem file or any other files on the network share.
Windows Bastion Hosts
If you require Microsoft Windows applications, you can also choose Windows as the operating system for your Elastic fleets. Note that each unique user is required to have an RDS SAL license to access Windows in AppStream 2.0. Customers can either bring their own RDS SAL licenses into AWS or pay an RDS SAL fee to AWS each month. See Amazon AppStream 2.0 Pricing for details.
The following alternative applications could be used for bastion host use cases with your Elastic fleet and Windows instances:
- PuTTY for SSH. PuTTY is an SSH and telnet client for Windows.
- Windows includes a native RDP client (mstsc.exe) located at C:\Windows\system32\mstsc.exe . You can create an empty VHD file and then configure your application to launch mstsc.exe. For example, see this application JSON definition:
{
     "Name": "RDP",
     "DisplayName": "Remote Desktop",
      "Description": "Remote Desktop client.",
     "IconS3Location": {
          "S3Bucket": <BUCKET-NAME>,
          "S3Key": "Apps/RDP/remote-desktop-rdp-mstsc-icon.png"
     },
     "LaunchPath": "C:\\Windows\\system32\\mstsc.exe",
     "Platforms": ["WINDOWS_SERVER_2019"],
     "InstanceFamilies": ["GENERAL_PURPOSE"],
     "AppBlockArn": <APPBLOCK-ARN>
}
Cleanup
To remove resources created in this blog:
- Disassociate the RDP and SSH application you created from your Elastic fleet.
- Delete your application and app block resources in AppStream 2.0
- Delete any objects (VHD files, icons and mount scripts) you uploaded to your S3 bucket.
Conclusion
AppStream 2.0 is an excellent choice for providing secure bastion hosts to systems administrators. Two new features, Elastic fleets and Linux instances, provide additional benefits that make AppStream 2.0 an even better solution for bastion host use cases: administrators no longer need to worry about scaling policies to balance high availability with cost optimizations. Customers are charged only per second that users are accessing applications and don’t have to worry about incurring cost for idle instances in their fleet.
To learn more about Elastic fleets and Linux instances, see the following announcements:
- AWS announces availability of Elastic fleets with Amazon AppStream 2.0
- Amazon AppStream 2.0 Introduces Linux Application Streaming
In this blog, we’ve outlined the steps to manually create VHD files and applications and then associate them with an Elastic fleet. If you’d like to automate the process of creating and updating these applications, see the following blog: