AWS for Games Blog
Migrating from Kubernetes and Agones to Amazon GameLift Servers
Kubernetes with Agones is a popular open-source solution for hosting dedicated game servers. For a single-cluster, single AWS Region setup, this provides a good foundation for dedicated game servers hosting. But at a global production scale Agones can become complex to manage, requiring you to build and operate multiple supporting systems for each location. These include secure cross-Region communication, private network peering, game session allocator, matchmaking, monitoring, and Agones itself. This is all before you deploy your first game server.
The operational complexity and associated cost are why many developers choose Amazon GameLift Servers for fully managed global game server hosting. In addition to managing the global game server orchestration, Amazon GameLift Servers offers built-in real-time distributed denial of service (DDoS) protection and matchmaking at no additional cost. To significantly reduce the total cost of ownership, data egress is also included in the price of sixth generation and later instances.
Amazon GameLift Servers also has a 99.95% availability SLA for the whole global game server orchestration. On an Agones-based solution, you’re responsible for everything beyond the underlying Amazon Elastic Kubernetes Service (Amazon EKS) SLA.
In this post, we discuss some of the differences between the two hosting options and cover how to migrate from an Agones-based implementation to Amazon GameLift Servers.
Key operational and cost differences
The main differences between the two options for a production environment center around cost and operational complexity. Table 1 compares the operational aspects of this equation.
| Feature | Agones on Amazon EKS | Amazon GameLift Servers |
|---|---|---|
| Containers control plane | EKS deployment, version upgrades and plugins managed by you | Built-in |
| Session lifecycle management | Agones controller in each Region operated by you | Built-in |
| Session allocation | Agones allocator operated by you | Built-in |
| Global game server compute | Amazon EKS clusters managed by you in each Region | Built-in |
| Matchmaking | Managed and operated by you (Open Match or other solution) | Built-in |
| Monitoring | Container Insights on Amazon CloudWatch and solutions like Prometheus and Grafana | Built-in (you can also add Prometheus and Grafana with built-in integration support) |
| Fleet auto-scaling | Eviction signals and Karpenter | Built-in |
| Communication between remote location clusters and central backend | Secure certificate-based communication between the clusters built by you | Built-in |
| Replicating container images across Regions | Managed by you | Built-in |
| Blue/green deployment | Custom continuous integration and delivery (CI/CD) solution built by you | Simple: Switch between versions of your game transparently |
| DDoS protection for game sessions | Custom global relay solution in each Region managed by you (Quilkin or similar) | Built-in |
| Ping endpoints | Deployed as part of the Agones infrastructure and managed by you | Built-in |
| Game server container image | Managed by you | Managed by you |
Table 1 – Operational feature comparison
The components of a production-ready Agones-based deployment include 30–40 Pods in the home Region, and 20–25 Pods in the additional locations before the first game server is deployed. These are services and tools that you’re responsible for monitoring, operating, patching, securing, and paying for.
In an Amazon GameLift Servers based deployment, you upload your build once and define a global fleet and its configuration. You aren’t responsible for the supporting tooling, because they’re managed for you by the service.
Diagram 1 shows a high-level architectural difference of a global production-ready Agones-based and Amazon GameLift Servers deployment.
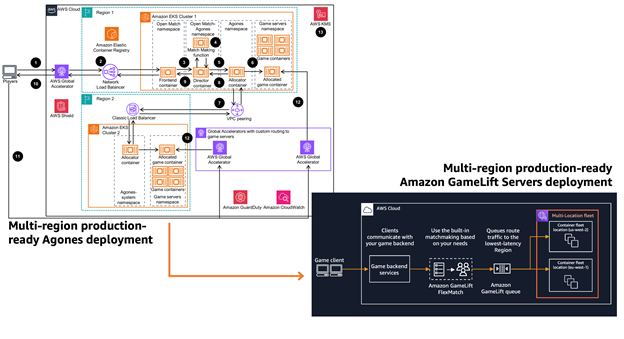
Diagram 1 – Architecture comparison
Cost is equally important when choosing a hosting provider. Table 2 compares the cost components.
| Cost component | Agones on Amazon EKS | Amazon GameLift Servers |
|---|---|---|
| Containers control plane | Amazon EKS control plane costs | Included |
| Game server compute | Amazon Elastic Compute Cloud (Amazon EC2) costs | GameLift Servers compute costs (approximately 20% premium on top of EC2) |
| Game server instance data volumes | Amazon EBS costs | Included |
| Data egress from the game server to players | Data transfer out costs per GB | Included |
| Supporting services (orchestration, allocation, cross-Region communication, ping endpoints) | Amazon EC2 compute costs for all systems across all AWS Regions (more than 20 Pods per Region) | Included |
| DDoS protection | Compute costs for a custom relay layer in each Availability Zone in each Region | Included |
| Matchmaking | Compute costs (Open Match or similar) | Included |
| Monitoring | Costs for Container Insights and custom metrics (Prometheus or Grafana) | Included (additional monitoring through Prometheus or Grafana available with additional cost) |
Table 2 – Cost comparison
As shown in the table, costs consist of a wide set of components. The two key cost components are compute and data egress. On Amazon GameLift Servers, data egress is included, but on a custom Agones solution you pay per GB of traffic. The data transfer costs can be up to 40–50% of the total cost for game server hosting. For compute, you pay an approximately 20% premium on Amazon GameLift Servers, but you don’t have any additional costs for supporting tooling. These can add up across Regions in an Agones-based solution. Amazon GameLift Servers includes built-in matchmaking and DDoS protection. These are capabilities that can otherwise represent significant costs.
The inclusion of data egress and the supporting tooling, matchmaking, data volumes, and advanced DDoS capabilities makes Amazon GameLift Servers the most cost-optimal solution in virtually every scenario. In addition, having the features managed reduces the operational complexity, so you can focus on implementing and optimizing your game server.
Although we’ve covered the benefits of Amazon GameLift Servers in operational ease, cost, and features, there can still be situations where you want more custom deployment. Some use cases—such as massively partitioned MMO games that require tight coordination between game server nodes—might be challenging to implement on Amazon GameLift Servers. Basic relay servers that host up to hundreds of game sessions on a single process are another use case that might not be an optimal fit for the service. This is because Amazon GameLift Servers is designed around a 1:1 mapping between a game session and game server process.
Migrating from Agones to Amazon GameLift Servers
When migrating from an existing Agones-based solution to Amazon GameLift Servers, the steps are relatively straightforward:
- Replace Agones SDK calls with GameLift Server SDK, or use an SDK wrapper
- Use a single private port across your game servers
- Build and push your container image to Amazon Elastic Container Registry (Amazon ECR)
- Create a container group definition
- Create a container fleet
- Replace your allocator with a game session queue (and optionally FlexMatch)
- Update your backend to call GameLift APIs for connection info instead of Agones allocator APIs
- Decommission Agones infrastructure
Let’s review the steps in more detail.
Step 1: Replace Agones SDK with GameLift Server SDK or use an SDK wrapper
Swap your Agones SDK integration (SDK.Ready(), SDK.Shutdown(), SDK.Health()) for the Amazon GameLift Servers SDK equivalents. The key conceptual shift is that Agones is pull-based (your server or external allocator calls Allocate()) whereas Amazon GameLift Servers is push-based (the service calls your OnStartGameSession callback on the selected game server when placing a session). You’ll implement InitSDK() to establish a WebSocket connection, ProcessReady() with callback handlers for OnStartGameSession and OnProcessTerminate, and then ProcessEnding() to signal session completion. The Amazon GameLift Server SDK is available in C++, C#, and Go and plugins are available for Unreal and Unity. The blog post on Development phase steps for successful game launches on Amazon GameLift Servers covers in detail how the SDK integration and game session lifecycle management works.
If you don’t want to do the full SDK integration, the Containers Starter Kit provides a sidecar solution. It automatically implements the required connections to the service without modifications to your server build.
Step 2: Use a single private port across game servers
Agones doesn’t do public-to-private port mapping. It allocates host ports directly from a configured range (for example, 7000–7029) on each Kubernetes node. Your game server binds to that port with players connecting to the node IP at that same port number. On Amazon GameLift Servers, your container defines an internal port, and the service manages the mapping to external ports on the EC2 instance. This means your game server code doesn’t need to know or care about the public-facing port. Instead of discovering your assigned host port using the Agones SDK and registering it, you bind to your internal port and let Amazon GameLift Servers handle the external mapping. The service then returns the correct connection info for clients when the session is placed. On an Unreal game for example, this could mean that every server registers the default 7777 port.
Step 3: Build and push your container image to Amazon ECR
Amazon GameLift Servers Container fleets pull images from Amazon ECR. Create a private ECR repository in the same AWS Region where you plan to create your fleet, then tag and push your game server image. Your existing Docker file will usually work as-is or require minimal modifications. The entry point of the container is the game server process in both systems. The Containers Starter Kit shared previously automates this whole process.
Step 4: Create a container group definition
Define your container architecture by creating a container group definition. This replaces your Agones Fleet spec and Pod template. Specify the ECR image URI, and vCPU and memory limits for the container group. You can add support containers (sidecars) for logging or monitoring. Amazon GameLift Servers automatically calculates how many container group replicas fit each EC2 instance based on your resource limits and the instance type. This is similar to how Agones packs Pods onto nodes based on resource requests. Again, the Containers Starter Kit includes automation for the requirements of this step.
Step 5: Create a container fleet
Create a managed container fleet specifying the container group definition, EC2 instance type, and geographic locations. This single resource replaces your EKS clusters, node pools, Agones installation, Helm charts, cert-manager, and the multi-cluster allocation configuration. Amazon GameLift Servers handles instance provisioning, underlying OS, container deployment, health checks, and auto scaling. Add multiple locations to a single fleet for multi-Region presence. No VPC peering or cross-cluster TLS exchange is needed. The communication from your home Region to remote locations is completely managed by the service.
Step 6: Replace your allocator with a game session queue (and optionally FlexMatch)
Create a game session queue pointing at your fleets. This replaces your custom Director, the multi-cluster Agones allocator, and the TLS/VPC peering connections between Regions. The queue handles placement across locations with latency-based or location priority routing. If you want built-in matchmaking, configure FlexMatch with a rule set defining team sizes, skill ranges, and latency tolerances. Otherwise, call StartGameSessionPlacement() directly from your backend with player latency data and let the queue find the best location.
Step 7: Update your backend to call GameLift APIs for connection info instead of Agones allocator APIs
Your backend service currently queries the Agones allocator API for game server connection info (IP and port from GameServer.Status). Replace this with processing queue events: you receive an Amazon Simple Notification Service (Amazon SNS) notification when placement completes. You can also use FlexMatch events if you’re using that for matchmaking. The events include the game session IP address, port, and player session IDs that clients use to authenticate their connection to the server. Amazon GameLift Servers offers optional player session management: You can adopt it or continue using your existing solution. The Event-based session placement guidance includes architecture and sample code for using queues effectively.
Step 8: Decommission Agones infrastructure
After traffic is fully migrated and validated on Amazon GameLift Servers, decommission the Agones stack. This includes the EKS clusters (all Regions), VPC peering connections, Open Match deployment, cert-manager, Amazon ECR replication rules, and the associated node groups. This eliminates the 30-40 system pods in the home Region and 20–25 in each remote Region that were running only to keep the platform operational.
Conclusion
We discussed the key differences between an Agones-based solution and Amazon GameLift Servers from operations and cost perspectives. We identified that operationally you have a lot more responsibility on Agones than you do on Amazon GameLift Servers. On the cost side, the free data egress, included supporting tooling, and additional features make Amazon GameLift Servers in most cases the more cost-optimal solution.
We also showed you the steps to migrate from Agones to Amazon GameLift Servers. For most games, this should be a straightforward and painless process, with the game server and game backend logic requiring minimal changes.
Get started today with Amazon GameLift Servers for multiplayer game server hosting. Contact an AWS Representative to learn how we can help accelerate your business.