AWS HPC Blog
Announcing Capacity Blocks support for AWS Parallel Computing Service
 This post was contributed by by Kareem Abdol-Hamid, Kyle Bush
Today we’re happy to announce that support for Amazon EC2 Capacity Blocks for Machine Learning are now supported in AWS Parallel Computing Service (AWS PCS). This allows you to reserve and schedule GPU-accelerated Amazon EC2 instances for future use. That includes the NVIDIA Hopper GPU series and the AWS Trainium.
AWS PCS is a managed service that makes it easier for you to run and scale your HPC workloads and build scientific, engineering, or AI models on AWS using Slurm. With the addition of Capacity Blocks support, organizations can now ensure reserved access to accelerated compute when they need it most, while maintaining the simplicity of a fully managed service that handles cluster operations, updates, and observability.
What are Capacity Blocks?
Capacity Blocks are an EC2 capability that allows customers to reserve accelerated instances for future use by paying upfront. You can reserve blocks of 1-64 instances for durations of up to 6 months, with the ability to extend active reservations.
This is particularly valuable for organizations running large-scale training or inference workloads in AI or machine learning (ML), or GPU-accelerated codes like those in molecular dynamics or fluid dynamics, in HPC.
Key benefits
Reserved Access allows customers to reserve GPU instances up to 8 weeks in advance, ensuring capacity availability for critical workloads while offering discounted rates compared to on-demand pricing. This feature bridges the gap between flexible on-demand instances and long-term On-Demand Capacity Reservation (ODCR) commitments, making it ideal for customers running ML or HPC workloads that require consistent execution on powerful GPUs without extended reservations. By enabling advance booking of GPU resources, customers can maintain workflow continuity and streamline resource planning for scenarios like scheduled training cycles, periodic model updates, and time-sensitive ML training jobs and research projects.
Flexible Scheduling allows you to reserve GPU capacity either immediately for urgent tasks like real-time inference optimization or future-date your reservations for planned large-scale GPU jobs running on PCS. With Slurm on PCS you can queue up jobs that will kick off as soon as the Capacity Block instances are available. This versatility ensures you can either quickly access powerful instances when needed, such as for rapid model fine-tuning and validation, or strategically schedule resources for upcoming intensive workloads like distributed training across multiple GPUs. Whether you’re responding to immediate modelling needs, or planning ahead for extensive training pipelines, the ability to toggle between immediate and future reservations gives you consistent access to the compute resources your workloads require, while maintaining cost benefits and capacity reservations.
Capacity Blocks offer powerful resource sharing capabilities, too – allowing you to distribute reserved GPU instances across multiple PCS clusters. You can also aggregate multiple Capacity Blocks into a single large queue in PCS to extract the greatest utilization across diverse instance types. This lets you maximize the value of your GPU reservations across varying workload types or experiments. This extends to sharing reserved capacity across multiple projects. This is ideal for organizations that want to efficiently allocate pre-scheduled GPU resources among different initiatives or teams.
Seamless Integration delivers a frictionless experience by incorporating Capacity Blocks directly into PCS Compute Node Groups (CNGs) through a straightforward purchase option. Simply updating a launch template allows you to leverage all of the PCS familiar scheduling capabilities and queue management features with your reserved capacity. Teams can immediately take advantage of reserved GPU access while maintaining their existing ML or HPC workflows and processes, making the transition to using Capacity Blocks as straightforward as selecting a new purchase option.
Getting started with Capacity Blocks in PCS
Before getting started ensure you’ve created a PCS cluster.
1. Create or Select a Capacity Block
First, purchase your Capacity Block through the EC2 console, specifying:
- Instance type
- Number of instances (1-64)
- Duration (up to 6 months)
- Start date (up to 8 weeks in advance)
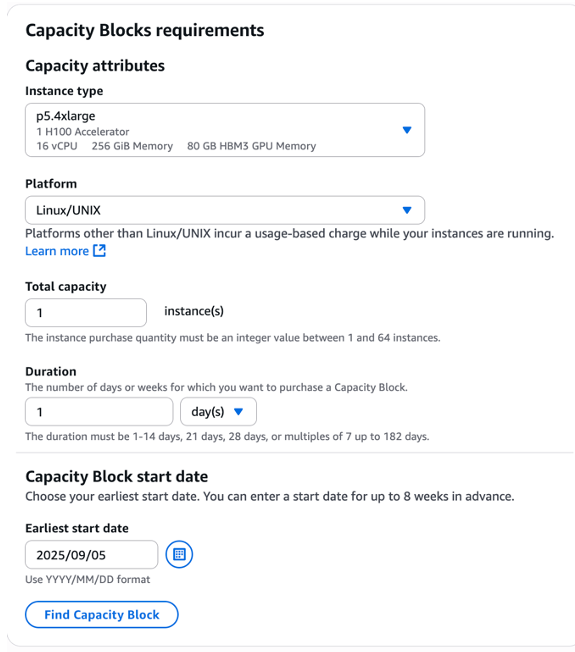
Figure 1 – The AWS Management Console EC2 Capacity Blocks requirements dialog showcasing the instance type, capacity, duration, and start date.
2. Create your launch template
We’ll create a launch template through the Amazon EC2 launch templates page. Update the instance type to match your Capacity Block Instance type (in this case, p5.4xlarge).

Figure 2 – The AWS Management Console EC2 Create Launch Template dialog showcasing the Instance type matching the instance type specified in the Capacity Block purchase.
Under Network settings, specify the Availability Zone that corresponds with your Capacity Block (in this case, us-west-2c) and select the security group that you created during your PCS cluster set up. You can leave the rest of your configurations or customize them to your preference – they’re not required to activate capacity blocks.

Figure 3 – The AWS Management Console Create Launch Template dialog showcasing the Availability Zone matching the AZ of the Capacity Block and the security group matching the PCS cluster security group.
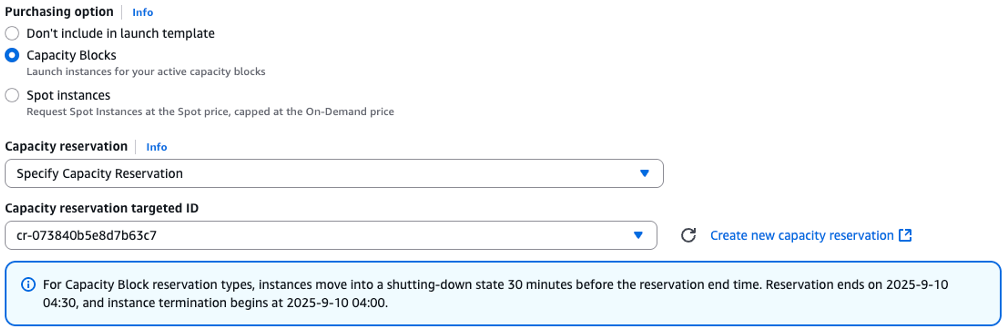
Under Advanced Details, change your purchasing option to Capacity Blocks and under Capacity Reservation, select Specify Capacity Reservation. Select your Reservation ID. Exclude the rest of the details from the Launch Template. This is the last step required to activate Capacity Blocks.
3. Create a Compute Node Group
In the PCS Console, create a Compute Node Group by selecting the appropriate launch template and version. Update your instance profile as needed by creating a basic profile with permissions for EC2 instances to join AWS PCS clusters. Next, choose the subnet that corresponds to your Capacity Block and select the matching Instance Type for your Capacity Block, such as p5.4xlarge.

Figure 5- The AWS Management Console PCS Create Compute Node Group dialog showcasing the subnet matching the Capacity Block subnet, the instance type matching the capacity block, and the purchase option as “Capacity Block”.
After a few minutes, you should see your instance running in the EC2 instances dashboard. Once an instance passes the status check, it’s ready for work.

Figure 6 – The AWS Management Console EC2 Instances dashboard showcasing the instance from the Capacity Block has been launched by PCS and has passed the status check
Suggested best practices
We recommend monitoring capacity utilization when sharing blocks across multiple services using the console or CLI.
To change instance types or use a new Capacity Block, create a new compute node group rather than updating an existing one. This ensures seamless transition and avoid any potential disruption to your workloads.
Plan for job handling when Capacity Blocks expire You can either extend your CB or you could choose to alert teams through an automated EventBridge notification. When extending a CB, you’ll see no interruption in jobs submitted to your PCS compute node group.
To identify if a capacity block is expiring, note the following: EC2 will emit a Capacity Block Reservation Delivered event through EventBridge when a CB reservation starts and a Capacity Block Reservation Expiration Warning event 40 minutes before the CB reservation expires with an instance being reclaimed 30 minutes before the CB expires. You can subscribe to these events and take appropriate action. More details in the monitoring section of the Capacity Blocks official documentation.
Make sure you match availability zones between your Capacity Block and compute node group.
Capacity Blocks must be in scheduled or active state before connecting to PCS. If scheduled the PCS scheduler will hold jobs in queue until the CB reaches active.
When creating a compute node group be aware the instance will not be spun up until the start time of your capacity reservation, even if your reservation is active before then.
Availability and pricing
PCS now supports Amazon EC2 Capacity Blocks in all AWS Regions where both services are available.
Standard PCS and Capacity Block pricing applies. You’ll be charged for the reserved capacity according to the EC2 Capacity Blocks pricing model, regardless of utilization.
Happy Building!