AWS for Industries
Beyond webhooks: Event-driven payment architectures with Amazon EventBridge
Introduction to Modern Payment landscape
The rapid evolution of digital payments has fundamentally transformed how businesses handle financial transactions, with payment processors becoming essential partners in this transformation. Modern payment processors provide the foundational infrastructure that handles the complexities of payment processing, compliance, and global payment methods. When this infrastructure integrates with AWS cloud services, it enables organizations to build sophisticated, event-driven architectures that respond intelligently to real-time payment events, orchestrate complex business workflows, and deliver scalability and reliability, essential for modern applications.
After a payment succeeds, systems need to fulfill orders, update customer accounts, send confirmations, and trigger analytics processes. If payments fail, systems must initiate recovery workflows, update risk models, and communicate with customers. Traditional webhook-based approaches struggle with the complexity and scale of these requirements, while event-driven architectures powered by Amazon EventBridge provide the flexibility and resilience needed for modern payment systems.
Payment Processors and AWS: better together
AWS and leading payment processors are driving innovation to transform how businesses handle financial transactions in the digital age. This powerful combination serves organizations of all sizes through three key pillars:
- Accelerate growth and drive innovation through new customer experiences and innovative business models.
- Modernize and optimize their business to drive efficiency by modernizing billing and invoicing together with streamlining engineering costs, developer workflows, and deployments with no or low-code architecture.
- Reduce risk by adhering to regulatory requirements, expanding into new countries confidently, and decreasing fraud and disputed payments.
By combining the deep payment processing expertise of industry leaders with AWS’s cloud capabilities, businesses can build scalable, resilient, and innovative payment systems that align with modern financial needs. Currently, payment processors with native EventBridge integration include Stripe, Checkout.com, and PayShield, with additional processors joining this ecosystem regularly.
Tackling business use cases through event-driven architectures
Payment processor event-driven integration capabilities enable organizations to respond dynamically to a wide range of payment-related activities. When transactions and interactions occur within your payment platform, the system generates immutable events containing detailed information about these activities.
These events serve as powerful triggers for various business-critical use cases and regulatory compliance processes, such as:
- Reacting to recurring payments to implement bespoke workflows.
- Implement loyalty programs based on end-user purchases.
- Build real-time inventory controls.
- Generating customized invoices to meet regulatory requirements.
Let’s explore how to make payment processor events available on AWS through Amazon EventBridge and dive deep into how to build two of the use cases outlined above.
Payment Processor integration with Amazon EventBridge
Amazon EventBridge is a serverless event bus service that simplifies application integration. Producers publish events on a bus, and EventBridge routes them to the interested consumers based on configurable rules. EventBridge refers to consumers as targets and provides more than 20 built-in integrations.
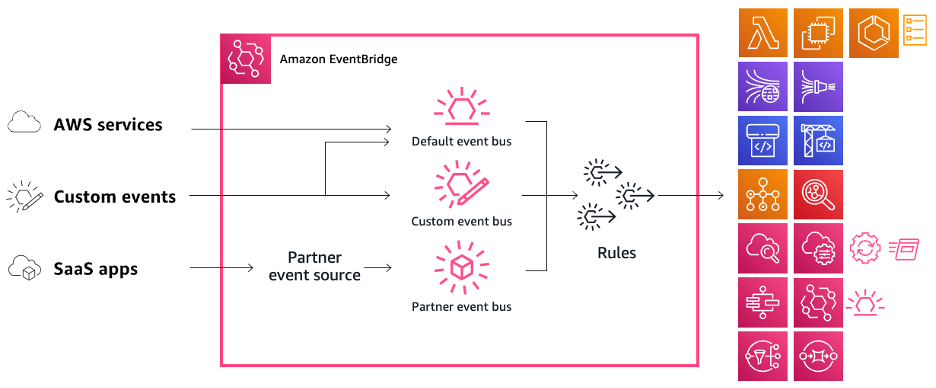
Figure 1. EventBridge bus architecture
EventBridge offers native integration with supported payment processors through dedicated partner event buses, enabling direct event reception in your AWS account. This integration eliminates the complexity of traditional webhook implementations, where you need to build, publish, and maintain API endpoints.
To enable it, you need to perform a one-time configuration with actions in both your payment processor and AWS accounts. The specific steps vary by processor but follow a general pattern. Let’s see how to configure this integration using Stripe as an example:
1. Open the Webhooks tab in Workbench.
2. Choose the +Add destination button. Stripe supports two configurations to send events from: Your account and Connected accounts. For simplicity, select Your account to listen to events from your own account.
3. Select the event types you want this destination to receive. Then, choose Continue.

Figure 2. Configure an event destination on Stripe: source and event types
4. Select Amazon EventBridge as your destination type. Choose Continue and then enter your AWS account ID and region. Optionally, enter a destination name and description.
5. Choose Create Destination.
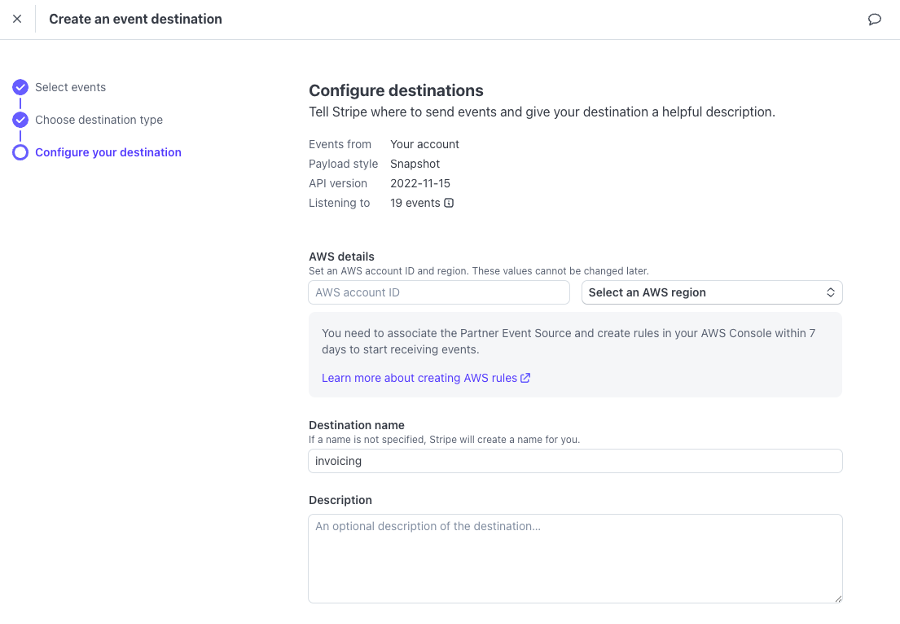 Figure 3. Configure an event destination on Stripe: AWS account and region targets
The steps above will create a partner event source in the provided AWS account and region. Similar configuration steps apply to other supported processors like Checkout.com and PayShield, with processor-specific variations in interface and terminology.
To receive events, you need to associate this event source with an event bus. Continuing with the Stripe example, these are the steps to follow on your AWS console:
1. Under EventBridge, navigate to Partner event sources from the Integration section on the left hand-side menu.
2. You will see the newly created partner event source, with an Amazon Resource Name (ARN) matching aws.partner/stripe.com/{UNIQUE_ID}. Choose Associate with event bus.

Figure 4. Associating the Stripe partner event source with an event bus
3. If needed, use the Permissions section to define which AWS accounts will have access to the event bus.
4. Choose Associate.
Once you complete the configuration, your event bus receives events from your payment processor. However, you are not processing any of them yet.
Let’s learn how to do so through a couple of real-life use cases that will further highlight EventBridge features and give you a glimpse of what can be achieved through this integration.
Recurrent payments
Software-as-a-Service companies dominate today’s market, shifting consumption from lifetime licenses to subscription plans. Under this model, customers typically pay a recurring fee to use the software, which replaces older models of a one-time purchase. Each time a recurring payment takes place – either successfully or not – the payment processor generates the corresponding event which is used to build functionality on top. A common scenario is to send a notification to the end-user to let them know everything went well and they can carry on using the service or, on the contrary, something failed, and it needs their attention.
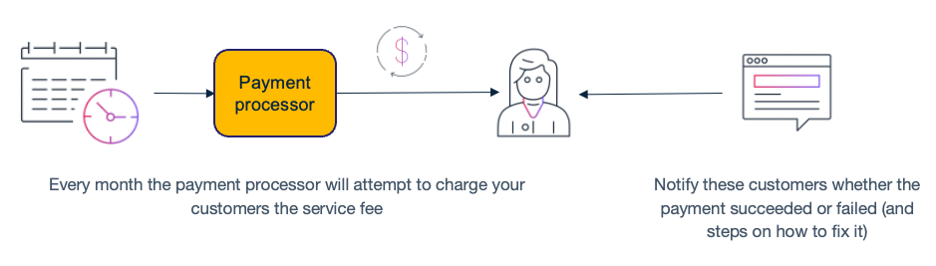
Figure 5. Recurrent payment workflow
The following is an example of the email that gets sent to an end-user when the monthly payment fails.

Figure 6. Example of an email sent to an end-user when a recurrent payment fails
Your goal is to build a service that listens to the events generated by successful or unsuccessful payments and sends the corresponding notifications to end-users. Additionally, consider the following requirements:
- Send notifications within a 1-minute window after the payment attempt.
- You don’t want to provision and manage infrastructure, but to focus just on the business logic.
- Send notifications through two different channels: email and push notifications.
Knowing the functionality to build, let’s focus on the technical implementation. This is the architecture you will be building:
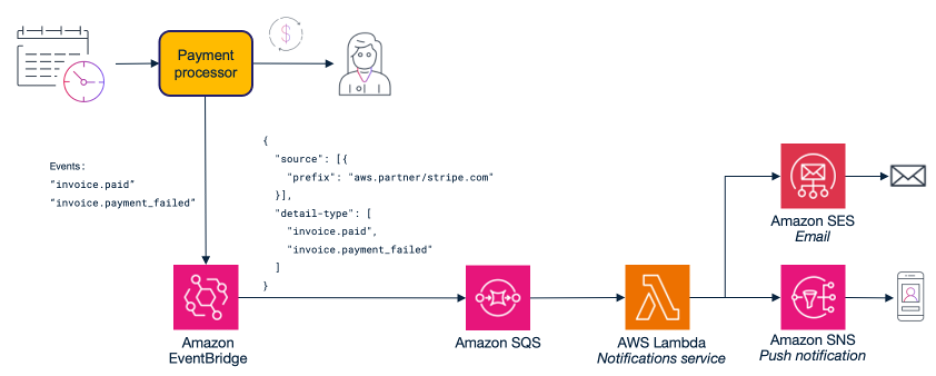
Figure 7. Payment status notification system architecture
These are the most relevant choices:
- Amazon Simple Queue Service (SQS). EventBridge can send events to targets directly. In fact, it supports retry policies, allowing you to perform several delivery attempts when errors occur. However, using a SQS queue in between (which turns the queue into de facto target) provides several advantages:
- Persistence: events are stored beyond the EventBridge retry policy limit of 24 hours.
- Buffering: in case of a burst of events, they get stored in the queue allowing consumers to process messages at their own pace without overwhelming downstream services.
- Batch processing: queue workers can retrieve and process several messages at a time.
- AWS Lambda natively integrates with SQS queues. The service takes care of polling messages and deleting them off the queue upon successful processing, reducing the amount of code developers need to write and maintain. Nonetheless, Lambda is a serverless service with no infrastructure to manage and a cost-effective pay-as-you-go model.
Now, let’s see how to create and configure these components using the AWS Management Console.
Amazon SQS
Navigate to Amazon SQS which will take you to the Queues page, then:
1. Choose Create queue.
2. Enter the queue name and ensure the queue type is Standard.
3. Leave the remaining settings at their default values. Learn more about them here.
4. Choose Create queue.
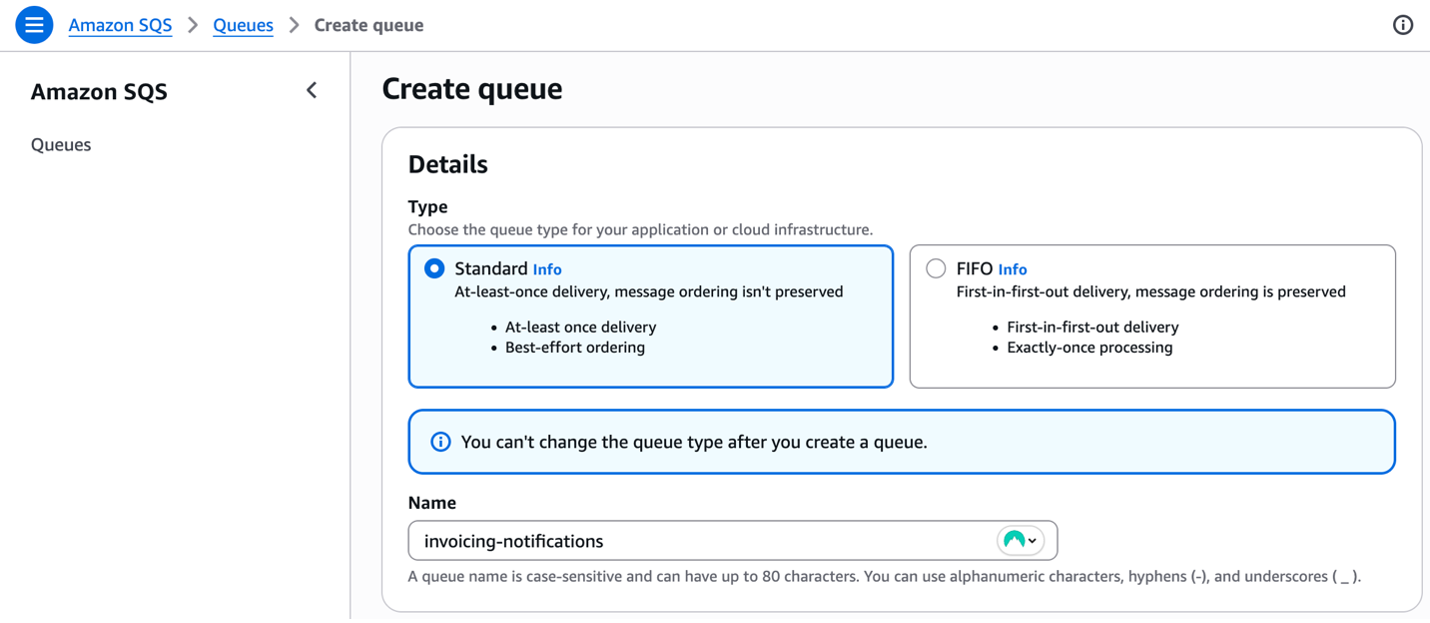
Figure 8. Creating a queue to store invoicing events
Amazon EventBridge
For this implementation, you need to process specific types of events from the payment processor related to invoice payments. Using Stripe as an example, these will be invoice.paid and invoice.payment_failed. Event types might vary between processors, so consult your processor’s documentation for the appropriate event names.
As outlined before, an EventBridge bus routes events to interested consumers when they meet certain criteria. You define these conditions using event patterns in rules. In this case, you want to have a consumer that sends notifications only for payment status events that are coming through the Stripe partner event bus. To create such rule, follow these steps:
1. Go to EventBridge and under Buses choose Rules.
2. On the Event bus dropdown, find your payment processor partner bus and choose Create rule.
3. Provide a meaningful name and description. Ensure it is enabled and choose Next.
4. In the Build event pattern step, select Other as the event source. For the event pattern section, ensure the Creation Method is Customer pattern (JSON editor) and enter an event pattern matching your processor’s event structure.
{
  "source": [{
    "prefix": "aws.partner/{your-payment-processor}"
  }],
  "detail-type": [
    "invoice.paid",
    "invoice.payment_failed"
  ]
}
Event patterns are a powerful filtering mechanism, controlling over event routing by allowing you to define specific conditions that events must match. When an event satisfies the defined pattern criteria, it is automatically delivered to the designated targets for processing. To learn more about event patterns, please read the Amazon EventBridge event patterns documentation page.

Figure 9. Building an event pattern step in the rule creation
5. Now select the targets for the rule. Select AWS service and then SQS queue from the dropdown. Select the queue you created previously, and under Execution role, leave Create a new for this specified resource selected. EventBridge assumes an IAM role when sending events to targets. With this setting, you are creating a new role with permissions that allow EventBridge to send messages to the SQS queue.
6. Under Additional settings, you can transform the event that will be passed to the target, configure a retry policy and even a Dead-letter queue (useful for those events that cannot be delivered to the target once the retry policy has been exhausted). Leave default values. Choose Next.
7. Add tags to the rule according to your organization policies and choose Next.
8. Review all the details of the rule and choose Create Rule.
AWS Lambda
The last step is to implement a Lambda function that processes events from the SQS queue and handles notification delivery.
Creating a Lambda function is a well-documented process. To get started, follow the steps from the Create your first Lambda function documentation page. Let’s dive deep into the integration with SQS and the settings available.
Assume you already created the Lambda function. From the Function overview, choose Add trigger and select the SQS queue you created in the previous steps.
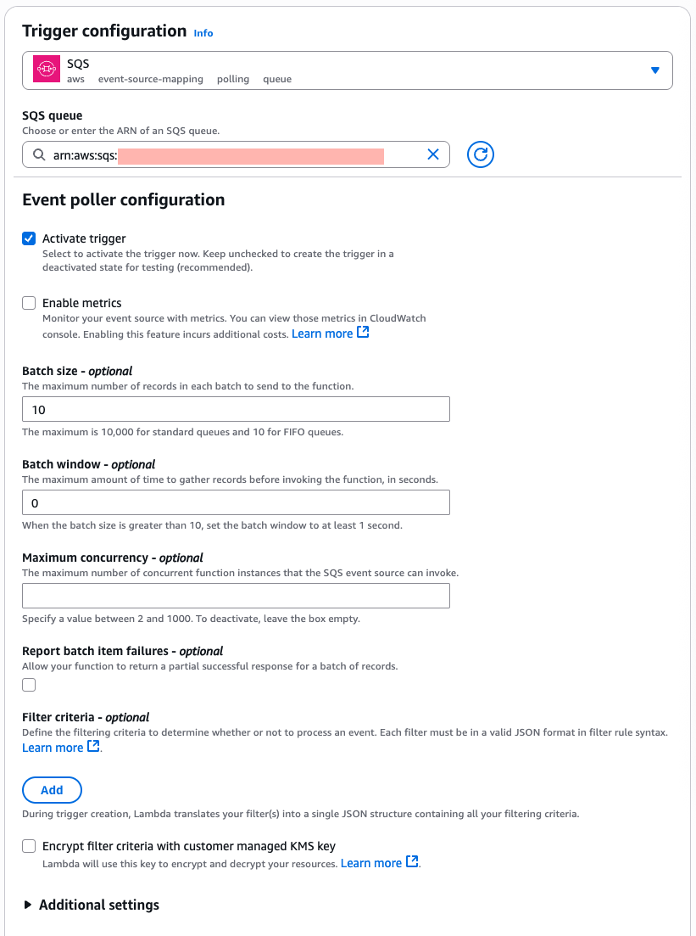
Figure 10. Configuring a SQS queue as the trigger for the Lambda function
Lambda supports different invocation methods. For stream and queue-based invocations, Lambda employs an event source mapping, an internal poller that continuously reads from your queue and invokes your function with batches of records. Understanding how to configure this poller is important for optimizing message processing in your event-driven architecture.
The event source mapping configuration controls how Lambda reads, processes and deletes messages from the queue. The most relevant are:
- Batch size: the maximum number of records to send to the function in each batch. Your function timeout must allow enough time to process an entire batch.
- Batch window: the maximum time to gather records before invoking the function, in seconds. The batch window acts as a timeout mechanism. Lambda will wait up to the specified window duration to collect messages until it either reaches the batch size limit or the time window expires, whichever comes first.
- Maximum concurrency: the maximum number of concurrent functions that the event source can invoke. It helps prevent the function from consuming all available Lambda concurrency of the account and avoids messages returning to the queue unnecessarily because of Lambda functions being throttled.
The values used in these settings directly impact the SLA that was set for sending notifications as a business requirement. The shorter the SLA (e.g., send notifications within 30 seconds vs. 5 minutes), the more resources it will consume. Higher resource consumption shows in more concurrent executions, larger batch sizes, and shorter batch windows to process messages quickly enough to meet the commitment.
Having established the configuration details, let’s examine the implementation of the business logic for sending notifications via email and push notification channels. The following pseudo-code demonstrates the notification delivery mechanism:
exports.handler = async (event) => {
    for (const record of event.Records) {
        try {
            const paymentEvent = JSON.parse(record.body).detail;
            const eventType = paymentEvent.type;
            const invoice = paymentEvent.data.object;

            // Get customer details for notifications
            const customerDetails = await getCustomerDetails(invoice.customer);

            const paymentInfo = {
                amount: formatAmount(invoice.amount_paid, invoice.currency),
                customerEmail: customerDetails.email,
                isSuccess: true
            };

            // Set payment information based on type
            switch (eventType) {
                case 'invoice.paid':
                    paymentInfo.paymentDate = new Date(invoice.created * 1000).toLocaleDateString();
                    break;

                case 'invoice.payment_failed':
                    paymentInfo.attemptCount = invoice.attempt_count;
                    paymentInfo.isSuccess = false;
                    break;
            }

            // Generate content for each notification type and process accordingly
            const email = generateEmailContent(customerDetails, paymentInfo);
            const pushNotificationContent = generatePushNotificationContent(customerDetails, paymentInfo);
            await Promise.allSettled([
                sendEmailNotification(customerDetails, email),
                sendPushNotification(customerDetails, pushNotificationContent)
            ]);
        } catch (error) {
            console.error('Failed to process recurrent payment:', {
                messageId: record.messageId,
                error: error.message,
                body: record.body
            });
        }
    }
};
This code snippet shows how to:
- Process SQS batches by iterating through multiple records.
- Parse events from EventBridge.
- Route by event type to handle different scenarios.
- Handle errors gracefully to build fault-tolerant systems.
Keep in mind it is not production-ready code. For example, for production you might want to send failing records to dead letter queues or alert monitoring systems.
This recurring payment notification system shows how organizations can effectively leverage payment processor events to build automated, scalable solutions. By combining EventBridge’s routing capabilities with SQS’s reliability and Lambda’s serverless compute, you’ve created a robust system that meets timing requirements while remaining cost-effective and maintenance-free.
Building upon these event-driven patterns, let’s explore how similar architectural approaches can be applied to create dynamic loyalty programs that drive customer engagement and retention.
Loyalty programs
According to the Harvard Business Review, acquiring new customers costs anywhere between five and 25 times more than retaining existing ones (https://hbr.org/2014/10/the-value-of-keeping-the-right-customers), making loyalty programs critical for sustainable growth. Traditional loyalty systems often rely on batch processing that calculates rewards hours or days after purchases, missing crucial opportunities for immediate customer engagement when purchase satisfaction is highest.
Event-driven loyalty programs solve this challenge by responding instantly to payment processor events. After a successful transaction, the payment event immediately triggers loyalty calculations, evaluates tier progression, and sends personalized communications. This real-time approach enables retailers to deliver timely reward recognition and create engaging customer experiences that drive repeat purchases.
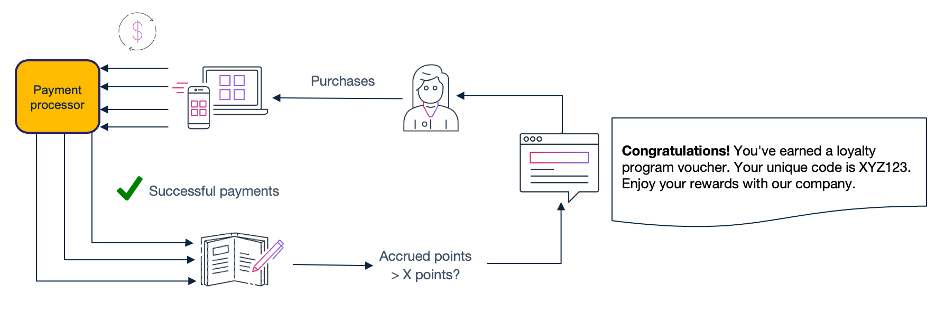
Figure 11. Loyalty program workflow
Following the same structure of the recurring payments example, let’s see how a fictitious retailer named Umbrella Corporation can build a new loyalty service with the following requirements:
- Instant point accrual based on purchase amounts and product categories:
- Business rules for the rewards program: 1 point per dollar spent, 2x points for premium items, and 3x points during promotional periods.
- Real-time tier progression with immediate VIP status notifications
- The system evaluates tier progression using point thresholds (Silver at 1,000 points, Gold at 5,000 points, Platinum at 15,000 points) and triggers reward notifications.
- Personalized email campaigns triggered by spending milestones.
- Automatic application of earned discounts to customer accounts.
Building on the EventBridge integration, you will implement the following loyalty architecture:
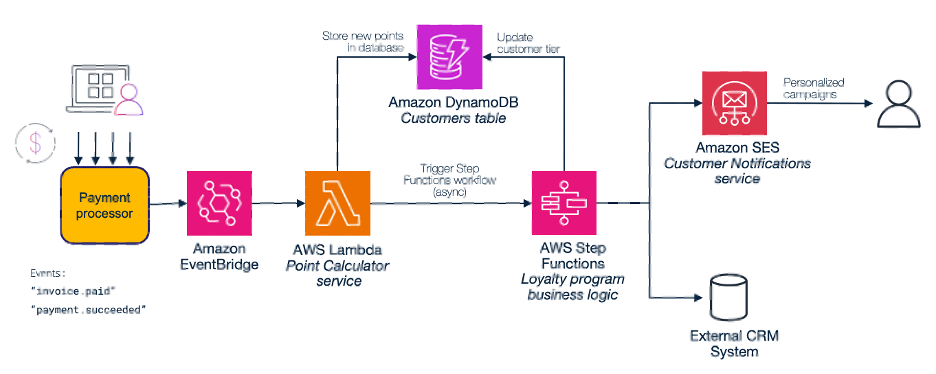
Figure 12. Loyalty program architecture diagram
These are the most relevant decisions:
- AWS Step Functions.While Lambda functions handle loyalty processing independently, orchestrating complex loyalty workflows with Step Functions provides several key advantages:
-
- Workflow orchestration: Step Functions manage the complete loyalty journey from point calculation to tier evaluation and reward delivery. This ensures each step executes in the correct sequence and handles failures gracefully with built-in retry mechanisms.
- State management: The service maintains workflow state across multiple steps. This helps track customer progression through tier evaluations, reward notifications, and follow-up campaigns without requiring additional persistence layers for workflow coordination.
- Error handling and monitoring: Step Functions provide visual workflow monitoring and automatic error handling, making it easier to identify bottlenecks in loyalty processing and implement sophisticated retry policies.
- Amazon DynamoDB. Traditional relational databases can store loyalty data, but DynamoDB offers specific advantages for real-time loyalty processing:
- Atomic operations: DynamoDB’s atomic increment operations ensure point balances remain consistent even when multiple transactions occur simultaneously for the same customer, preventing race conditions that lead to incorrect loyalty calculations.
- Built-in scaling: it automatically handles traffic spikes during promotional periods or seasonal sales without manual intervention, ensuring loyalty processing remains responsive during peak business periods.
The workflow (or state machine) will handle the complex logic asynchronously, which can take from seconds up to minutes depending on the selected path. A Lambda function consumes the events from EventBridge in real-time, calculating the loyalty points and sending the information to the workflow in Step Functions for async processing. This ensures points update instantly (<200ms) while further enhancements in the loyalty program, downstream services updates and email communications, happen at their own time. Besides, issues during any of these async operations will not impact the current point status of the customer. In this example, there is a conditional entry point based on a tier status change, a high valuable engagement or a default engagement.
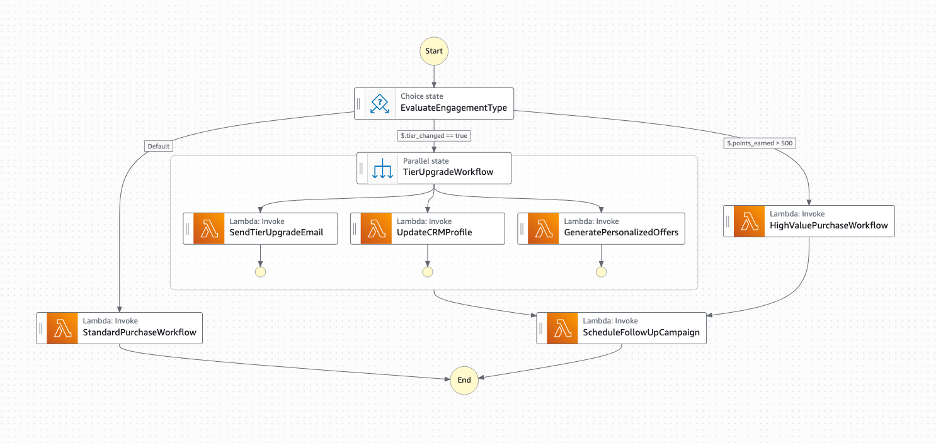
Figure 13. Loyalty program architecture diagram
The following section details the configuration steps through the AWS Management Console.
Amazon EventBridge
Follow the same steps as in the previous use case, but this time the rule only subscribes to the event that covers one-time payments. This is the resulting event pattern:
{
  "source": [{
    "prefix": "aws.partner/{your-payment-processor}"
  }],
  "detail-type": [
    "payment.succeeded"
  ]
}
AWS Lambda
The function processes each payment event, applying business rules for the rewards program: 2x points for premium items, 3x points during promotional periods. It also updates customer loyalty balances in DynamoDB using atomic operations to handle concurrent transactions safely and triggers the Step Functions workflow asynchronously.
Let’s see a snippet of example code for this function:
exports.handler = async (event) => {
    try {
        // Extract payment data from EventBridge event
        const paymentData = extractPaymentData(event);

        console.log(`Processing payment for customer ${paymentData.customerId}, amount: ${paymentData.amount}`);

        // Calculate loyalty points based on business rules
        const pointsEarned = calculateLoyaltyPoints(paymentData.amount, paymentData.productCategory);

        // Update customer record in database
        const customerUpdate = await updateCustomerPoints(paymentData.customerId, pointsEarned);

        // Prepare workflow input for Step Functions
        const workflowInput = {
            customerId: paymentData.customerId,
            transactionAmount: paymentData.amount,
            pointsEarned: pointsEarned,
            previousTier: customerUpdate.previousTier,
            currentTier: customerUpdate.currentTier,
            tierChanged: customerUpdate.tierChanged,
            totalPoints: customerUpdate.totalPoints,
            productCategory: paymentData.productCategory,
            transactionId: paymentData.transactionId,
            timestamp: new Date().toISOString()
        };

        // Trigger Step Functions workflow for customer engagement
        const executionArn = await triggerCustomerEngagementWorkflow(workflowInput);
        console.log(`Successfully processed loyalty points for customer ${paymentData.customerId}`);

    } catch (error) {
        console.error('Failed to process loyalty points:', {
            error: error.message,
            event: JSON.stringify(event)
        });
    }
};
AWS Step Functions
In the loyalty system, Step Functions orchestrate customer engagement activities based on transaction characteristics. The state machine evaluates conditions and routes to different branches (tier upgrades, high-value purchases, or standard confirmations). To create the loyalty workflow, follow these steps:
1. Navigate to the AWS Step Functions console.
2. Choose State machines in the left navigation panel and then Create state machine.
3. Enter a meaningful name (such as dev-loyalty-workflow) and select Standard as the state machine type (suitable for this use case with long-running workflows). Choose Continue.
4. You are now on the Workflow Studio in the Design tab. Switch to Code and replace the default code with your workflow definition using Amazon States Language:
{
  "Comment": "Umbrella Loyalty Customer Engagement Workflow",
  "StartAt": "EvaluateEngagementType",
  "States": {
    "EvaluateEngagementType": {
      "Type": "Choice",
      "Choices": [
        {
          "Variable": "$.tier_changed",
          "BooleanEquals": true,
          "Next": "TierUpgradeWorkflow"
        },
        {
          "Variable": "$.points_earned",
          "NumericGreaterThan": 500,
          "Next": "HighValuePurchaseWorkflow"
        }
      ],
      "Default": "StandardPurchaseWorkflow"
    },
    "TierUpgradeWorkflow": {
      "Type": "Parallel",
      "Branches": [
        {
          "StartAt": "SendTierUpgradeEmail",
          "States": {
            "SendTierUpgradeEmail": {
              "Type": "Task",
              "Resource": "arn:aws:lambda:region:account:function:dev-send-tier-upgrade-email",
              "Retry": [
                {
                  "ErrorEquals": ["Lambda.ServiceException", "Lambda.AWSLambdaException"],
                  "IntervalSeconds": 2,
                  "MaxAttempts": 3,
                  "BackoffRate": 2.0
                }
              ],
              "End": true
            }
          }
        },
        {
          "StartAt": "UpdateCRMProfile",
          "States": {
            "UpdateCRMProfile": {
              "Type": "Task",
              "Resource": "arn:aws:lambda:region:account:function:dev-update-crm-profile",
              "Retry": [
                {
                  "ErrorEquals": ["Lambda.ServiceException", "Lambda.AWSLambdaException"],
                  "IntervalSeconds": 2,
                  "MaxAttempts": 3,
                  "BackoffRate": 2.0
                }
              ],
              "End": true
            }
          }
        },
        {
          "StartAt": "GeneratePersonalizedOffers",
          "States": {
            "GeneratePersonalizedOffers": {
              "Type": "Task",
              "Resource": "arn:aws:lambda:region:account:function:dev-generate-tier-offers",
              "Retry": [
                {
                  "ErrorEquals": ["Lambda.ServiceException", "Lambda.AWSLambdaException"],
                  "IntervalSeconds": 2,
                  "MaxAttempts": 3,
                  "BackoffRate": 2.0
                }
              ],
              "End": true
            }
          }
        }
      ],
      "Next": "ScheduleFollowUpCampaign"
    },
    "HighValuePurchaseWorkflow": {
      "Type": "Task",
      "Resource": "arn:aws:lambda:region:account:function:dev-high-value-engagement",
      "Retry": [
        {
          "ErrorEquals": ["Lambda.ServiceException", "Lambda.AWSLambdaException"],
          "IntervalSeconds": 2,
          "MaxAttempts": 3,
          "BackoffRate": 2.0
        }
      ],
      "Next": "ScheduleFollowUpCampaign"
    },
    "StandardPurchaseWorkflow": {
      "Type": "Task",
      "Resource": "arn:aws:lambda:region:account:function:dev-standard-purchase-confirmation",
      "Retry": [
        {
          "ErrorEquals": ["Lambda.ServiceException", "Lambda.AWSLambdaException"],
          "IntervalSeconds": 2,
          "MaxAttempts": 3,
          "BackoffRate": 2.0
        }
      ],
      "End": true
    },
    "ScheduleFollowUpCampaign": {
      "Type": "Task",
      "Resource": "arn:aws:states:::lambda:invoke.waitForTaskToken",
      "Parameters": {
        "FunctionName": "arn:aws:lambda:region:account:function:dev-schedule-follow-up-campaign",
        "Payload": {
          "customer_id.$": "$.customer_id",
          "campaign_type.$": "$.current_tier",
          "delay_hours": 72,
          "task_token.$": "$$.Task.Token"
        }
      },
      "End": true
    }
  }
}
Important: Replace the placeholder values region and account variables in the Lambda function ARNs with your specific ones.
5. Switch to the Config tab. Under Permissions, select Create new role.
6. Logging configuration and Tags are optional but highly recommended. Follow your own organization policies here.
7. Choose Create on the top right corner.
This is an example of the logic and operations to implement in your state machine. Sending welcome emails for new tiers, updating customer profiles in the marketing platform, or scheduling follow-up campaigns based on purchase behavior. Modify and adapt as required for your own use cases.
Through building this loyalty system, you have seen how to combine EventBridge and Lambda capabilities with Step Functions orchestration to create a robust loyalty system that delivers immediate value to customers while providing detailed insights into customer behavior and engagement effectiveness. As an additional benefit, the serverless architecture automatically scales during peak shopping periods like Black Friday, while DynamoDB millisecond response times ensure customers see their updated point balances immediately after purchase. This real-time feedback loop helps increase customer engagement rates and average order values as customers become more aware of their progress toward rewards.
Conclusion
Event-driven payment architectures powered by Amazon EventBridge represent a significant evolution from traditional webhook-based integrations. By leveraging native EventBridge integration with supported payment processors, businesses simplify their systems and focus on delivering value to customers. The two architectural patterns outlined in this guide show how event-driven approaches address complex business requirements while eliminating the need for custom webhook infrastructure.
For organizations evaluating payment processors, consider EventBridge integration capabilities as a key factor in your decision-making process. The ability to leverage AWS’s event-driven services directly provides organizations with the agility to adapt quickly to changing business demands and regulatory environments while maintaining the reliability and efficiency that modern businesses demand.
To get started, explore in the Amazon EventBridge documentation, follow this guide to configure your payment processor integration, and begin receiving your events.