AWS for M&E Blog
Enhance your Android or iOS ecommerce app with Amazon Interactive Video Service
The internet has drastically changed the way that many people around the world shop. Although online shopping can be more convenient than shopping in-person, the human touch of a retail experience can be difficult to recreate in a website or app. As stores expand their online presence, some have turned to live, interactive video streams as a way to connect with shoppers.
Live video streams led by sales professionals or social media influencers can both help increase sales, and also provide a personal touch to an otherwise sterile online shopping experience. Live streams are also effective at building communities and promoting special events like limited-time flash sales or product “drops”.
While live video experiences may seem expensive and time-consuming to build and maintain, in this post I show you how to build a live shopping experience in a few minutes using Amazon Interactive Video Service (Amazon IVS). Amazon IVS is a managed live streaming solution that is quick and easy to set up, and ideal for creating interactive video experiences.
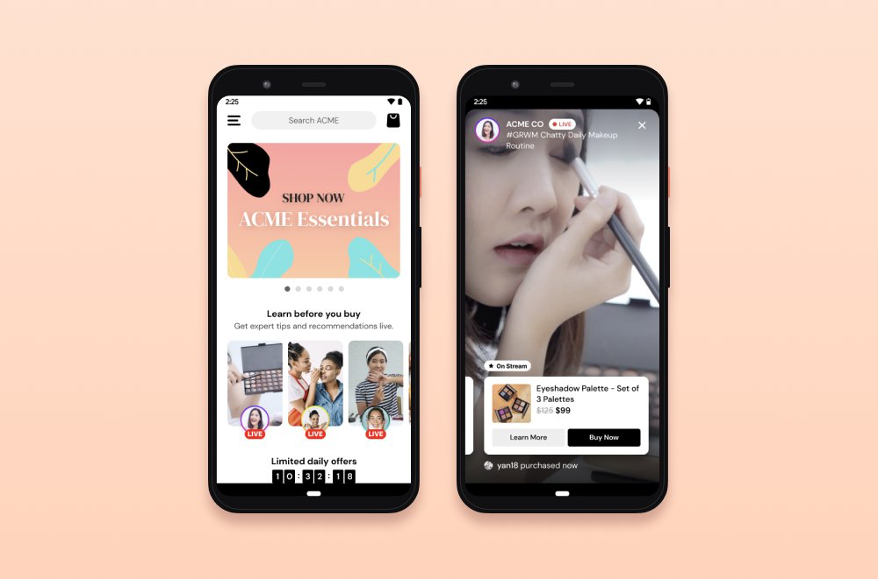
The example in this post showcases a live video stream, and a carousel that gives shoppers the opportunity to purchase the products shown on stream. Here’s what this post covers:
- Setting up an example ecommerce app on Android phones (10 min)
- Modifying the example to point to your own products and Amazon IVS live stream (15–30 min)
Select a platform to jump to specific instructions on how to set up and modify the example app:
Android app instructions
Prerequisites
Before you can set up the example app, you need the following tools:
- Android Studio, installed and up-to-date.
- An Android Virtual Device (AVD) phone with API level 23 or later (Android 6.0). Learn more here: Run apps on the Android Emulator.
- Git installed and up-to-date.
If you want to modify this example, you also need the following:
- An Amazon IVS channel that you can stream to. Follow the steps in Setting Up for Streaming with Amazon Interactive Video Service to learn how to stream to Amazon IVS.
- AWS CLI version 2 installed and configured with access to Amazon IVS.
The following steps describe the process on macOS, but they can also be completed on any operating system that supports the prerequisites.
Setting up the example
To set up the example, get the Amazon IVS ecommerce Android Demo code from GitHub. Follow these steps to clone the repository and run the app in the Android Emulator:
- Clone the repository from GitHub using your method of choice. The following steps describe how to do this using the Terminal app on MacOS.a) Open the Terminal app.
b) Navigate to a directory where you want to store the app code. For example:cd ~/Developer.
c) Clone the demo code repository with this command:git clone git@github.com:aws-samples/amazon-ivs-ecommerce-android-demo.git.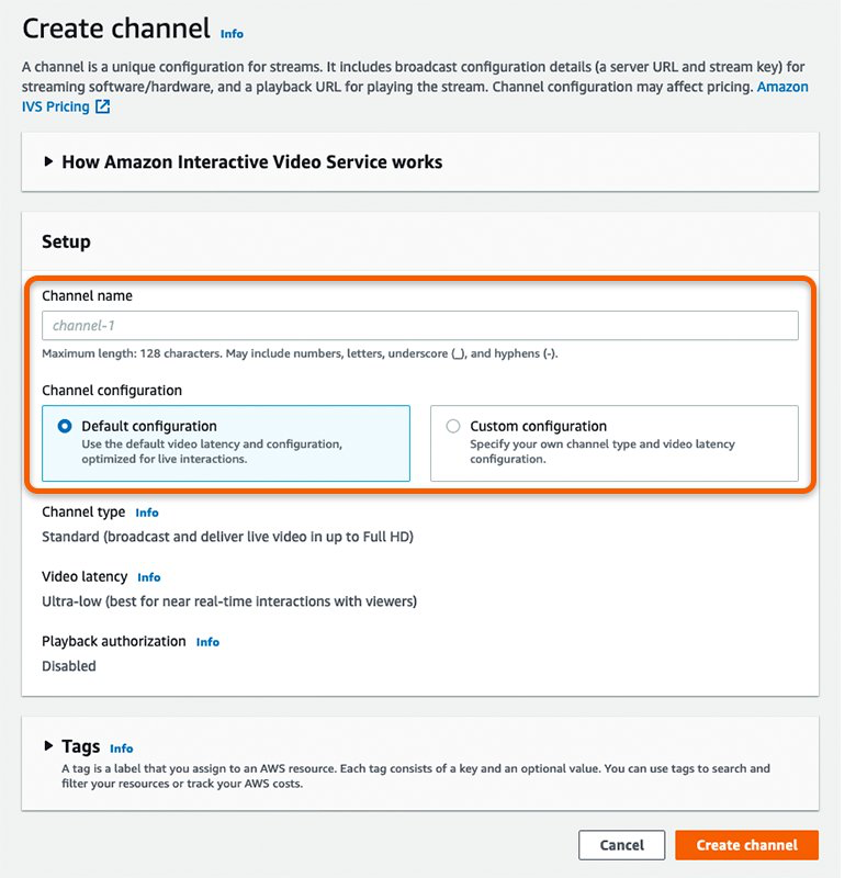
- Launch Android Studio.
- Select Open an Existing Android Studio Project, navigate to the repository you cloned in step 1, and open it.
 You should now have the demo app open in Android Studio. Follow these next steps to run the app in the Android Emulator.
 - In the top-right corner of the app, click the list of available devices, and select an Android phone with API level 23 or later (Android 6.0 or later). This example uses the Pixel 3a with Android 10.0+ (Google Play). If you do not see any available Android devices, you must create and configure one. Learn more here: Run apps on the Android Emulator.
- Click the run button or press
Ctrl-Rto run the app.
- Wait for the emulator to boot and launch the example app. This may take a few moments if it is your first time launching your virtual device in the emulator.

Congratulations! The app should now be running in the Android Emulator. There are two examples of video in this app. Follow the instructions for the video type that you would like to see:
- To view an example of portrait video, tap the leftmost image in the carousel.
- To view an example of landscape video, tap the second-to-leftmost image in the carousel.
Modifying the example
While this example is not meant to be run in a production environment, it may be helpful to modify it to see how your own products or live video might appear. In order to modify this example, you must be able to stream to your Amazon IVS channel. To do this, you can follow the instructions here: Setting Up for Streaming with Amazon Interactive Video Service.
Important note: Using your own stream will create and consume AWS resources, which will cost money.
Customizing the example video
Use the following steps to replace the example video provided with your own Amazon IVS video stream.

Once you have created an Amazon IVS channel, follow these steps to use your own live video in place of the portrait and/or landscape streams provided:
- Open the Amazon IVS Console and navigate to the channel you would like to use.
- Copy the Playback URL for the channel. The URL should end in
.m3u8.
- In Android Studio, open
src/main/java/com/amazonaws/ivs/player/ecommerce/common/Configuration.kt. - If you are streaming portrait video, replace the string on line
8with the Playback URL from step 2. For landscape video, replace the string on line9.
- Save your changes (
File > Save All). - Press
Ctrl-Rto run the app. - Navigate to the leftmost image in the
LIVEcarousel to view landscape video, or the second-to-leftmost image to view portrait video.

Customizing the products shown
Once you are using your own video in the example app, you can use Timed Metadata to embed your own product information into the Amazon IVS video stream.
Amazon IVS Timed Metadata provides a way to embed metadata in an Amazon IVS stream. It ensures that your users receive the metadata at the same time as the video stream, regardless of stream latency or geographic location. To learn more about how to use Timed Metadata, read this guide: Embedding Metadata within a Video Stream.

Follow these steps to embed product information into your Amazon IVS stream.
- In Android Studio, open
src/main/java/com/amazonaws/ivs/player/ecommerce/common/Configuration.kt. - On line
10change the value ofBASE_URLto the base url of the server hosting your product and user images. This url string is prepended to theimageUrlandlastPurchaser.userprofilekeys in the timed metadata you will compose next. If you are unsure of what to put here, replace it with an empty string, like this:let BASE_URL = ""
- Using a text editor of your choice, create a new file
metadata.jsonin a directory of your choice, like~/Developer/temp. - Open the
metadata.jsonfile you just created and add the product information you want to show into an object containing an array ofjsonproduct objects following this structure: -
{
    "products": [
        {
            "id": 0,
            "priceDiscount": "$<product-discount-price>",
            "priceOriginal": "$<product-original-price>",
            "imageUrl": "<product-image-url>",
            "name": "<product-name>",
            "webLink": "<product-details-url>",
            "isFeatured": <BOOL | true if currently on stream, false if not>,
            "lastPurchaser": {
                "username": "<purchaser-name>",
                "userprofile": "<purchaser-image-url>"
            }
        }
    ]
}
Each of these keys maps onto a piece of information displayed in the product carousel:

Note that your metadata must be less than 1 KB. - Once you have formatted your data, convert it from a
jsonobject to aString.One way to do this is to open your web browser’s javascript console withCommand(⌘)-Option(⌥)-Jand use theJSON.Stringify()function. Copy your object and invokeJSON.Stringify(). - Copy the output string to your clipboard and paste it somewhere where you can retrieve it.

- Open a command line tool with access to the AWS CLI, such as Terminal on MacOS, or PowerShell on Windows 10.
- Use the AWS CLI to call the PutMetadata endpoint. Replace
<YOUR_CHANNEL_ARN>and<YOUR_STRINGIFIED_JSON>with your channel ARN from step 1 and your stringified json from step 4.
aws ivs put-metadata \
    --channel-arn <YOUR_CHANNEL_ARN> \
    --metadata '<YOUR_STRINGIFIED_JSON>'
Your command should look similar to this (note the use of single quotes to wrap the metadata string):
aws ivs put-metadata \
--channel-arn arn:aws:ivs:us-west-2:XXXXXXXXXX:channel/XXXXXXXXXX \
--metadata '{"products":[{"id":614522,"priceDiscount":"$75","priceOriginal":"$99","imageUrl":"/p-614522.png","name":"Tri-Ply Heavy Duty Round Pan 8-in","webLink":"https://aws.amazon.com","isFeatured":true,"lastPurchaser":{"username":"yan18","userprofile":"/u-yan18.png"}},{"id":725412,"priceDiscount":"","priceOriginal":"$89","imageUrl":"/p-725412.png","name":"Handcrafted Forged Steel Chefs Knife","webLink":"https://aws.amazon.com","isFeatured":false,"lastPurchaser":{"username":"marnie27","userprofile":"/u-marnie27.png"}},{"id":109822,"priceDiscount":"$110","priceOriginal":"$150","imageUrl":"/p-019822.png","name":"8-quart Pro Kitchen Stock pot","webLink":"https://aws.amazon.com","isFeatured":false,"lastPurchaser":{"username":"TNKO","userprofile":"/u-TKNO.png"}}]}'
11. Go back to the portrait or landscape video you opened in step 7 of the Customizing the example video previous section.
12. When you call the PutMetadata endpoint in step 6, you should be able to see the product information you entered appear in the carousel at the bottom of the screen.

Customizing the video metadata
Follow the next steps to change the stream metadata displayed in the app, including the streamer’s avatar, name, and stream title.

- Using an image-editing app of your choice, create an avatar and export it to a file named
avatar_1.png. If you would like a template of the avatar design, you can use the template in this file: Amazon IVS ecommerce Demo Android Avatar Asset.
- In the Android Studio project tree panel, navigate to the directory
app/src/main/res/drawable.Drag and drop youravatar_1.pngfile into this directory. Click “Overwrite” when asked.
- In Android Studio, open the file a
pp/src/main/res/values/strings.xmland modifyline 13andline 14to change the streamer’s name and stream title, respectively. - Save your changes (
File > Save All). - Press
Ctrl-Rto run the app. - Navigate to the leftmost image in the
LIVEcarousel to view landscape video, or the second-to-leftmost image to view portrait video.

iOS app instructions
Before you can set up the example app, you need the following tools:
- Xcode 11 or greater, installed, and up-to-date. You can build this application for devices running iOS 10 or later
- Cocoapods, installed and up-to-date. You can quickly install cocoapods from Terminal with
sudo gem install cocoapods. - Git installed and up-to-date. You can quickly install git from Terminal with
xcode-select --install.
If you want to modify this example, you also need the following:
- An Amazon IVS channel that you can stream to. Follow the steps in Setting Up for Streaming with Amazon Interactive Video Service to learn how to stream to Amazon IVS.
- AWS CLI version 2 installed and configured with access to Amazon IVS.
The following steps describe the process on MacOS, but they can also be completed on any operating system that supports the prerequisites.
Setting up the example
To set up the example, you need to get the Amazon IVS iOS ecommerce Demo code from GitHub. Follow these steps to clone the repository and run the app in the iOS Simulator:
- Clone the repository from GitHub using your method of choice. The following steps describe how to do this using the Terminal app on MacOS.
a) Open the Terminal app.
b) Navigate to a directory where you want to store the app code. For example:
cd ~/Developer.c) Clone the demo code repository with this command:
git clone #fixme.d) Navigate to the repository you just cloned with this command:
cd #fixme.
- Install required packages with this command:
pod install. - Using a file browser like Finder, open the project workspace file named
ecommerce.xcworkspace. You should now have the demo app open in Xcode. Follow these next steps to run the app in the iOS Simulator.
 - Open the Scheme pop-up menu in the top-left corner of Xcode and select iPhone 11 Pro from the menu.
- Click the run button or press
Command(⌘)-Rto run the app.
- Wait for the simulator to boot and launch the example app. This may take a few moments if it is your first time launching the iPhone 11 Pro in the simulator.
Congratulations! The app should now be running in the iOS Simulator. There are two examples of video in this app. Follow the instructions for the video type that you would like to see:
- To view an example of portrait video, tap the leftmost image in the carousel.
- To view an example of landscape video, tap the second-to-leftmost image in the carousel.
Modifying the example
While this example is not meant to be run in a production environment, it may be helpful to modify it to see how your own products or live video might appear. In order to modify this example, you must be able to stream to your Amazon IVS channel. To do this, you can follow the instructions here: Setting up for streaming with Amazon Interactive Video Service.
Important Note: Using your own stream will create and consume AWS resources, which will cost money.
Customizing the example video
Use the following steps to replace the example video with your own Amazon IVS video stream.

Once you create an Amazon IVS channel, follow these steps to use your own live video in place of the portrait and/or landscape streams provided:
- Open the Amazon IVS Console and navigate to the channel you would like to use.

- Copy the Playback URL for the channel. The URL should end in
.m3u8. - In Xcode, open
eCommerce/ViewControllers/HomeViewController.swift. - If you are streaming portrait video, replace the string on line
20with the Playback URL from step 2. For landscape video, replace the string on line21.
- Save your changes with
Command(⌘)-S. - Press
Command(⌘)-Rto run the app. - Navigate to the leftmost image in the
LIVEcarousel to view landscape video, or the second-to-leftmost image to view portrait video.

Customizing the products shown
Once you have your own video in the example app, you can use Timed Metadata to embed your own product information into the Amazon IVS video stream.
Amazon IVS Timed Metadata provides a way to embed metadata in an Amazon IVS stream. This means that your viewers receive the metadata at the same time as the video stream, regardless of stream latency or geographic location. To learn more about how to use Timed Metadata, read this guide: Embedding metadata within a video stream.
Follow these steps to embed product information into your Amazon IVS stream.
- In Xcode, open
eCommerce/CustomViews/ProductsCarouselViews/CarouselProductView.swift. - On line 49 change the value of
imagesBaseUrlStringto the base url of the server hosting your product and user images. This url string will be prepended to theimageUrlandlastPurchaser.userprofilekeys in the timed metadata you will compose. If you are unsure of what to put here, replace it with an empty string, like this:let imagesBaseUrlString = "" - Using a text editor of your choice, create a new file
metadata.jsonin a directory of your choice, like~/Developer/temp. - Open the
metadata.jsonfile you just created and add the product information you want to show into an object containing an array ofjsonproduct objects following this structure: -
5.	{
    "products": [
        {
            "id": 0,
            "priceDiscount": "$<product-discount-price>",
            "priceOriginal": "$<product-original-price>",
            "imageUrl": "<product-image-url>",
            "name": "<product-name>",
            "webLink": "<product-details-url>",
            "isFeatured": <BOOL | true if currently on stream, false if not>,
            "lastPurchaser": {
                "username": "<purchaser-name>",
                "userprofile": "<purchaser-image-url>"
            }
        }
    ]
}
Each of these keys map onto a piece of information displayed in the product carousel:

Note that your metadata must be less than 1KB. - Once you have formatted your data, convert it from a
jsonobject to aString.One way to do this is to open your web browser’s javascript console withCommand(⌘)-Option(⌥)-Jand use theJSON.Stringify()function. Copy your object and invokeJSON.Stringify(). - Copy the output string to your clipboard and paste it somewhere where you can retrieve it.
- Open a command line tool with access to the AWS CLI, such as Terminal on MacOS.
- Use the AWS CLI to call the PutMetadata endpoint. Replace
<YOUR_CHANNEL_ARN>and<YOUR_STRINGIFIED_JSON>
with your channel ARN from step 1 and your stringified json from step 4.
aws ivs put-metadata \
    --channel-arn <YOUR_CHANNEL_ARN> \
    --metadata '<YOUR_STRINGIFIED_JSON>'
Your command should look similar to this (note the use of single quotes to wrap the metadata string):
aws ivs put-metadata \
--channel-arn arn:aws:ivs:us-west-2:XXXXXXXXXX:channel/XXXXXXXXXX \
--metadata '{"products":[{"id":614522,"priceDiscount":"$75","priceOriginal":"$99","imageUrl":"/p-614522.png","name":"Tri-Ply Heavy Duty Round Pan 8-in","webLink":"https://aws.amazon.com","isFeatured":true,"lastPurchaser":{"username":"yan18","userprofile":"/u-yan18.png"}},{"id":725412,"priceDiscount":"","priceOriginal":"$89","imageUrl":"/p-725412.png","name":"Handcrafted Forged Steel Chefs Knife","webLink":"https://aws.amazon.com","isFeatured":false,"lastPurchaser":{"username":"marnie27","userprofile":"/u-marnie27.png"}},{"id":109822,"priceDiscount":"$110","priceOriginal":"$150","imageUrl":"/p-019822.png","name":"8-quart Pro Kitchen Stock pot","webLink":"https://aws.amazon.com","isFeatured":false,"lastPurchaser":{"username":"TNKO","userprofile":"/u-TKNO.png"}}]}'
9. Go back to the portrait or landscape video you opened in step 7 of the Customizing the example video section.
10. When you call the PutMetadata endpoint with the command you constructed in step 8, you should be able to see the product information you entered appear in the carousel at the bottom of the screen.

Customizing the video metadata
Follow the next steps to change the stream metadata displayed in the app, including the streamer’s avatar, name, and stream title.

- Using an image-editing app of your choice, create an avatar of your choice and export it to a file named
avatar_1.png. If you would like a template of the avatar design, you can use the template in this file: Amazon IVS ecommerce Demo Android Avatar Asset.
- In the Xcode project, navigate to the
Assets.xcassetsfolder. Selectavatar_1in the asset list and drag and drop youravatar_1.pngfile over the image in the1xtarget.
- In Xcode, open
Main.storyboardand modify the title and subtitle to change the streamer’s name and stream title.
- Save your changes (
File > Save All). - Press
Command(⌘)-Rto run the app. - Navigate to the leftmost image in the
LIVEcarousel to view landscape video, or the second-to-leftmost image to view portrait video.

Food for thought
If you want to extend this example and use it in your own application, consider the following:
- Store product information like price, name, and id in a database like Amazon DynamoDB, and use Timed Metadata only to indicate which product id is being shown on-stream.
- Add live chat, so shoppers can ask the host any questions they might have.
About Amazon IVS
Amazon Interactive Video Service (Amazon IVS) is a managed live streaming solution that is quick and easy to set up, and ideal for creating interactive video experiences. Simply send your live streams to Amazon IVS and the service does everything you need to make ultra-low latency live video available to any viewer around the world, letting you focus on building interactive experiences alongside the live video. Learn more.