AWS for M&E Blog
Using AWS Elemental Inference with MediaLive
Today’s audiences consume media differently than ever before. While most broadcast content is still produced in horizontal (also called landscape) format for traditional viewing on TVs, mobile-first platforms like TikTok, Instagram Reels, and YouTube Shorts, which use a vertical format, have fundamentally changed how viewers engage with video. Converting 16:9 broadcast content into vertical formats optimized for these platforms typically requires hours of manual editing, causing broadcasters and content creators to miss trending moments and lose audiences to mobile-first competitors.
AWS Elemental Inference is a fully managed AI service that automatically transforms live video broadcasts to vertical video, reaching audiences across every screen. Broadcasters and streaming media creators can use Elemental Inference to deliver content to social and mobile platforms without manual post-production work or AI expertise.
In this post, I show you how to enable Elemental Inference on an AWS Elemental MediaLive channel and use the Smart Crop (vertical video) feature to automatically convert landscape broadcast content into vertical 9:16 format.
Prerequisites
Before you begin, make sure you have the following:
- An active AWS account
- AWS Identity and Access Management (IAM) permissions to create and manage MediaLive channels
- An existing MediaLiveAccessRole IAM role (or permissions to create one)
- Source video content stored in an Amazon Simple Storage Service (Amazon S3) bucket
- Basic familiarity with MediaLive concepts (channels, inputs, output groups)
Solution overview
This walkthrough demonstrates how to:
- Create a MediaLive channel with Elemental Inference enabled
- Configure a landscape output (1280×720) and a vertical output (720×1280)
- Enable smart cropping on the vertical output to automatically reframe content for mobile platforms
The following diagram shows the high-level architecture:
- MediaLive receives a source video from an S3 bucket
- MediaLive sends the video to Elemental Inference for real-time analysis
- Elemental Inference returns metadata to MediaLive
- MediaLive produces both landscape and vertical outputs using the smart cropping metadata
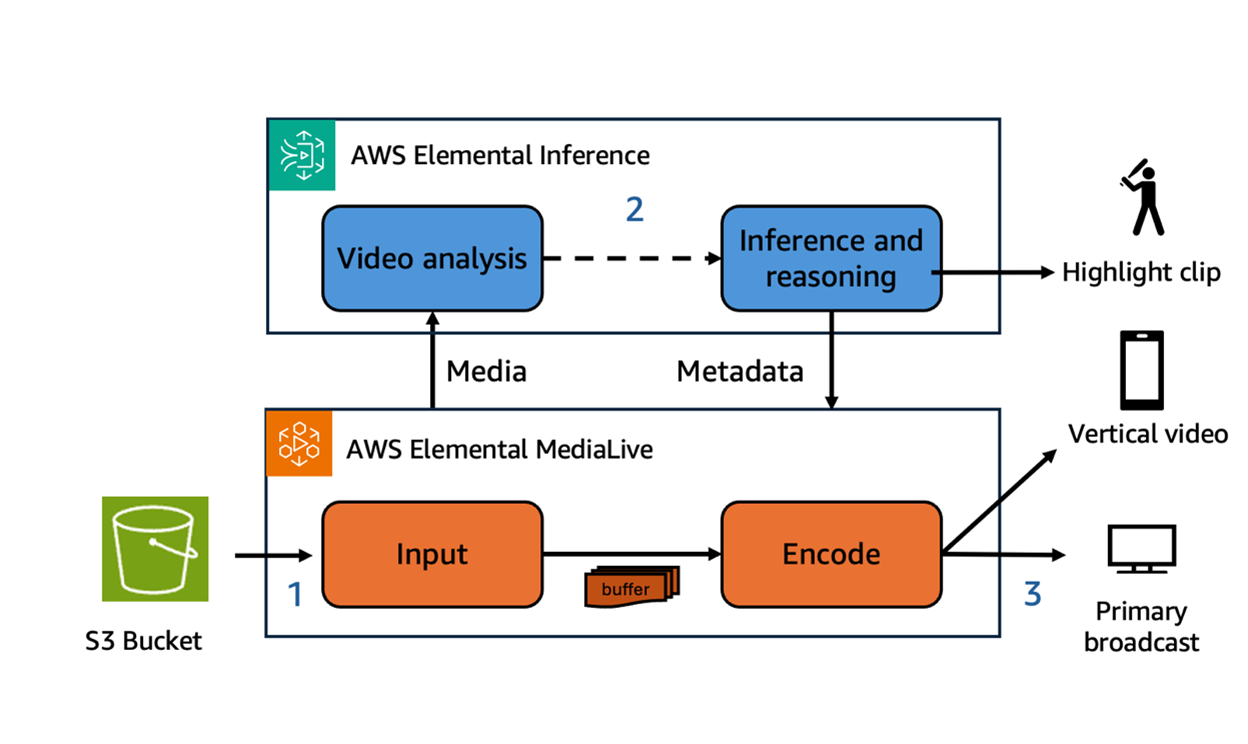
Figure 1: Solution architecture
Use Elemental Inference to convert horizontal media to vertical
With the prerequisites in place, you’re ready to use Elemental Inference with Media Live to convert horizontal media to vertical media.
Create a MediaLive channel
- Go to the MediaLive console and choose Create channel.
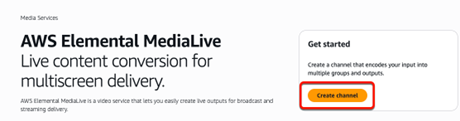
Figure 2: Create channel in MediaLive
- Name your channel and assign an IAM role:
- a. Enter a name for your channel in Channel name.
- b. Under IAM role, choose Use existing role.
- c. Under Use existing role, select MediaLiveAccessRole.
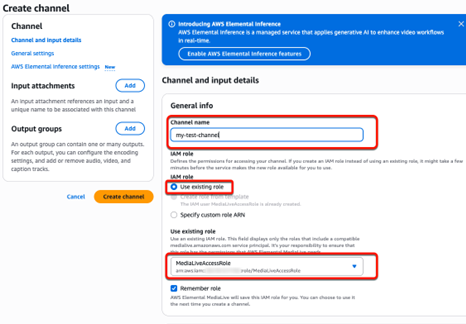
Figure 3: Enter a name for your channel and select an IAM role
- Leave most settings as default. For this example, make the following changes:
- a. Channel class: Select SINGLE_PIPELINE.
- b. Maximum input bitrate for Input specifications: Select MAX_10_MBPS.
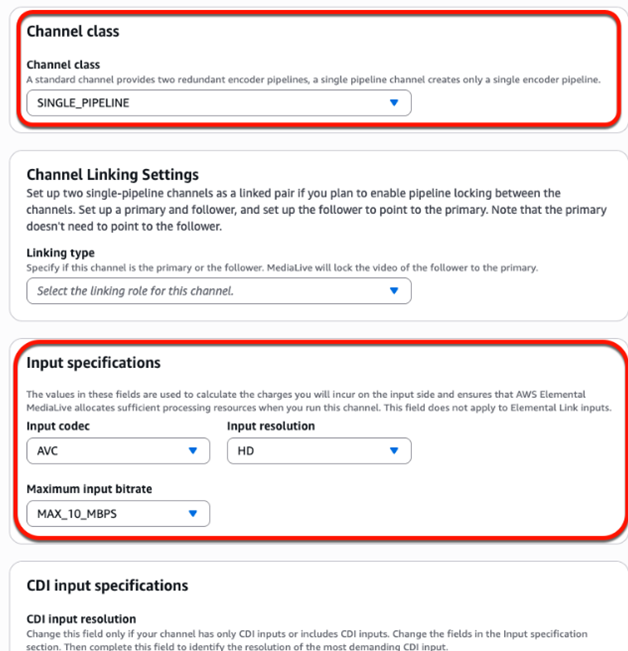
Figure 4: Set channel class and Input specifications settings
- Attach an input for the channel. For this example, use footage of High School Hoops—which is provided by Sinclair and saved in an S3 bucket—as the input source:
- a. Input: Enter
s3://kp-general-usage/source-files/high-school-hoops-from-sinclair.mp4 - b. Attachment name: Enter
high-school-hoops-from-sinclair
- a. Input: Enter
- Choose Confirm to attach the input.
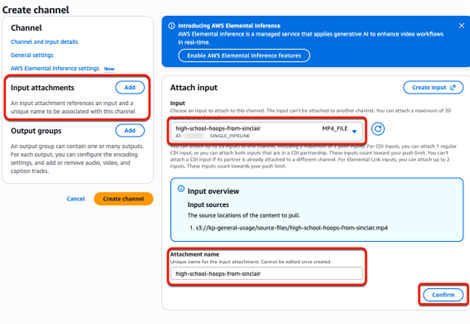
Figure 5: Attach input and enter an attachment name
With the channel created and input source attached, you’re ready to enable Elemental Inference so you can use its features with the MediaLive channel. MediaLive sends video to Elemental Inference for:
- Real-time video analysis
- Video understanding
- Inference
Enable Smart Crop:
The metadata from Elemental Inference enhances the outputs of the MediaLive channel. In this example, you will enable the Smart Crop feature.
- Navigate to AWS Elemental Inference settings in the navigation pane.
- Use the State dropdown to select Enabled.
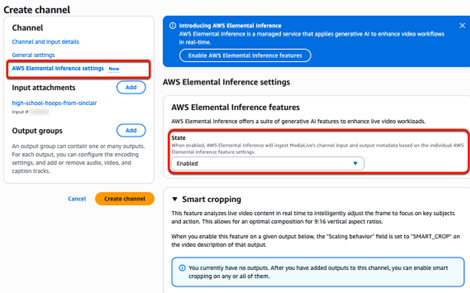
Figure 6: Enable Elemental Inference features
- Create two output groups, each with a single output. Both output groups use an HLS output group that writes to Amazon S3. Both outputs have the following rate control settings:
- Rate Control Mode: QVBR
- Bitrate: 1,500,000 bits per second (1.5 Mbps)
- Max bitrate: 2 Mbps
- Min bitrate: 1 Mbps
a. Output Group 1: Landscape
- i. Output group name: Enter
High School Hoops [landscape] (HLS) - ii. Output name: Enter
landscape - iii. Resolution: For this example, select 1280×720 (landscape, same aspect ratio as input)
- iv. Scaling behavior: Leave as the default (not Smart Crop)
b. Output Group 2: Vertical (with Smart Crop)
- i. Output group name: Enter
High School Hoops [vertical] (HLS) - ii. Output name: Enter
vertical - iii. Resolution: For this example, select 720×1280 (vertical, 9:16 aspect ratio).
- iv. Scaling Behavior: Select SMART_CROP—this enables the Elemental Inference smart cropping feature for a specific output.
- When done, you can review the complete configuration in the left pane, including the output name, HLS settings, and both output groups.
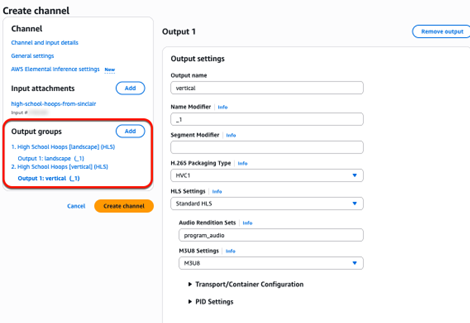
Figure 7: Output settings for the vertical output
To configure the vertical output stream settings:
- In the Output groups section, select the vertical output.
- Under Stream settings, choose Add video.
- Set Video Description Name to
video_vertical. - Set Width to
720and Height to1280. - Set Codec Settings to H264.
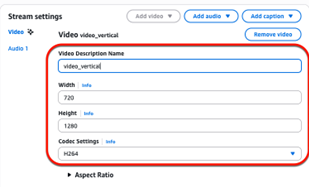
Figure 8: Video stream settings for video_vertical
To set the rate control and scaling behavior:
- Expand the Rate Control section and configure QVBR with the following settings:
- Bitrate: 1,500,000 bits per second (1.5 Mbps)
- Max bitrate: 2 Mbps
- Min bitrate: 1 Mbps
- Expand the Scaling Settings section in the video stream settings.
- Set Scaling Behavior to SMART_CROP.
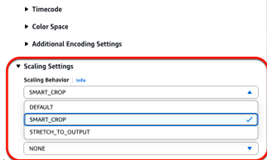
Figure 9: Scaling Settings with SMART_CROP selected
Verify Smart cropping settings and create the channel:
- Before creating the channel, navigate back to the AWS Elemental Inference settings to verify that the Smart cropping feature is correctly enabled on the vertical output:
- Output group 1:
- Name: High School Hoops [landscape].
- Smart cropping: Off.
- Output 1: landscape (_1): Off.
- Output group 2:
- Name: High School Hoops [vertical].
- Smart cropping: On.
- Output 1: vertical (_1) – On.
- Output group 1:
- After verifying the settings, choose Create channel.
Figure 10: Smart cropping enabled for vertical output
Review the created channel and Elemental Inference feed:
After the channel has been created, the Channel details page includes a new tab labeled AWS Elemental Inference. This tab displays:
- ID: The feed ID
- Name: my_test_channel-Feed
- Status: Active
- ARN: arn:aws:elemental-inference:us-west-2:123456789012:feed/<feed_ID>
- Data endpoints: The endpoint URL
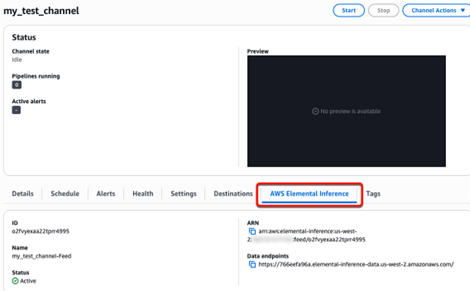
Figure 11: Channel details page showing AWS Elemental Inference tab
The Amazon Resource Name (ARN) represents the Elemental Inference Feed—the Elemental Inference resource that MediaLive automatically creates. This feed:
- Receives video from MediaLive
- Generates metadata for each enabled feature (for example, Smart cropping)
- Returns that metadata to MediaLive to enhance the channel outputs
Conclusion
In this post, you learned how to enable AWS Elemental Inference on a MediaLive channel and use the Smart Crop feature to automatically convert landscape broadcast content into vertical 9:16 format. This eliminates the need for manual post-production editing and enables broadcasters to deliver content to mobile-first platforms in real time.
To learn more see:
- AWS Elemental Inference User Guide
- AWS Elemental Inference features
- AWS Elemental MediaLive User Guide
About the author
Kali Ridley
Kali is a Senior Technical Industry PMM for Media & Entertainment at AWS, where she leads product marketing for AWS Elemental Services. She’s passionate about building product narratives at the intersection of media, entertainment, and technology. Outside of work, Kali is a beach lover who enjoys reading novels, running, and spending time with her family.