AWS Messaging Blog
Enhance email security using VPC endpoints with Amazon SES Manager
Organizations managing on-premises email infrastructure face a critical challenge: how to modernize email systems while maintaining strict security and compliance standards. For healthcare providers, financial institutions, and government agencies, email messages often contain sensitive data that must remain on private networks throughout processing.
The virtual private cloud (VPC) endpoint feature of Amazon Simple Email Service (Amazon SES) Mail Manager addresses this challenge by enabling SMTP messages to remain on your private network throughout processing, routing, and compliance logging before final delivery. This post walks you through implementing this solution to securely modernize your email infrastructure.
Consider this scenario: You’re responsible for a healthcare organization’s email infrastructure that processes thousands of patient communications daily. Your on-premises Exchange servers are aging, maintenance costs are climbing, and your organization is moving workloads to AWS. Your security team requires that email processing for sensitive patient communications—including workflow processing, temporary storage, rule-based routing, and compliance logging—remain within private, controlled networks until ready for final delivery. The Amazon SES Mail Manager VPC endpoint feature addresses this requirement by maintaining network-level isolation for email operations from generation through processing, minimizing data exposure, meeting compliance requirements, and providing defense-in-depth security before final message delivery.
This post demonstrates how to implement VPC endpoints with Amazon SES Mail Manager using exercises from the Amazon SES Mail Manager workshop. We show how to configure VPC endpoints, security groups, and ingress endpoints to maintain private network connectivity for your email processing workflows.
Solution overview
Our approach combines AWS services to create a secure, private email infrastructure:
- Amazon Virtual Private Cloud (Amazon VPC) endpoints powered by AWS PrivateLink
- AWS security groups to further limit SMTP message traffic to approved network subnets
- AWS Secrets Manager to manage the creation and rotation of SMTP passwords
- AWS Key Management Service (AWS KMS) to encrypt and decrypt the SMTP password stored in Secrets Manager
This solution requires your applications to run within a VPC or have established connectivity between your on-premises network and Amazon VPC through AWS Direct Connect or VPN. For guidance on connecting on-premises networks to AWS, refer to Hybrid network connections.
The following diagram illustrates the solution architecture.
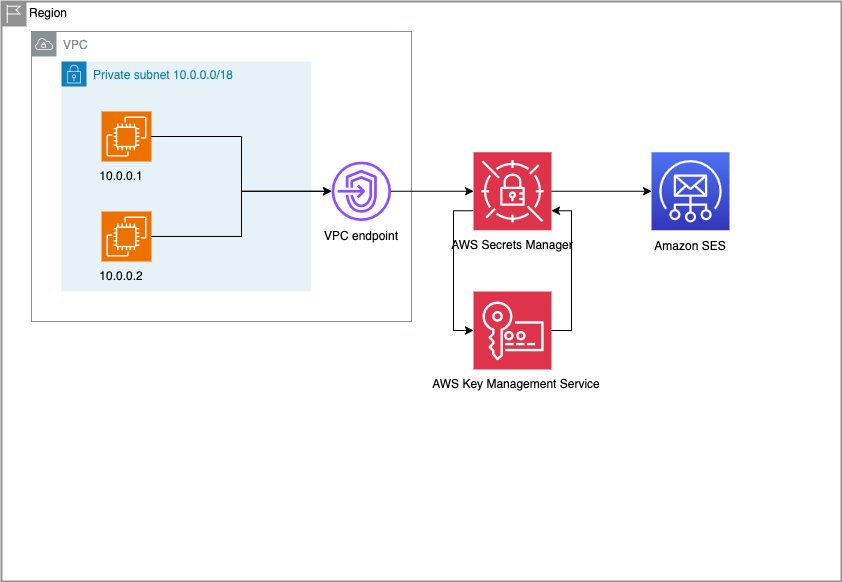
The workflow consists of the following steps:
- Amazon Elastic Compute Cloud (Amazon EC2) instances running the sender email application on subnet 10.0.0.0/18 connect to the Amazon SES Mail Manager ingress endpoint through a VPC endpoint.
- Sender credentials are retrieved securely from Secrets Manager.
- AWS KMS decrypts credentials using your managed encryption keys.
- Authenticated email traffic flows securely to SES Amazon SES Mail Manager.
Prerequisites
Before beginning your migration, ensure you have the following:
- AWS account – Use an AWS account with appropriate permissions for creating and managing a VPC, Secrets Manager, AWS KMS, and Amazon SES. Make sure AWS Identity and Access Management (IAM) policies follow least privilege principles.
- Existing VPC infrastructure – Use a VPC that hosts your applications in the same AWS account and AWS Region as Amazon SES. For more information, see Plan your VPC.
- Amazon SES configured – Configure Amazon SES in the same Region and AWS account.
- Network connectivity – Deploy application servers either on premises with network connectivity to your VPC using Direct Connect or VPN, or already running within the VPC.
- AWS blocks outbound SMTP traffic on port 25 across most AWS services. You can either use an alternative TCP port, such as 587 (recommended), or request port 25 exemption by submitting a request to AWS Support from your AWS account using the Request to remove email sending limitations form. This can take upwards of 7 business days to be reviewed; approval is not guaranteed.
- Configure DNS resolution for Amazon SES Mail Manager VPC endpoints (for more details, see Resolving DNS queries between VPCs and your network).
For this example, we use Linux SMTP commands from an EC2 instance in the VPC to connect to the Amazon SES Mail Manager ingress endpoint through a VPC endpoint on port 587.
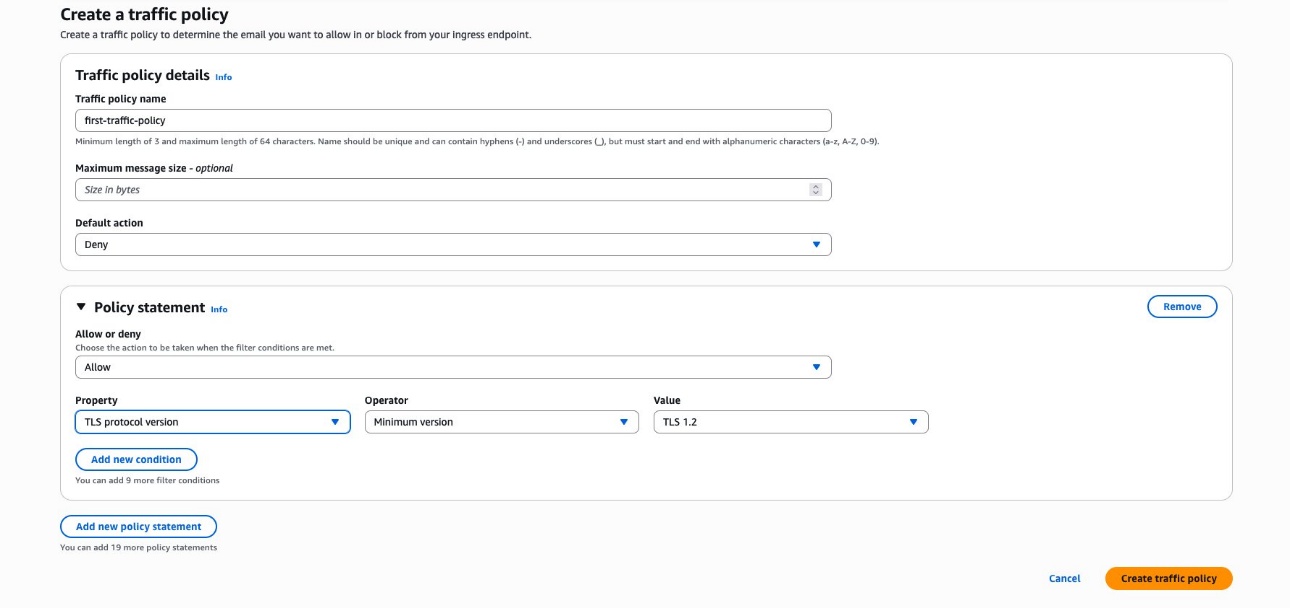
Create traffic policy
Create an Amazon SES Mail Manager traffic policy to filter incoming messages by a combination of recipient address, sender IP address range, and TLS protocol version (1.2 or 1.3). For more details about Amazon SES Mail Manager traffic policies, refer to Traffic policies and policy statements. In this example, we use a traffic policy with minimum TLS version of 1.2.
Complete the following steps:
- Open the Amazon SES console in the target Region.
- In the navigation pane, under SES Mail Manager, choose Traffic policies.
- Choose Create traffic policy.
- For Policy name, enter a descriptive name, such as
first-traffic-policy. - For Default action, choose Deny.
- Choose Add new policy statement.
- For Allow or deny properties, choose Allow.
- For Properties, choose TLS protocol version.
- For Operator, choose Minimum version.
- For Value, choose TLS 1.2.
- Choose Create traffic policy.
Create rule set
Rule sets are containers for an ordered set of rules that determine how the messages are processed. For more information, see Rule sets and rules. In this example, we use the archive rule to archive all emails processed by Amazon SES Mail Manager.
Complete the following steps:
- On the Amazon SES console, under Amazon SES Mail Manager in the navigation pane, choose Rule sets.
- Choose Create rule set.
- Name the rule (for example,
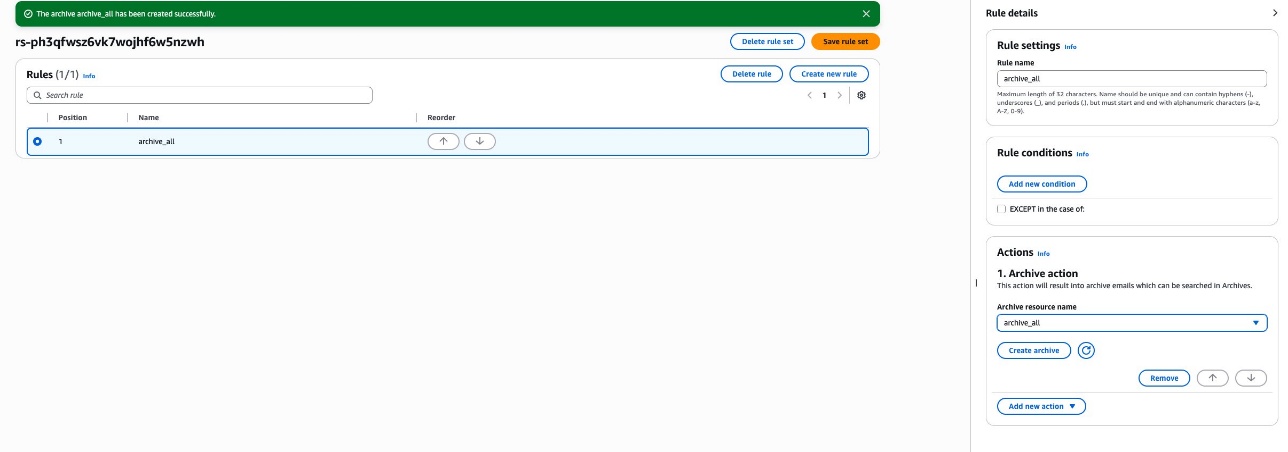
first-rule-set) and choose Create rule set. - Choose Create new rule, then choose Create new rule again.
- Under Rule settings, name the rule (for example,
archive_all). - Under Actions, choose Add new action.
- Chose Archive.
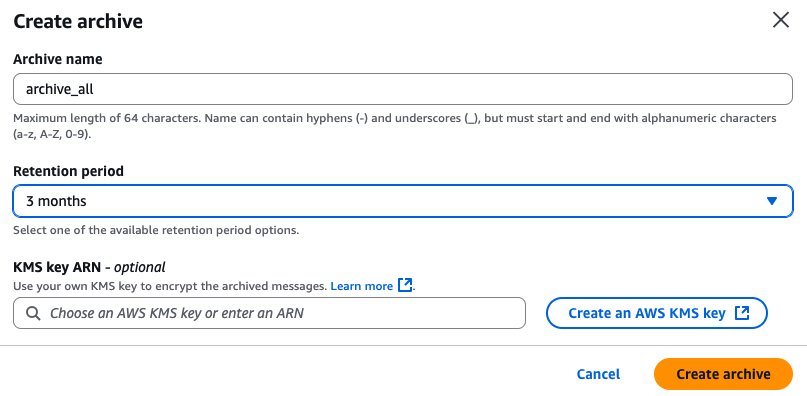
- Choose Create archive.
- Give the archive a name, such as
archive_all. - Set a retention period (3 months for testing).
- Choose Create archive.
- For Archive resource name, choose
archive_all. - Choose Save rule set.
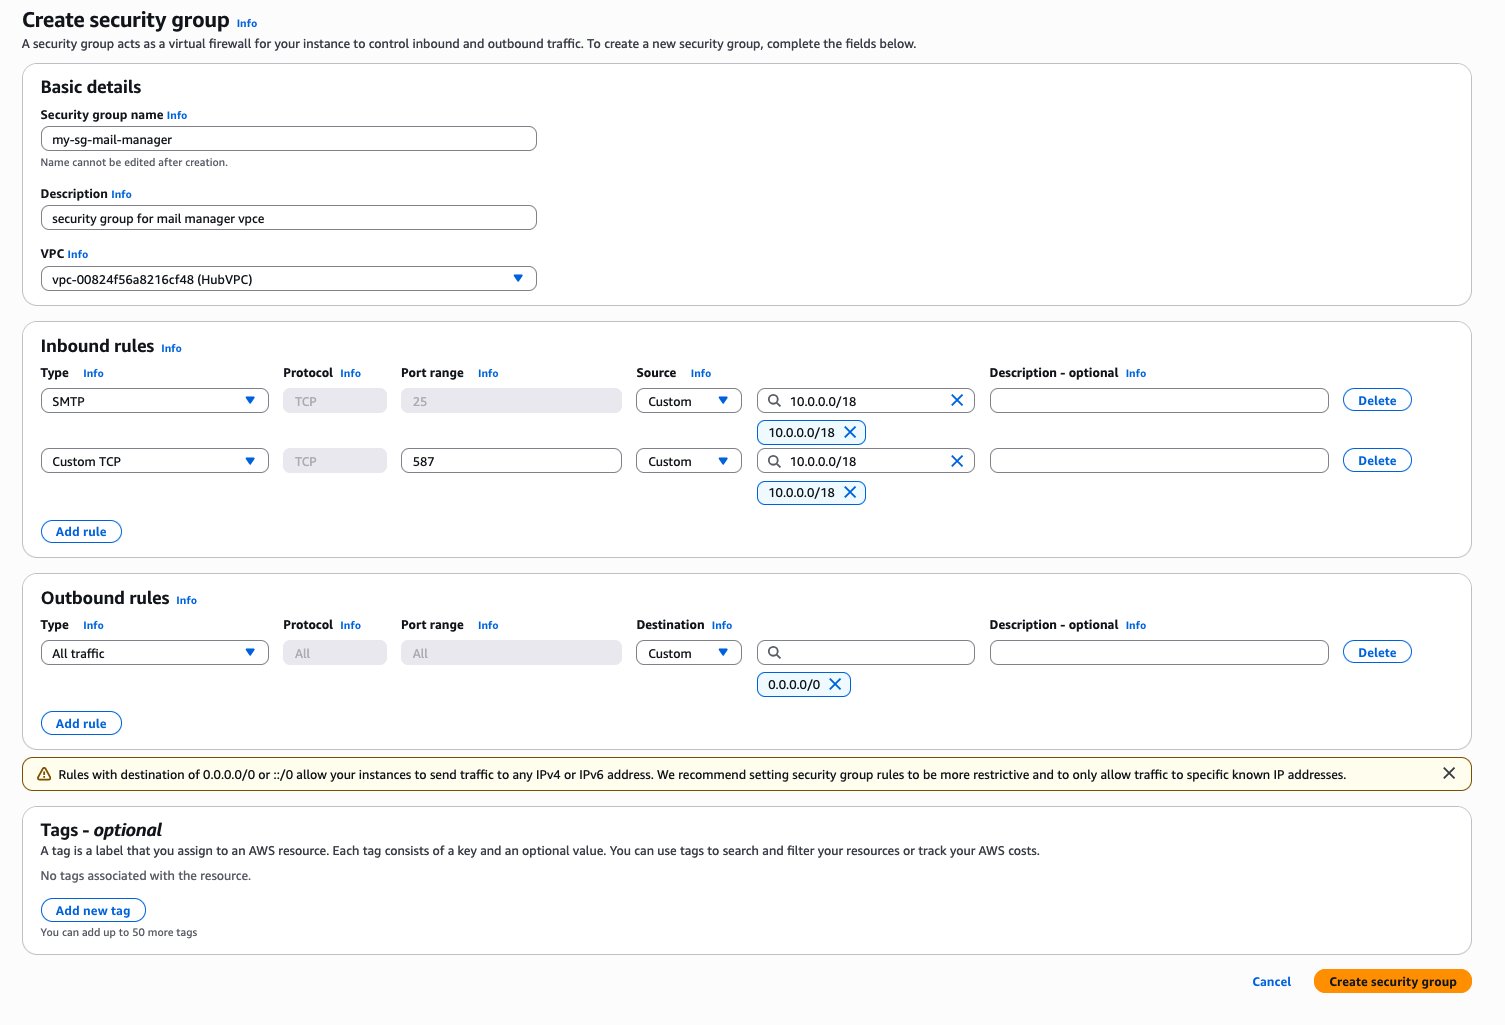
Create security group
Complete the following steps to create a security group:
- On the Amazon VPC console, under Security in the navigation pane, choose Security groups.
- Choose Create security group.
- For Security group name, provide a name that uniquely identifies the security group. For this example, we name the security group
my-sg-mail-manager. - For Description, describe the purpose of this security group.
- For VPC, choose the VPC that hosts your applications.
- For Inbound rules, choose Add rule.
- For Type, choose SMTP.
- For Source, enter the IP range of your private subnet.
- Choose Add rule again.
- For Port range, enter
587and the IP range of your private subnet. - Choose Create security group.
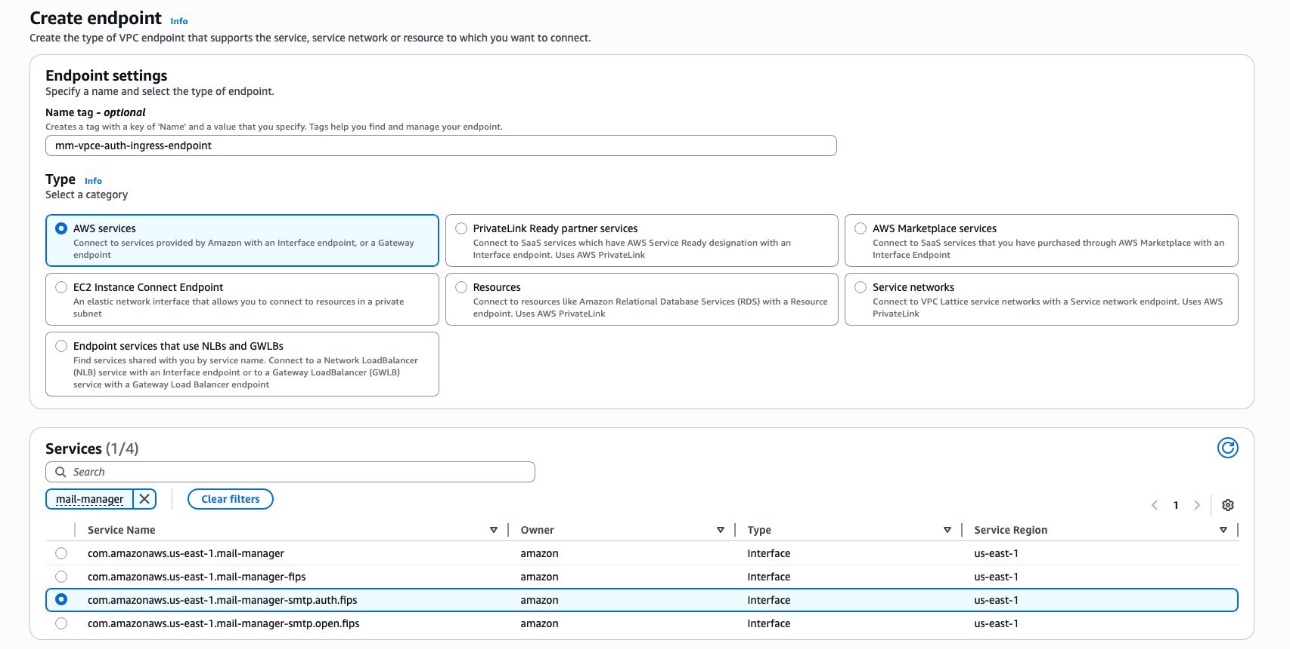
Create VPC endpoint
VPC endpoints make it possible to keep your email traffic within your private AWS network. Complete the following steps to create a VPC endpoint:
- Open the Amazon VPC console in the target Region.
- Under PrivateLink and Lattice in the navigation pane, choose Endpoints.
- Choose Create endpoint.
- For Name tag, enter an optional tag, such as
mm-vpce-auth-ingress-endpoint. - Select AWS services.
- For Services, enter
mail-managerto search for Amazon SES Mail Manager VPC endpoints. - Select
com.amazonaws.us-east-1.mail-manager-smtp.auth.fips.
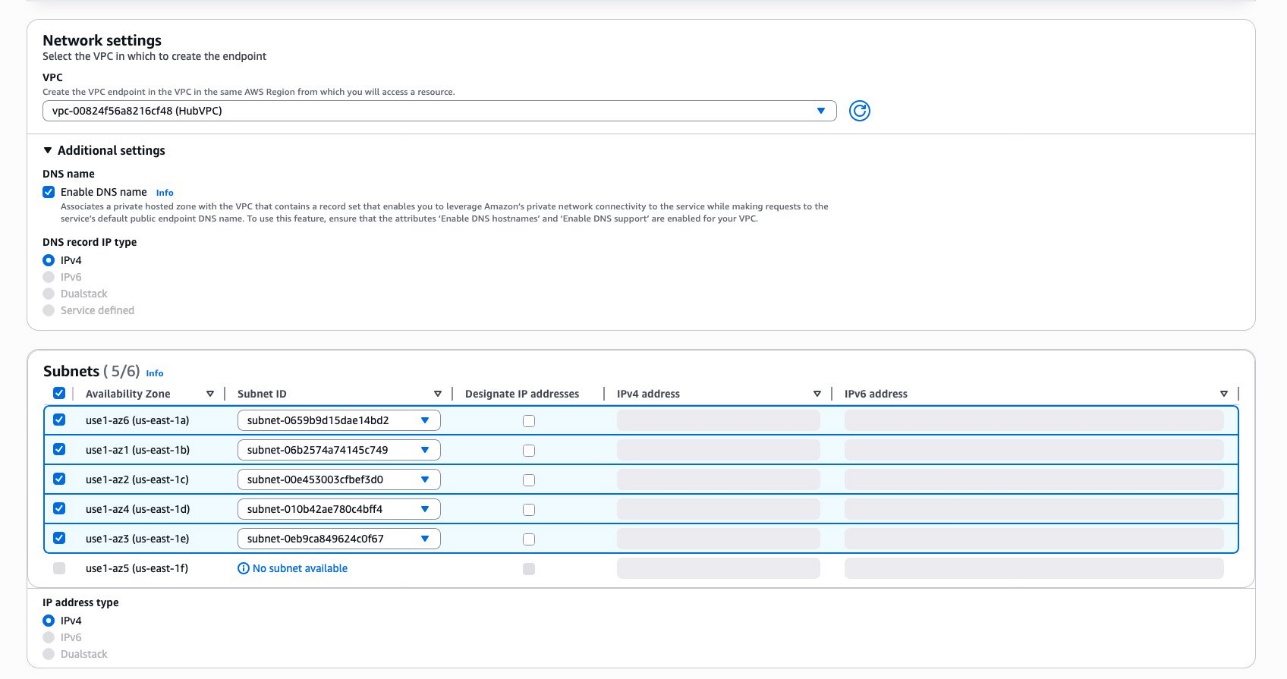
- For VPC, choose the VPC that hosts your applications.
- For DNS name, select Enable DNS name
- For DNS record IP type, select IPv4.
- Under Subnets, select all Availability Zones and choose the subnet ID for each subnet.
- For IP type, select IPv4.
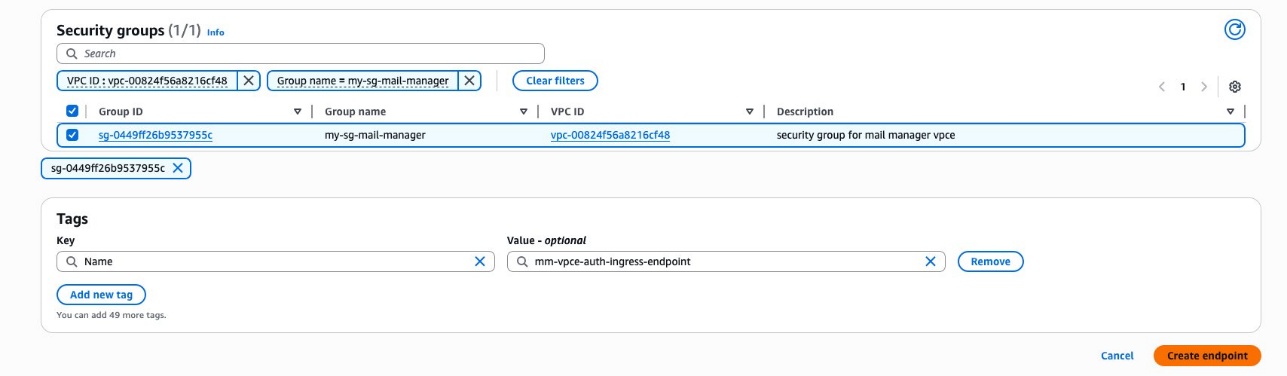
- For Security groups, select the group
my-sg-mail-manager. - Choose Create endpoint.
Create ingress endpoint
Complete the following steps to create an authenticated ingress endpoint using Secrets Manager and AWS KMS:
- On the Amazon SES console, under Amazon SES Mail Manager in the navigation pane, choose Ingress endpoints.
- Choose Create ingress endpoint.
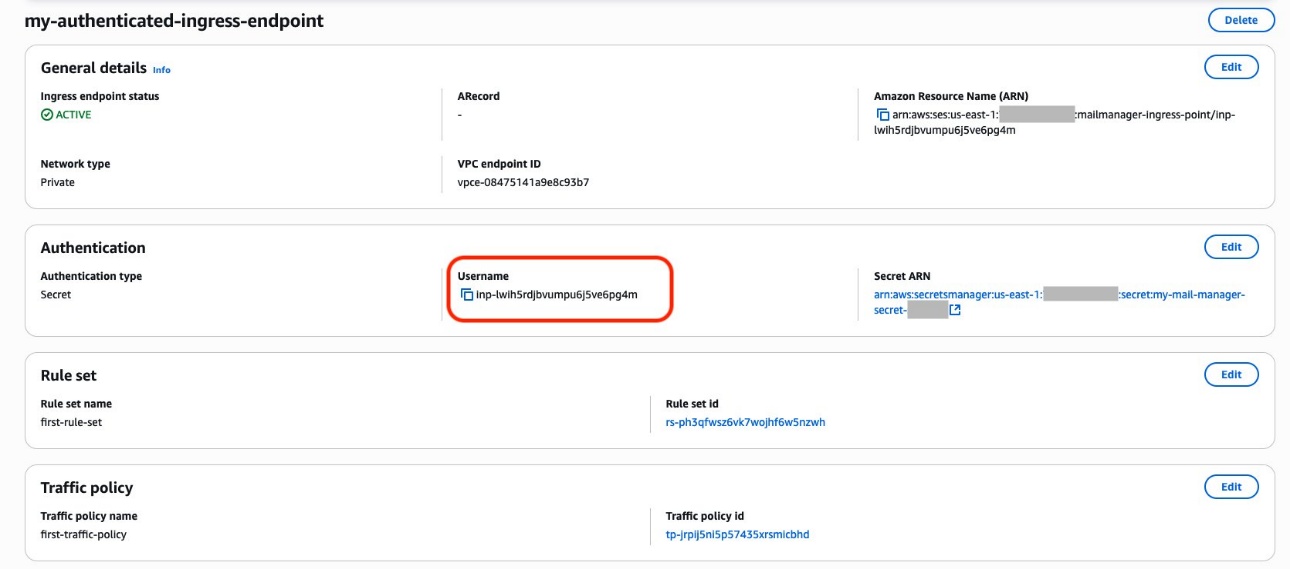
- For Ingress endpoint name, enter a unique name for the ingress endpoint. For this example, we use
my-authenticated-ingress-endpoint. - For Type, choose Authenticated.
- For Authentication type, choose Secret.
- Choose Create new, which will open a new tab.
- For Secret type, choose Other type of secret.
- Under Key/value pairs, enter
passwordas the key (anything else will cause authentication to fail), then enter a password as the value. - For Encryption Key, choose Add new key, which will open a new tab.
- Choose Create key.
- Keep the default values for Key type and Key usage and choose Next.
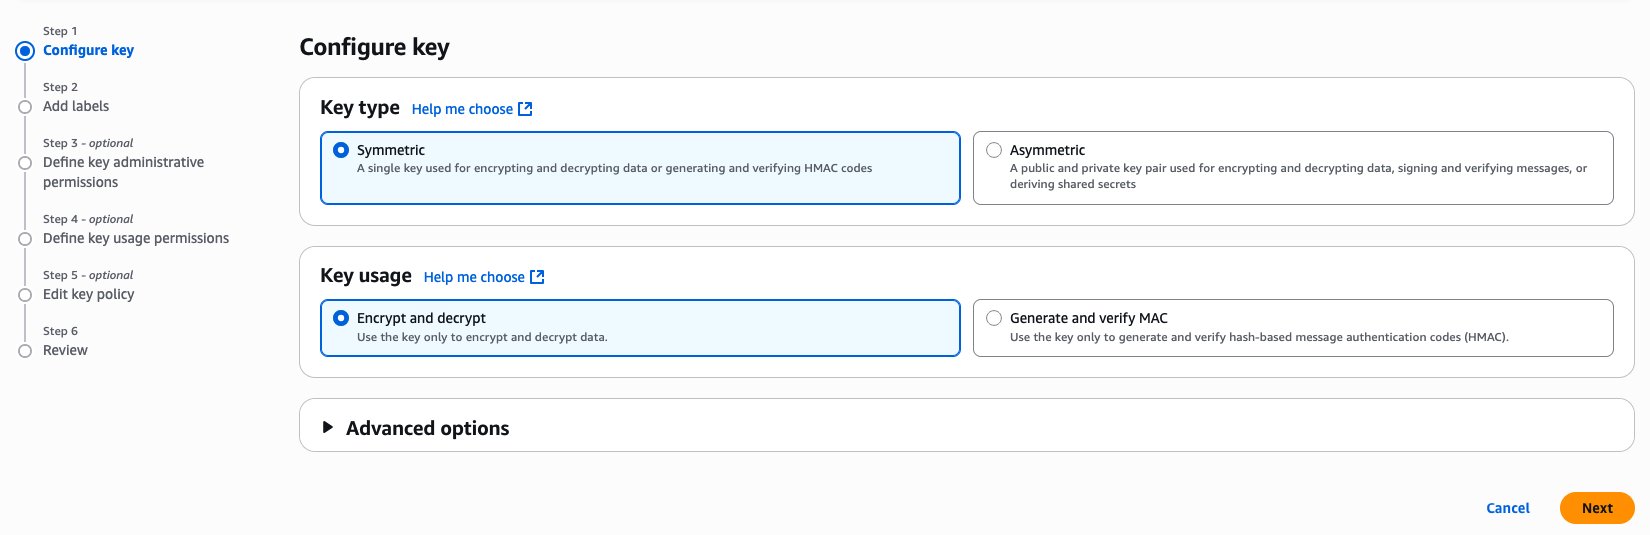
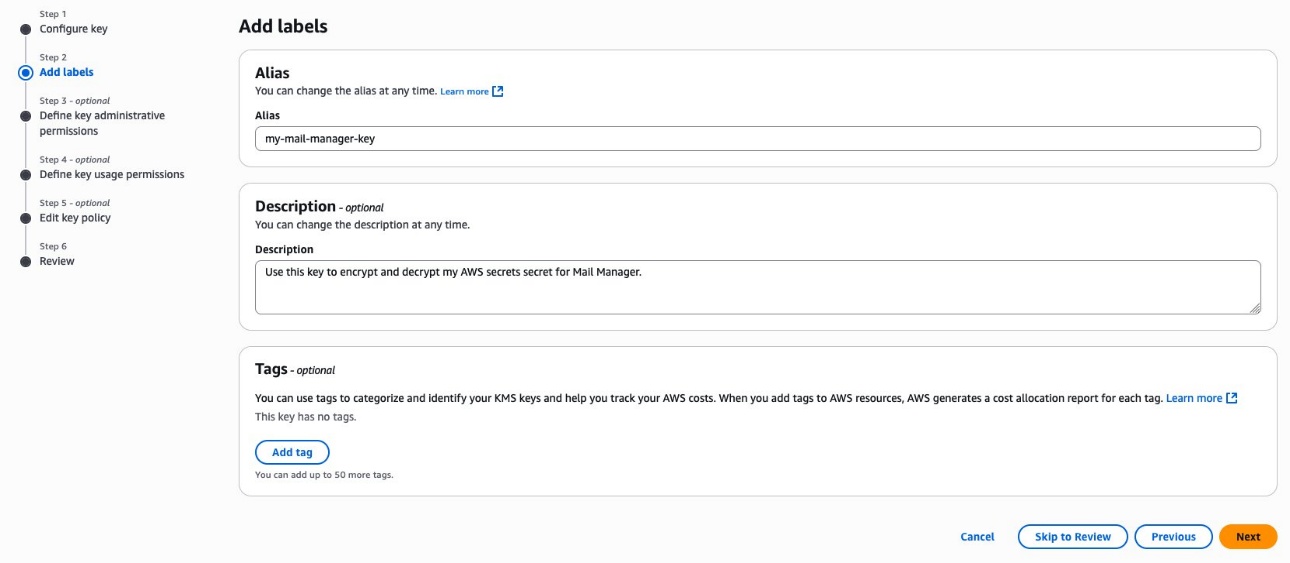
- For Alias, enter a unique name for your custom managed key. For this example, we use
my-mail-manager-key. - For Description, describe the purpose of the key.
- Choose Next.
- For Key administrators, choose any users (other than yourself) or roles you want to permit to administer the key, then choose Next.
- For Key users, choose any users (other than yourself) or roles you want to permit to use the key, then choose Next.
- For Key policy, choose Edit, then enter the following KMS key policy into the key policy JSON text editor at the
"statement"level by adding it as an additional statement separated by a comma. Replace the Region and account number with your own.
- Choose Next.
- Review and choose Finish.
- Switch to the Secrets Manager tab and choose the refresh icon.
- Choose the KMS key you just created, then choose Next.
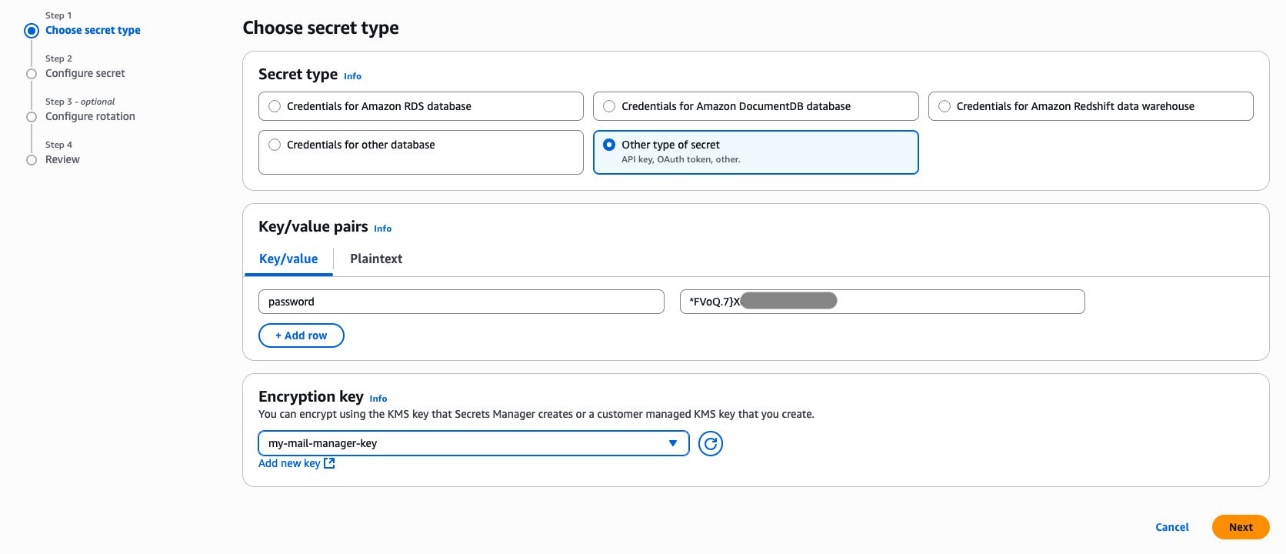
- For Secret name, provide a unique name for the secret. For this example, we use
my-mail-manager-secret. - For Description, describe the purpose for the secret.
- For Resource permissions, replace the example JSON code in the editor with the following policy. Replace the Region and the account number with your own.
- Choose Save, then choose Next.
- Configuring automatic rotation is optional. We skip this step and choose Next.
- Review and choose Store.
- Switch back to the Amazon SES console tab to finish creating the ingress endpoint.
- For Secret ARN, choose Refresh list, then choose the secret you just created.
- For Rule set, choose
first-rule-set. - For Traffic policy, choose
first-traffic-policy. - For Network type, select Private.
- For VPC endpoint ID, choose
mm-vpce-auth-ingress-endpoint. - Choose Create ingress endpoint.

Test configuration
Complete the following steps to test your configuration:
- Open the Amazon VPC console in the target Region.
- Under PrivateLink and Lattice in the navigation pane, choose Endpoints.
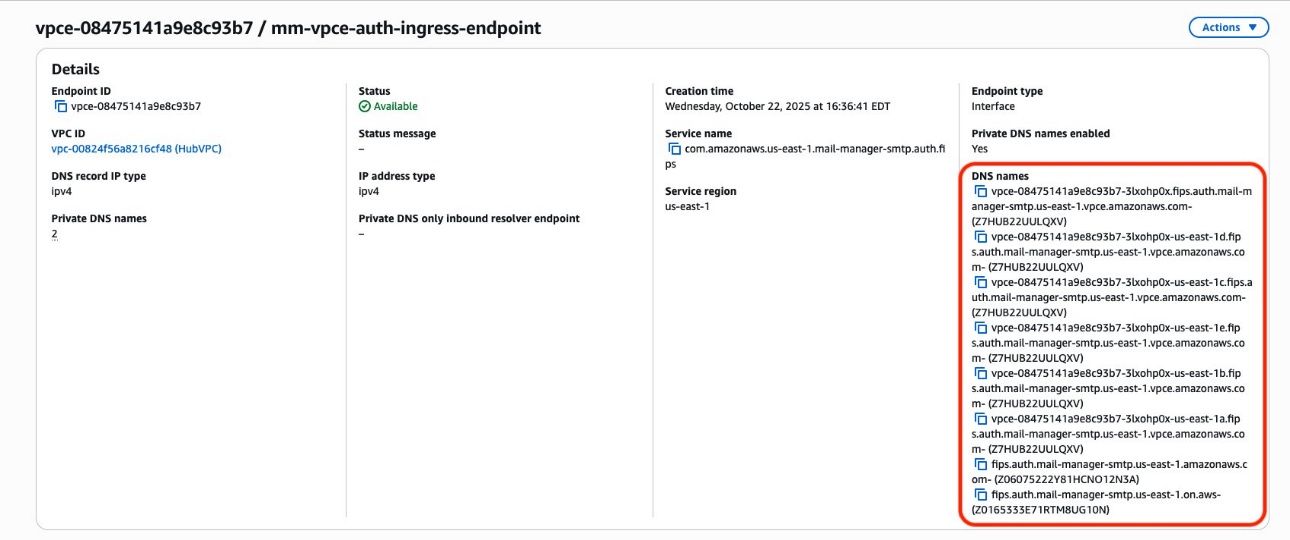
- Choose the VPC endpoint ID of
mm-vpce-auth-ingress-endpointto open the details page. - Find the DNS names for the VPC endpoint. The first DNS name on this list is the Regional DNS name of the VPC endpoint; copy this DNS name and save it on a notepad for later use.
- Open the Amazon SES console in the target Region.
- Under Amazon SES Mail Manager in the navigation pane, choose Ingress endpoints.
- Choose
my-authenticated-ingress-endpoint. - In the Authentication section, locate the SMTP user name (typically starts with
inp-).
- Connect to your EC2 instance using SSH.
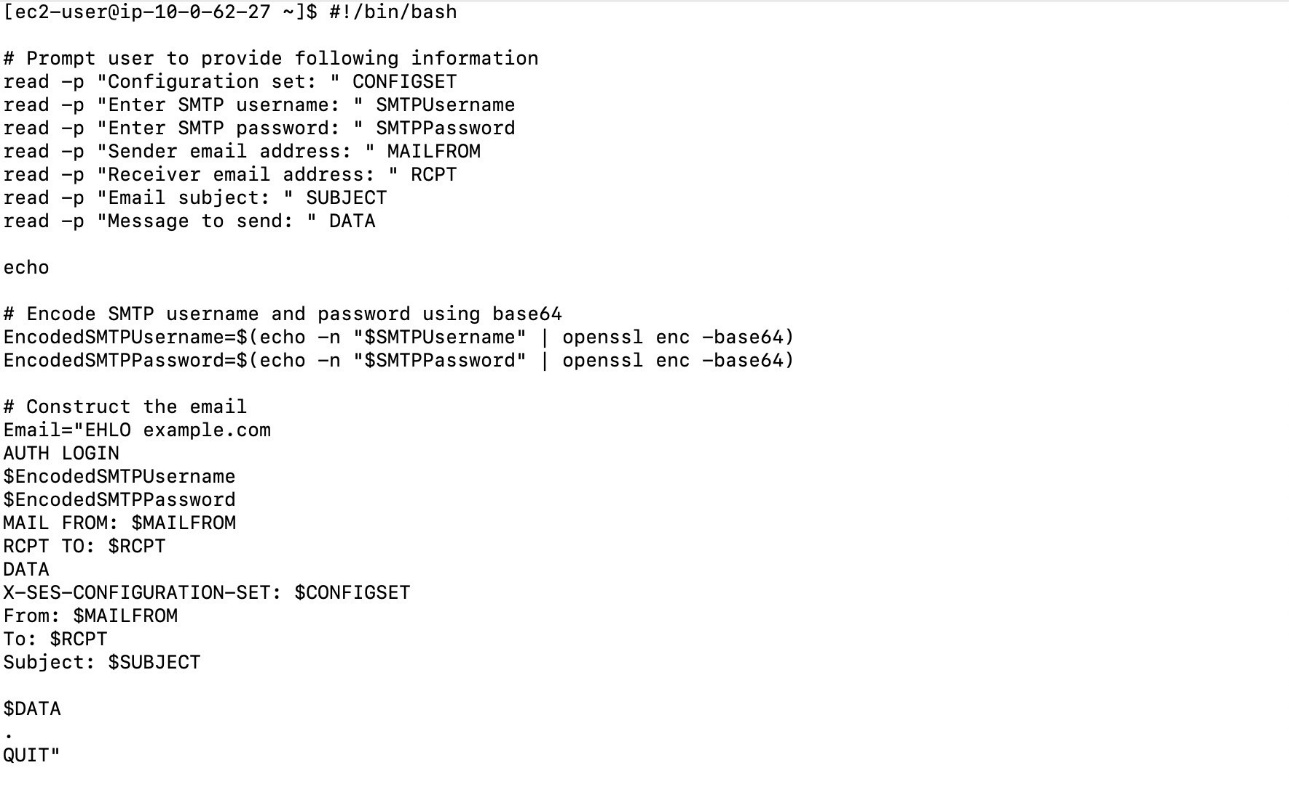
- Use the command line to send an email using the Amazon SES SMTP interface to test the connectivity. Replace the endpoint with the DNS name of the VPC endpoint you copied earlier.
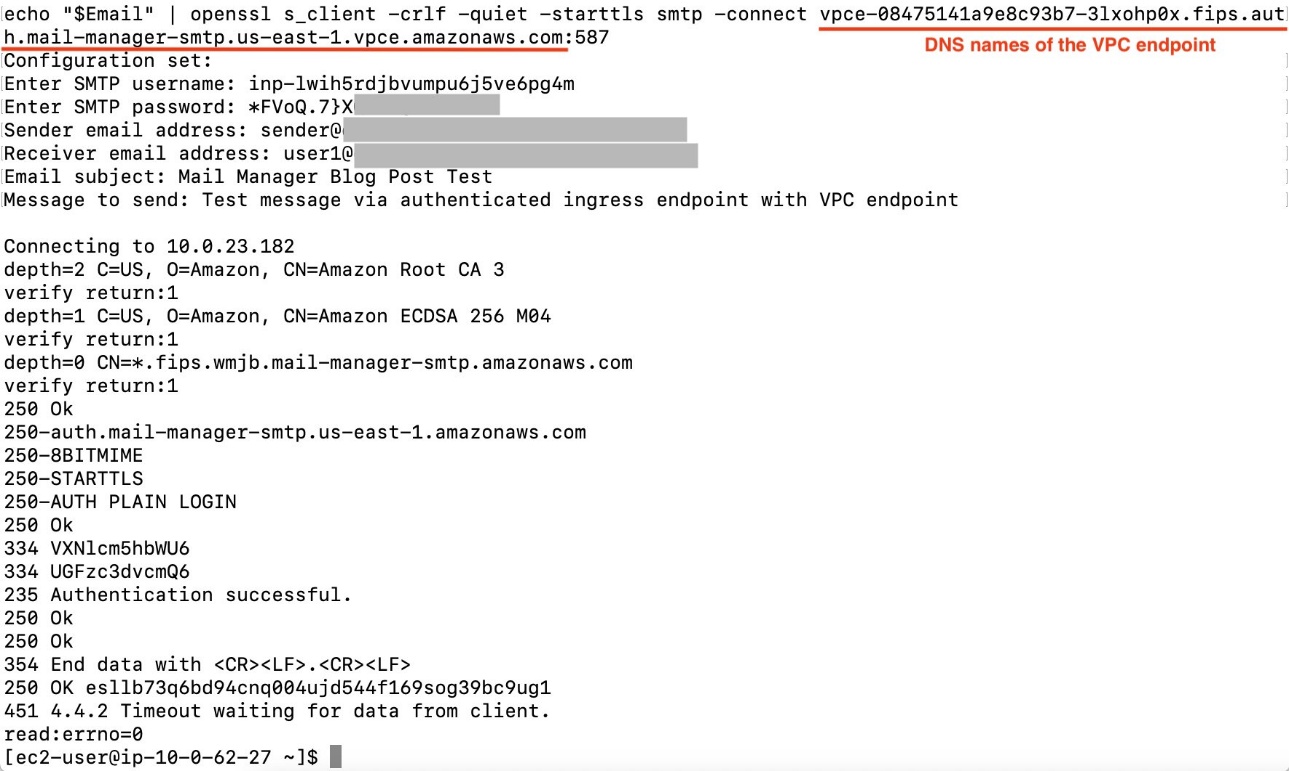
The message 250 OK esllb73q6bd94cnq004ujd544f169sog39bc9ug1 indicates the message was successfully accepted by Amazon SES Mail Manager.
Clean up
When you’re done with this solution, clean up the resources you created including Mail Manager configurations, security groups, VPC endpoints, KMS keys, and Secrets Manager secrets to avoid additional charges.
Conclusion
In this post, we showed how to enhance email security by implementing Amazon SES Mail Manager with VPC endpoints. This solution can help you modernize your email infrastructure while maintaining network-level isolation and meeting enterprise compliance requirements.
To learn more about Amazon SES, see the Amazon SES Developer Guide. For additional security best practices, refer to AWS Best Practices for Security, Identity, & Compliance. To get started using Amazon SES Mail Manager, participate in an Amazon SES Mail Manager workshop event, explore the advanced workflow features of Amazon SES Mail Manager, and consider integrating with your existing monitoring and alerting systems.