AWS Messaging Blog
Isolate email suppression per tenant with Amazon SES
If you operate a multi-tenant email platform on Amazon Simple Email Service (Amazon SES), you know that managing email reputation across your tenants is a constant balancing act. Until now, all tenants in an Amazon SES account shared a single account-level suppression list. Suppose an email from Tenant 1 to Recipient A results in a hard bounce or a spam complaint. Amazon SES then places Recipient A’s email address on the account-level suppression list. As a result, none of your other tenants can send email to Recipient A. The block applies even when they have a valid, opted-in relationship with that recipient.
Tenant-level suppression lists solve this by allowing you to isolate bounce and complaint data per tenant, which eliminates cross-tenant contamination. With tenant-level suppression enabled, Amazon SES maintains a separate suppression list per tenant. Bounces and complaints affect only the sending tenant’s list. Other tenants can still attempt delivery to the same recipients.
In this post, you learn about the business problem this feature solves, how the new suppression precedence works, and how to implement tenant-level suppression for your multi-tenant email platform.
Quick reference
| Item | Detail |
| Feature | Tenant-level suppression lists |
| Primary API operation | PutTenantSuppressionAttributes |
| Scope options | TENANT (isolated), ACCOUNT (shared, default) |
| Suppressed reasons | BOUNCE, COMPLAINT, or both |
| Prerequisites | Multi-tenancy enabled, production access |
| Key behavior | Amazon SES evaluates exactly one suppression list per SendEmail call |
| Precedence order | Configuration Set → Tenant → Account |
| Automatic recording | Bounces → tenant list + global list. Complaints → tenant list only |
| Backward compatible | Yes — opt-in per tenant, existing behavior unchanged |
The cross-tenant suppression contamination problem in Amazon SES
Consider the following scenario. Imagine you run a SaaS marketing automation platform called “AnyCompany-SaaS.” You use Amazon SES multi-tenancy to send email on behalf of your customers (your tenants). For this example, consider Tenant A (a fast-growing fitness brand) and Tenant B (a conservative financial services company).
One day, Tenant A runs an aggressive, poorly targeted email campaign. Recipient A reports the email as spam, and that email address (jane@example.com) gets added to your Amazon SES account-level suppression list to protect your sender reputation.
The problem? Tenant B has a perfectly valid, opted-in relationship with jane@example.com and needs to send her a critical financial receipt. Before tenant-level suppression became available, AnyCompany-SaaS relied on the Amazon SES shared account-level suppression list. In this scenario, when Tenant B attempts to send email to jane@example.com, Amazon SES accepts the message but does not send it. The address is suppressed for every tenant in the account. Tenant B loses access to a valid recipient simply because of their neighbor’s poor email hygiene.
This is cross-tenant suppression contamination, and it creates several downstream problems:
- Unfair deliverability outcomes — One tenant’s poor list hygiene affects all other tenants.
- Increased support burden — Tenants ask “why is my email being suppressed?” and you have no clear answer.
- Eroded trust — Your customers (the tenants) lose confidence in your platform’s email delivery capabilities.
- Scaling challenges — The more tenants you add, the worse the contamination problem becomes.
Before today, the only workarounds were managing separate Amazon SES accounts per tenant (operationally expensive), or building custom suppression logic in your application layer (complex and error-prone). With Amazon SES tenant-level suppression lists, this shared-fate scenario is a thing of the past.
What is new: Tenant-level suppression lists
Each tenant in your account can now maintain its own isolated suppression list. When a hard bounce or complaint occurs for a tenant, Amazon SES records the suppressed address only on that tenant’s list. It does not add the address to other tenants’ lists.
Here is what this means in practice:
- Isolation — Tenant A’s bounces and complaints affect only Tenant A’s suppression list.
- Autonomy — Each tenant owns its own deliverability without impact from neighboring tenants.
- Automatic management — Amazon SES automatically records entries based on hard bounces and complaints, and removes entries when recipients submit not-spam feedback.
- Backward compatibility — Existing account-level suppression continues to work unchanged. Tenant-level suppression is opt-in per tenant.
Who benefits from tenant-level suppression?
This feature is designed for any organization that uses Amazon SES multi-tenancy to send email on behalf of multiple entities. Common use cases include:
- SaaS platforms — Send transactional or marketing email for multiple customers, each with isolated suppression.
- Marketing automation providers — Manage campaigns for different clients without cross-client contamination.
- Enterprise multi-brand organizations — A corporation with multiple brands (for example, separate product lines or regional divisions) that need suppression isolation between brands.
- Digital agencies — Manage email programs for dozens of clients under one Amazon SES account.
- ISVs and resellers — Independent software vendors offering email capabilities as part of their platform.
When to use tenant-level vs. account-level suppression
| Scenario | Recommended scope | Why |
| Single-tenant account (one brand, one sender) | ACCOUNT |
No isolation needed — account-level works fine |
| Multi-tenant SaaS sending on behalf of customers | TENANT |
Prevents cross-tenant contamination |
| Enterprise with multiple business units | TENANT |
Each BU owns its deliverability independently |
| Per-workflow control within a single tenant | Configuration set override | Granular suppression at sub-tenant level |
| Migrating from separate Amazon SES accounts per tenant | TENANT |
Consolidate into one account with isolation preserved |
How Amazon SES tenant-level suppression precedence works
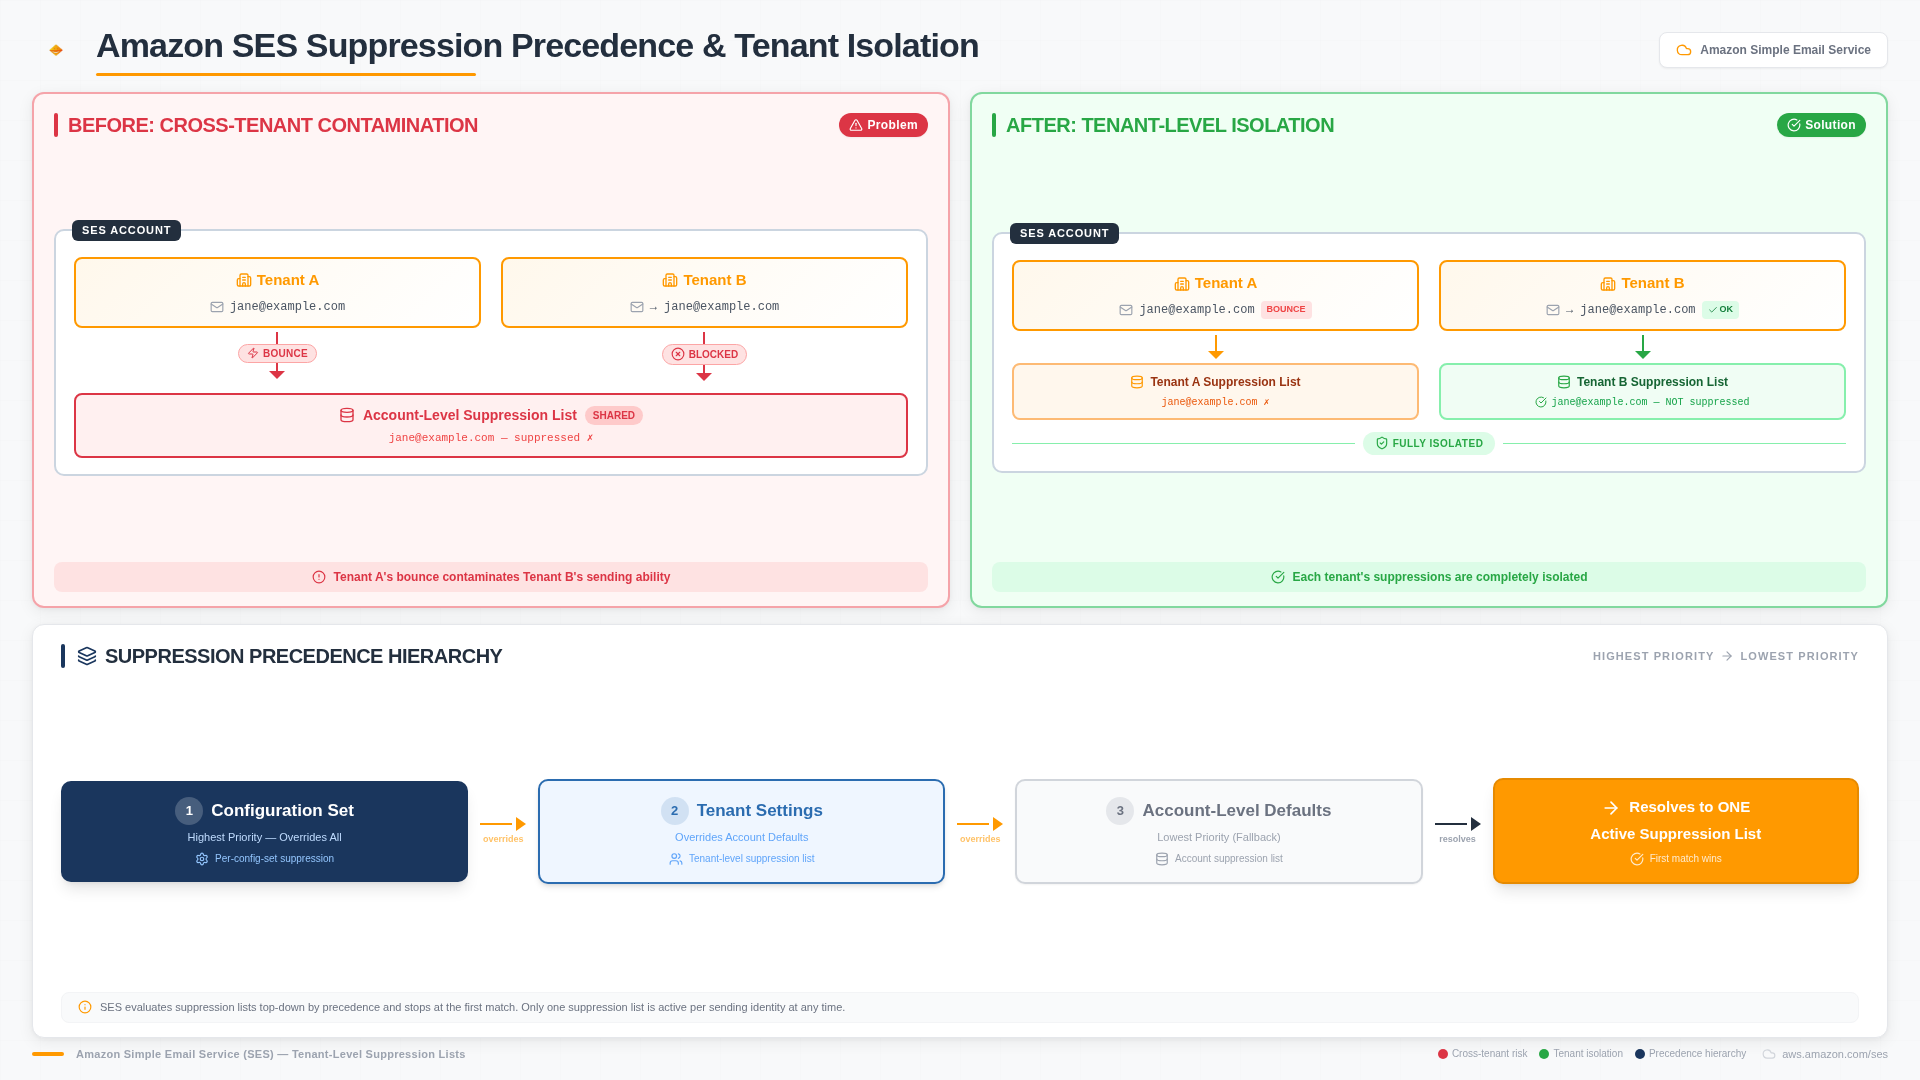
When you start mixing account-level lists, configuration sets, and tenant-level lists, it is important to understand how Amazon SES determines which list to check before sending an email. Amazon SES evaluates suppression rules in the following hierarchy (resolving to exactly one list).
Configuring suppression scope and suppressed reasons
Tenant-level suppression is controlled by two settings that you configure together:
- Suppression scope — Determines which suppression list Amazon SES checks at send time:
TENANT— Use the tenant’s own suppression list.ACCOUNT— Use the account-level suppression list (this is the default).
- Suppressed reasons — Determines which events cause Amazon SES to automatically add addresses to the suppression list:
BOUNCE— Add addresses that produce hard bounces.COMPLAINT— Add addresses that produce complaints.- Both
BOUNCEandCOMPLAINT— Add addresses for either event.
You configure both settings together using the PutTenantSuppressionAttributes API operation or by specifying SuppressionAttributes when creating a new tenant with CreateTenant.
Suppression precedence order
Behavior: Amazon SES evaluates exactly one suppression list per
SendEmailcall. The precedence is: Configuration Set > Tenant > Account. It does not check multiple lists in sequence.
Amazon SES resolves suppression settings using the following precedence order:
- Configuration set overrides (highest priority) — If the email is sent using a configuration set with a defined
SuppressionOptionsscope, Amazon SES uses that setting first. - Tenant-level settings — If no configuration set override exists, and the email includes a
TenantName, Amazon SES checks the isolated suppression list for that specific tenant. - Account-level defaults (lowest priority) — If neither the configuration set nor the tenant specifies suppression settings, Amazon SES uses account-level defaults.
Important: An address that is on the account-level suppression list but not on the tenant’s list will not be suppressed when the scope is
TENANT. Conversely, an address on the tenant’s list will not affect sends when the scope resolves toACCOUNT.
Automatic suppression recording behavior
When the suppression scope is TENANT, Amazon SES automatically manages entries:
- Hard bounces — Amazon SES adds the address to the tenant’s suppression list and the global suppression list. Amazon SES does not add the address to the account-level suppression list.
- Complaints — Amazon SES adds the address to the tenant’s suppression list only.
- Not-spam feedback — When a recipient marks a previously reported message as not spam, Amazon SES automatically removes
COMPLAINT-reason entries from the tenant’s suppression list.
Prerequisites
Before implementing tenant-level suppression, make sure you have the following:
Required resources:
- An AWS account with Amazon SES configured.
- Multi-tenancy enabled with at least one tenant in your Amazon SES account.
- AWS Command Line Interface (AWS CLI) version 2 installed and configured with appropriate permissions.
- Production access (required for PutSuppressedDestination operations — sandbox accounts cannot manually add suppression entries).
Knowledge prerequisites: You should be familiar with Amazon SES account-level suppression concepts and multi-tenancy configuration.
Minimal example: Enable and send with tenant suppression
The following is the shortest path to enabling tenant-level suppression and sending an email that uses it:
Implementation walkthrough
Implementing tenant-level suppression requires configuring your tenants and updating your sending API calls. Here is how to get started using the AWS CLI.
Step 1: Enable tenant-level suppression for an existing tenant
First, you need to configure the suppression attributes for a specific tenant. In this example, you enable suppression for both bounces and complaints for MyTenant:
A successful request returns an HTTP 200 response with no body. Verify the configuration:
The response includes the suppression configuration:
You can also configure suppression for a single reason type:
Step 2: Create a new tenant with suppression enabled
If you are creating a new tenant, you can enable suppression from the start using the CreateTenant API operation:
The response contains the new tenant’s ID:
Step 3: Verify suppression is working
After configuring a tenant, verify that suppression entries are being recorded correctly. You can list entries on a tenant’s suppression list:
To check if a specific address is on a tenant’s suppression list:
Step 4: Send email with tenant context
When sending email, include the TenantName parameter so that Amazon SES evaluates the correct suppression list:
Step 5: Manually manage suppression entries
You can manually add or remove entries from a tenant’s suppression list. This is useful for pre-loading known bad addresses or removing addresses that have been re-validated.
To add an entry:
To remove an entry:
Advanced: Configuration set overrides for per-workflow suppression control
For scenarios where you need per-workflow suppression control within a tenant, you can override tenant suppression settings at the configuration set level:
You can also update an existing configuration set:
Key considerations
Keep the following points in mind as you implement tenant-level suppression:
- Sandbox restrictions — You cannot call
PutSuppressedDestinationwhile your account is in the Amazon SES sandbox. Request production access first. Note that this restriction only applies to manually adding entries. Automatic suppression from bounces and complaints works in sandbox mode. - Entries persist — Disabling tenant-level suppression does not delete existing entries from the tenant’s suppression list. If you re-enable tenant-level suppression later, those entries are still active.
- Fail-close behavior — If the tenant suppression service is unavailable, Amazon SES suppresses the message rather than allowing it through.
- The “no tenant” fallback — If you enable tenant-level suppression across your architecture but inadvertently miss updating a legacy microservice, any
SendEmailcall made without aTenantNameparameter automatically falls back to evaluating your shared account-level suppression list. - Migration strategy — We recommend a phased migration. Start by configuring tenant-level suppression for new tenants or low-volume tenants first. Monitor their isolated lists using the
ListSuppressedDestinationsAPI before updating theSendEmailcalls for your highest-volume legacy tenants.
Check the Amazon SES Developer Guide for the latest supported actions and service quotas.
Disabling tenant-level suppression
If you need to return a tenant to account-level suppression, you have two options:
Option 1: Explicitly set the scope to ACCOUNT:
Option 2: Clear all suppression settings:
When you omit both --suppression-scope and --suppressed-reasons, Amazon SES clears the tenant’s suppression settings, and the tenant falls back to account-level suppression behavior.
Cleaning up
If you followed along with this walkthrough and want to remove the resources you created, take the following steps:
Important: Disabling tenant-level suppression does not delete existing suppression entries. If you plan to re-enable this feature later, be aware that previously suppressed addresses remain on the tenant’s list.
- Clear tenant suppression settings (returns the tenant to account-level behavior):
- If you created a test tenant, delete it:
- If you created a configuration set for testing, delete it:
FAQ
Q: Does tenant-level suppression replace account-level suppression?
A: No. Account-level suppression continues to work unchanged. Tenant-level suppression is opt-in. You enable it per tenant by setting the suppression scope to TENANT. Tenants without this configuration continue using the account-level suppression list.
Q: What happens if I send an email without a TenantName parameter after enabling tenant-level suppression?
A: The email falls back to account-level suppression evaluation. Amazon SES only checks a tenant’s isolated suppression list when the SendEmail call includes the TenantName parameter and that tenant has SuppressionScope set to TENANT.
Q: Are existing suppression entries deleted when I disable tenant-level suppression for a tenant?
A: No. Entries persist on the tenant’s suppression list. If you re-enable tenant-level suppression later, those entries become active again. To remove entries, you must explicitly call DeleteSuppressedDestination for each address.
Q: Can a single email address appear on both the account-level and a tenant-level suppression list?
A: Yes. The same address can exist on multiple lists. However, Amazon SES only checks the list that the resolved scope points to. If the scope is TENANT, only the tenant’s list is evaluated. The account-level list is not consulted.
Q: Does tenant-level suppression work in the Amazon SES sandbox?
A: Automatic suppression recording (from bounces and complaints) works in sandbox mode. However, you cannot manually add entries using PutSuppressedDestination until you request production access.
Q: How do I migrate from separate Amazon SES accounts per tenant to a single account with tenant-level suppression?
A: We recommend a phased approach: (1) Create tenants in your consolidated account, (2) Enable tenant-level suppression for each, (3) Export suppression entries from the old accounts using ListSuppressedDestinations, (4) Import them into the new tenant lists using PutSuppressedDestination, (5) Update your sending logic to include TenantName in all SendEmail calls.
Q: What is the maximum number of entries on a tenant’s suppression list?
A: Tenant-level suppression lists follow the same limits as account-level suppression lists. Check the Amazon SES quotas page for current limits.
Conclusion
Tenant-level suppression lists give ISVs, SaaS platforms, and large enterprises the granular control they need to manage email deliverability fairly and effectively. No more shared suppression lists causing cross-tenant contamination, and no more tenants losing access to valid recipients because of a neighbor’s email hygiene problems. Each tenant now owns their reputation data independently.
To get started:
- Using tenant-level suppression lists in Amazon SES.
PutTenantSuppressionAttributesAPI reference.- Using the Amazon SES account-level suppression list.
You can also configure and manage tenant-level suppression directly from the Amazon SES console.
If you have questions or feedback, reach out to us on AWS re:Post or through your AWS account team. We look forward to hearing how you are using tenant-level suppression to improve your multi-tenant email platform.
Related posts
- Implement Tenants in your Amazon SES environment, Part 3: Implementation guide.
- Improve email deliverability with tenant management in Amazon SES.
- Improving email deliverability with new Virtual Deliverability Manager features.