Migration & Modernization
Enabling single sign-on for AWS Transform with Microsoft Entra ID
Enabling single sign-on for AWS Transform with Entra ID ensures that the dozens, sometimes hundreds, of people involved in enterprise migration programs, from application owners and infrastructure engineers to business analysts and program managers, all work inside a single platform. That platform is governed by the same access controls and security policies your organization already enforces, which is essential for running migrations at scale.
AWS Transform is an AI-powered modernization service that provides a unified web experience for planning and executing large-scale migrations, whether you are modernizing mainframe applications, migrating VMware workloads to Amazon Elastic Compute Cloud (Amazon EC2), or moving SQL Server databases to Amazon Aurora. AWS Transform uses your existing corporate identity provider using the OpenID Connect (OIDC) protocol. Once connected, your users sign in with the same credentials they use for email and every other enterprise application, with your existing multi-factor authentication (MFA) policies applied automatically.
This post walks you through the complete configuration for Microsoft Entra ID. You will register an application in Entra ID, enable AWS Transform with your organization’s identity provider, and verify that a test user can sign in successfully.
Figure 1 shows the AWS Transform console home page after sign-in.
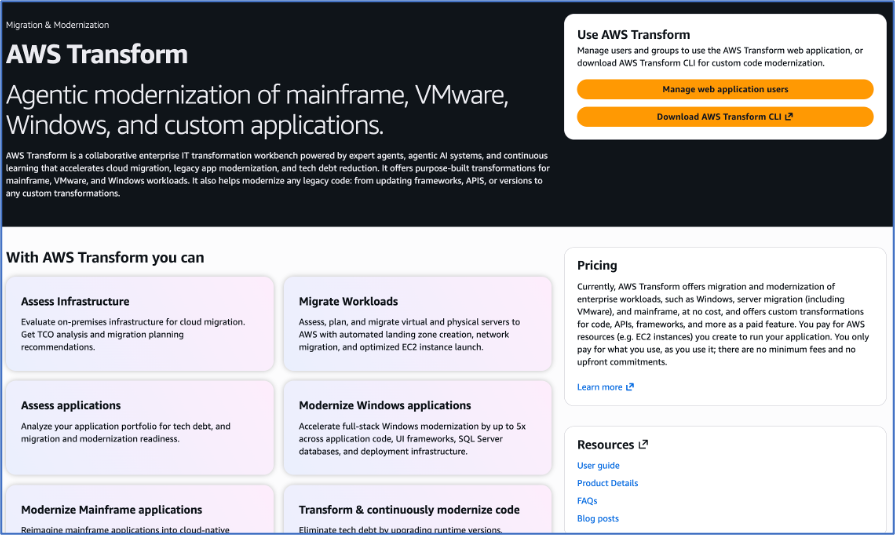
Figure 1 – AWS Transform console home page displaying workspace navigation after SSO Authentication.
Solution overview
When you configure single sign-on for AWS Transform, you establish trust between your corporate identity provider and AWS Transform using the OpenID Connect (OIDC) protocol. The authentication flow works as follows:
- A user navigates to the AWS Transform web application URL.
- AWS Transform redirects the user to your identity provider’s sign-in page.
- The user authenticates with their corporate credentials (including any multi-factor authentication your organization requires).
- The identity provider issues an authorization code and redirects the user back to AWS Transform.
- AWS Transform exchanges the authorization code for an ID token and an access token by calling the identity provider’s token endpoint.
- AWS Transform validates the tokens, extracts the user’s identity, and grants access.
To make this flow work, you configure three things in your identity provider: an application registration that identifies AWS Transform as a trusted client, an OAuth 2.0 scope (transform:read_write) that governs what the token authorizes, and a redirect URI that tells the identity provider where to send the user after authentication. On the AWS side, you provide your identity provider’s credentials (client ID, client secret, and issuer URL) so AWS Transform knows where to send users and how to validate their tokens.
Prerequisites
Before you start, confirm that you have the following:
- An AWS account with administrator access.
- AWS Transform enabled in your chosen region.
- A Microsoft Entra ID tenant with Application Administrator or Global Administrator privileges.
- Users in your identity provider with display name, email address, and username attributes populated (AWS Transform reads these attributes on first login to populate its user directory).
Important: You choose the identity provider once, when you first enable AWS Transform, and cannot change it after setup completes. If you later need to switch providers, you will need to recreate your AWS Transform profile. Choose your authentication method before proceeding.
How authentication works
Understanding the flow makes the configuration steps easier to follow and troubleshooting easier when something goes wrong. Figure 2 shows the full OIDC authorization code flow for AWS Transform.
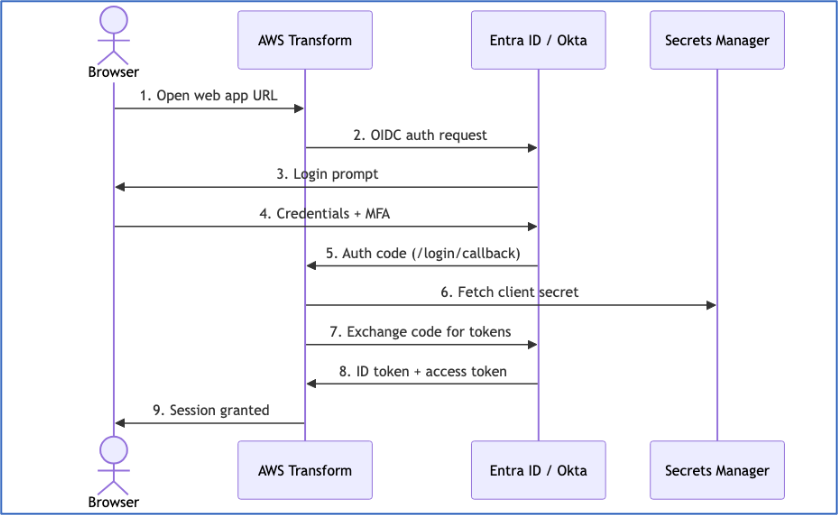
Figure 2 – OIDC authentication flow between the user’s browser, AWS Transform, the identity provider, and AWS Secrets Manager.
When a user lands on the AWS Transform web application URL, the service redirects their browser to the identity provider’s authorization endpoint with an OpenID Connect (OIDC) authorization request that includes the transform:read_write scope. The user authenticates with the IdP (password, MFA, conditional access checks, all enforced by the IdP itself) and the IdP redirects the browser back to the /login/callback URL with a short-lived authorization code.
AWS Transform exchanges code for an ID token and access token by calling the IdP’s token endpoint directly, using the client credentials stored in AWS Secrets Manager. It validates the token, extracts the immutable user identifier, and either creates a new user profile or updates the existing one in its authentication database, encrypted with your chosen KMS key.
The user then enters the Transform web experience with the workspace roles they have been assigned.
Because authentication is fully delegated to the identity provider, your existing conditional access policies, including location restrictions, device compliance checks, and risk-based MFA, apply to AWS Transform logins automatically with no additional configuration required in the Transform console.
Configuring Microsoft Entra ID
Microsoft Entra ID integrates with AWS Transform over OIDC. When a user signs in, Entra issues a v2.0 access token that AWS Transform validates. AWS Transform tracks each user by the oid (object identifier) claim, an immutable value that stays the same even if the user changes their name or email address. This identifier appears in the Entra admin center and in AWS CloudTrail, giving you a consistent audit trail across both systems.
The configuration happens in two environments: the Microsoft Entra admin center, where you register and configure the application, and the AWS Transform console, where you enter the credentials that let the two systems communicate. The redirect URI ties them together, which is why it gets added last, only after AWS Transform has generated the web application URL. As you follow these steps, keep two kinds of permissions distinct. The Application Administrator or Global Administrator role is a tenant-level directory role assigned to the user who performs this setup. The transform:read_write scope you define later under Expose an API is a permission published by the application registration itself.
Step 1: Register the application in Entra ID
Open the Microsoft Entra admin center at entra.microsoft.com and sign in with Application Administrator or Global Administrator privileges. Navigate to App registrations and choose New registration.
- Give the application a descriptive name, for example, AWS-Transform, so you can find it later in your app registry.
- Under Supported account types, select Accounts in this organizational directory only (single tenant).
- Leave the Redirect URI field blank for now. You will return to add it once AWS Transform has generated the callback URL.
- Choose Register. On the Overview page, copy the Application (client) ID and the Directory (tenant) ID.
Figure 3 shows the App registrations overview with the required IDs highlighted.
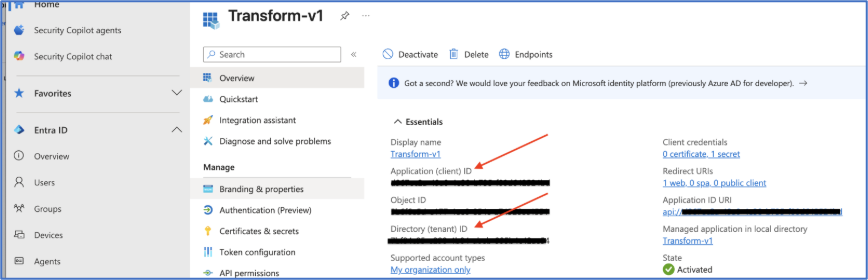
Figure 3 – The Entra admin center App registrations overview page showing the Application (client) ID and Directory (tenant) ID.
Step 2: Set the access token version to v2.0
By default, Entra ID may issue either v1.0 or v2.0 access tokens. AWS Transform requires v2.0. You set this in the application manifest.
- In the app registration navigation pane, choose Manage, then Manifest.
- Find the field
"requestedAccessTokenVersion"and change its value fromnullto2. - Choose Save.
Figure 4 shows the Manifest editor with the token version updated.
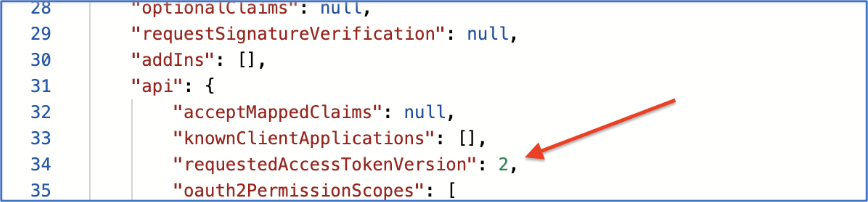
Figure 4 – The Entra admin center Manifest editor with requestedAccessTokenVersion set to 2.
Note: The manifest field is named requestedAccessTokenVersion. Older documentation for other services may refer to this field as accessTokenAcceptedVersion; they are the same setting. For AWS Transform, set the value to 2.
Important: The Issuer URL must end with /v2.0. Some panels in the Entra admin center show the authority URL without this suffix. Using a URL that omits /v2.0 will cause token validation to fail with an invalid issuer error at sign-in.
Step 3: Expose an API and define the required scope
AWS Transform validates that the access token contains a specific OAuth 2.0 scope named transform:read_write. You define this scope on the application under Expose an API.
- In the navigation pane, choose Manage, then Expose an API.
- Choose Add a scope. If prompted to set an Application ID URI first, accept the default (
api://<your-client-id>) and choose Save and continue. - In the scope name field, enter
transform:read_write. - Set Who can consent to Admins and users, provide a display name such as “Access AWS Transform”, and ensure State is Enabled.
- Choose Add scope.
Figure 5 shows the Expose an API page with the transform:read_write scope enabled.
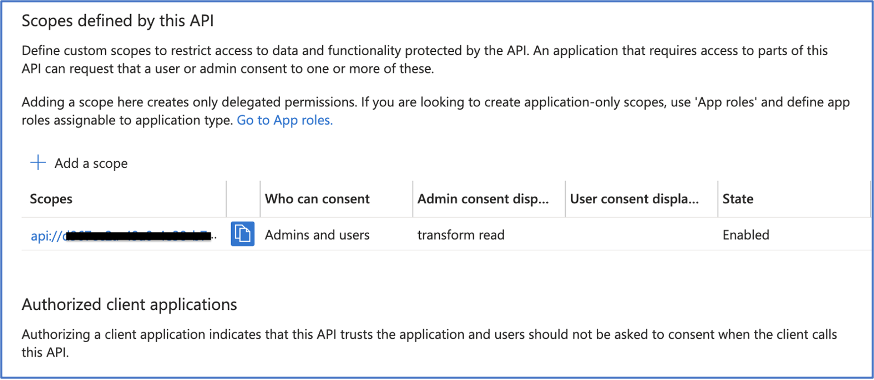
Figure 5 – The Expose an API page showing the transform:read_write scope with status Enabled.
Step 4: Create a client secret
AWS Transform authenticates itself to Entra ID using a client secret. Treat it like a password; copy it once, store it securely, and rotate it on a schedule.
- In the navigation pane, choose Manage, then Certificates & secrets.
- Under Client secrets, choose New client secret. Enter a description and select an expiry period that matches your organization’s key rotation policy.
- Choose Add. Copy the Value column immediately; Microsoft displays this only once and it cannot be retrieved after you navigate away.
Figure 6 shows the Certificates & secrets page with the new client secret Value column highlighted.
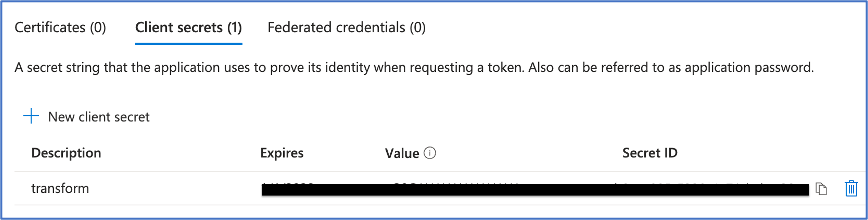
Figure 6 – The Certificates & secrets page immediately after secret creation, with the Value column highlighted.
Important: Copy the Value, not the Secret ID. The Secret ID is a reference identifier; the Value is the actual credential. Storing the wrong one is a common mistake that surfaces only when the first login attempt fails.
Step 5: Find the Issuer URL
The correct Issuer URL for v2.0 tokens follows the pattern https://login.microsoftonline.com/<tenant-id>/v2.0. You can confirm it from the OpenID Connect metadata document.
- From any page in the app registration, choose Endpoints at the top of the screen.
- Copy the URL labeled OpenID Connect metadata document and open it in a browser.
- In the JSON response, locate the
"issuer"field. It will read:https://login.microsoftonline.com/<your-tenant-id>/v2.0 - Copy this value. This is your Issuer URL.
Figure 7 shows the Endpoints panel with the OpenID Connect metadata document URL highlighted.

Figure 7 – The Endpoints panel showing the OpenID Connect metadata document URL highlighted.
With the values collected (Client ID, client secret, and Issuer URL) and the Entra application configured, you are ready to enable AWS Transform and connect the two systems.
Enabling AWS Transform
With the Entra ID application registered and your credentials in hand, navigate to the AWS Management Console to enable the service. Sign in, search for AWS Transform, and choose Get started.
- Select your encryption key preference. The default AWS managed key works for most environments; choose Customize encryption settings to specify your own AWS KMS key.
- Under capabilities, choose Enable web application.
- Under User access, select third-party identity provider.
- Enter the Client ID (Application (client) ID from Step 1), Client Secret (from Step 4), and Issuer URL (from Step 5).
- Choose Enable AWS Transform. The console displays a progress indicator while it provisions the service.
- Once provisioning completes, open the Settings tab and copy the Web application URL. This is the address your users will bookmark to access AWS Transform.
Figure 8 shows the AWS Transform identity provider configuration form with Entra ID credentials entered.
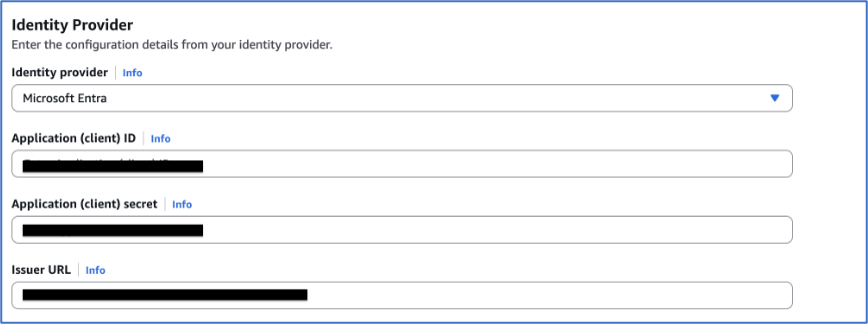
Figure 8 – The AWS Transform identity provider configuration form with Entra ID credentials entered.
Figure 9 shows the AWS Transform Settings tab showing the Web application URL generated after enablement.

Figure 9 – The AWS Transform Settings tab showing the Web application URL generated after enablement.
Note: AWS Transform stores the client secret you provide during setup in AWS Secrets Manager via a Service Linked Secret in your account. User profile data, including display name, email, username, and unique identifier, is encrypted at rest using your chosen KMS key and is only collected the first time each user signs in.
Important: The choice of identity provider is made once, at the time you first enable AWS Transform, and cannot be changed after setup is complete.
Registering the redirect URI in Entra ID
The last step ties the two systems together. AWS Transform’s Web application URL was not available until the service was provisioned, which is why the redirect URI is registered at the end. Return to the Entra admin center to add it now.
- Open your app registration and choose Manage, then Authentication.
- Choose Add a platform and select Web.
- Enter your Web application URL followed by
/login/callback. For example:https://your-transform-url.aws.amazon.com/login/callback - Choose Configure, then Save.
Figure 10 shows the Entra ID Authentication page with the /login/callback redirect URI registered under the Web platform.
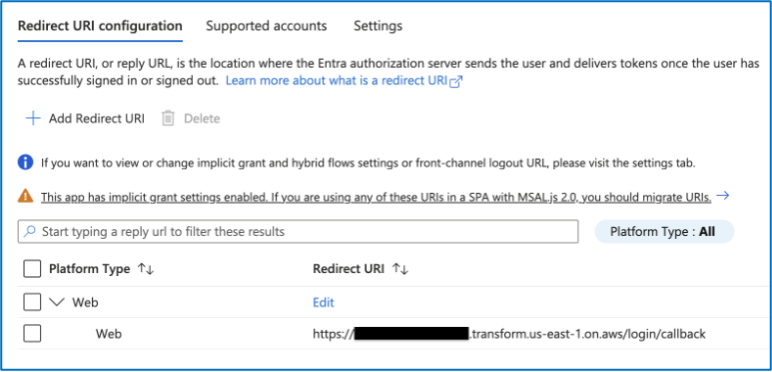
Figure 10 – The Entra ID Authentication page showing the /login/callback redirect URI registered under the Web platform.
That completes the configuration. Your users can now sign in to AWS Transform using their Entra credentials, subject to whatever conditional access and MFA policies you have already configured in your tenant.
Assigning users
When you use a third-party identity provider, user access to AWS Transform is controlled entirely within the IdP, not in the Transform console. The assignment you configure on the OIDC application in Entra ID is the gate that determines who can authenticate.
In the Entra admin center, navigate to the Enterprise applications view for your registered app and choose Users and groups. Assign the users or groups who should have access to AWS Transform. Any user not assigned to the application will be denied at the Entra sign-in screen before reaching Transform.
Once assigned, ask a test user to navigate to the Web application URL. They will see an option to sign in with their Entra ID credentials. After completing authentication, including any MFA challenge enforced by your conditional access policies, they arrive at the AWS Transform welcome experience where they can create a workspace or be added to an existing one by a workspace admin.
User profile information, including display name, email, and username, is stored in AWS Transform’s directory only after a user’s first successful login. A user’s name will not appear in Transform’s workspace invite search until they have completed that first sign-in.
Note: If you also need programmatic or automation-based access alongside your IdP users, you can enable IAM credential access under Settings by toggling Enable IAM access. IAM principals and IdP users can collaborate in the same workspaces, but a user who authenticates both ways appears as two separate identities in AWS Transform and their work is not linked between the two sessions.
Security considerations
Client secrets have expiry dates; when the secret rotates, update both Entra ID and AWS Transform (under Settings) in the same maintenance window to avoid an authentication outage. Using a customer-managed KMS key for the AWS Transform profile gives you direct control over encryption for stored user data and the ability to revoke access at the key level.
Because authentication is fully delegated to Entra ID, any conditional access policies you enforce there, including MFA requirements, device compliance, and location-based access, apply to AWS Transform logins automatically. Revoking a user’s access in Entra, or removing their assignment from the enterprise application, is sufficient to prevent further logins.
All AWS Transform activity is logged in AWS CloudTrail with the user’s Entra oid claim as the caller identity. This means your CloudTrail audit logs and Entra audit logs can be correlated using the same identifier, which simplifies security investigations and compliance reviews.
Troubleshooting
Authentication fails with an invalid redirect URI error. The redirect URI registered in Entra ID must exactly match what AWS Transform sends, including protocol, hostname, path, and no trailing slash. Double-check that you have entered <web-application-url>/login/callback precisely, using the URL from the AWS Transform Settings tab.
Token validation fails with an invalid issuer error. Confirm your Issuer URL ends with /v2.0. The Entra admin center Endpoints panel sometimes shows the authority URL without this suffix; use the issuer field from the OpenID Connect metadata document instead.
Entra ID returns a v1.0 access token. Open the application Manifest and verify that “requestedAccessTokenVersion” is set to 2, not null. A null value causes Entra to fall back to v1.0 tokens, which AWS Transform rejects.
The user authenticates but is denied access to AWS Transform. Verify the user, or a group they belong to, is assigned to the enterprise application in the Entra admin center under Users and groups.
A user’s profile shows an outdated display name or email. AWS Transform stores profile information on first login and does not automatically sync subsequent IdP changes. The user needs to sign in again after updating their Entra profile.
Conclusion
Connecting AWS Transform to Microsoft Entra ID is a one-time configuration that simplifies access for your entire migration program. Your team signs in with credentials they already have, your Entra conditional access policies apply consistently, and your CloudTrail logs carry the same user identifiers as your Entra audit trail.
To get started today, open the AWS Transform console, choose Get started, and follow the prompts to enable the service with Microsoft Entra ID as your identity provider. The full reference is available in the AWS Transform User Guide.
Have questions or want to share your experience configuring SSO for AWS Transform? Let us know in the comments.
Cleaning up
If you followed this walkthrough in a test environment, complete the following steps to remove the resources you created.
Delete the Entra ID app registration
Sign in to the Microsoft Entra admin center at entra.microsoft.com. In the navigation pane, choose Identity, then Applications, then App registrations.
- Select the application you registered for AWS Transform.
- Choose Delete and confirm the deletion when prompted. This also removes the associated client secret and API scope.
Note: Deleted app registrations remain in a soft-delete state for 30 days before permanent deletion. You can restore the registration during this window if needed.
Remove user assignments
In the Entra admin center, choose Identity, then Applications, then Enterprise applications.
- Select the AWS Transform enterprise application.
- Under Users and groups, select the assigned users or groups and choose Remove.
Disable AWS Transform
Sign in to the AWS Management Console and search for AWS Transform.
- Open the service and choose the Settings tab.
- Remove the identity provider configuration (Client ID, Client Secret, and Issuer URL) to disable third-party authentication.
Delete the stored client secret
In the AWS Management Console, navigate to AWS Secrets Manager. Locate the secret you created for the Entra ID client secret.
- Choose Actions, then Delete secret.
- Specify a recovery window (minimum 7 days, default 30 days) and confirm.
After completing these steps, confirm that the app registration no longer appears in the Entra admin center and that users can no longer authenticate to the AWS Transform web application URL.
For production environments, coordinate with your identity team before removing app registrations, as other applications may reference the same Entra ID tenant configuration.
Additional resources
- AWS Transform Console
- AWS Transform User Guide: Setting up AWS Transform
- AWS Transform User Guide: Managing users
- Microsoft Entra ID: Register an application