Microsoft Workloads on AWS
Govern Microsoft workloads using the myApplications dashboard on AWS
In this blog post, I will show you how to use the myApplications dashboard in the AWS Management Console. Using a sample .NET application, I will demonstrate how you can manage costs, monitor, and optimize your Microsoft workloads with this new dashboard.
Introduction
Assume you are a web application owner and it’s your team’s responsibility to report on the application’s security, performance, and cost regularly. With your application’s growing demand, you know that more resources will need to be allocated to manage the application, posing a challenge for oversight. This is where the myApplications dashboard can help.
The myApplications dashboard is a new experience in the AWS Management Console that can help you manage your application efficiently and effectively. It provides an at-a-glance view of important application metrics, such as cost (via AWS Cost Explorer) , performance (via Amazon CloudWatch), and security findings (via AWS Security Hub). It also helps you debug operational issues and optimize your applications, which I’ll show you using AWS Compute Optimizer. You only incur costs for the underlying resources and services you consume, not for the myApplications dashboard.
Solution overview
To demonstrate the myApplications dashboard, I will use a .NET e-commerce sample application, Bob’s Used Books (Figure 1). I will also show how AWS Compute Optimizer can be used in combination with the dashboard to reduce manual efforts in optimizing your application workload cost.
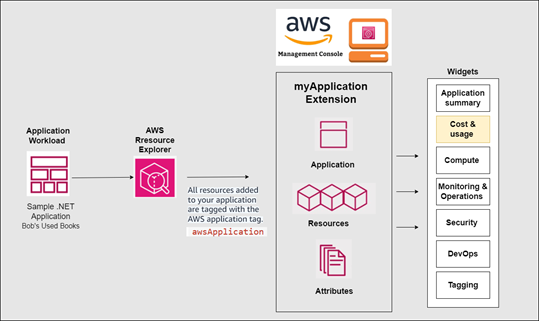
Figure 1 – Solution architecture
You can use myApplications dashboard to handle resource management for any new or existing application stack. I’m just using the .NET sample application for demonstration purposes only.
I encourage you to use your own application for the following walkthrough, but you’re welcome to follow along with my demo by setting up the Bob’s Used Books sample application using this AWS CloudFormation template. To verify successful deployment of the Bob’s Used Books application, navigate to the AWS CloudFormation console, select the deployed stack, and select Outputs. Use the BobsBookstoreALBDNSName value and paste the URL into a web browser
Prerequisites
There are no prerequisites to set up and use the myApplications dashboard but the account or IAM user will need the appropriate permissions to use the myApplication dashboard with the underlying mentioned application dashboard services. (Figure 11).
Walkthrough
In this walkthrough, I will use the Bob’s Used Books sample application to show you how to:
- Step 1. Set up an application using the myApplications dashboard
- Step 2. Add existing resources
- Step 3. Manage your application with myApplications
- Step 4. Use myApplications with AWS Compute Optimizer
Step 1. Set up an application using the myApplications dashboard
Sign into the AWS Management Console. In the left sidebar, choose myApplications. On the Applications page, choose Create application (Figure 2).
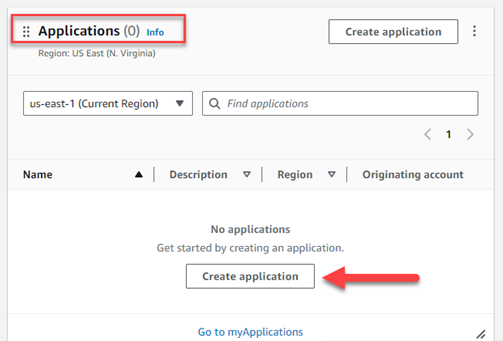
Figure 2 – AWS myApplications dashboard
As shown in Figure 3, specify the application details:
- Application name: Enter a name for your application. e.g., WebApp.
- Application description – optional: Enter the description e.g. This is a Windows web application using IIS webservers owned by the WebApp application team.
- Tags – optional: Add resource tags. Tags are key-value pairs applied to resources to hold metadata about those resources. E.g., AppOwner=WebAppTeam and Environment=Production.
- Attribute groups – optional (not shown): Add attribute groups. You can use attribute groups to store application metadata. I have not added any for this demo.
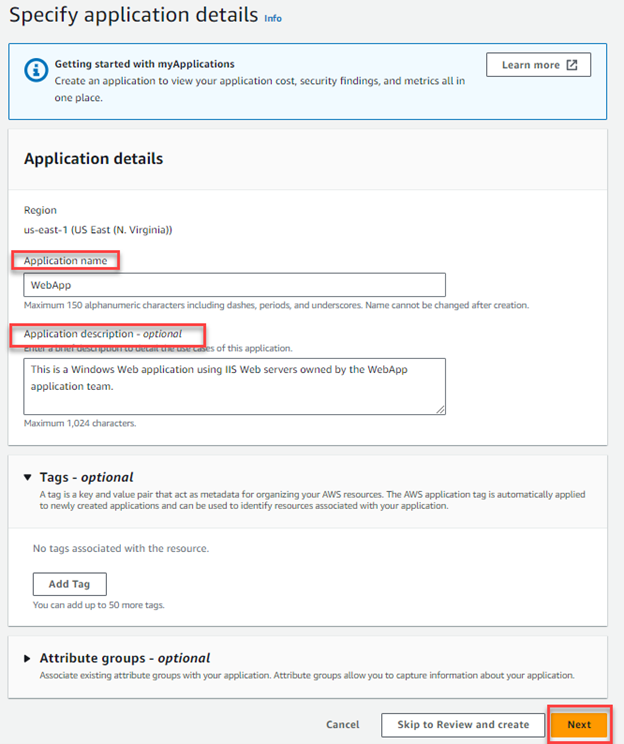
Figure 3 – AWS myApplications dashboard application details
Step 2. Add existing resources.
The myApplication dashboard offers effective resource management for your application resources. Let’s say that you have 1,000 resources in your account belonging to various applications or teams. When creating an application using the dashboard, it’s logical to only add resources that belong to applications you own since you are accountable for their security, performance, and cost.
On the Add existing resources page, you have options. Example, skip this step and move on if you don’t want to add any resources. If you’re considering adding resources, activate AWS Resource Explorer through the setup wizard (Figure 4) if it’s not already activated in your account. This managed capability will simplify the search and discovery of your AWS resources across AWS Regions. Select, Activate Resource Explorer and go to step 2.1. You won’t get the “Resource Explorer Activation warning” if AWS Resource Explorer is already enabled then follow step 2.2 to add appropriate resource.
Step 2.1. Activate AWS Resource Explorer
If you need to activate AWS Resource Explorer, On the Resource Explorer activation page (Figure 4), select the AWS Region that is appropriate for your geographic location and contains an aggregator index and choose Activate.
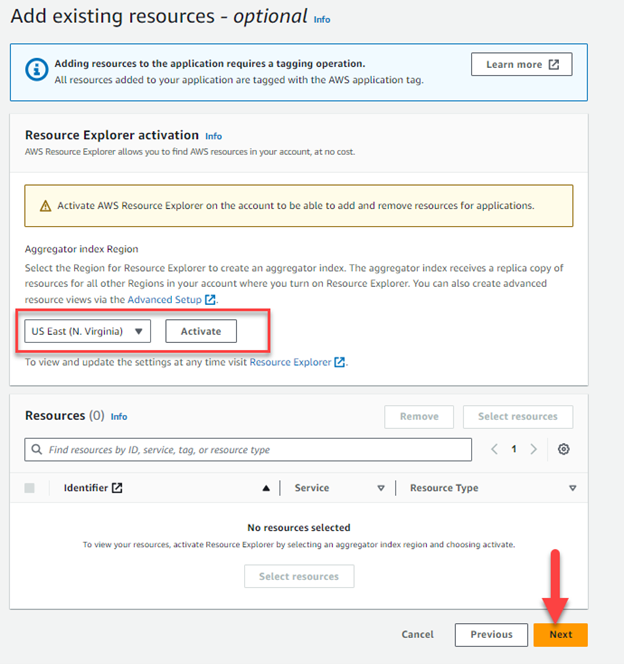
Figure 4 – Activate AWS Resource Explorer
Step 2.2. Add existing resources
Once Resource Explorer is configured, select the resources to add to your applications. You can click Select resources and search by keyword, tag, or AWS CloudFormation stack to integrate groups of resources to manage the full lifecycle of your application and choose Add resources.
In this example, if you want to add resources deployed by a CloudFormation template (such as the supplied sample), you will do it on this page. Select the checkbox next to the CloudFormation stack that was deployed and the related EC2 instances (Figure 5 & 6).
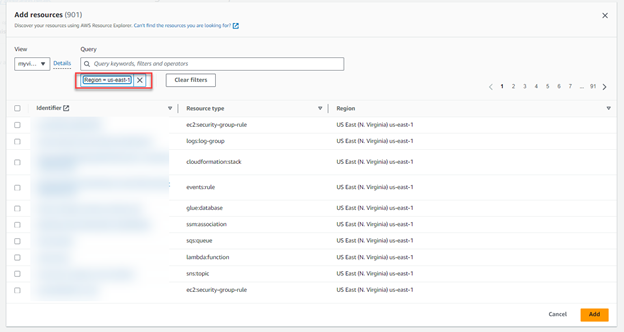
Figure 5 – Select and add resources using AWS Resource Explorer
If you have deployed sample CloudFormation template from this blog, then you must select and add the Amazon EC2 instances explicitly as they were not deployed as part of the CloudFormation stack (Figure 6) and then add CloudFormation template to include other resources (Figure 7)
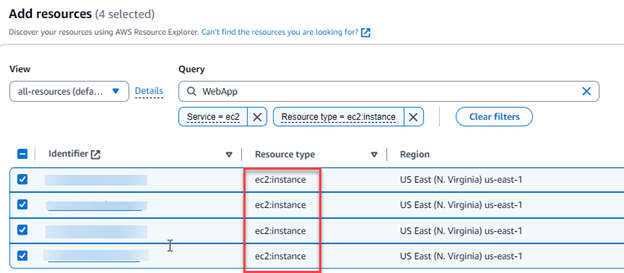
Figure 6 – AWS Resource list to add to your myApplications
Choose Add existing resources(Figure 7)
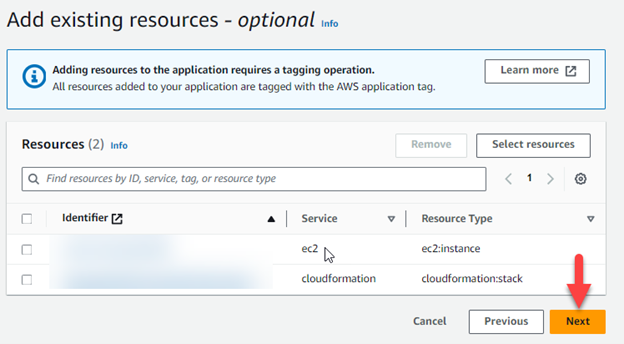
Figure 7 – Adding existing resources using AWS CloudFormation template in myApplications
Choose Next.
Review your choices.
If associating an AWS CloudFormation stack, select the checkbox at the bottom of the page and select Create application (Figure 8).
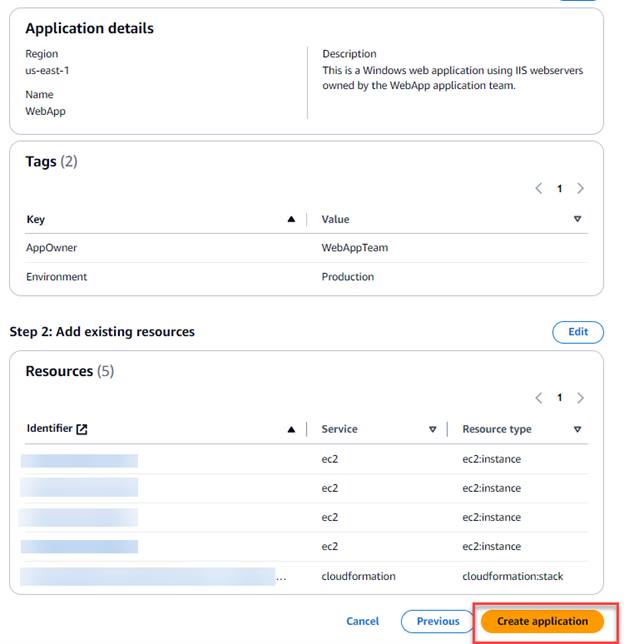
Figure 8 – AWS myApplications review and create configuration
After confirming your resources are added and new awsApplications tags applied, the myApplications dashboard will be generated automatically. You are redirected to the myApplications page at the end of the create workflow.
Step 3. Manage your application with myApplications
Initially, the myApplications dashboard will not display any cost or usage data. You will need to wait up to 24 hours (Figure 9).
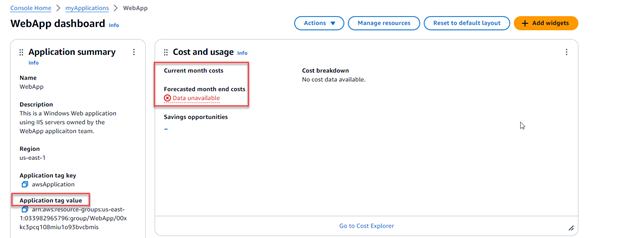
Figure 9 – AWS myApplications initial dashboard
Over time, data populates in myApplications as application resources continue running. The data represents the cost and performance of this application stack over a period of 30+ days. Running the solution over a one-month period, the Cost and usage widget in the myApplications dashboard will provide a cost summary (Figure 10).
This application tag key value will be unique to your application. Any resource you deploy using this tag will be automatically part of your myApplications console.
In the myApplications dashboard, there are Cost and usage, Compute, DevOps, Monitoring and operations, AWS Security, and Tags widgets to manage application resources effectively. With a single action on the applications dashboard setup widget, you can dive deeper to act on specific resources in the relevant services, such as AWS Compute Optimizer to optimize your workload with respect to performance and cost at-a-glance view.
You can view your application-related costs, security, and performance using the myApplications dashboard. Once the data has populated, you will be able to view the total current month’s cost, as well as broken out by the top services. Figure 10 shows example application usage was over a full month for my sample application.
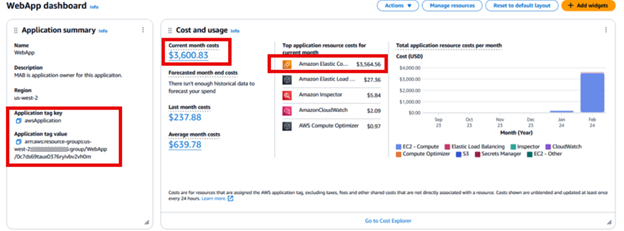
Figure 10 – AWS myApplications dashboard Cost and usage widget before optimization
Step 4. Use myApplications with AWS Compute Optimizer
The myApplications setup widget contains a list of suggested activities that can help configure AWS services for managing your application resources effectively (Figure 11). The myApplications dashboard allows you to manage your application costs with AWS Compute Optimizer.
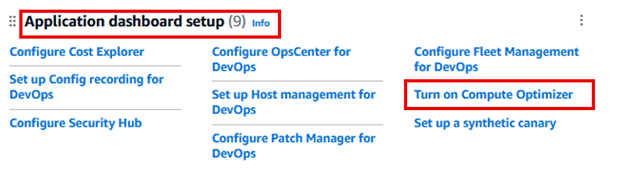
Figure 11 – AWS myApplications dashboard Application dashboard widget
Optimizing your application cost using AWS Compute Optimizer
AWS recommends using AWS Compute Optimizer to identify your application rightsizing opportunities. Here are the steps to get started using it from the myApplications dashboard.
- Turn on AWS Compute Optimizer from the myApplications dashboard setup widget if not already enabled. You can opt-in to the service by following the Getting Started with AWS Compute Optimizer After youopt in, AWS Compute Optimizer analyzes the specifications such as vCPUs, memory, or storage, and the CloudWatch metrics of your running resources from a period over the last 14 days (Default period) up to 93 days.
- Enable Memory metrics collection for more accurate rightsized recommendations using a CloudFormation template. (Optional): For more accurate recommendations, memory metrics supply AWS Compute Optimizer with essential metrics. For AWS Compute Optimizer to utilize operating system level metrics, they must be published to Amazon CloudWatch. You can learn more about enabling memory collection on your instances (Refer Link)
- Consume the recommendations on the AWS Compute Optimizer dashboard : AWS Compute Optimizer will evaluate your application stack based on your optimization preference and provide you recommendations. You can select Amazon EC2 overprovisioned instances for details. AWS Compute Optimizer will make recommendations about EC2 instance type and size based on the data it collects. You can view these in the console or download a CSV export
Savings opportunities for your resources are displayed on the Compute Optimizer dashboard (Figure 12). You can drill down to find the top optimization recommendations for each of your resources listed.

Figure 12 – AWS Compute Optimizer service dashboard (over a period of 30 days)
AWS Compute Optimizer also recommends licensing optimization opportunities for SQL Server workloads on Amazon EC2. Figure 13 shows an example recommendation for SQL Server based on the example application I have deployed. You can find more potential savings related to SQL Server in Reduce Microsoft SQL Server licensing costs with AWS Compute Optimizer. For example, if you aren’t using SQL Enterprise edition features, you can consider downgrading to Microsoft SQL Server Standard or Developer edition per AWS Compute Optimizer recommendation to save on licensing costs.
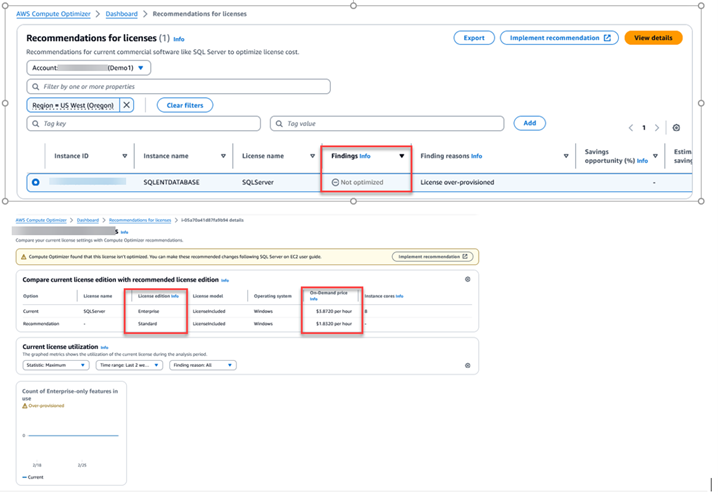
Figure 13 – AWS Compute Optimizer service licensing recommendation details
- Take actions on recommendations provided by the AWS Compute Optimizer : Next, review the instance type recommendations made by the AWS Compute Optimizer tool and make the appropriate changes. In my example, I can modify the web server instance type using the EC2 launch template and Auto scaling group that was deployed, and change the instance type of the SQL Server instance manually. For example, Figure 14 illustrates examples from my workload for optimized EC2 instances. We have changed EC2 instance type for Web servers to t3.medium from t3.2xlarge , and database instance to m7i-flex.2xlarge from r6i.2xlarge instance type as per AWS Compute Optimizer recommendations.
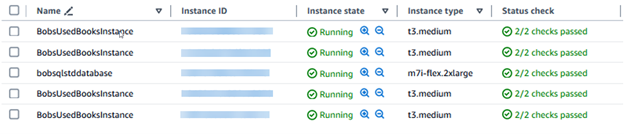
Figure 14 – Optimize AWS EC2 instances as per AWS Compute Optimizer recommendations
- Analyze cost impact after implementation of recommended changes : After successfully rightsizing resources, you can monitor the cost impact using different native AWS services, AWS Cost Explorer, myApplications dashboard, and Cost Optimization Hub. Use AWS Cost Explorer to compare before and after costs and track updated costs in the myApplications dashboard. In my example, five instances were rightsized and resource tags used to track the costs. By employing multiple layers of tags, you can achieve granular visibility of your costs.
Next, compare the myApplications dashboard before and after optimization. In my example, opportunities were discovered that resulted in a 72% cost savings. e.g., before right sizing efforts cost of an EC2 instances were $3564.56 (Figure 10), and after considering AWS Compute optimizer recommendations cost of compute went to $970.87(Figure 15).
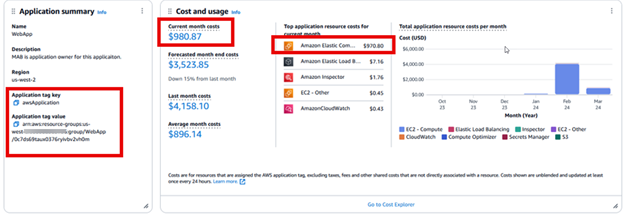
Figure 15 – Optimize AWS EC2 instances AWS myApplications dashboard Cost and usage widget
Additionally, you can monitor cost within Cost Explorer using the awsApplication tag without having to create specific cost allocation tags. You can also monitor cost specific to the Windows platform as well by using the Platform filter (Figure 16).
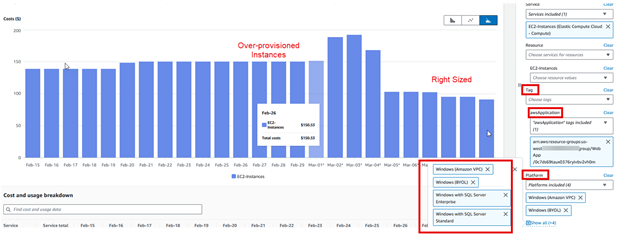
Figure 16 – Optimize AWS EC2 instances cost illustration using AWS Cost Explorer
Cleanup
Deploying sample AWS CloudFormation and manual database instance from this blog will provision AWS resources and incur costs. It is a best practice to delete resources that you are no longer using so that you do not incur unintended charges.
Conclusion
In this blog, I reviewed options to solve the common challenges customers face when managing their application resources. I illustrated how AWS Compute Optimizer can be used in combination with the myApplications dashboard on AWS to reduce the manual efforts to optimize your application workload cost. Similarly, you can use other wizards within the myApplications dashboard to monitor , manage your application resources and take appropriate actions, operate them with less effort, and move faster at scale. The myApplications dashboard provides a summary view of important management metrics from AWS services such as AWS Compute Optimizer, Security Hub, and Cost Explorer. The myApplications dashboard offers a convenient way to onboard your application quickly to AWS and optimize its security, performance and cost with an at-a-glance view.
AWS has significantly more services, and more features within those services, than any other cloud provider, making it faster, easier, and more cost effective to move your existing applications to the cloud and build nearly anything you can imagine. Give your Microsoft applications the infrastructure they need to drive the business outcomes you want. Visit our .NET on AWS and AWS Database blogs for additional guidance and options for your Microsoft workloads. Contact us to start your migration and modernization journey today.