Microsoft Workloads on AWS
Migrate Azure SQL Managed Instance to Amazon RDS for SQL Server with BYOM
Introduction
Migrating SQL Server off Azure SQL Managed Instance usually means paying for licenses you already own. With Bring Your Own Media (BYOM) on Amazon RDS for SQL Server, you can move those databases to a fully managed AWS service and reuse your existing SQL Server licenses instead of paying twice. In this post, you export the database from Azure SQL Managed Instance, transfer the backup to Amazon Simple Storage Service (Amazon S3), deploy an Amazon RDS BYOM instance from the console, restore the database, and validate the result.
With the launch of BYOM on Amazon RDS for SQL Server in June 2026, you can reuse your existing SQL Server licenses (through Microsoft’s License Mobility through Software Assurance benefit) on a fully managed AWS database service, without paying for licensing twice. Running on AWS puts your SQL Server workloads closer to services like Amazon Bedrock and your analytics pipelines, with automated patching, backups, and high availability. With BYOM, you get there while reusing the SQL Server licenses you already own.
Note: For migrations targeting self-managed SQL Server on Amazon Elastic Compute Cloud (Amazon EC2), refer to Migrate SQL Server database from Azure SQL Managed Instance to AWS.
Solution overview
This walkthrough uses a full-backup cutover: you take a COPY_ONLY backup on the source, move it to Amazon S3, and restore it natively on Amazon RDS. Downtime is proportional to database size (backup, plus transfer, plus restore time), so it suits databases that can tolerate a maintenance window.
Out of scope: If you need lower downtime than a full-backup cutover allows, AWS Database Migration Service (AWS DMS) can replicate ongoing changes from Azure SQL Managed Instance using change data capture (CDC). That pattern is out of scope for this post; for details, refer to Using Microsoft Azure SQL Managed Instance as a source for AWS DMS.
The following diagram shows the migration flow (Figure 1).
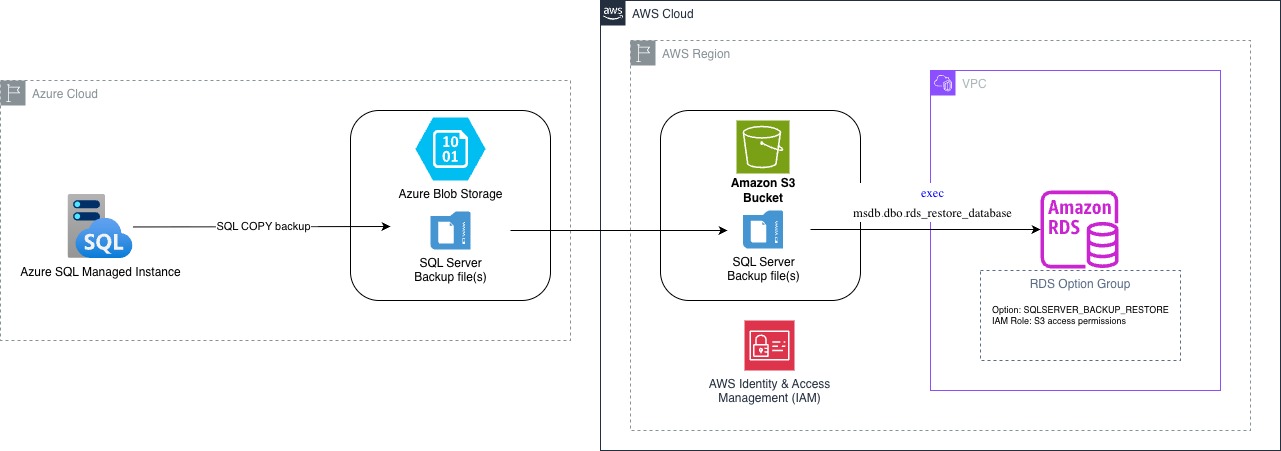
Figure 1: Migration flow from Azure SQL Managed Instance to Amazon RDS for SQL Server with BYOM.
Prerequisites
Before you begin, make sure you have the following:
- SQL Server licenses with active Software Assurance, and eligibility for Microsoft’s License Mobility through Software Assurance benefit confirmed before deployment (allow lead time for any Microsoft verification).
- Your SQL Server Release to Manufacturing (RTM) ISO uploaded to an Amazon S3 bucket. BYOM requires English-language, core-based licensing media, and supports SQL Server 2019, 2022 and 2025 Enterprise, Standard, and Developer editions.
- An Amazon S3 bucket in the same AWS Region you will deploy Amazon RDS into, for the database backup files.
- An Amazon RDS option group that includes the SQLSERVER_BACKUP_RESTORE option, and an AWS Identity and Access Management (IAM) role that grants the instance read access to the backup bucket (and AWS Key Management Service (AWS KMS) decrypt permission if the backup is encrypted). Scope the role and bucket policy to least privilege.
- Access to the source Azure SQL Managed Instance and a target Amazon Virtual Private Cloud (Amazon VPC).
- A management host with a SQL client and network access to both the source and the (private) Amazon RDS endpoint. A common choice is a Windows Amazon EC2 instance in the target Amazon VPC with SQL Server Management Studio (SSMS), azcopy, and the AWS Command Line Interface (AWS CLI) installed. These tools are cross-platform, so Azure Data Studio plus a bastion host, VPN, or AWS Direct Connect from your workstation also works.
Walkthrough
The migration has five steps: export the database, transfer the backup to Amazon S3, deploy the BYOM instance, restore the database, and validate the result.
Step 1: Export the database from Azure SQL Managed Instance
Using SQL Server Management Studio (SSMS) on your management host, connect to your Azure SQL Managed Instance.
Transparent Data Encryption (TDE): Azure SQL Managed Instance enables TDE by default. Because Managed Instance does not let you export the TDE certificate for service-managed keys, the practical path is to disable TDE before the backup, then re-enable it on Amazon RDS after the restore (Step 4):
ALTER DATABASE [Bobs-used-bookstore] SET ENCRYPTION OFF;
-- Wait until decryption completes, then take the COPY_ONLY backup above
GO
Tip: Decryption time is proportional to database size, so plan a maintenance window for large databases.
Then create a credential (using a shared access signature (SAS) token) so the backup can be written to Microsoft Azure Blob Storage and take a COPY_ONLY full backup. For security, the SAS token must grant write permission on the target container, or the backup will fail. Azure SQL Managed Instance only supports user-initiated COPY_ONLY backups.
-- Create a credential for Azure Blob Storage using a SAS token
CREATE CREDENTIAL [https://mystorageaccount.blob.core.windows.net/sqlserverbackups]
WITH IDENTITY = 'SHARED ACCESS SIGNATURE',
SECRET = '<sas-token>';
GO
-- Take a COPY_ONLY full backup to Azure Blob Storage
BACKUP DATABASE [Bobs-used-bookstore]
TO URL = 'https://mystorageaccount.blob.core.windows.net/sqlserverbackups/Bobs-used-bookstore-full-copy.bak'
WITH COPY_ONLY, COMPRESSION, MAXTRANSFERSIZE = 4194304, BLOCKSIZE = 65536;
GO
Tip: MAXTRANSFERSIZE = 4194304 is a common tuning setting. For large backups, also set BLOCKSIZE = 65536, because the default 1 MB block size limits each backup file to approximately 48 GB. Validate your values with a test restore.
For larger databases, stripe the backup across multiple files to improve throughput:
-- Multi-file (striped) COPY_ONLY backup
BACKUP DATABASE [Bobs-used-bookstore]
TO URL = 'https://mystorageaccount.blob.core.windows.net/sqlserverbackups/Bobs-used-bookstore-stripe-1.bak',
   URL = 'https://mystorageaccount.blob.core.windows.net/sqlserverbackups/Bobs-used-bookstore-stripe-2.bak',
   URL = 'https://mystorageaccount.blob.core.windows.net/sqlserverbackups/Bobs-used-bookstore-stripe-3.bak'
WITH COPY_ONLY, COMPRESSION, MAXTRANSFERSIZE = 4194304, BLOCKSIZE = 65536;
GO
Step 2: Transfer the backup to Amazon S3
Move the backup file into the Amazon S3 bucket in the same AWS Region as your target Amazon RDS instance. For a one-time migration, you can use azcopy with the AWS CLI. For production or repeatable transfers, use AWS DataSync, which adds built-in verification and supports copying data from Azure Blob Storage.
# Download the backup from Azure Blob Storage using a read-only SAS token (run on your management host)
azcopy copy "https://mystorageaccount.blob.core.windows.net/sqlserverbackups/Bobs-used-bookstore-full-copy.bak?<sas-token>" "C:\Temp"

# Upload to Amazon S3 (same Region as the target Amazon RDS instance)
aws s3 cp "C:\Temp\Bobs-used-bookstore-full-copy.bak" "s3://my-rds-backup-bucket/Bobs-used-bookstore-full-copy.bak"
# Or upload all files in the folder at once (useful for striped, multi-file backups)
aws s3 cp "C:\Temp\" "s3://my-rds-backup-bucket/" --recursive
Step 3: Deploy Amazon RDS for SQL Server with BYOM
Deploy the BYOM instance from the Amazon RDS console. The console can create the BYOM engine version from your RTM media automatically during instance creation, which adds approximately 20 minutes.
- Open the Amazon RDS console, choose Create database, and choose Microsoft SQL Server.
- Under Engine options, select your edition (Enterprise or Standard) and major version (2019, 2022 or 2025).
- Under License model, choose Bring your own media, then point to your RTM media in Amazon S3. The console creates the BYOM engine version for you (Figure 2).
- Configure the instance class, storage, parameter group, and Multi-AZ. For connectivity, place the instance in private subnets across two Availability Zones in your Amazon VPC. Associate the option group from the prerequisites, and use a security group that allows port 1433 only from your application subnets.
- Choose Create database and wait for the instance status to reach Available.
The following screenshot shows the BYOM license model selection during instance creation (Figure 2).
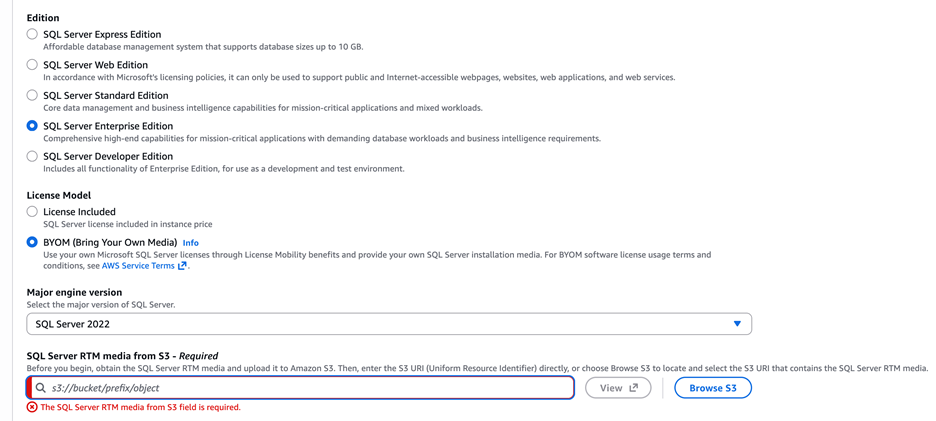
Figure 2: Selecting the Bring your own media license model in the Amazon RDS console.
Step 4: Restore the database on Amazon RDS
Once the instance is available and the backup is in Amazon S3, open SSMS on your management host and connect to the RDS instance using its endpoint on port 1433 with the master username and password you set during creation. Then restore the database using the native restore stored procedure. Use a single-file restore for one backup file, or a wildcard prefix for striped (multi-file) backups, then monitor progress.
-- Single-file restore
exec msdb.dbo.rds_restore_database
    @restore_db_name = 'Bobs-used-bookstore',
    @s3_arn_to_restore_from = 'arn:aws:s3:::my-rds-backup-bucket/Bobs-used-bookstore-full-copy.bak';
-- Multi-file (striped) restore — use a wildcard prefix
exec msdb.dbo.rds_restore_database
@restore_db_name = 'Bobs-used-bookstore',
@s3_arn_to_restore_from = 'arn:aws:s3:::my-rds-backup-bucket/Bobs-used-bookstore-stripe-*';
-- Monitor restore progress
exec msdb.dbo.rds_task_status @db_name = 'Bobs-used-bookstore';
For striped restores, the file names must share a consistent prefix that matches the wildcard, and a single restore supports up to 10 files. If you disabled TDE in Step 1, re-enable it after the restore. Add the TRANSPARENT_DATA_ENCRYPTION option into the DB instance’s option group.
ALTER DATABASE [Bobs-used-bookstore] SET ENCRYPTION ON;Step 5: Validate and cut over
Run an integrity check and confirm the database is online before cutting over your applications.
USE [Bobs-used-bookstore];
DBCC CHECKDB ('Bobs-used-bookstore') WITH NO_INFOMSGS;
DBCC CHECKDB is a baseline integrity check. Before cutover, also review logins and user mappings, recreate any SQL Server Agent jobs (these do not travel with the backup), and validate application connectivity and performance. Then update your application connection strings to the Amazon RDS endpoint. Using a CNAME record that you repoint from the source to the Amazon RDS endpoint keeps application changes minimal, and reducing the DNS time-to-live (TTL) before cutover speeds up the switch.
Cleanup
To avoid ongoing charges, delete the resources you created:
- In the Amazon RDS console, select the BYOM instance, choose Actions, and choose Delete. (Turn off deletion protection first if you enabled it.)
- Delete the backup files and bucket if you no longer need them
- Remove the RTM media from Amazon S3 if it is no longer needed, and delete the BYOM engine version if you do not plan to launch more instances from it.
- If you launched a Windows Amazon EC2 instance as a management host for this migration, stop or terminate it to avoid ongoing compute and storage charges.
Conclusion
In this post, you migrated a SQL Server database from Azure SQL Managed Instance to Amazon RDS for SQL Server with BYOM: you exported a COPY_ONLY backup, transferred it to Amazon S3, deployed a BYOM instance from the console, restored the database, and validated the result. The database now runs on a fully managed AWS service that reuses your existing SQL Server licenses.
To get started, confirm your License Mobility eligibility, upload your RTM media to Amazon S3, and try the walkthrough in a test environment. For a deeper dive on the feature, see the Bring your own media documentation. To track vCPU usage for license compliance across your AWS environment, you can configure AWS License Manager.
Helpful resources: