Microsoft Workloads on AWS
Using AWS Auto Scaling lifecycle hooks and warm pools to effectively handle spikes in demand for Windows Server
In this blog post, I will show you how to use lifecycle hooks and warm pools to prepare your Windows Servers for a scale-out event using Windows native tools. You will be simulating a scale-out event by increasing the minimum capacity of the AWS Auto Scaling group to learn how an instance moves through the Auto Scaling lifecycle stages.
When customers migrate their workloads to the cloud, they want to take advantage of cloud capabilities by deploying a minimal amount of infrastructure and then scale out when demand dictates it. For some workloads, handling the spike in demand in a timely fashion can prove challenging as it takes time to configure new Windows servers and install the required applications. This situation is exacerbated when Windows workloads require domain joins, as this necessitates an extra reboot.
An AWS customer, who was in the midst of a large-scale migration, was trying to determine how to migrate their legacy Windows workloads and take advantage of cloud benefits to reduce costs. Their desire was to take advantage of AWS Auto Scaling, but configuring their new application servers was taking anywhere from 30-45 minutes. With a large number of applications being migrated, it wasn’t practical to manage an Amazon Machine Image (AMI) per application. This customer required a mechanism to scale up in under a few minutes without having to develop custom AMIs or requiring deployment of additional capacity to meet demand spikes. How could this customer achieve agility and reduce the amount of AMI management overhead, but still address spikes in demand in a timely fashion?
Two features of AWS Auto Scaling help solve this challenge: lifecycle hooks and warm pools. These features provide mechanisms to configure and stage instances in a pool fully available for the next scale-out event. By using warm pools to stage servers, AWS customers are able scale out quickly to address peaks in demand.
Solution Overview
The diagram in Figure 1 highlights the stages of a launch event with Auto Scaling lifecycle hooks and warm pools enabled.
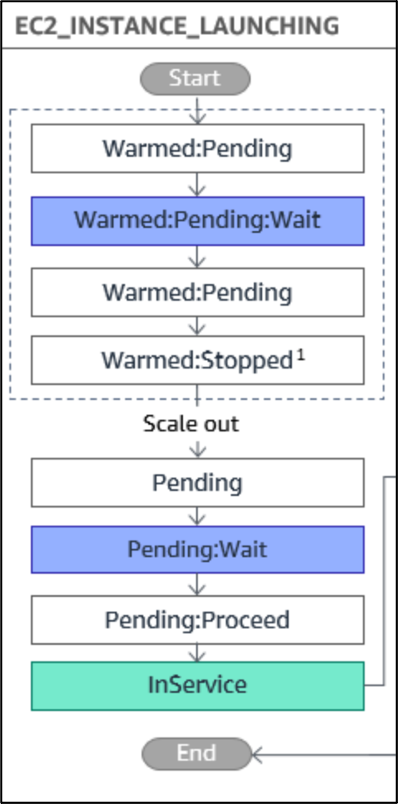
Figure 1 – Lifecycle state transitions.
Upon launch, the instance will proceed through each stage as presented in Figure 2. The instance won’t leave the Warmed:Pending:Wait or Pending:Wait stages until the Auto Scaling group receives a signal to proceed. This signal could come from an AWS Lambda function or a script running on the instance. It is in these “Wait” stages where you can install applications, join Active Directory domains, and validate services.
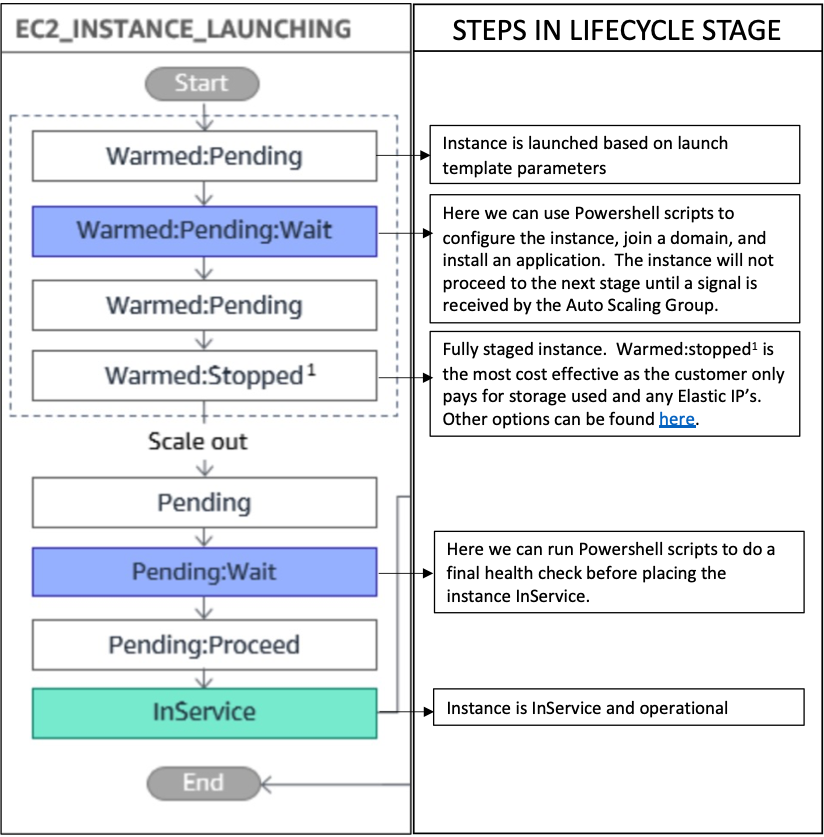
Figure 2 – Scripting steps in each stage
Enabling lifecycle hooks and warm pools
For the purposes of this blog post, you will enable lifecycle hooks and warm pools using an AWS CloudFormation template. The CloudFormation template file enables the Launching Lifecycle Hook within the definition of the Auto Scaling resource as shown in Figure 3. In this example, you will enable the Lifecycle Hook for the launching stages with a timeout of 3,600 seconds and a default action to abandon the launch if the Auto Scaling group doesn’t receive a signal from the instance within the timeout period. While waiting for the signal, the instance remains either in the “Warmed:Pending:Wait” or “Pending:Wait” state depending on where the instance is in the overall lifecycle. Other configuration options can be found in the Auto Scaling User Guide.

Figure 3 – Lifecycle Hook definition
Within the CloudFormation template file, the warm pool resource definition presented in Figure 4 is created and is attached to the Auto Scaling resource. In this example, you will set to a “Warmed:Stopped” state when the instance is in the warm pool, as it is the most cost-effective option. Other configuration options can be found in the Auto Scaling User Guide.
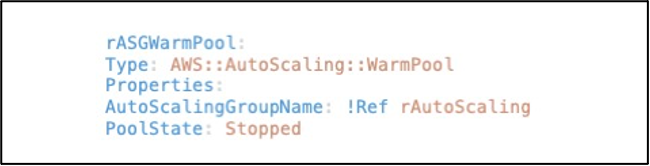
Figure 4 – Warm Pool resource definition
Solution Deployment
Prerequisites
For this walkthrough, you should have the following prerequisites:
- An AWS account
- A VPC with at least two defined subnets. The default VPC can be used for this walkthrough.
- Good understanding of AWS Auto Scaling
- Familiarity with Windows PowerShell and Windows Task Manager
- Download the required files for the deployment simulation by clicking the button below:
![]()
Downloaded files include:
- asgblogs3.yaml
- asgblog.yaml
- Appinstall.ps1
- Lifecyclehook.ps1
- Warmpool.ps1
Deployment Steps
- Have the following information prepared:
- VPC ID – this can be the default VPC
- Subnet IDs (2 subnets will need to be chosen from the selected VPC)
- AMI ID of Microsoft Windows Server 2019 Base for the AWS Region you are deploying to
- <Importbase> – this string will be used as the prefix when creating the Amazon S3 bucket. Use a name that is unique to other Amazon S3 bucket names.
- Deploy Amazon S3 bucket for the application code. Here you will create a S3 bucket to store the scripts and application code using the asgblogs3.yaml file downloaded earlier. Sign into the console and navigate to the CloudFormation service. From the CloudFormation console menu, select Create Stack, with New Resources(standard). Next, select the options as shown in Figure 5. In the parameter section, enter a stack name and the Importbase to use as a prefix for the S3 bucket. The S3 bucket name, when created, will be <Importbase>-s3-blog. Take note of the Importbase as it will be used in step 4. Go through the wizard and accept the default values for the other prompts. After a few minutes, the stack will be created.
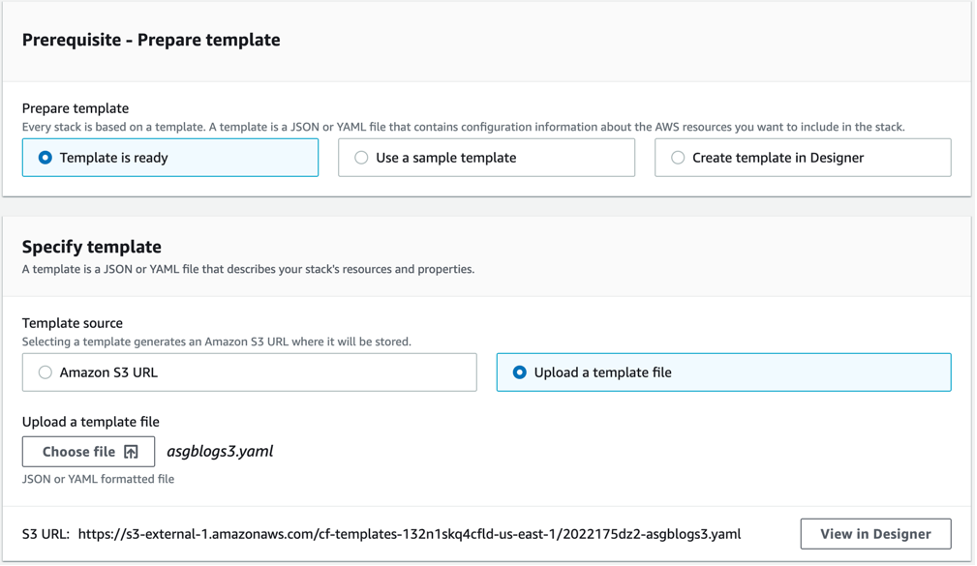
Figure 5 – Amazon S3 Bucket CloudFormation settings
- Upload the application installer and PowerShell scripts into the Amazon S3 bucket. Within the console, navigate to the newly created bucket and upload the files downloaded earlier. The files include:
- Appinstall.ps1– PowerShell script to install the application. This script is called from the Windows Task Scheduler to execute after the instance reboots. The task is created from within the Userdata section of the Launch Template resource within the asgblog.yaml file. This is run in the Warmed:Pending:Wait stage where it downloads and installs the latest version of Wireshark.
- Lifecyclehook.ps1 – PowerShell script to validate that the application has installed correctly. This script is called from the Windows Task Scheduler to execute after the AppInstall task executes. The task is created from within the Userdata section of the Launch Template resource within the asgblog.yaml file. If successful, a signal is sent to the Auto Scaling group to proceed to the next stage of the lifecycle. If not successful, the instance will be abandoned per the Lifecycle Heartbeat Timeout setting. This is run in the Warmed:Pending:Wait stage.
- Warmpool.ps1 – PowerShell script to perform a final check that the instance has everything installed and running prior to putting the instance InService. If successful, a signal is sent to the Auto Scaling group to proceed to the next stage of the lifecycle. This is run while the instance is in the Pending:Wait stage.
- Deploy the Auto Scaling group. Here you will create all of the resources required for the demonstration, including the launch template, Auto Scaling Group, and an AWS Elastic Load Balancer. Sign into the console, and navigate to the CloudFormation service. Click on Create Stack, with New Resources (standard) and select the options as shown in Figure 6. Use the information prepared from Step 1 to enter into the parameter section. Go through the wizard and accept the default values for the other prompts. In the parameter section, enter the Importbase that was used to create the Amazon S3 bucket in Step 2. In the last step of the wizard, acknowledge that CloudFormation may create IAM resources and click Create Stack. After 10-15 minutes, the stack will be created.
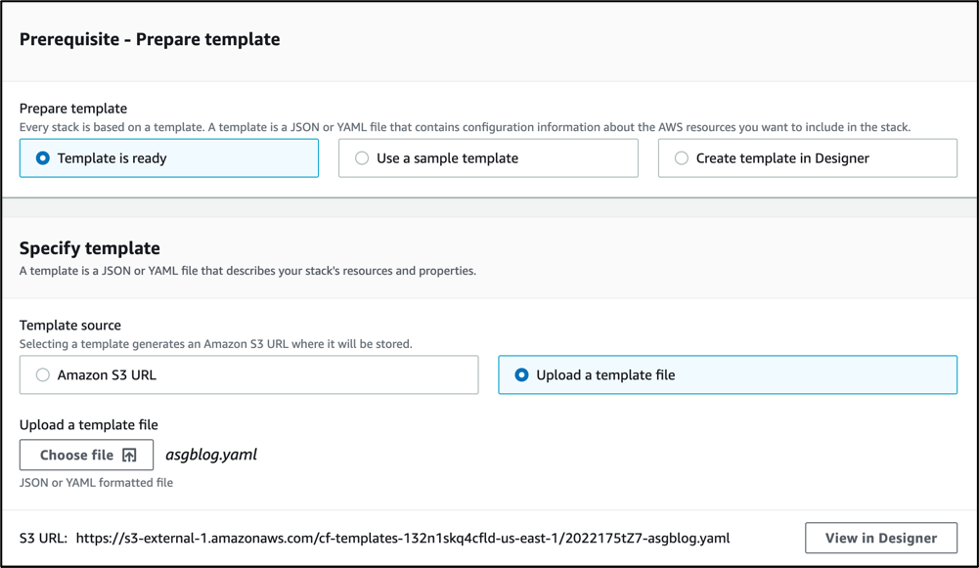
Figure 6 – Autoscaling CloudFormation settings
- Set the Auto Scaling group to the desired capacity: Once the stack deployment has completed, navigate to the EC2 service/Auto Scaling groups. Select the Auto Scaling group created and select Edit. You will see that the CloudFormation script deployed the environment with the Desired, Minimum, and Maximum capacity values set to 0. We will now update the values to observe the launching of instances In-Service and into the warm pool. Set the Desired, Minimum, and Maximum capacity values to the values shown in Figure 7.
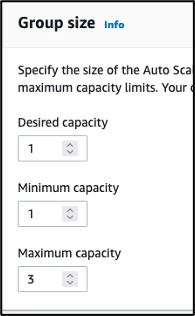
Figure 7 – Set Auto Scaling group size
Scroll to the bottom of the page and click Update.
- Observe instance creation within the Auto Scaling group: As the Auto Scaling group is being updated, within the console, select the Auto Scaling group created and click the Instance Management tab. Here you can see the lifecycle hook and warm pool configurations. Continue to refresh the instances and warm pool instances sections within the Instance Management tab. You will be able to observe them moving from the different lifecycle stages, all driven by the Windows tasks and PowerShell scripts discussed earlier. This may take 5-10 minutes to initialize and move through the different stages.
- Simulate a scale-out event: With one instance “InService” and two in the warm pool, select the Details tab of the Auto Scaling group and click Edit. Set the Desired Capacity to 2 (as shown in Figure 8) and click Update.
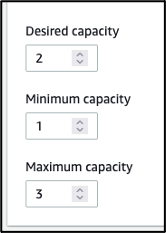
Figure 8 -Increase Desired Capacity
- Observe an instance being pulled from warm pool: Within the Auto Scaling group, click on the Instance Management tab. You will see an instance pulled from the warm pool (note instance ID) and put into InService.
Cleaning up
To avoid incurring future charges, delete the resources by logging into the console and navigating to the CloudFormation service. Click on Stacks and select the Auto Scaling group stack created for this walkthrough. Click Delete. Navigate to the S3 bucket and delete the files uploaded earlier. Next, navigate to Cloudformation, select the stack used to create the S3 bucket and click delete.
Conclusion
As customers migrate their applications to the AWS Cloud, it’s important to realize the benefits and cost benefits of the cloud, even for legacy Windows applications. Customers often want to begin with a minimum amount of infrastructure and then scale application components as demand spikes. For components that make good candidates for AWS Auto Scaling, the use of lifecycle hooks and warm pools along with Windows native tools, such as PowerShell and Windows Task Scheduler, can help organizations realize those savings and cloud benefits.
AWS can help you assess how your company can get the most out of cloud. Join the millions of AWS customers that trust us to migrate and modernize their most important applications in the cloud. To learn more on modernizing Windows Server or SQL Server, visit Windows on AWS. Contact us to start your modernization journey today.