AWS Cloud Operations Blog
Build your own software asset governance platform on AWS
Software Asset Governance or Software Asset Management is a key component of an organization’s cyber security strategy. Different aspects of Software Asset Governance find notable mentions in renowned security frameworks and standards such as SANS CIS Critical Security Controls, NIST Special Publication 800-53, and Cloud Security Alliance’s Cloud Control Matrix. The subject goes beyond cyber-security to encompass license compliance issues as well as IT cost management. A robust Software Asset Governance program starts with an Inventory of (Authorized and Unauthorized) Software.
In this blog post, we walk you through some of AWS services that can be used to build an inventory of software running on AWS EC2 instances. Once the inventory is collected from all accounts into a central location, we build dashboards that help customers visualize security and compliance issues in their environment arising out of the use / abuse cases that we most commonly see in the field.
Overview of the solution
The Software Asset Governance solution presented in this post uses a set of AWS services to identify security and compliance issues arising out of enterprise deployments of server instances. The solution uses a simple account structure where AWS Systems Manager is configured in each child account and pushes the inventory information to a master account as shown below.
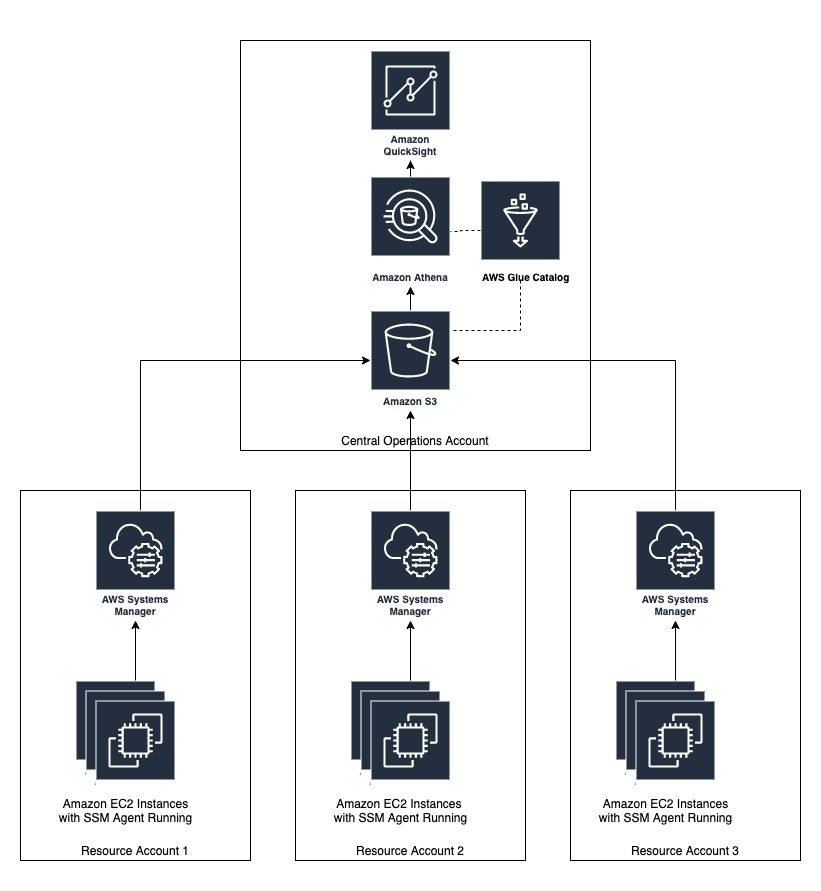
Figure 1: Sample AWS account structure for the setup
For simplicity in this post, four accounts are used for demonstration purposes.
The solution covers the following use / abuse cases, but is generic and can be extended to support other use cases as well.
- Number of instances running an old version of SSM Agent, by account
- Number of instances that don’t have mandatory applications installed, by account
- Number of instances that have mandatory application installed but that are not in a running state, by account
- Number of instances that have blacklisted applications (such as Nmap) installed, by account
- Total number of application instances, by account
- Top three accounts with the most occurrences of issues 1-4 above
Prerequisites and assumptions
- This post assumes that you are familiar with the following AWS services used in the solution:
-
- AWS System Manager – to collect the details around software installations on Amazon EC2 instances.
- AWS S3 – to store the collected inventory information in a centralized manner.
- AWS Glue – to discover the inventory data and store the associated metadata (e.g. table definition and schema) in the AWS Glue Data Catalog.
- Amazon Athena – to query the inventory data stored in Amazon S3 using standard SQL.
- Amazon QuickSight – to create dashboards and provide visualization of below mentioned use cases.
- To demonstrate the power of the platform, we have used two AWS accounts in this post: a Central Operations account and 3 Resource accounts. However, the concept can be extended to large number of resource account scenarios.
- Central Operations account – account with an Amazon S3 bucket where inventory would be stored and analyzed using AWS services such as AWS Glue, Amazon Athena. and Amazon QuickSight.
- Resource account – account where the Amazon EC2 instances from which software inventory needs to be governed are running.
Please note that you can also use a single account to conduct a proof-of-concept following the same steps.
- Amazon EC2 instances for collecting and analyzing inventory information.
- IAM access to create / modify AWS resources such as Amazon S3 bucket, IAM roles and policies, AWS Systems Manager, etc.
- AWS Systems Manager Inventory collection works for instances configured as managed instances. Refer to AWS Systems Manager Managed Instances and Systems Manager Prerequisites for configuring Amazon EC2 instances or on-premises machines in a hybrid environment as managed instances. The AWS IAM role attached to Amazon EC2 instances would need access to Amazon S3 bucket where inventory data will be stored.
- For this solution to work, the managed instances require connectivity to the AWS Systems Manager APIs and Amazon S3 APIs. This can be achieved using an internet gateway attached to your Amazon VPC and a NAT gateway (for instances in a private subnet). You can also use A VPC Endpoint. A VPC endpoint enables you to privately connect your VPC to supported AWS services and VPC endpoint services powered by AWS PrivateLink without requiring an Internet gateway, NAT device, VPN connection, or AWS Direct Connect connection.
- This post assumes that you are setting up the environment as part of the following walkthrough in a fresh AWS account. If you have already set up centralized inventory collection using AWS Systems Manager and Amazon S3, you can skip to Step 4.
Walkthrough
Step 1 – Create an Amazon S3 bucket in the ‘Central Operations’ account
Create a centralized Amazon S3 bucket in the ‘Central Operations’ account to allow AWS Systems Manager to store software inventory data. Please refer to Security Best Practices for Amazon S3 to protect the software inventory data stored in this bucket.
For demonstration purposes, we have created the Amazon S3 buckets in the same region as the managed Amazon EC2 instances. If you have Amazon EC2 managed instances in multiple regions, you can create a bucket in each respective region. You can use Amazon S3 the cross-region replication feature to pull all data into a central Amazon S3 bucket in the same region where you are setting up the Glue, Athena, and QuickSight resources.
Step 2 – Configure bucket policy on the Amazon S3 bucket
Configure the following bucket policy on the Amazon S3 bucket created in Step 1. The bucket policy will allow cross-account storage and analysis of software inventory data.
{
    "Version": "2012-10-17",
    "Statement": [
        {
            "Sid": "SSMBucketPermissionsCheck",
            "Effect": "Allow",
            "Principal": {
                "Service": "ssm.amazonaws.com"
            },
            "Action": "s3:GetBucketAcl",
            "Resource": "arn:aws:s3:::<your bucket name>"
        },
        {
            "Sid": "quicksight",
            "Effect": "Allow",
            "Principal": {
                "Service": [
                    "glue.amazonaws.com",
                    "quicksight.amazonaws.com",
                    "athena.amazonaws.com"
                ]
            },
            "Action": [
                "s3:Get*",
                "s3:List*"
            ],
            "Resource": [
                "arn:aws:s3:::<your bucket name>/*",
                "arn:aws:s3:::<your bucket name>"
            ]
        },
        {
            "Sid": " SSMBucketDelivery",
            "Effect": "Allow",
            "Principal": {
                "Service": "ssm.amazonaws.com"
            },
            "Action": "s3:PutObject",
            "Resource": [
                "arn:aws:s3:::<your bucket name>/<bucket prefix>/*/accountid=<account XXX>/*",
                "arn:aws:s3:::<your bucket name>/<bucket prefix>/*/accountid=<account XXX>/*"
            ],
            "Condition": {
                "StringEquals": {
                    "s3:x-amz-acl": "bucket-owner-full-control"
                }
            }
        }
    ]
}
Replace:
- <your bucket name> – with the name of the Amazon S3 bucket created in Step 1.
- <bucket prefix> – this is optional. If you specify it, then , then specify the same bucket prefix as in step 3.2.
- <account XXX> – 12-digit AWS account number for Resource account(s). Add one line for each account to be governed.
Step 3 – Configure AWS System Manager inventory
Configure AWS System Manager to start collecting the software inventory and store in designated Amazon S3 bucket.
In each of the ‘Resource’ account(s), execute the following steps to set up AWS Systems Manager to collect the inventory information from all Systems Manager managed instances, and use AWS Systems Manager Resource Data Sync to send inventory data collected from managed instances to the Amazon S3 bucket created in Step 1. Please make sure that you are logged in to the same region where the S3 bucket is created.
Step 3.1 – Configure inventory collection
Configure inventory collection in the AWS Systems Manager section of the AWS Management Console.
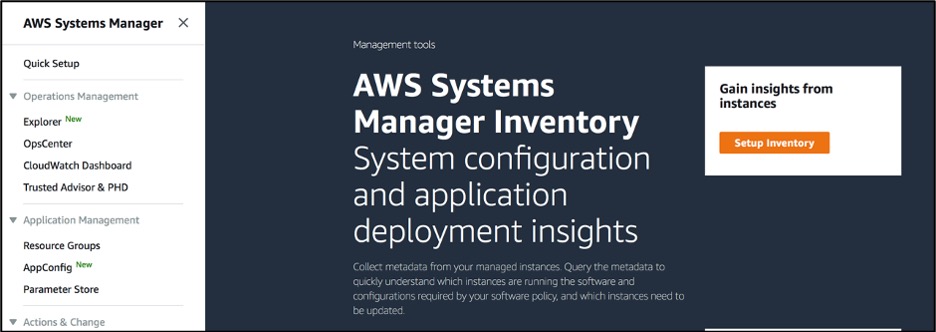
Figure 2: Setup System Manager Inventory
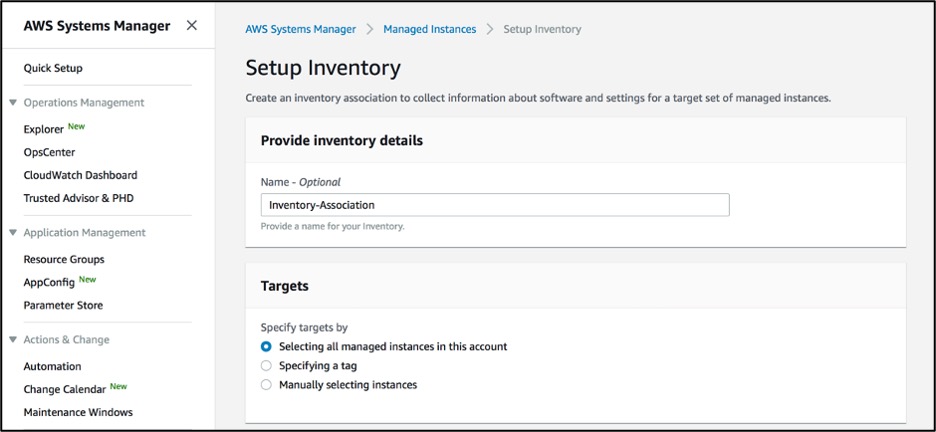
Figure 3: System Manager Inventory configuration
We have configured Systems Manager to collect inventory from all managed instances in the AWS account. You have can select instances individually, or select a group of instances by using Amazon EC2 tags.
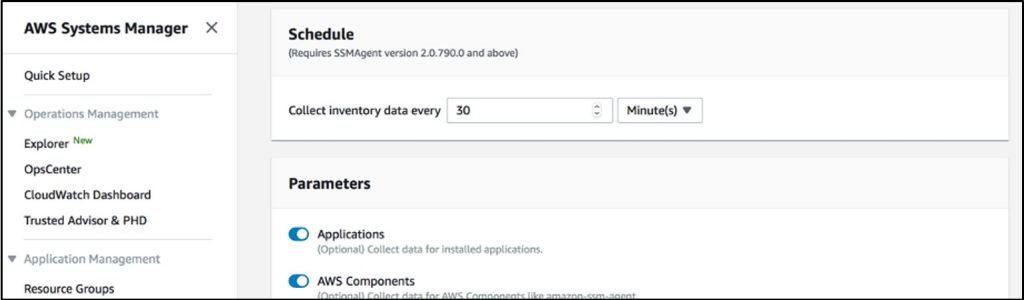
Figure 4: System Manager Inventory configuration schedule
We have configured inventory collection every 30 minutes. You can specify any collection interval in terms of minutes, hours, and days.
Step 3.2 – Configure resource data synchronization
Configure ‘Resource Data Syncs’ in the AWS System Manager section of AWS Management Console. This configuration will start pushing inventory information to the centralized Amazon S3 bucket created in Step 1.
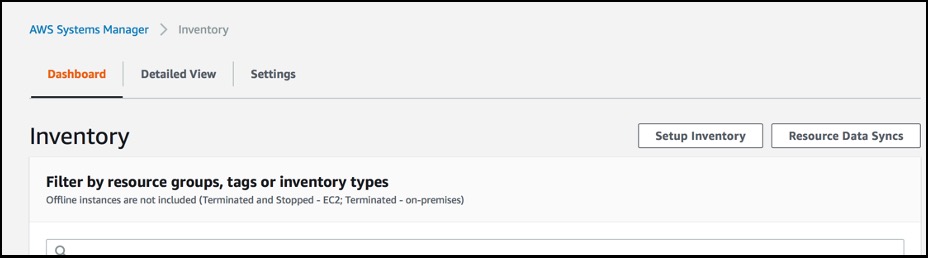
Figure 5: System Manager Inventory configuration list
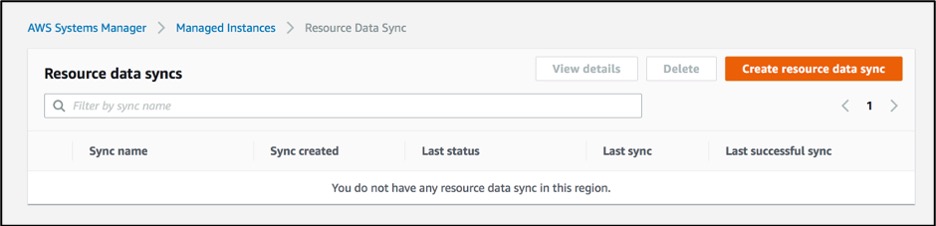
Figure 6: System Manager Resource data syncs
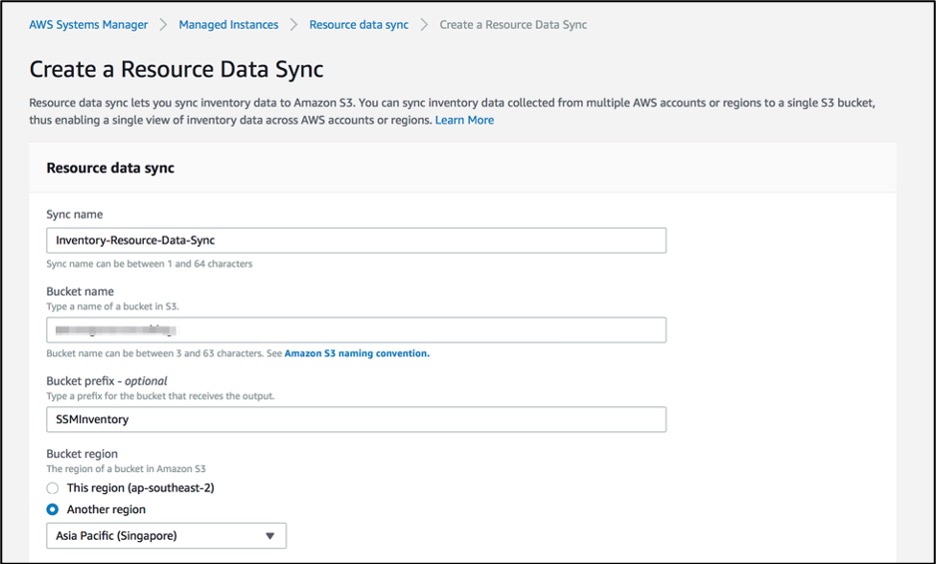
Figure 7: Create System Manager Resource data syncs
Provide the Amazon S3 bucket name created in step 1.
Step 4 – Setup AWS Glue crawler
Set up the AWS Glue crawler to create databases and tables (schema) to be able to query in Athena.
All the following steps need to be performed in the ‘Central Operations Account.’
Amazon Athena is an interactive query service that makes it easy to analyze data directly from Amazon S3 using standard SQL. Athena is serverless, so there is no infrastructure to set up or manage before you can start analyzing your data. Once the data is in S3 you can use Athena to query your data and analyze the results. This lets you load it into Amazon QuickSight for additional visualization.
When using Athena with the AWS Glue Data catalog, you can use AWS Glue crawler to create databases and tables (schema).
Step 4.1 – Add crawler
Go to the AWS Glue console and select Crawlers. Select Add crawler.
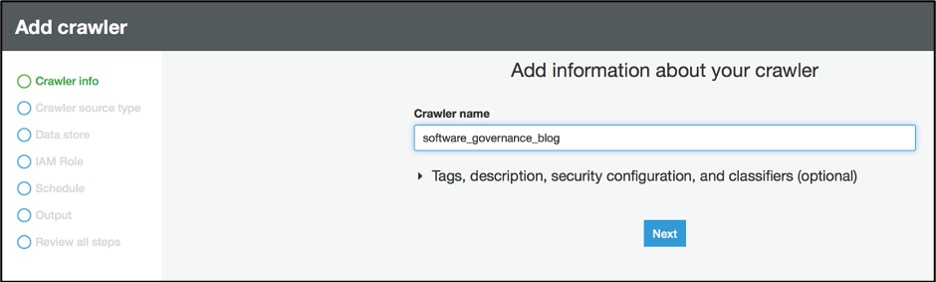
Figure 8: Add AWS Glue crawler info
Step 4.2 – Select source type
Select ‘Data stores’ as crawler source type.
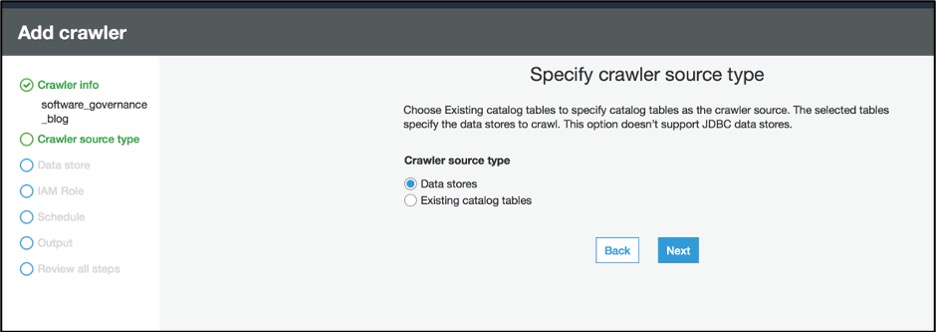
Figure 9: Add AWS Glue crawler source type
Step 4.3 – Configure path for data store
Under ‘Choose a data store’, select S3 and provide S3 bucket (created in Step 1) path in the ‘Include path’ field.
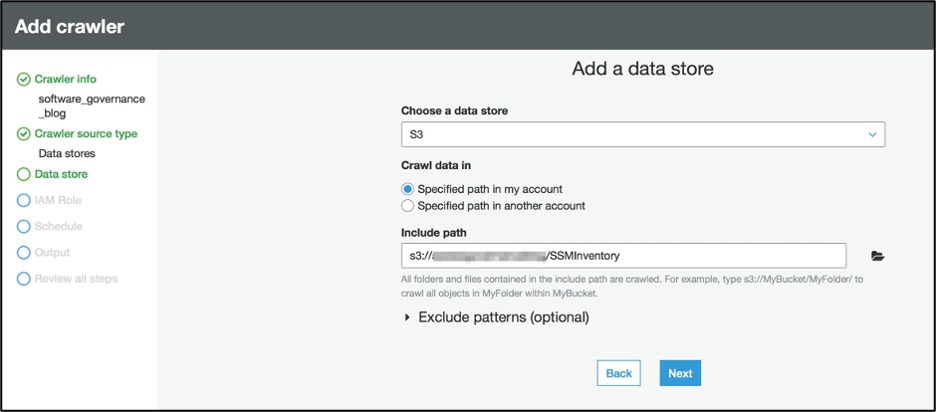
Figure 10: Add AWS Glue data store
Step 4.4 – Specify AWS IAM role
Create ‘IAM role’ to allow the crawler to run and access your Amazon S3 data stores.
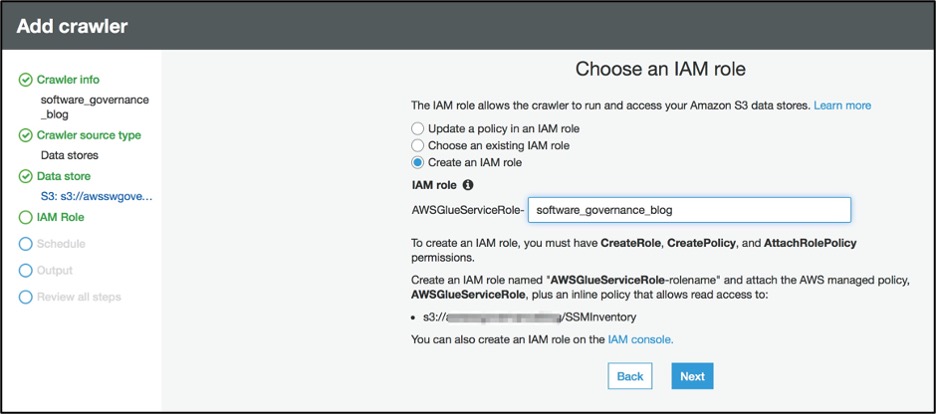
Figure 11: Specify AWS IAM role for AWS Glue
Step 4.5 – Configure schedule
For the ‘Schedule’, select ‘Run on demand’ as ‘Frequency’.
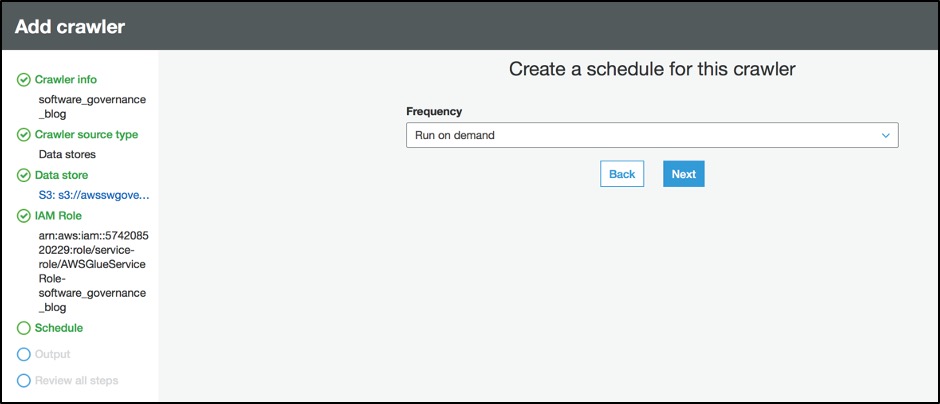
Figure 12: Create a schedule for the AWS Glue crawler
Step 4.6 – Configure output
Configure the crawler’s output.
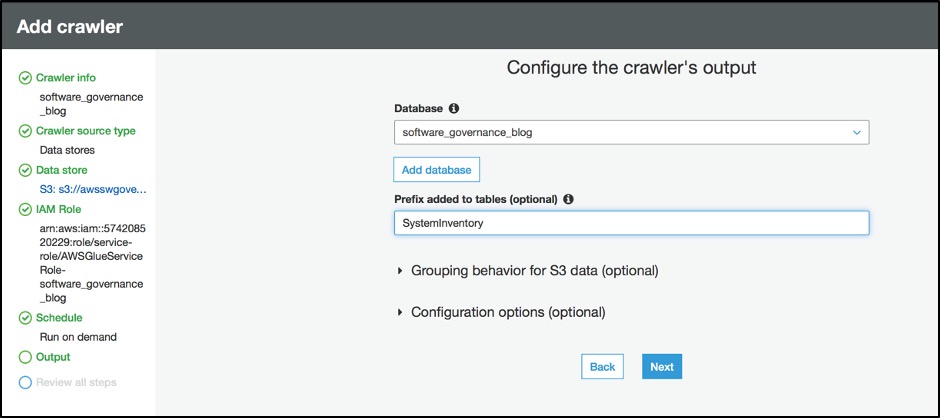
Figure 13: Configure ouput for AWS Glue crawler
Replace <your-database-name> and <your-table-name> with the appropriate values for your environment.
Click Next to “Review all steps” and click Finish to create crawler.
Step 5 – Run crawler
From the list of crawlers, select the crawler created in the previous step and click ‘Run crawler’ button.
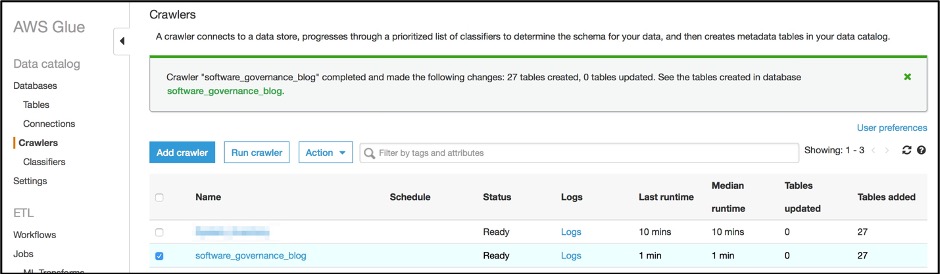
Figure 14: Verify AWS Glue crawler list
This will create a database and tables for the information stored in the Amazon S3 bucket which can be queried using the Amazon Athena.
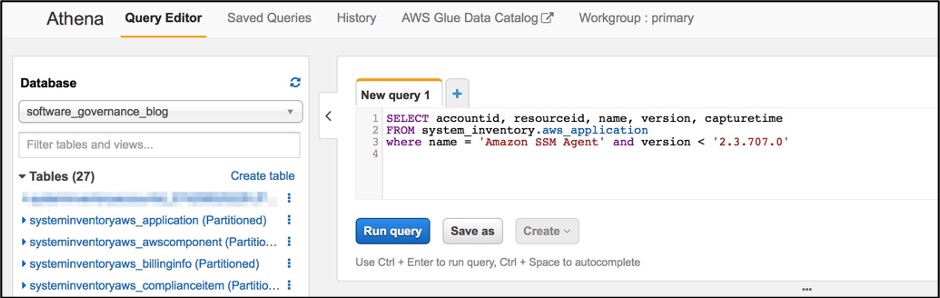
Figure 15: Verify the tables created in Amazon Athena console
Step 6 – Run sample queries
In the Athena console, create a new Query tab and try the queries shown below, which are sample queries reflecting common governance use cases. You can write more queries as needed for your organization-specific use cases.
Query 1. Number of instances running an old SSM agent version by account
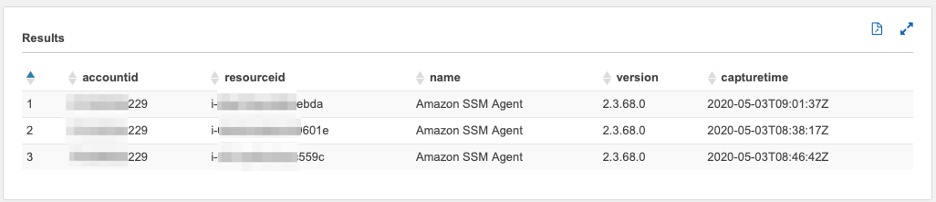
Figure 16: Amazon Athena query 1 output
Query 2. List of instances sorted by account that don’t have mandatory applications (such as Amazon CloudWatch agent) installed
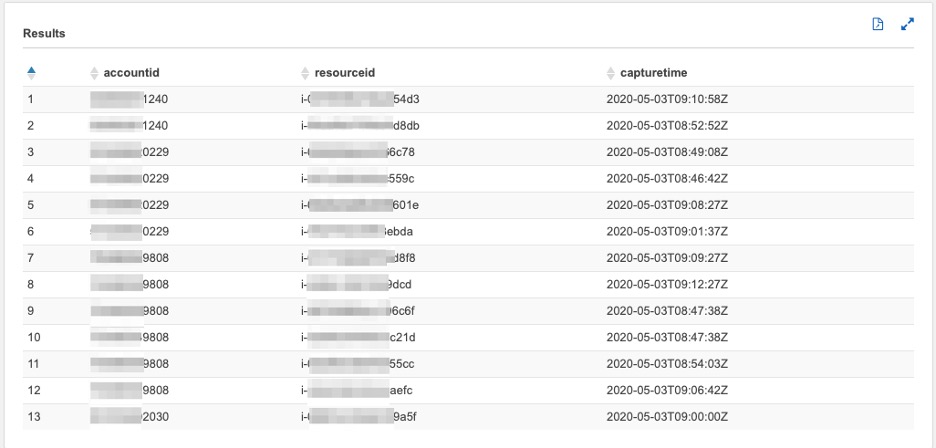
Figure 17: Amazon Athena query 2 output
Query 3. List of instances by account that have a mandatory application installed but are not in a running state
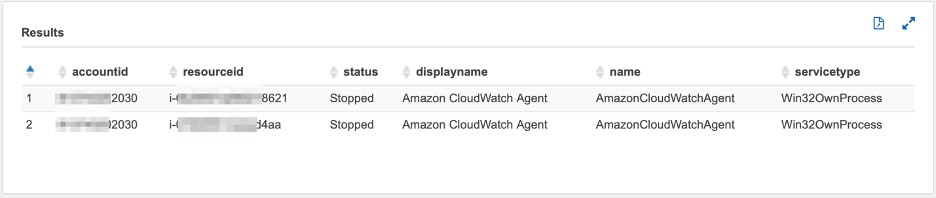
Figure 18: Amazon Athena query 3 output
Query 4. List of instances by account that have prohibited applications installed (such as the Nmap, Torrent client) installed
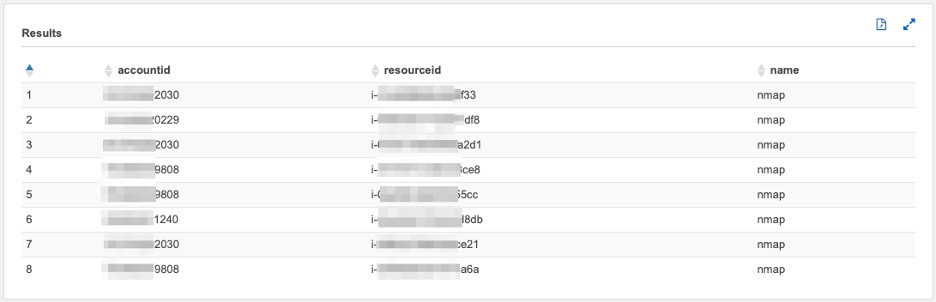
Figure 19: Amazon Athena query 4 output
Query 5. Total number of application instances by accounts (here AWS CLI is used as an example. You can tailor the query for the specific software you are interested in governing)
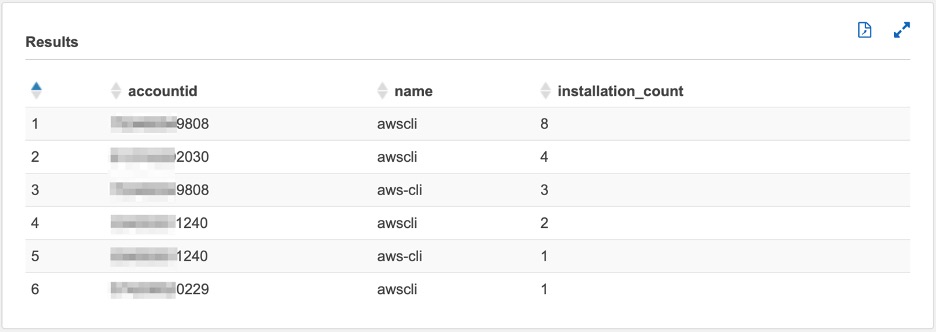
Figure 20: Amazon Athena query 5 output
Query 6. Top three accounts with the most occurrences of issues 1-4

Figure 21: Amazon Athena query 6 output
Step 7 – Amazon QuickSight visualization
Now that you can query your data in Athena, you can visualize the results using Amazon QuickSight. First, grant Amazon QuickSight access to the S3 bucket where your Athena query results live.
- In the Amazon QuickSight console, log in.
- Choose Admin/username, Manage QuickSight.
- Choose Account settings, Security & permissions.
- Under QuickSight access to AWS services, choose Add or remove.
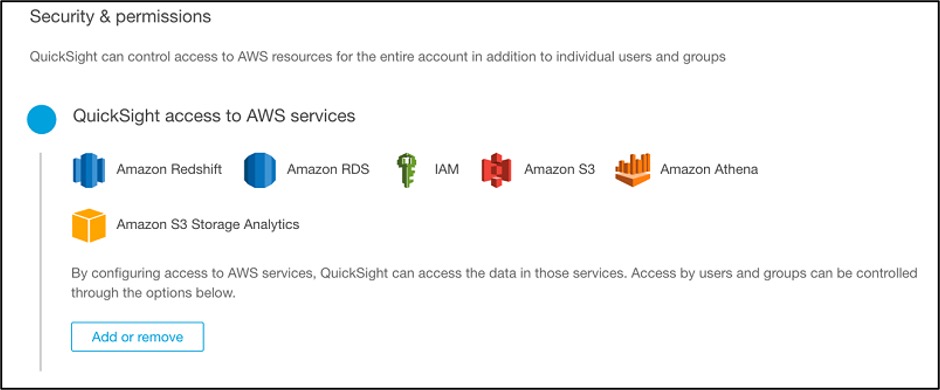
Figure 22: Configure Amazon QuickSight permissions
- Choose Amazon Athena and Amazon S3. For Amazon S3, choose Select S3 buckets and select the source S3 bucket where inventory execution logs are stored.
Now that you have imported your data into your analysis, you can create Quicksight visualizations. To set up your visualizations, follow these steps:
- In the QuickSight console, switch to the region of your Athena datasource and choose Manage data, New data set.
- For Source, choose Athena.
- Give your new dataset a name and choose Validate connection.
- After you validate the connection, choose Create data source.
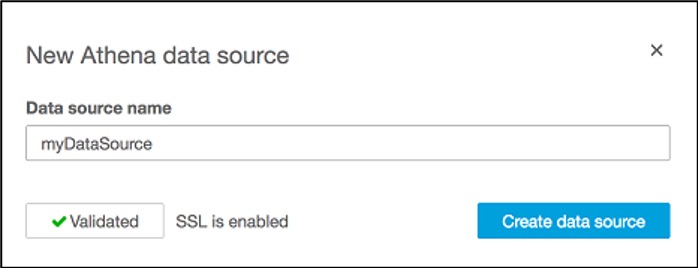
Figure 23: Add Amazon Athena data source
- Select Use custom SQL and give your SQL query a name.
- Input the query 1: in Athena queries section above, and choose Confirm query.
- Choose Import to SPICE for quicker analytics, Visualize.
Please refer Workgroup or Output Errors When Using Amazon Athena with Amazon QuickSight if you encounter an error related to Athena workgroup.
An example of a dataset using a query is shown below:
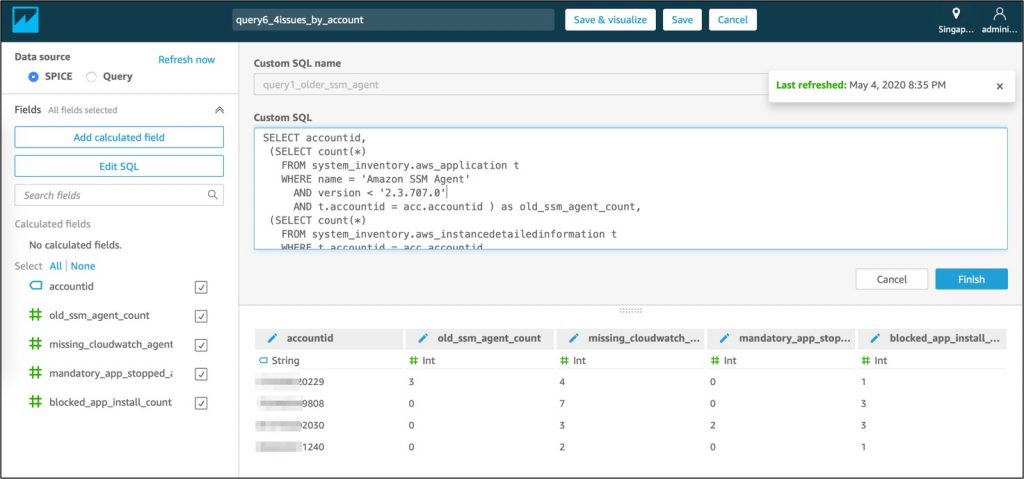
Figure 24: Input SQL queries from step 6 in Amazon QuickSight ‘Custom SQL’ field
Finally, you can set up a daily scheduled refresh of the storage class analysis data set in Amazon QuickSight to keep it up to date, and publish and share the analysis as a dashboard to other users in your organization to monitor software asset governance.
A sample dashboard is shown below:
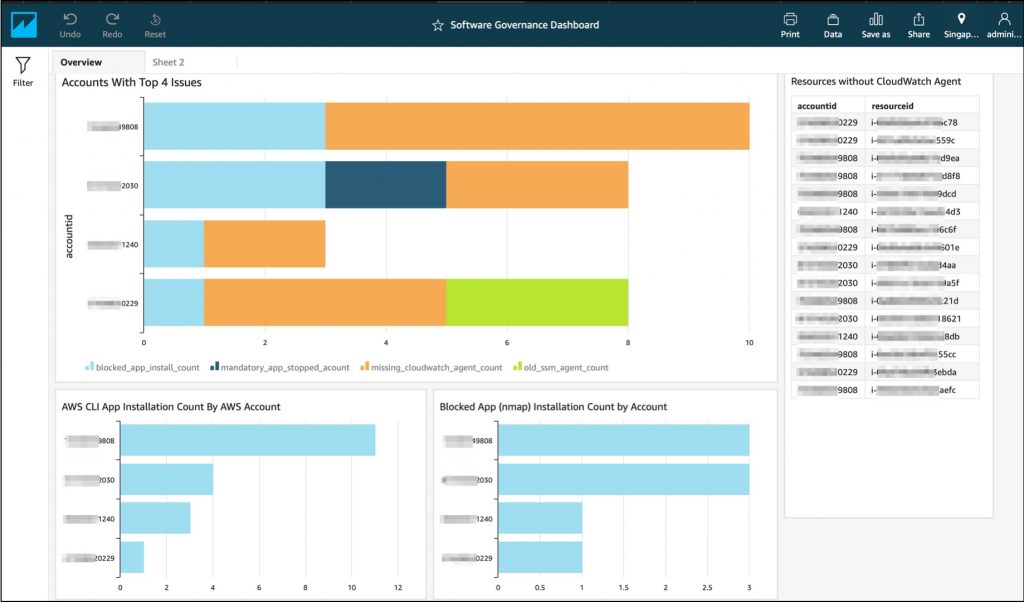
Figure 25: Sample software governance dashboard in Amazon QuickSight
Cleaning up
To avoid incurring future charges, delete these resources:
- Amazon EC2 instances created to collect the inventory information.
- Amazon S3 bucket created to store the inventory information.
- Amazon Glue crawler created to create databases and tables (schema) to be queried in Athena.
- Amazon Athena database and tables.
- Amazon QuickSight dashboard.
Conclusion
As demonstrated in this blog post, AWS customers can use various AWS services to build a Software Asset Governance platform that can help them gain visibility into their operating environments. Such platforms help make informed decisions and take appropriate actions to improve your overall governance, security, and compliance posture.
Author bio
 |
Prateek Prakash is a Security, Risk and Compliance professional at Amazon Web Services and based out of Singapore. He helps AWS Customers adopt AWS Cloud platform while meeting or exceeding their Security & Compliance objectives. |
 |
Gopala Raju is an IoT Data Architect at AWS Professional Services based out of Singapore. He helps AWS Customers with Big Data, IoT and IIoT implementations. |