AWS Cloud Operations Blog
Create immutable servers using EC2 Image Builder and AWS CodePipeline
When you run an application on multiple Amazon Elastic Compute Cloud (Amazon EC2) instances, you want to avoid differences between the instances because they can cause unpredictable behavior and make it hard to troubleshoot and solve issues. The best way to prevent differences is to replace your instances whenever you want to make a change—to create, in effect, an immutable server. Although this approach sounds simple, you might have questions about how to do this in a practical way.
In this blog post, I will answer the following questions:
- How do you build fully installed Amazon Machine Images (AMIs)?
- How do you replace EC2 instances without downtime?
- How do you handle configurations that change frequently?
To illustrate the concept of an immutable server, I will show you how to use EC2 Image Builder and AWS CodePipeline to create a pipeline that builds and deploys fully installed AMIs. In this post, I assume you are familiar with Amazon EC2, Amazon Simple Storage Service (Amazon S3), AWS CloudFormation, and AWS CodePipeline.
| About this blog post | ||
| Time to read | 16 minutes | |
| Time to complete | 30-45 minutes | |
| Cost to complete | Under $1 (at publication time) | |
| Learning level | 300 | |
| Services used |
|
|
What problems do immutable servers solve?
Here are some (fictional) examples of production incidents related to unintended differences between EC2 instances:
- “Four weeks ago, we inadvertently pushed a configuration file to the wrong server. It went unnoticed until yesterday, when the server was rebooted and our application did not start. It took us three hours to restore service because we initially only considered yesterday’s changes as a likely cause of the issue.”
- “Last week, the infrastructure team tightened network security policies. Yesterday’s sales campaign brought more traffic to the website, which meant we needed to create new EC2 instances. On startup, the instances tried to connect to an external Yum repository to install a runtime but could not reach it. The new capacity didn’t come online and the existing instances collapsed under the increased load. It took time to identify the network as the root cause. We lost hours of revenue at a crucial time for our Sales and Marketing department.”
- “We had a strange issue in production but were unable to reproduce it in our QA environment. For testing purposes, the QA team had recently updated the environment to run the next version of the software. Despite our best efforts, we cannot ascertain that QA is 100 percent equal to production. We hope the issue will disappear after Monday’s go-live.”
Each of these incidents is related to differences between EC2 instances. In the first example, one instance is misconfigured due to human error. In the second example, the difference is that the new instances do not have the software installed yet. External installation dependencies during system startup increase the risk of failure and slow down the startup. In the third example, there is no mechanism to reproduce an exact replica of production.
Immutable servers can help prevent these issues. When you treat instances as immutable, they will always be exact replicas of their AMI. This leads to integrity and reproducibility of the instance. When you ship fully installed AMIs, you have no more installation dependencies on startup, so there is no more risk of installations failing at the worst possible time. Shipping fully installed AMIs also reduces the time it takes to add capacity to your fleet because you don’t have to wait for the installation to finish.
It’s not a silver bullet, though. For example, the root cause of the third issue might be outside the EC2 instance. It might have originated in the data store or in an underlying service. From the example, you can’t tell with certainty. With an immutable server, though, you can at least rule out differences between EC2 instances as a suspect.
The dos and don’ts of immutable servers
What makes immutable servers different from the regular ways of managing EC2 instances? Perhaps you have adopted a few of these best practices already.
| Don’t… | Instead, do… |
| Make changes your EC2 instances | Replace your EC2 instances when you want to make a change |
| Install software during startup | Build a fully installed AMI that includes the application |
| Open terminal sessions for operational purposes | Have a break-glass mechanism just in case
Make use of centralized logging and monitoring to get visibility into your workloads |
| Build AMIs manually | Create AMIs as part of your fully automated CI/CD pipeline |
| Bake environment specifics into the AMI | Release the same AMI that passed the test to production
Use UserData for minor configurations like changing environment variables Use service discovery tools for rapidly changing configurations |
When you follow these practices, you can say that you have adopted the immutable server pattern. Now I’ll walk you through the steps to set up a pipeline that creates fully installed AMIs.
EC2 Image Builder
First introduced at re:Invent 2019, EC2 Image Builder simplifies the creation and maintenance of AMIs for EC2. Before EC2 Image Builder, AMIs were either built manually or required a fair amount of scripting or third-party tools. With EC2 Image Builder, you can configure recipes to create images consisting of one or more components. You can use EC2 Image Builder by itself to create an AMI or you can use it as a component that is part of a pipeline in CodePipeline. In this blog post, I use CodePipeline as the orchestrator because I want to integrate the AMI creation with the compilation of software and the deployment to a test environment.
How do you build immutable servers?
Figure 1 shows an architecture for the build process.
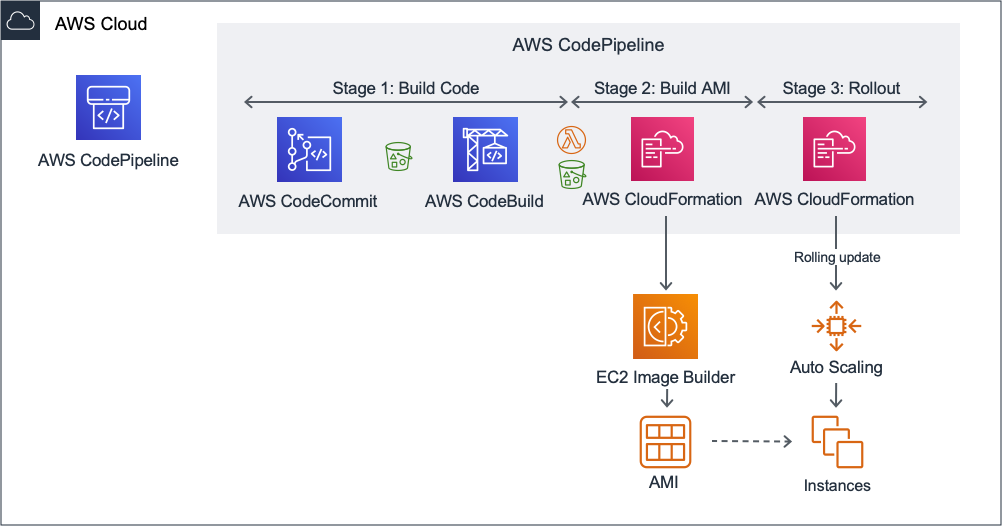
Figure 1: Architectural diagram
Stage 1: Build the application
In this stage, CodePipeline reads source code from CodeCommit and stores the latest version in an S3 bucket. CodeBuild runs the build process. At the end of this stage, the build artifacts are in an S3 bucket.
This diagram was created with the assumption that you own the source code for the application and that you make regular changes that must be compiled first. If that is not the case, you can skip this step and store installation files in an S3 bucket.
If your organization uses Atlassian Bitbucket or GitHub instead of AWS CodeCommit, you can edit the pipeline accordingly.
Stage 2: Build a fully installed AMI
In this stage, CodePipeline invokes an AWS Lambda function and then applies an AWS CloudFormation template. The purpose of the Lambda function is to prepare input parameters for CloudFormation. The input parameters consist of a reference to the build artifacts from the previous stage and a version number. The CloudFormation template creates EC2 Image Builder resources. EC2 Image Builder creates a fully installed AMI.
Stage 3: Deploy the image to your test environment using a rolling update
In this final stage, CodePipeline applies a second CloudFormation template. This template performs a rolling deployment using an EC2 Auto Scaling group. A rolling deployment removes an old instance only after creating a new instance to avoid downtime. The Auto Scaling group represents your development environment. This template is separate from the previous CloudFormation template to make the solution modular. If you want to extend the pipeline to deploy to more environments, you can replicate this deployment mechanism.
Set up a build pipeline for fully installed AMIs
In this section, I will show you how to deploy an example pipeline that builds fully installed AMIs based on source code in CodeCommit.
To create resources for this use case:
- Follow the installation steps described in the AWS Samples Github repository Immutable Server Pipeline.
To see the pipeline in action:
- Open the AWS CodePipeline console at https://console.aws.amazon.com/codesuite/codepipeline/pipelines.
- Choose YourStackName-Pipeline and watch the pipeline run.
Note: Expect the pipeline to take 30-45 minutes to run all steps. It takes 25-30 minutes to build an image and 5-15 minutes to deploy it. The deployment takes longer on subsequent runs when CloudFormation performs a rolling deployment.
Now you have built a pipeline to create fully installed AMIs in a repeatable manner to use them as immutable servers. For more detail on this example pipeline, see the source code and documentation in the AWS Samples repository on GitHub.
Stop the development environment
To prevent unnecessary costs from running EC2 instances:
- Open the EC2 console at https://console.aws.amazon.com/ec2/.
- In the left navigation pane, choose Auto Scaling groups.
- Choose Demo ASG, and then choose Edit.
- In Group size, change Desired capacity to 0, and then choose Update.
Clean up the pipeline
To delete the AWS resources created by CloudFormation:
- Open the CloudFormation console at https://console.aws.amazon.com/cloudformation/.
- Choose YourStackName-DeployImg, and then choose Delete.
- Choose YourStackName-BuildImg, and then choose Delete.
- After the deletion of YourStackName-DeployImg and YourStackName-BuildImg is complete, choose YourStackName, and then choose Delete.
To delete resources created by EC2 Image Builder:
- Open the EC2 console at https://console.aws.amazon.com/ec2/.
- In the left navigation pane, under Images, choose AMIs.
- Choose YourStackName-Image-Timestamp, choose Actions, and then choose Deregister.
- In the left navigation pane, under Elastic Block Store, choose Snapshots.
- Choose YourStackName, choose Actions, and then choose Delete.
To delete the S3 bucket used by CodePipeline to store artifacts:
- Open the S3 console at https://console.aws.amazon.com/s3/.
- From the list of buckets, choose {YourStackName}-artifacts, choose Empty, and then enter the bucket name to confirm.
- Choose Delete, and then enter the bucket name to confirm.
To clean up a variable in the SSM Parameter Store created by the Lambda function:
- Open the SSM Parameter Store at https://console.aws.amazon.com/systems-manager/parameters/.
- Choose /YourStackName/ImageVersion, and then choose Delete.
- Choose Delete parameters.
Frequently asked questions
In this FAQ, I answer common questions about immutable servers.
Q: How do I keep my EC2 instances patched and up to date?
A: Replace your EC2 instances with a newly built AMI that contains all the latest versions of software. Do this frequently to stay current with the latest patches.
Q: How do I handle configurations that change frequently?
A: A fully installed AMI means that part of your configuration is built into the AMI. Not all configuration can be included, though. Some configuration parameters might change multiple times a day (for example, a parameter that refers to systems that are launched and terminated by EC2 Auto Scaling groups). Use service discovery tools to manage these parameters outside of the AMI. Think of tools like AWS Systems Manager Parameter Store, AWS Cloud Map, and AWS App Mesh.
Q: How do I keep anyone from making changes on the EC2 instances?
A: The best way is to deny terminal access to any administrator. When you follow the immutable server pattern consistently, there is no need to sign in to EC2 instances.
Q: Can I have a break-glass mechanism for terminal access to instances just in case?
A: Although the immutable server pattern is strict on the no-change policy, in exceptional cases you do need to sign in to an EC2 instance (for example, to perform forensics after an incident). For cases like these, I suggest you build a break-glass mechanism.
Q: How can I find out what is happening on my EC2 instance without signing in?
A: Use centralized logging and monitoring tools to expose metrics and information from your EC2 instances. If this is your first time setting up centralized logging and monitoring, I suggest you get started with Amazon CloudWatch and Amazon CloudWatch Logs. Configure tools like the procstat plugin for the CloudWatch agent to collect process metrics. Use Amazon CloudWatch Logs Insights to analyze large numbers of log files.
Q: How can my Internal Audit department track all changes to EC2 instances?
A: Immutable servers have a high degree of traceability. You can only change an application by pushing code to the Git repository. The application code and installation scripts are managed in Git. The pipeline traces all the automated steps, from source control to the EC2 instance that’s deployed. To illustrate this, the example pipeline built in this blog post tags EC2 instances with the Git commit ID and the commit message.
Q: Can I use Windows Server instead of Linux?
A: Yes. If you want to treat Windows instances as immutable servers, replace the bash scripts with Windows PowerShell scripts. A prerequisite is that software must be installed through scripts, command line tools, or unattended/silent installations.
Q: How do immutable servers work with stateful workloads?
A: You can follow many of the same practices with a few caveats. If the architecture supports it, you store the state in a managed service like Amazon ElastiCache for Redis or Amazon DynamoDB, effectively making the workload stateless. If that is not feasible, the application should store its state on a separate Amazon Elastic Block Store volume dedicated to the application data. Edit the deployment step in the pipeline to start a custom process that unmounts the data volume from the original instance and then mounts it to a newly created EC2 instance.
Q: How do I safely promote an AMI to subsequent environments?
A: Create a separate launch template for every environment, each with its own version. When you want to promote an AMI to an environment, create a new version of the launch template for that environment. The new version points to the AMI that is being promoted with the environment variables specific to the environment.
Conclusion
When you treat your EC2 instances as immutable servers, you get a repeatable and reliable process for creating instances. You reduce the risk of human error and the risk of inconsistencies in automated installations. When you need to resolve an issue, you can rule out environmental differences as a potential cause, at least as far as the EC2 instance is concerned.
Immutable servers require a different way of working. You need a mechanism for creating fully installed AMIs and rolling them out across environments. In this blog post, I showed you how to launch a pipeline in CodePipeline that orchestrates the entire process—from source control to an up-and-running development environment.
The immutable server pattern is commonly adopted in the world of containers. There is nothing stopping us from doing the same with EC2 instances!
Further reading
- Samples repository for this post on GitHub
- Creating Packer images using AWS System Manager Automation blog post
- Automate OS Image Build Pipelines with EC2 Image Builder blog post
- Executing Ansible playbooks in your Amazon EC2 Image Builder pipeline blog post
- Leveraging AWS CloudFormation to create an immutable infrastructure at Nubank blog post
- Immutable Server on the Martin Fowler website
- What is Mutable vs. Immutable Infrastructure? on the HashiCorp website
With special thanks to Samartha Chandrashekar, Kimberly Chow, Kevin Dejong, Juha Knuuttila, Tim Power and Rohit Satyanarayana for the extensive review and feedback.