Networking & Content Delivery
Fine-grained Amazon Route 53 access with IAM condition keys (Part 3)
When federated users require access to DNS records in shared environments, you often turn to overly broad permissions or maintain separate policies per user. Both approaches create operational overhead and broader-than-necessary permissions that grow with your organization. Part 1 of this series showed you how to use AWS Identity and Access Management (IAM) condition keys and principal tags for fine-grained Amazon Route 53 access within the same account. In Part 2, you extended the solution across accounts using session tags. In this post, you’ll learn how to implement fine-grained access for federated users in AWS IAM Identity Center to shared Route 53 hosted zones, using session tags derived from user attributes.
Solution overview
This solution assumes you’re familiar with AWS IAM Identity Center for managing single sign-on to AWS accounts and applications. You’ll learn how to integrate IAM Identity Center session tags with the fine-grained Route 53 access approach from Part 1 and Part 2. This builds on the foundation you established in previous parts.
Part 1 established the foundation for creating fine-grained permissions based on user attributes for same-account Route 53 hosted zone access. You worked with four conditional operators: ForAllValues:StringEquals, ForAllValues:StringNotEquals, ForAllValues:StringLike, and ForAllValues:StringNotLike. In Part 2, you combined both approaches to handle cross-account scenarios using session tags in assumed roles.
You use the aws:PrincipalTag/tag-key condition key to combine fine-grained permission policies with session tags derived from user attributes stored in your identity provider, to simplify access management for federated users. The fine-grained permissions follow least-privilege principles without individual user policies. The identity provider passes dynamic user attributes as session tags during authentication and policy adapts permissions whenever user attributes change.
Passing session tags with Security Assertion Markup Language (SAML) federation
You can set up federated access to AWS accounts by assuming roles using IAM. With IAM, you pass user attributes from your external identity provider (IdP) to AWS as session tags using SAML 2.0 and implement fine-grained access permissions based on these attributes. You authenticate through SAML-based federation using the AssumeRoleWithSAML API operation. To pass SAML attributes as session tags, include an Attribute element with the Name attribute set to https://aws.amazon.com/SAML/Attributes/PrincipalTag:TagKey, replacing TagKey with the session tag key you want to populate. Use the AttributeValue element to specify the tag’s value, and include a separate Attribute element for each session tag.
Session tags in AWS IAM Identity Center
With AWS IAM Identity Center, you centrally manage federated access to multiple AWS accounts and business applications as an alternative to per-account federation. You can use IAM Identity Center with identities stored in its built-in user directory, Active Directory, or an external IdP.
You pass user attributes as session tags for access control in IAM Identity Center using two methods. Both methods format attributes as comma-separated key-value pairs. The key represents the name you assign to the attribute for use in policies, while the value represents the content of the attribute from your configured identity source.
The first method configures your IdP to send SAML assertions with the attribute name set to https://aws.amazon.com/SAML/Attributes/AccessControl:TagKey, replacing TagKey with the session tag key. The second method map attributes for Attribute-Based Access Control (ABAC) directly within IAM Identity Center. You don’t need to configure an ABAC attribute mapping for attributes that you already pass through SAML assertions from your external IdP. However, if you configure both, the IAM Identity Center mapping takes precedence over the value your IdP sends in the SAML assertion. For a list of default attribute mappings between IAM Identity Center and external identity providers, see Attribute mappings between IAM Identity Center and External Identity Providers.
You grant your federated users access to one or more AWS accounts by assigning them to permission sets in IAM Identity Center. When you make this assignment, you get a corresponding IAM role with the policies from your permission set attached. As an authorized user, you then assume this role with session tags that IAM Identity Center derives from your user attributes.
The following diagram illustrates the fine-grained Route 53 access architecture for IAM Identity Center federated users. On the left, administrators configure federated users with user attribute values. In the middle, IAM Identity Center maps the dnsrecord attribute key and sets the session tag key-value pair on the permission set role for the federated user. On the right, the federated user attempts to modify a Route 53 hosted zone.
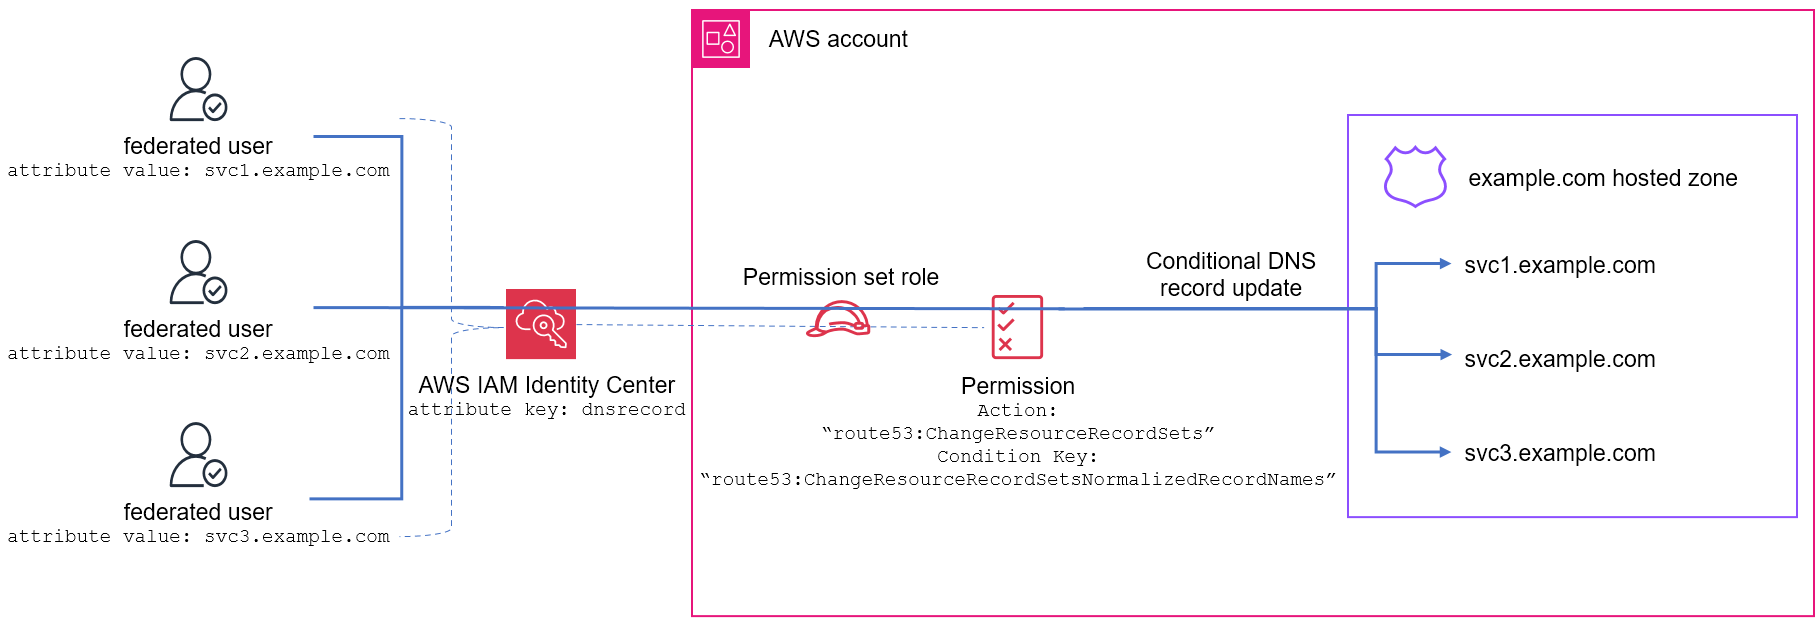
Figure 1: Fine-grained Route 53 access using IAM condition keys for AWS IAM Identity Center federated users
The IAM permission policy attached to the permission set evaluates the route53:ChangeResourceRecordSets action. It compares the DNS record name against the session tag value using the route53:ChangeResourceRecordSetsNormalizedRecordNames condition key. The policy evaluates the request against the ${aws:PrincipalTag/{custom-attribute}} policy variable, which resolves to the federated user’s session tag value. As a result, the federated users can manage only the specified DNS records.
Solution implementation
You’ll create a solution that permits federated users to manage only the DNS records matching their attribute values in a shared Route 53 hosted zone. The following steps guide you through configuring the IAM Identity Center permission set and federated user attributes that help you create fine-grained access control to your Route 53 hosted zone. When complete, federated users can manage only DNS records that match the values in their custom attributes within a shared hosted zone.
The example uses the attribute value in the dnsrecord attribute key of the federated user to grant conditional access to update DNS records ending with the .svc1.example.com domain suffix in the shared hosted zone example.com.
Prerequisites
Before you begin, confirm you have the following:
- A hosted zone for domain
example.comin your AWS account - An Identity Center organization instance with Identity Center directory as identity source
- An AWS Organizations management account or delegated management account with update access using AWS Command Line Interface (AWS CLI)
- An Identity Center directory user
Step 1: Create a permission set in IAM Identity Center
Use the following command to create an IAM Identity Center permission set. Replace <PERMISSION_SET_NAME> with the name of the permission set and <INSTANCE_ARN> with the ARN of your IAM Identity Center instance:
Step 2: Attach a permission policy to the permission set
Create the following IAM permission policy file for fine-grained access to DNS records. The wildcard * and period . prepended to the ${aws:PrincipalTag/dnsrecords} variable activate pattern matching against the record name. Replace <ZONE_ID> with the ID of your private hosted zone.
{
    "Version": "2012-10-17",
    "Statement": [
        {
            "Effect": "Allow",
            "Action": "route53:ChangeResourceRecordSets",
            "Resource": "arn:aws:route53:::hostedzone/<ZONE_ID>",
            "Condition": {
                "ForAllValues:StringLike": {
                    "route53:ChangeResourceRecordSetsNormalizedRecordNames": [
                        "*.${aws:PrincipalTag/dnsrecord}"
                    ]
                }
            }
        }
    ]
}
Use the following command to attach the inline policy to the permission set created in Step 1, replacing <INSTANCE_ARN> with the ARN of your IAM Identity Center instance, <PERMISSION_SET_ARN> with the ARN of the permission set, and <DOCUMENT_FILE> with the path to the permission policy file:
Step 3: Assign the permission set to an AWS account and IAM Identity Center user
Use the following command to assign the permission set to a federated user in an AWS account, replacing <INSTANCE_ARN> with the ARN of your IAM Identity Center instance, <AWS_ACCOUNT> with the AWS account number, <PERMISSION_SET_ARN> with the ARN of the permission set, and <USER_GUID> with the federated user GUID:
Step 4: Create an access control attribute
Use the following command to activate the ABAC feature for IAM Identity Center and map the key dnsrecord to a directory attribute, replacing <INSTANCE_ARN> with the ARN of your IAM Identity Center instance, and <DIR_ATTRIBUTE> with the appropriate directory attribute mapping:
Step 5: Set the IAM Identity Center user attribute
Use the following command to set the permitted DNS record value, svc1.example.com, for the federated user, replacing <INSTANCE_ID> with the ARN of your IAM Identity Center instance, <USER_GUID> with the federated user GUID, and <ATTRIBUTE_NAME> with the Identity Center directory attribute:
Step 6: Verify DNS update permissions for the federated user
Log in as the federated user using the permission set created in Step 1. You have permission to manage DNS records with the .svc1.example.com domain suffix in the shared hosted zone example.com. You can verify that the permissions work as expected by running the following commands:
The following CLI command creates the DNS record dev.svc1.example.com using a JSON configuration file. Replace <ZONE_ID> with the private hosted zone ID and <SVC1_FILE_LOCATION> with the path to the DNS record creation JSON file:
{
    "Comment": "configuration to create dev.svc1.example.com record",
    "Changes": [
        {
            "Action": "CREATE",
            "ResourceRecordSet": {
                "Name": "dev.svc1.example.com",
                "Type": "A",
                "TTL": 300,
                "ResourceRecords": [
                    {
                        "Value": "10.1.1.1"
                    }
                ]
            }
        }
    ]
}
The following CLI command attempts to create the DNS record dev.svc2.example.com, but fails because the federated user lacks permission for the .svc2.example.com domain suffix. Replace <ZONE_ID> with the private hosted zone ID and <SVC2_FILE_LOCATION> with the path to the DNS record creation JSON file:
{
    "Comment": "configuration to create dev.svc2.example.com record",
    "Changes": [
        {
            "Action": "CREATE",
            "ResourceRecordSet": {
                "Name": "dev.svc2.example.com",
                "Type": "A",
                "TTL": 300,
                "ResourceRecords": [
                    {
                        "Value": "10.1.1.1"
                    }
               ]
            }
        }
    ]
}
Cleaning up
Delete the resources created in this solution by running the following commands:
Clear the permitted DNS record value for the federated user, replacing <INSTANCE_ID> with the ARN of your IAM Identity Center instance, <USER_GUID> with the federated user GUID, and <ATTRIBUTE_NAME> with the Identity Center directory attribute name
Delete the ABAC feature for IAM Identity Center, replacing <INSTANCE_ARN> with the ARN of your IAM Identity Center instance:
Delete the permission set for the federated user in an AWS account, replacing <INSTANCE_ARN> with the ARN of your IAM Identity Center instance, <AWS_ACCOUNT> with the AWS account number, <PERMISSION_SET_ARN> with the ARN of the permission set, and <USER_GUID> with the federated user GUID:
Delete the inline policy from the permission set created in Step 1, replacing <INSTANCE_ARN> with the ARN of your IAM Identity Center instance and <PERMISSION_SET_ARN> with the ARN of the permission set:
Delete the IAM Identity Center permission set, replacing <PERMISSION_SET_ARN> with the permission set ARN and <INSTANCE_ARN> with the ARN of your IAM Identity Center instance:
Considerations
- Permission sets require an organization instance of AWS IAM Identity Center.
- As you manage your IAM Identity Center and IAM access, consider the IAM Identity Center quotas and IAM quotas for users, groups, and policies.
- If your permissions are not working as expected, the Troubleshoot IAM Policies and Troubleshooting IAM Identity Center documentation include useful guides for common issues.
- For environments that don’t use shared hosted zones, each team typically manages private hosted zones for their services. In these scenarios, consider Amazon Route 53 Profiles to centrally manage DNS configurations across Amazon Virtual Private Clouds (Amazon VPCs) and accounts. For more information, see Using Amazon Route 53 Profiles for scalable multi-account AWS environments.
Conclusion
You now have an approach that grows with your organization to grant federated users precise access to Route 53 records based on their attributes, removing the need to maintain separate policies for each user. As your organization grows, this solution automatically adapts to new users and changing attributes without requiring policy updates. This helps prevent granting excessive permission or forgetting to revoke access when users change roles, while reducing your policy maintenance workload.
This foundation creates several possibilities for your DNS management strategy. You can combine it with additional IAM condition keys to create even more fine-grained access patterns. To build on this solution and explore related AWS capabilities, see the following resources:
- Part 1: Fine-grained Route 53 access in the same account
- Part 2: Fine-grained Route 53 access across accounts
- IAM Identity Center documentation
- Route 53 condition keys reference
About the authors

Daniel Yu
Daniel Yu is a Senior Networking Solutions Architect who works with customers to design and implement AWS solutions. With expertise in networking and security infrastructure, he specializes in providing strategic guidance on AWS architectural design and operational excellence.