AWS Open Source Blog
Dive Deeper into Data Lake for Nonprofits, a New Open Source Solution from AWS for Salesforce for Nonprofits
Nonprofits are using cloud-based solutions for fundraising, donor and member management, and communications. With this move online, they have access to more data than ever. This data has the potential to transform their missions and increase their impact. However, sharing, connecting, and interpreting data from many different sources can be a challenge. To address this challenge, Amazon Web Services (AWS) and AWS Partner Salesforce for Nonprofits announced the general availability of Data Lake for Nonprofits – Powered by AWS.
Data Lake for Nonprofits is an open source application that helps nonprofit organizations set up a data lake in their AWS account and populate it with the data that they have in the Salesforce Non Profit Success Pack (NPSP) schema. This data resides in Amazon Relational Database Service (Amazon RDS), where it can be accessed by other AWS services like Amazon Redshift and Amazon QuickSight, as well as Business Intelligence products such as Tableau.
This post is written for developers and solution integrator partners who want to get a closer look at the architecture and implementation of Data Lake for Nonprofits to better understand the solution. We’ll walk you through the architecture and how to set up a data lake using AWS Amplify.
Prerequisites
To follow along with this walkthrough, you must have the following prerequisites:
- An AWS Account
- An AWS Identity and Access Management (IAM) user with Administrator permissions that enables you to interact with your AWS account
- A Salesforce account that has the Non Profit Success Pack managed packages installed
- A Salesforce user that has API permissions to interact with your Salesforce org
- Git command line interface installed on your computer for cloning the repository
- Node.js and Yarn Package Manager installed on your computer for cleanup
Solution Overview
The following diagram shows the solution’s high-level architecture.

Salesforce and AWS have released the source code in GitHub under a BSD 3-Clause license so nonprofits and their cloud partners can use, customize, and innovate on top of it at no cost.
Use your command-line shell to clone the GitHub repository for your own development.
git clone https://github.com/salesforce-misc/Data-Lake-for-Nonprofits
The solution consists of two tiers which are frontend and backend applications. In the following sections, we’ll walk you through both architectures and show you how to install a data lake.
Frontend Walkthrough
We have developed the frontend application using React with Typescript, and it has three layers.
- The view layer comprises React components.
- The model layer is where the most of the application logic is maintained. The models are Mobx State Tree (MST) types with properties, actions, and computed values. Relationships between models are expressed as MST trees.
- The API layer is used to communicate with AWS Services using AWS SDK for JavaScript v3.
The frontend application has been built and zipped for AWS Amplify using GitHub Workflows. This is done for every change in the repository. The latest build can be found in the GitHub repository.
Backend Walkthrough
We have developed the backend application using AWS CloudFormation templates that can be found under the infra/cf folder in the GitHub repository. These templates will provision the resources on your AWS account for your data lake as below.
vpc.yamltemplate is used to provision the Amazon Virtual Private Cloud (Amazon VPC) that the application will be running in.buckets.yamltemplate is used to provision several Amazon Simple Storage Service (Amazon S3) buckets.datastore.yamlis used to provision an Amazon Relational Database Service (Amazon RDS) PostgreSQL database.athena.yamlis used to provision Amazon Athena with a custom workgroup.step_function.yamlis used to provision AWS Step Functions and related AWS Lambda functions. Step Functions is used to orchestrate the Lambda functions that are going to import your data from your Salesforce account into Amazon RDS for PostgreSQL using an Amazon AppFlow connection.
Lambda functions can be found in the infra/lambdasfolder.
src/cleanupSQL.tsperforms the movement of data from the data-loading database schema to the public database schema.src/filterSchemaListing.tsfilters out S3’s “schema/” key as well as queries Salesforce for deleted objects.src/finalizeSQL.tsdrops tables that will be no longer needed in the application to save cost.src/listEntities.tscalls APIs since the output is too large for Step Functions.src/processImport.tsimports a Lambda function which writes to RDS the data which is sent to the Amazon SQS queue.src/pullNewSchema.tsqueries Amazon AppFlow and then Salesforce to gather any new or updated fields.src/setupSQL.tssets up the data-loading database schema and creates the tables based on the schema file.src/statusReport.tsperforms a status update to S3 based on where it is in the Step Functions State Machine.src/updateFlowSchema.tsuses the updated schema file on S3 to create or update the Amazon AppFlow flow.
Amazon Simple Queue Service (Amazon SQS) is used to queue the import data so that the Lambda function can use it.
Amazon EventBridge is used to set up a job that syncs your data based on your choice of frequency.
Amazon CloudWatch is used to keep logs during installation as well as synchronization. The application creates a CloudWatch dashboard to track the usage of the data lake.
Deploy the Frontend Application using AWS Amplify
The latest release of the frontend application can be downloaded from the GitHub repository and deployed in AWS Amplify in your AWS account as explained in the User Guide. It typically takes a few minutes to deploy the frontend application, after which a URL to the frontend application is presented. The URL should look like the link here:
https://abc.xyz....amplifyapp.com
When you open the URL, you will see the frontend application, which provides a wizard-like guide to the steps. Each step will guide you through the instructions on how to move forward.
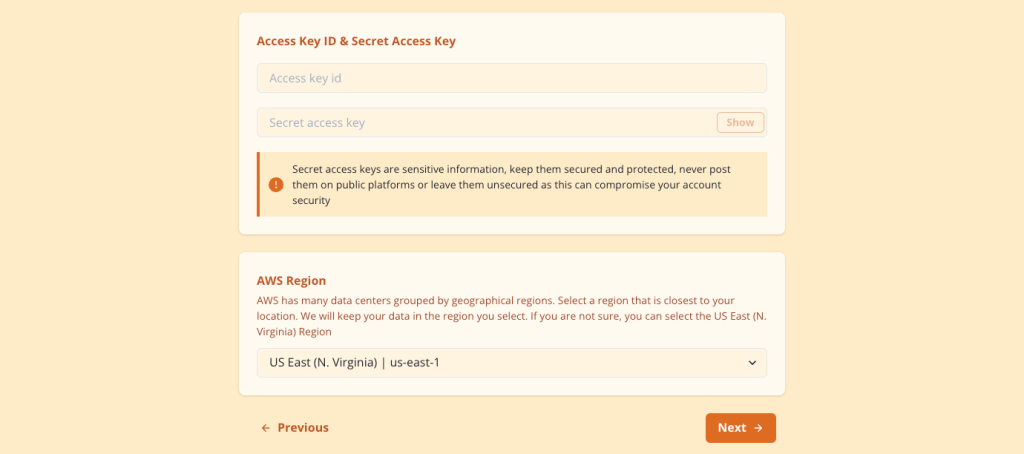
Step 1 will ask for an Access Key ID and Secret Access key for an IAM user of your AWS account. The application shows guidance on how to log in to AWS Management Console and use Identity and Access Management (IAM) to create the IAM user with admin permissions.
This step also requires you to select the AWS region where you would like to create the Amazon AppFlow connection and deploy the data lake.
Step 2 establishes the connection to your Salesforce account. The application guides the user to leverage Amazon AppFlow, which allows AWS to connect to your Salesforce account.

At the end of the page, use the drop down menu to select the connection name and click Next.

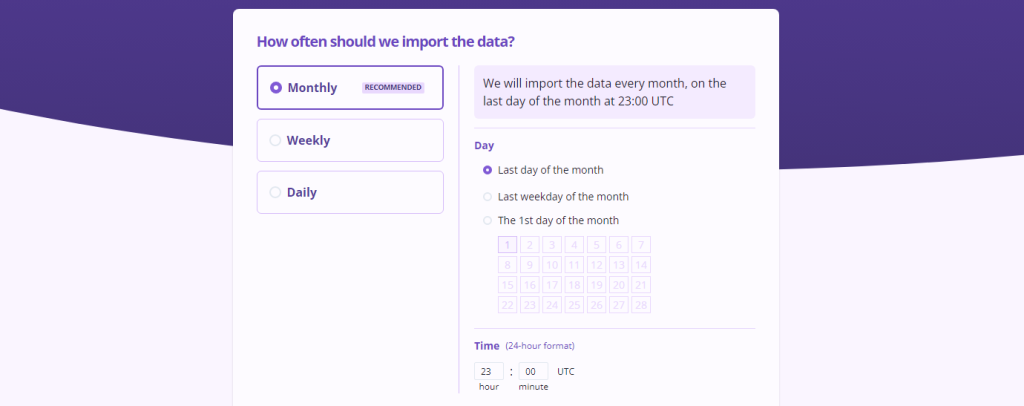
Step 3 will help you choose the data objects and set the frequency of data synchronization for your data lake. The data import option can be set to any date and time, and you can choose the frequency from the given options: daily/weekly/monthly.
This page further displays the complete set of objects from your Salesforce account. Choose the necessary objects that you want to import into your data lake.
In Step 4, you can review the data lake configuration and confirm. This step is where you are allowed to go back to the previous step to make any changes if needed.

Step 5 is where the data lake is provisioned, and then your data is imported. This can take half an hour to several hours, depending on the size of the data in your Salesforce account.

Once the data lake is ready, in Step 6, you can find the instructions and information needed to connect to your data lake using business intelligence applications such as Tableau Cloud and Tableau Desktop that will help you visualize your data and analyze it per your business needs.

Cleanup
Keeping the data lake in your AWS account will incur charges due to the resources provisioned. To avoid incurring future charges, run these commands on your terminal where you cloned the GitHub repository and follow the instructions:
cd Data-Lake-for-Nonprofits/app
yarn delete-datalake
Conclusion
This post showed you how AWS services are used to transform your Salesforce data into a data lake. It uses AWS Amplify to host the frontend application and provisions several AWS services for the data lake backend. The architecture is based on the successful collaboration between AWS and Salesforce to build an open source data lake solution using a simple and easy-to-use, wizard-like application.
We invite you to clone the GitHub repository and develop your own solution for your needs, provide feedback, and contribute to the project.