AWS Storage Blog
Simplify cross-account storage management with Amazon EFS and Amazon EKS
Organizations are increasingly adopting a multi-account Amazon Web Services (AWS) strategy to achieve enhanced security, governance, and operational efficiency at scale. Implementing separate accounts for production and non-production environments enables enterprises to group workloads based on business purpose, apply distinct security postures by environments, restrict access to sensitive data, and streamline cost management. You can use AWS Organizations to centrally manage multi-account AWS environments.
Amazon Elastic File System (Amazon EFS) is a scalable NFS file storage solution. Amazon EFS storage elastically grows and shrinks based on the amount of stored data, and performance automatically scales up and down to meet application demands. Amazon EFS provides industry-standard POSIX compliance with 11 9’s of data durability across multiple AWS Availability Zones (AZs). It serves as an excellent platform for active-active architectures through Regional storage that replicates data synchronously across multiple AZs. Organizations using multi-account AWS environments need reliable mechanisms for sharing data across different AWS accounts. By design, AWS restricts access between different accounts, unless explicitly configured, thus facilitating account-level isolation. Amazon EFS with cross-account mounting capability provides enterprises with a solution for efficiently sharing data across multiple accounts.
In this post, we walk through how Amazon EFS users can set up a single Amazon EFS file system and share it across multiple Amazon Elastic Kubernetes Service (Amazon EKS) environments spanning multiple AWS accounts. Maintaining a centralized Amazon EFS file system in a shared services account allows organizations to seamlessly share application code and data across their AWS ecosystem. This enables development teams in separate accounts to collaborate on the same codebase, and allows production environments to securely access shared configurations.
Solution overview
In this solution, you mount from an EKS cluster to an Amazon EFS file system using two different accounts. Therefore, you must establish secure networking connectivity between the accounts, make sure of proper availability zone alignment for optimal performance and cost efficiency, and configure Domain Name System (DNS) resolution to enable reliable file system access.
First, when implementing cross-account Amazon EFS access, you need to establish Amazon Virtual Private Cloud (Amazon VPC) connectivity between the accounts. This can be achieved through VPC peering or AWS Transit Gateway. When the VPC connectivity is in place, administrators should deploy Amazon EFS in a Regional configuration, that replicates data across multiple AZs within the same Region.
For optimal performance and to prevent cross-AZ data transfer charges, we recommend creating Amazon EFS mount targets in each AZ and making sure that the compute nodes connect to these Amazon EFS mount targets using the same AZ ID. AWS assigns random AZ names for each account, which means “us-east-1a” can point to different physical locations across accounts, as shown in the following figure:

Figure 1: Availability zone and Availability zone ID mapping across AWS accounts
To make sure of consistency, each physical location has a unique AZ ID (such as “use1-az1”) that remains the same across all accounts. Using AZ IDs instead of AZ names guarantees targeting the same physical location.
Next, you mount the Amazon EFS file system from the EKS cluster. Amazon EFS enables you to mount the file system using the file system ID or an IP address. We recommend mounting through the Amazon EFS file system ID instead of private IP addresses to prevent hardcoding IP addresses that are dynamic. Use an Amazon Route 53 hosted zone, which allows you to route traffic for specific domains. In this case, that would be to resolve the Amazon EFS file system ID to its private IP address and route traffic accordingly.
You also need to install Amazon EFS CSI Driver (aws-efs-csi-driver) v1.36.0 or newer on your compute node. Visit Manually installing the Amazon EFS client to get more details on how to install the latest version.
Walkthrough
The following steps walk through how to set up VPC networking between two different AWS accounts and mount your Amazon EFS file system from your EKS cluster.
Assume the two account IDs are 111111111111 and 222222222222. The Amazon EFS file system ID in this example is fs-0c492f870b90c1c9a in account 111111111111 while the EKS cluster named EKS-cross-account-cluster is in account 222222222222.
Step 1: Log in to the AWS Management Console for account 111111111111 (Amazon EFS account)
- Log in to the Amazon EFS Console and choose the appropriate Region.
- Choose the Amazon EFS file system ID, then choose Network, as shown in the following figure.
- Make sure the mount targets are created in every AZ. If the mount targets are not created in every AZ, then use the Managing mount targets steps to create them.
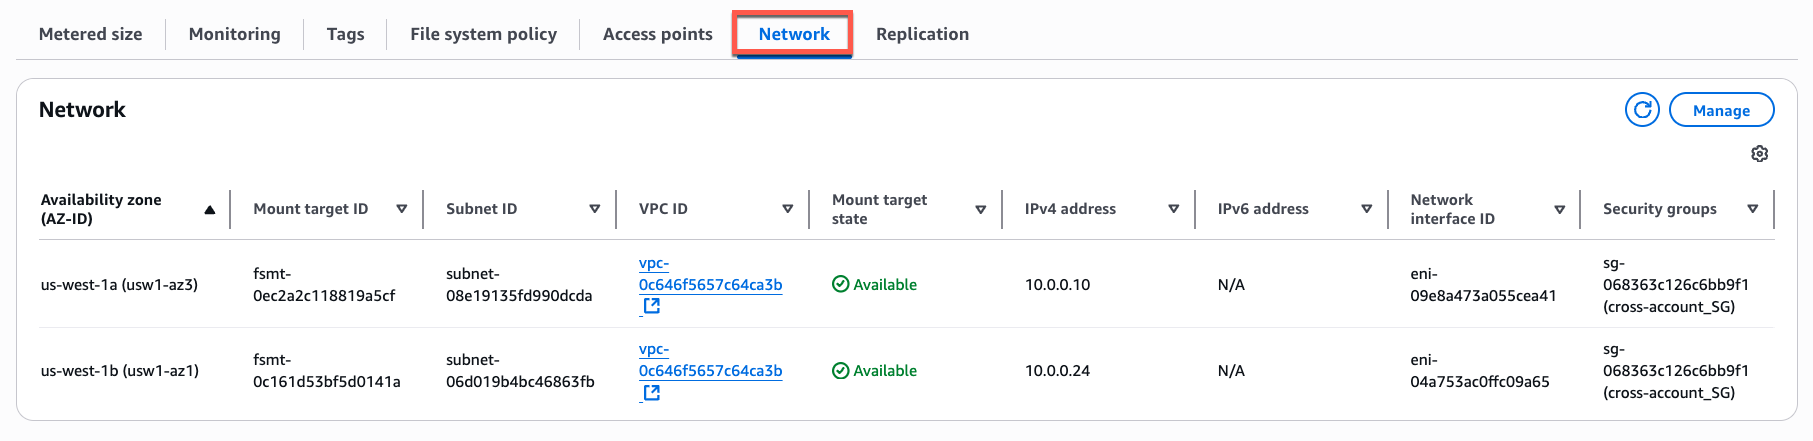
Figure 2: Network tab from EFS file system console page
Step 2: Note the Amazon EFS file system VPC ID for AWS Account 111111111111
- Note the VPC ID, AZ-ID and the corresponding IPv4 addresses of the Amazon EFS file system. You will need these later.
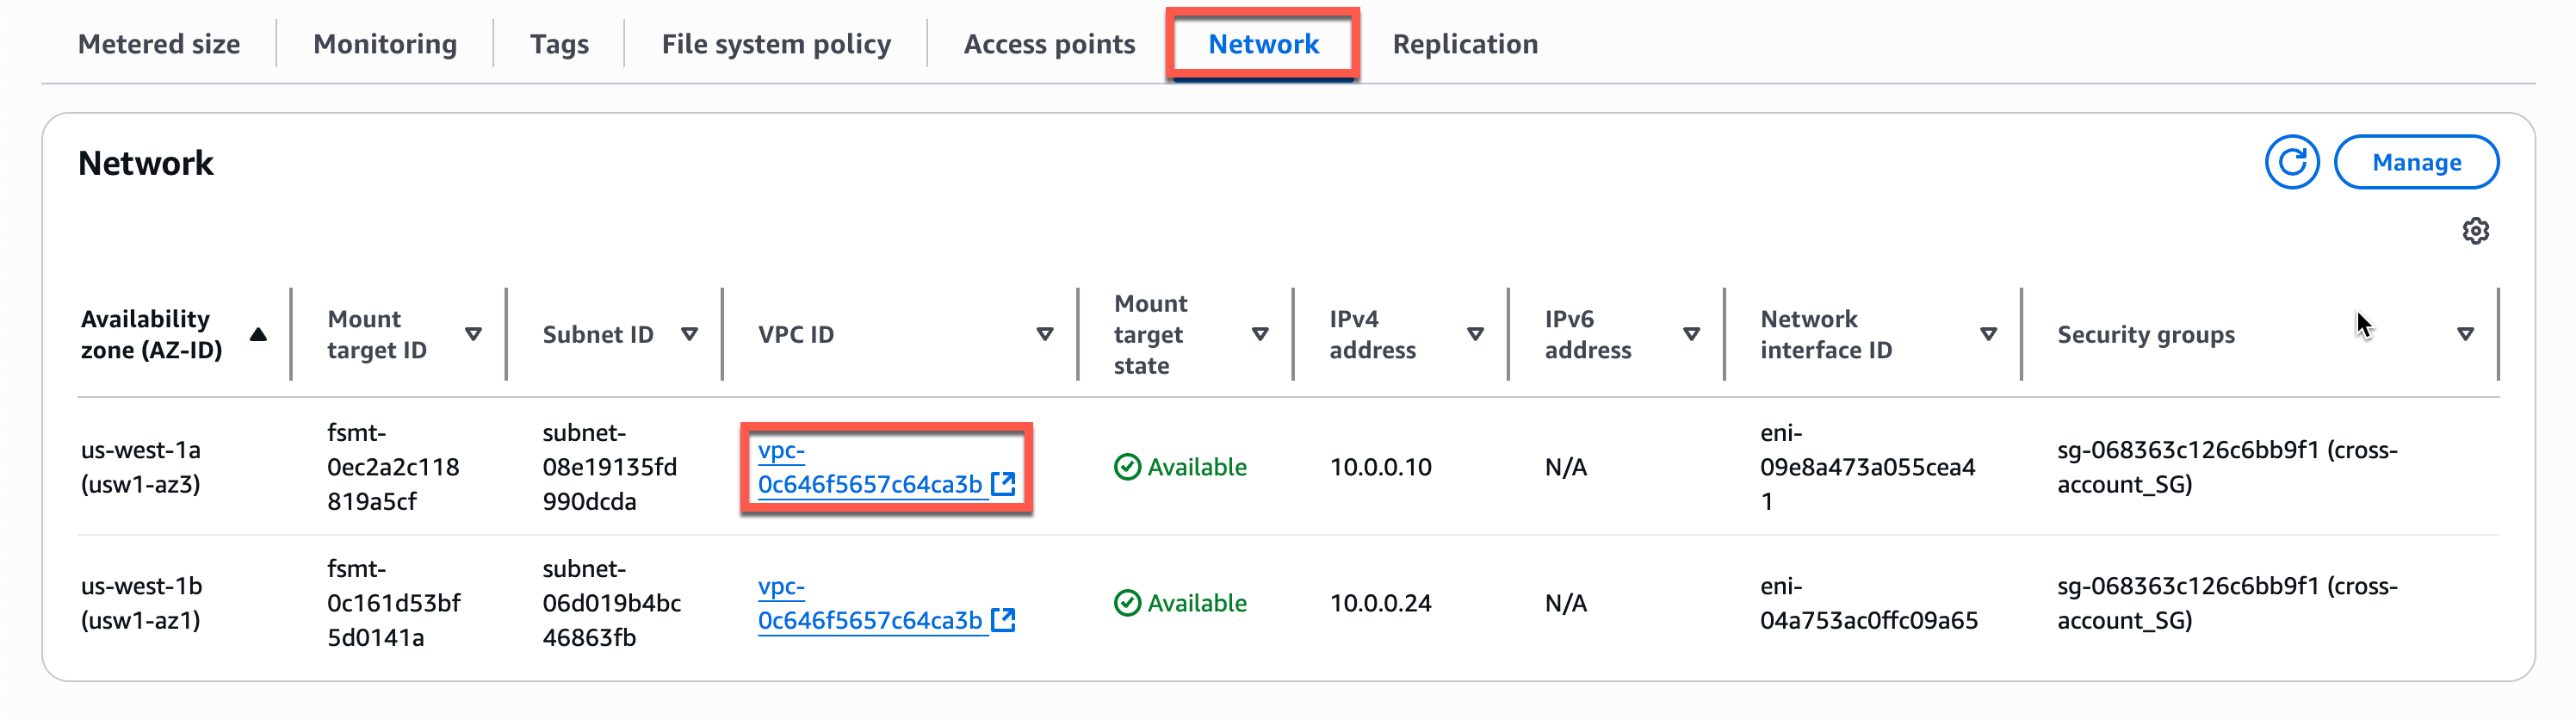
Figure 3: Network tab from EFS file system console page showing VPC ID
Step 3: Log in to the Console for AWS account 222222222222 (EKS cluster account)
- Log in to the Console for the EKS cluster and choose the appropriate Region.
- Go to the EKS console page and choose Clusters from the left navigation pane, choose the cluster name “EKS-cross-account-cluster”, then go to the Networking tab.
- Note the VPC ID and the cluster security group, as shown in the following figure.
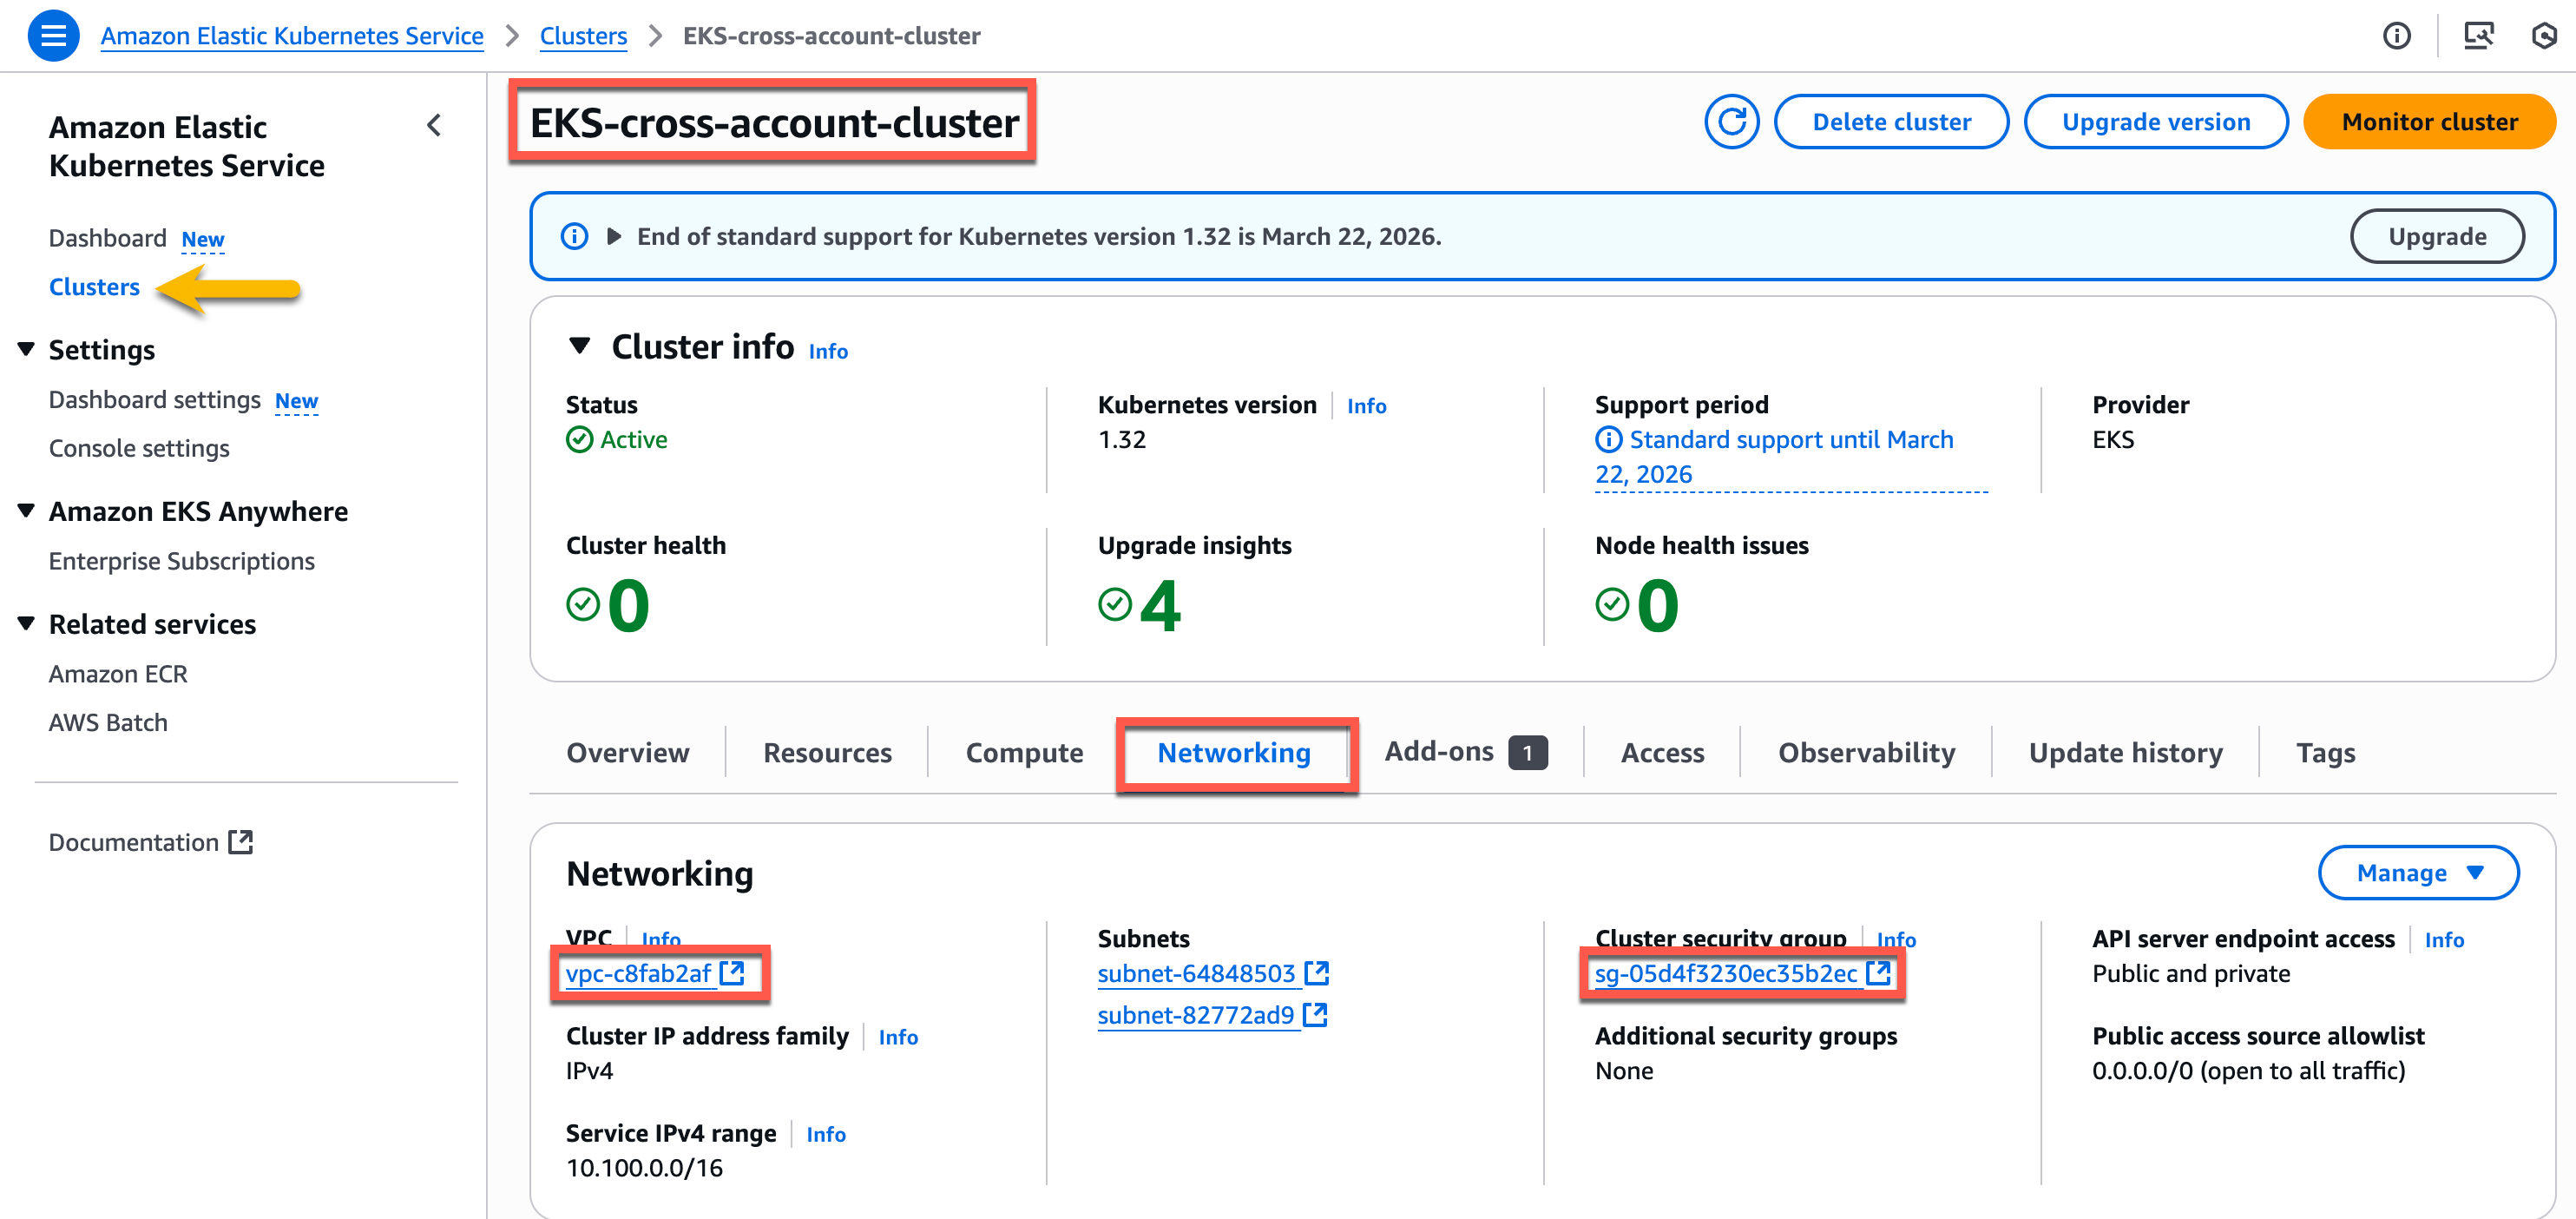
Figure 4: EKS Cluster details page
Step 4: Set up VPC peering connection between the two VPCs
- You can set up VPC peering from either account. In this example, you should set up VPC peering from EKS cluster account 222222222222.
- Go to the VPC console page and from left navigation page choose Peering connections. Choose Create peering connection, as shown in the following figure.
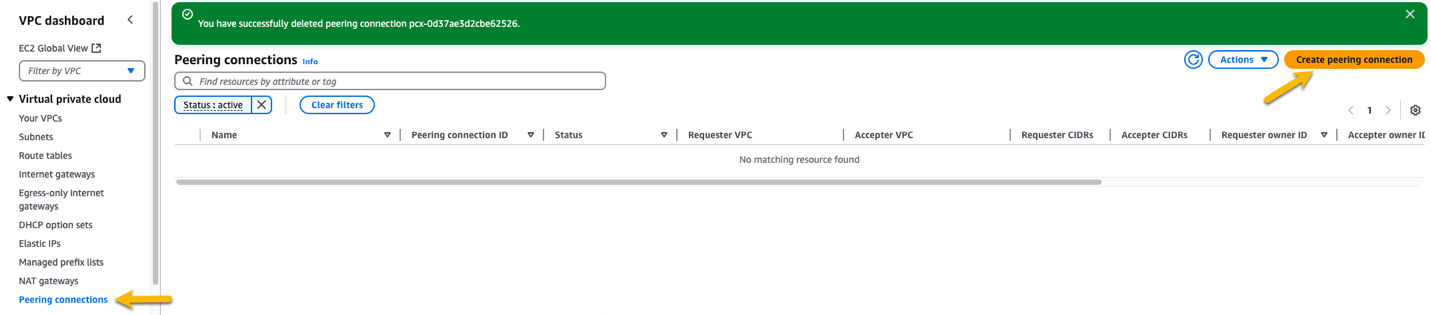
Figure 5: VPC Peering connection console page
- Provide the following details:
- Name – optional: Provide an optional name for the VPC peering connection.
- VPC ID (Requester): Choose the VPC ID noted from Step 3.3.
- Account field: Choose Another Account and input the account ID for your Amazon EFS file system, as shown in the following figure.
- Region: Choose This Region (in this example, it is us-west-1).
- VPC ID (Accepter): Paste the VPC ID noted in Step 2.1.
- NOTE: Make sure the VPCs do not have an overlapping CIDR range.
- Choose Create peering connection.
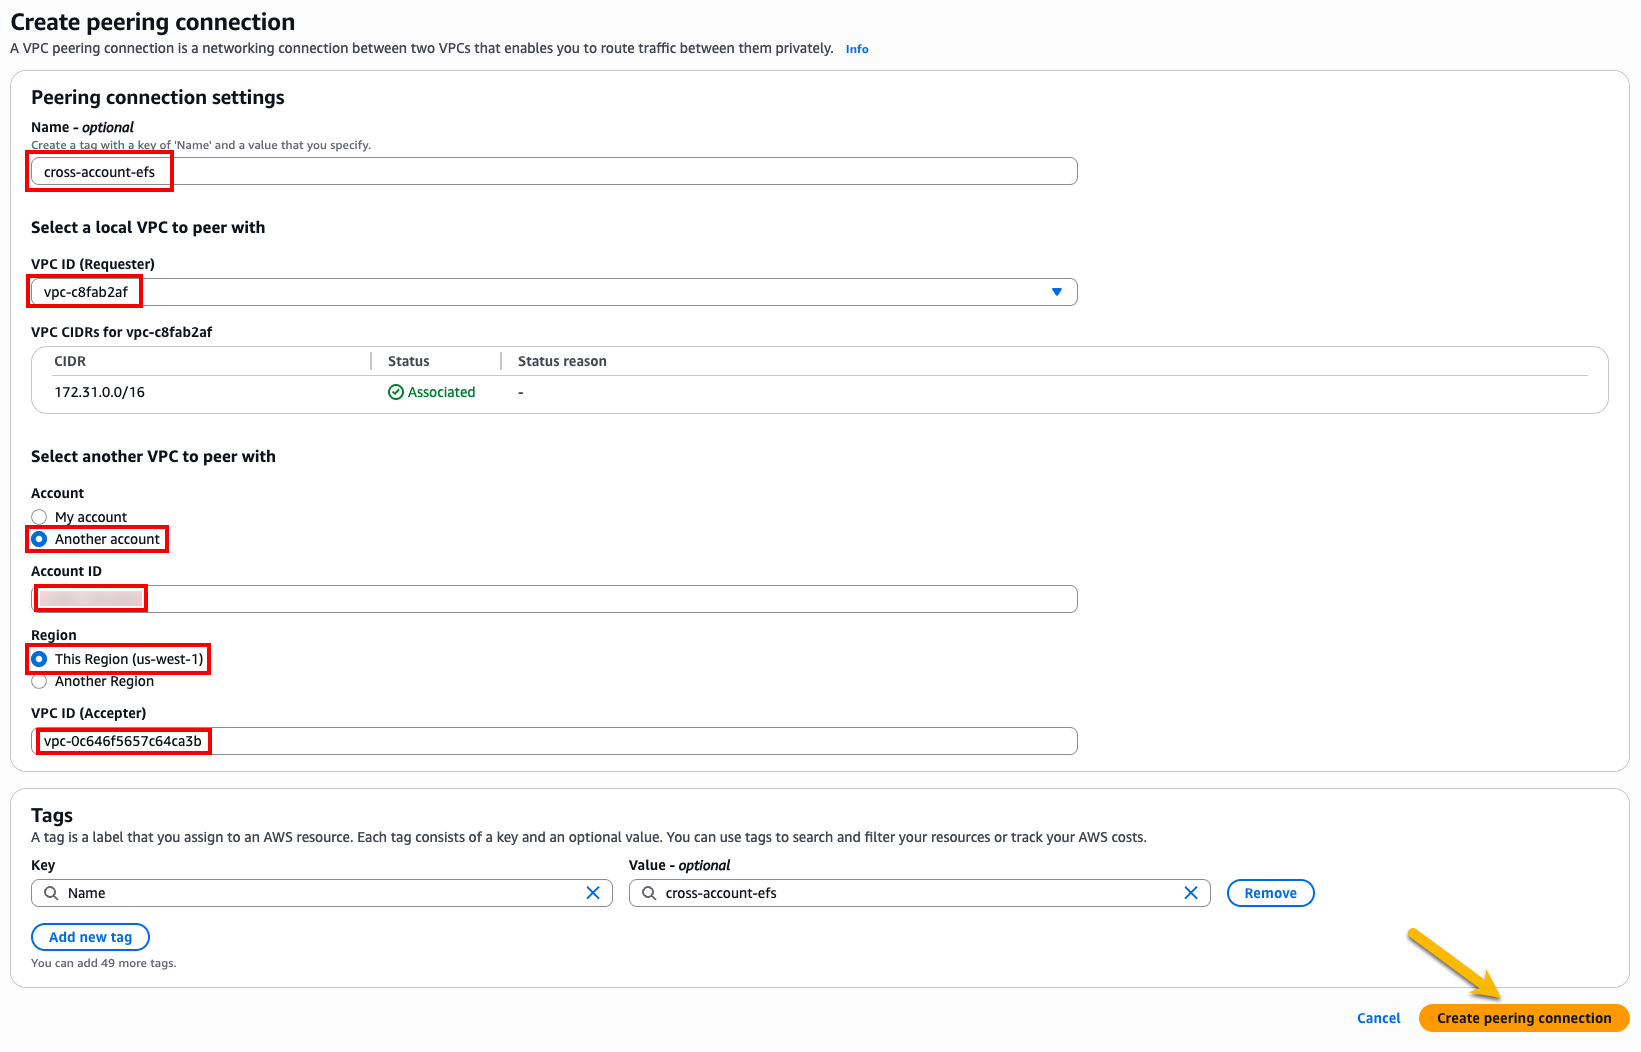
Figure 6: Creating a VPC peering connection
Step 5: Accept the VPC peering connection request for account 111111111111 (Amazon EFS account)
- Log in to account 111111111111 (Amazon EFS account) and navigate to the VPC console page, then choose Peering connections from the left pane, as shown in the following figure. You should see a request for VPC peering connection with status Pending acceptance. Choose the connection ID.
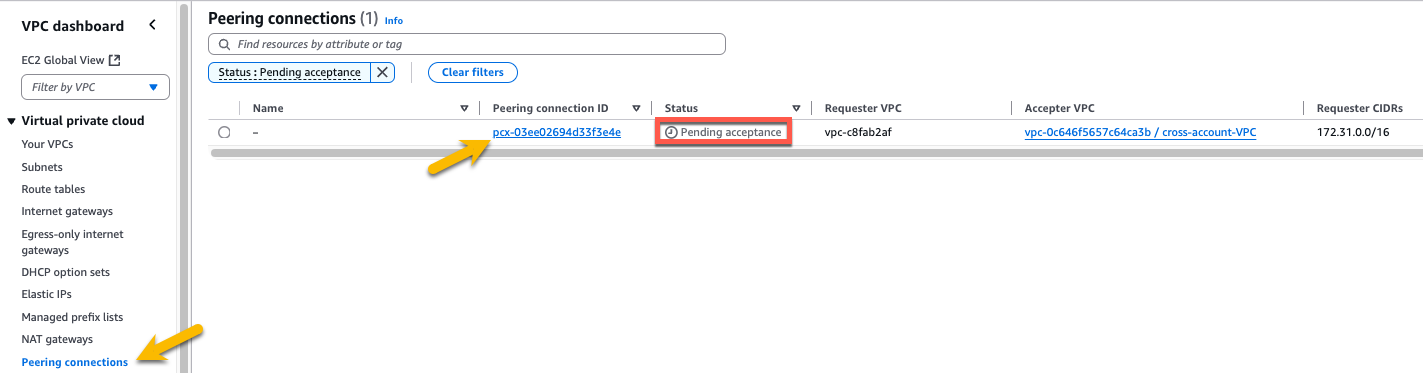
Figure 7: Peering connection ID for pending requests
- Make sure the Requester owner ID, Accepter owner ID, Requester VPC, and Accepter VPC are all correct as shown in the following figure. Then choose Actions > Accept request.
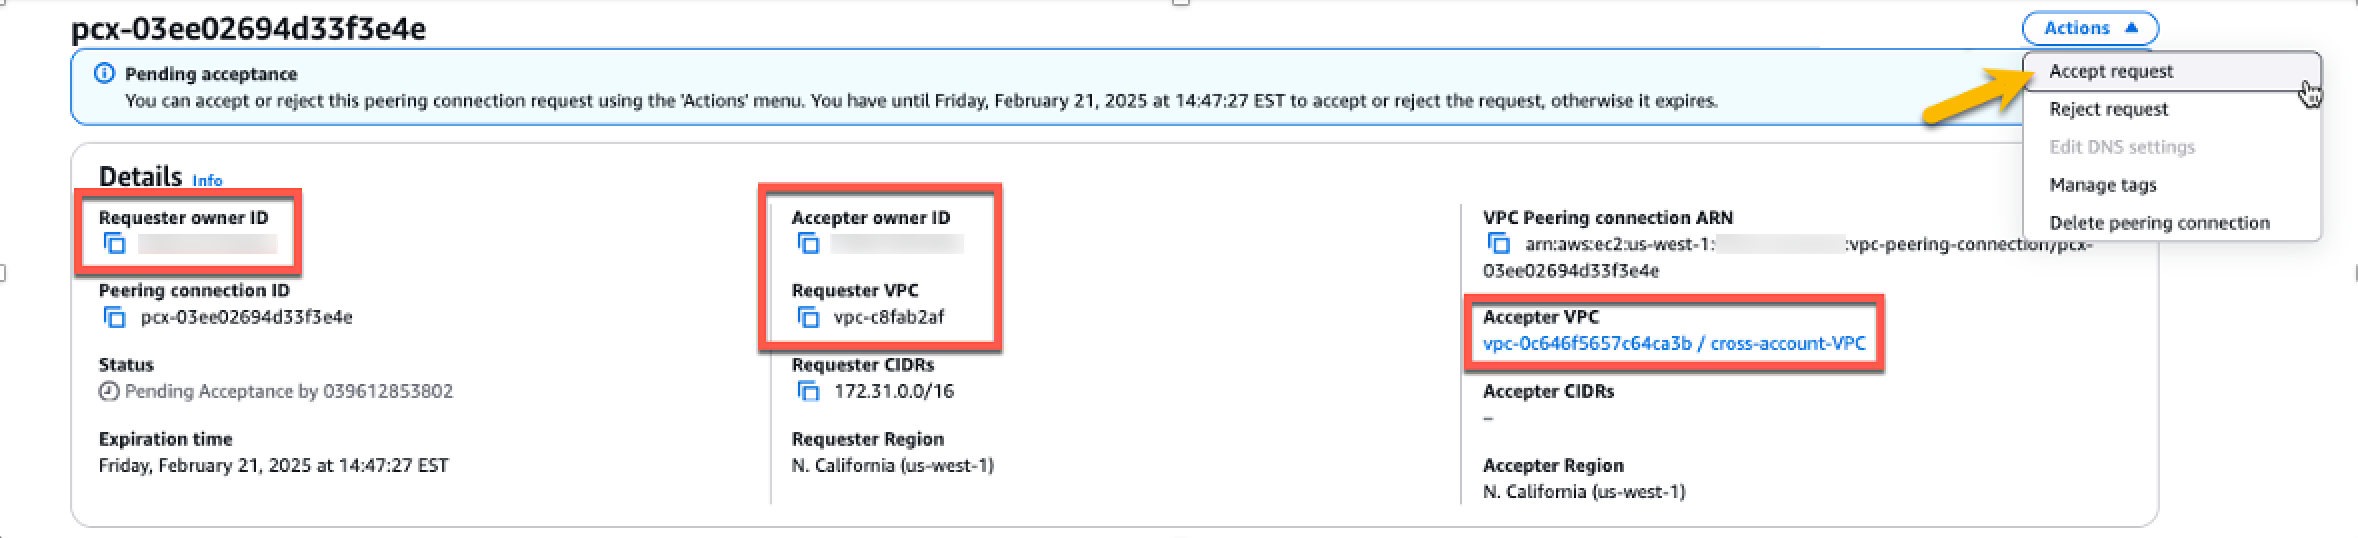
Figure 8: Accepting VPC peering connection request
- To confirm, again choose Accept request.
- The status of the VPC peering connection will change to Active.
Step 6: Add another route for the VPC peering connection in the route tables of both accounts
- Go to the VPC console page of AWS account 222222222222 (EKS cluster account), choose Route tables from the left navigation tab, and search for the route table ID that the EKS cluster is using, as shown in the following figure. Choose Actions > Edit routes.

Figure 9: VPC console page showing how to edit routes for a Route Table
- Choose the Add route button and input the following fields:
- Destination: Input the CIDR of the VPC in which the EFS file system is in from the other account.
- Target: First choose Peering Connection from the drop down, then input the ID of the peering connection noted from screenshot under Step 5.1. and then choose Save changes.
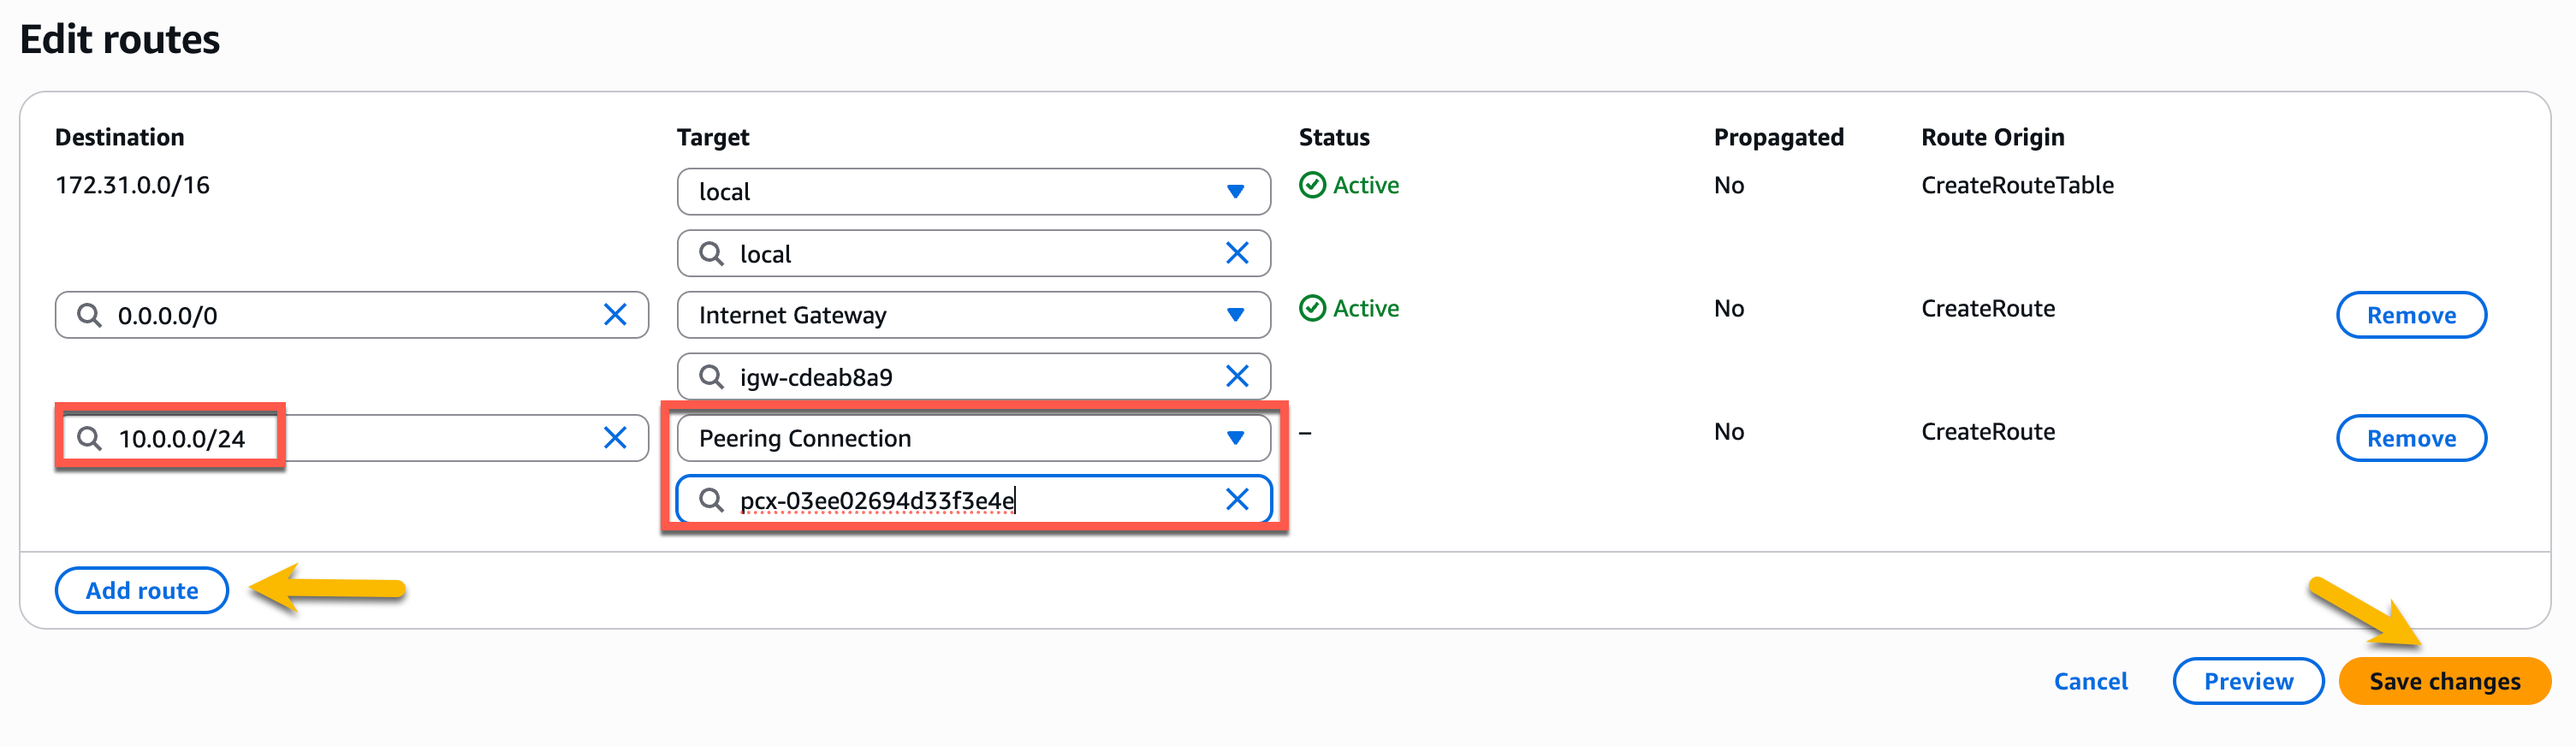
Figure 10: Adding peering connection entry in route table
- Log in to account 111111111111 (Amazon EFS account). Follow the preceding Steps 6.1 and 6.2 again in the Amazon EFS account.
- Destination: Input the CIDR of the VPC in which the EKS cluster is created in.
- Target: First choose Peering Connection from the drop down, then input the ID of the peering connection shown in Step 5.1, as shown in the following figure and then choose Save changes.
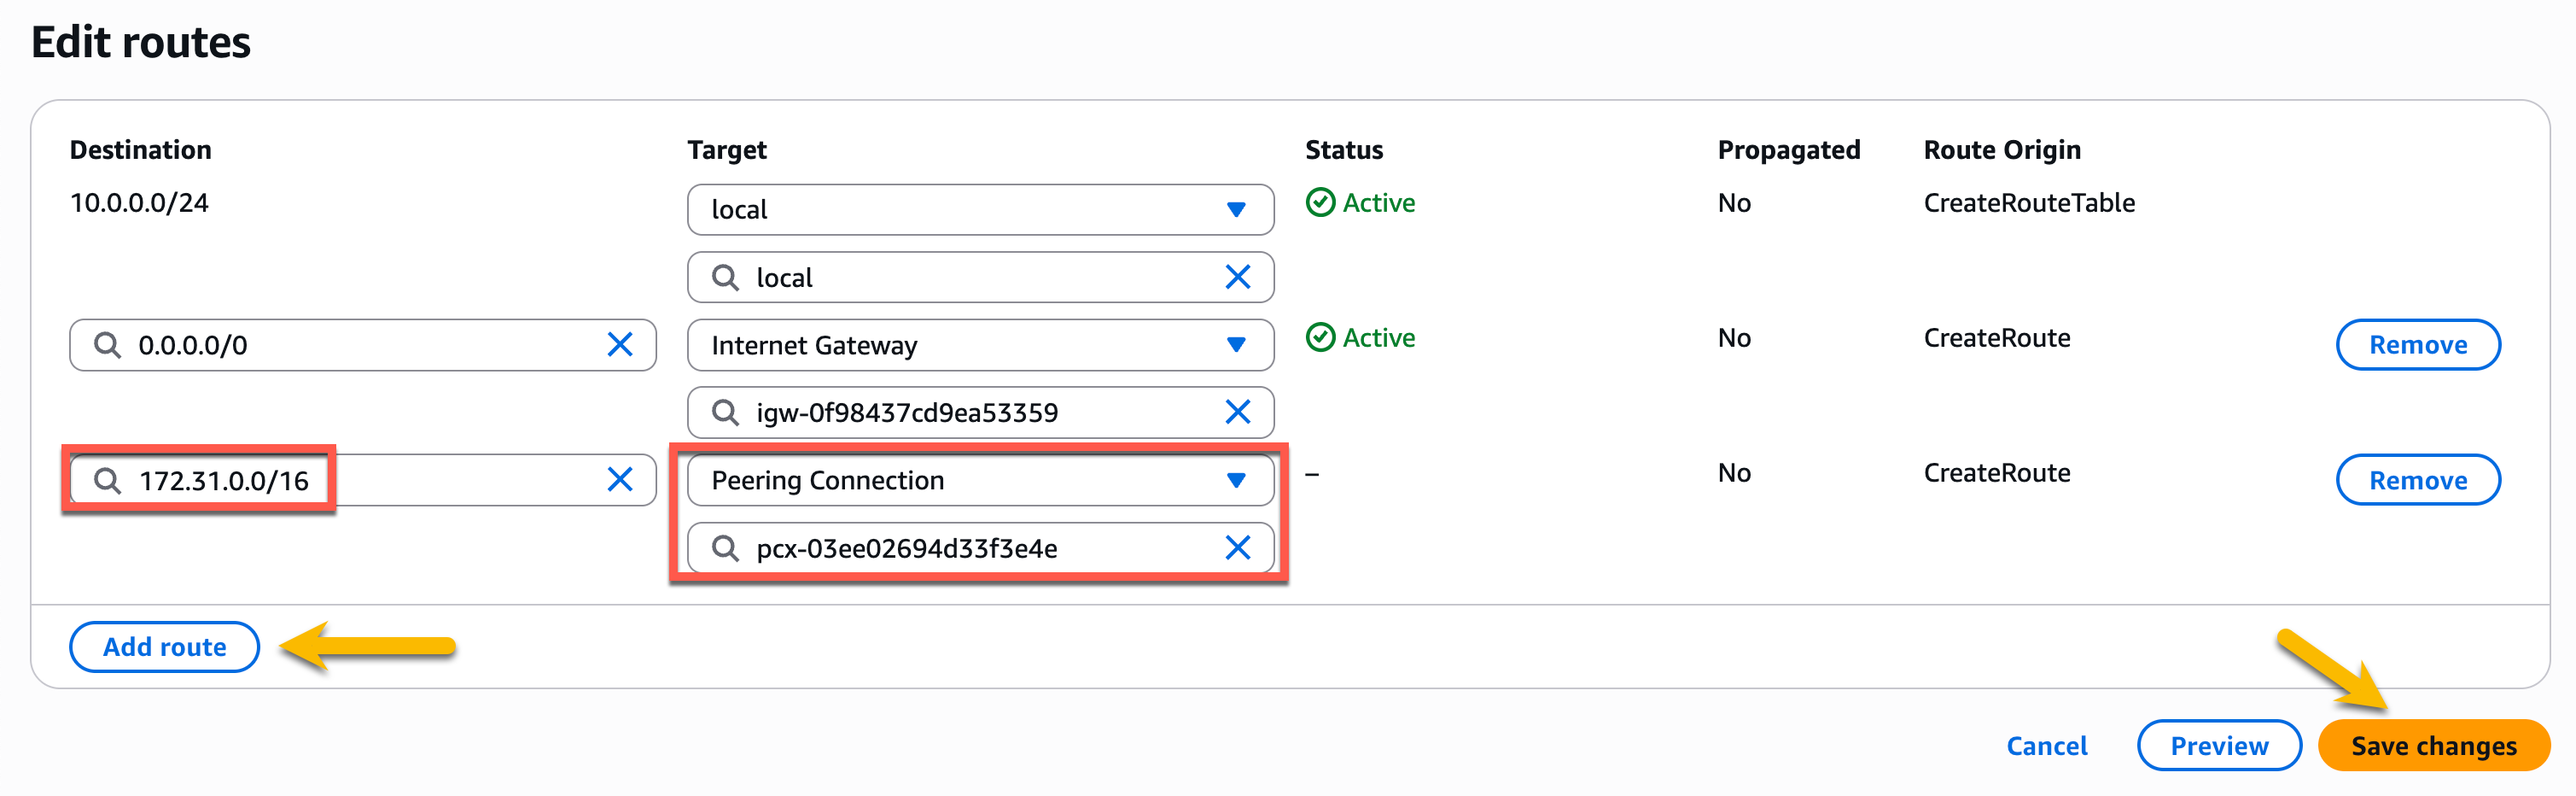
Figure 11: Adding peering connection entry in route table of the other account
Step 7: Add an entry to the security group of Amazon EFS file system to allow inbound traffic for port 2049 in AWS Account 111111111111 (Amazon EFS account)
- Go to the Amazon EFS file system console page in AWS account 111111111111 and choose the relevant Amazon EFS file system ID.
- Go to the Network tab, then note the security group ID.
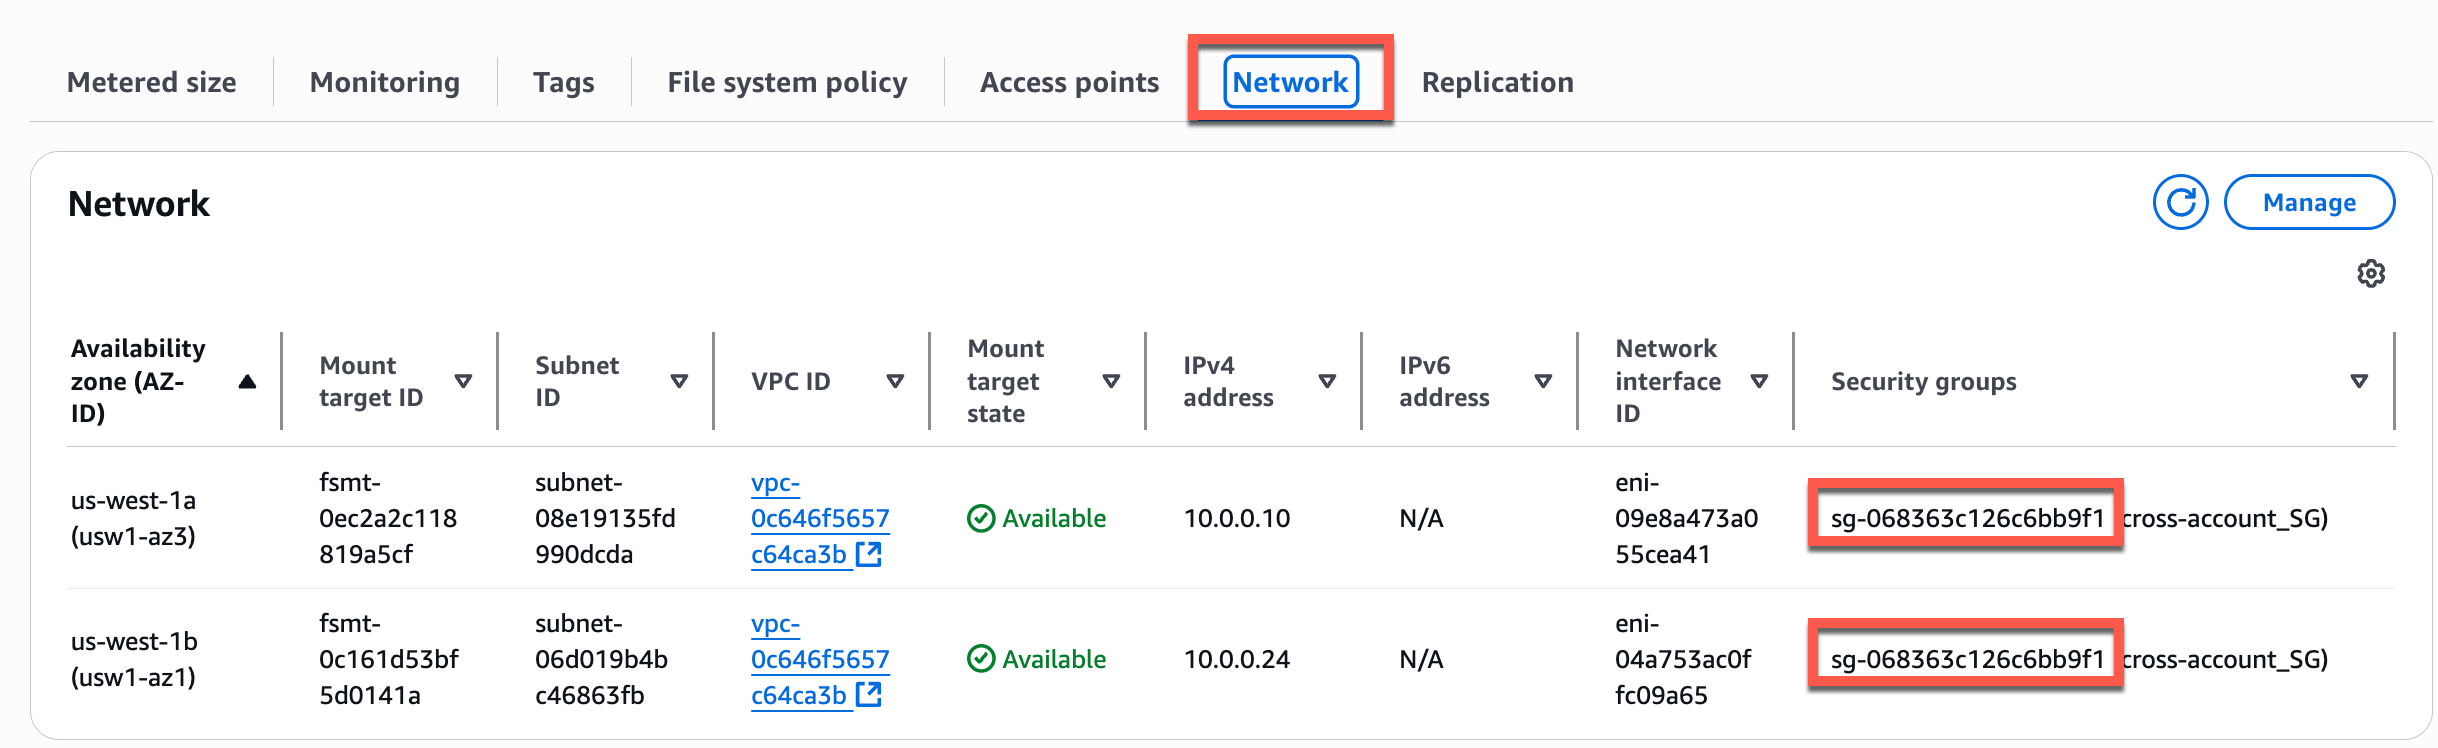
Figure 12: Security group IDs corresponding to mount targets of EFS file system
- Go to the VPC console, choose Security groups from the left navigation tab, and paste the security group ID copied from the previous step in the search field. Choose the security group ID as shown in the following figure.
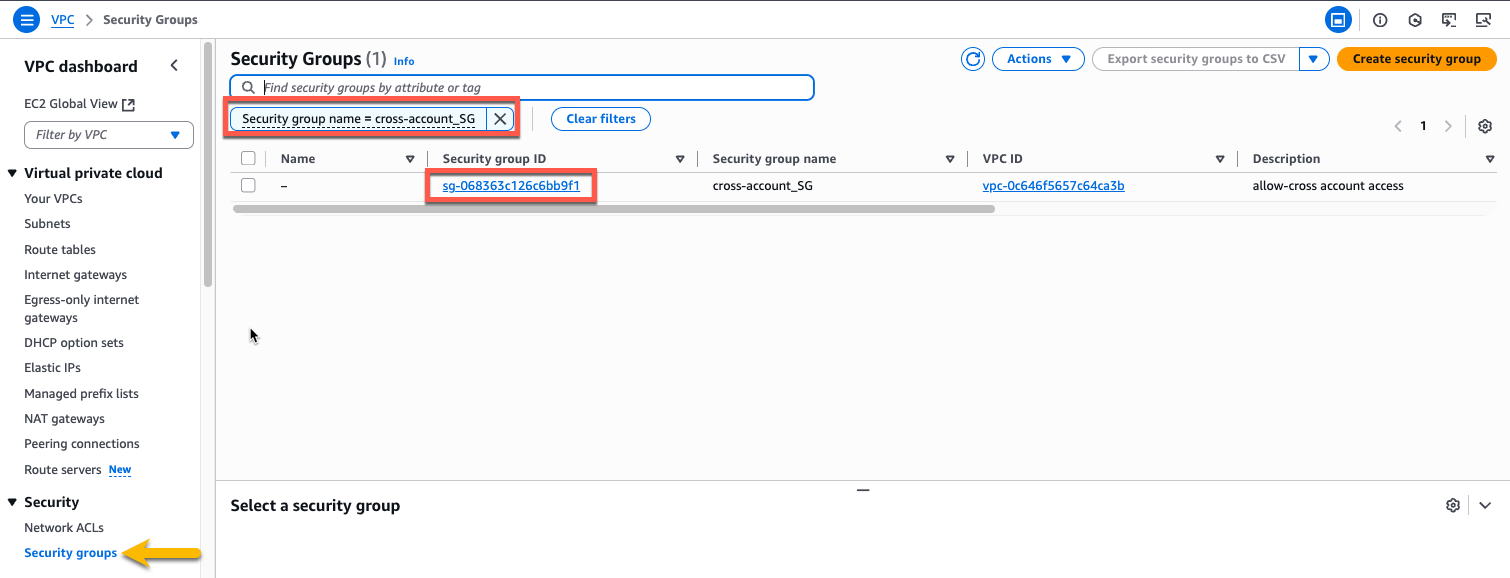
Figure 13: VPC console page for security groups
- Under the Inbound rules tab, choose Edit inbound rules.
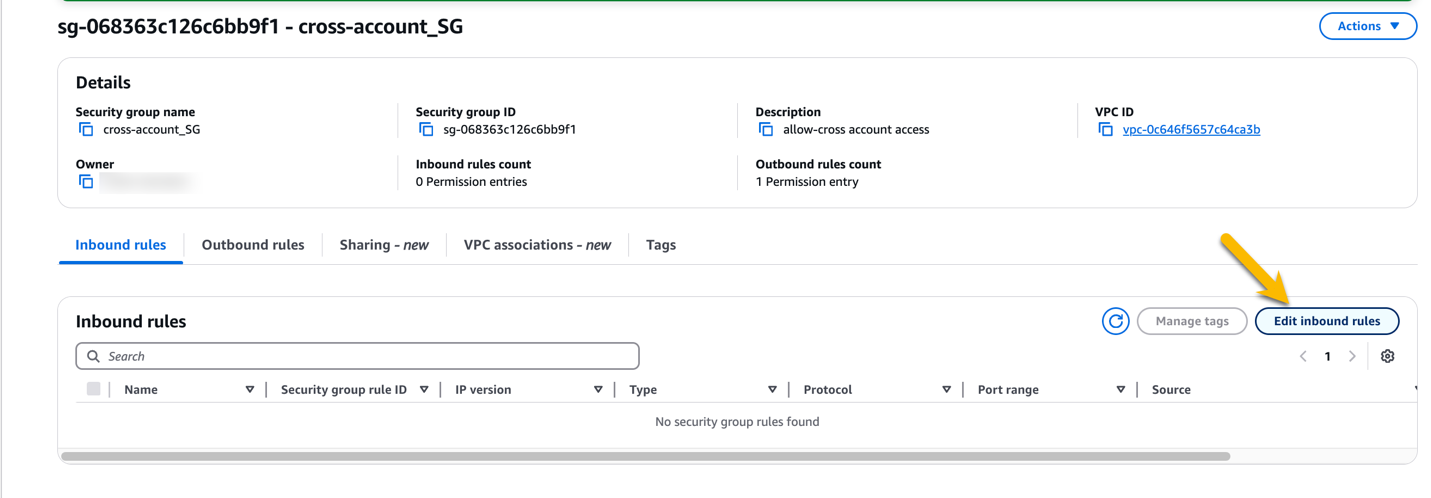
Figure 14: Editing inbound rule of security group
- Choose Add rule and add the following configurations:
- Type: From the drop down, choose NFS.
- Source: Choose Custom. Then enter the following format in the box next to it:
<Owner ID>/<Security group ID> - The owner ID is the account ID for the EKS cluster. The Security group ID is the EKS cluster security group ID. Paste the owner ID and security group ID that you copied in Step 3.3:
222222222222/sg-05d4f3230ec35b2ec
- Choose Save rules
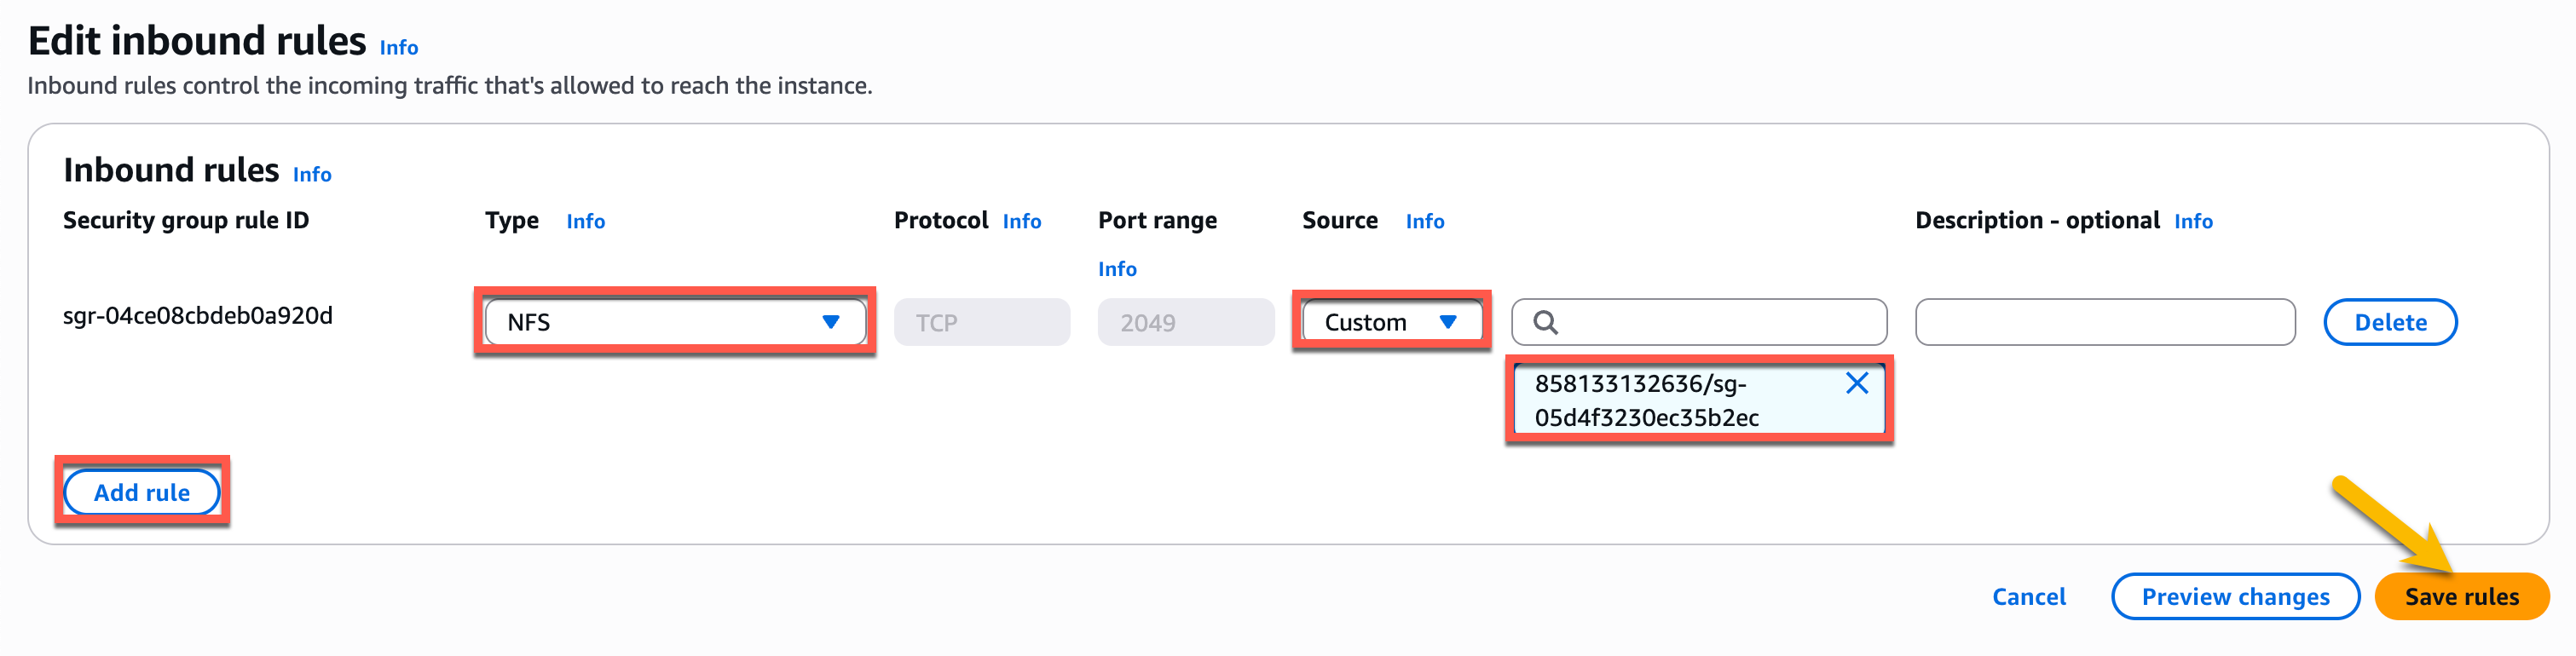
Figure 15: Adding an NFS inbound rule to cross account connection
Step 8: Create a Route 53 hosted zone in the AWS account 222222222222 (Amazon EKS cluster account)
To create a hosted zone, you must get the EFS file system ID from AWS account 111111111111. The hosted zone must be created for every AZ ID. Note the private IP address of the mount targets corresponding to the AZ IDs under the IPv4 address column, as can be seen in the screenshot from Step 2.1. The hosted zone needs to be created using the following template:
<availability-zone-id>.<file-system-id>.efs.<aws-region>.amazonaws.com.
To find the AZ ID of the relevant Region, follow the steps listed in Availability Zone IDs for your AWS resources.
For example, us-west-1 has two “availability-zone-ids” named usw1-az3 and usw1-az1 corresponding to two AZs. Replace these in the above template and thus in this example, you will have the two following domains::
- Go to the Route 53 console page and choose Hosted Zones from the left navigation pane, then choose Create hosted zone.

Figure 16: Creating a hosted zone from Route 53 console page
- Enter the following configurations:
- Domain name:
usw1-az3.fs-0c492f870b90c1c9a.efs.us-west-1.amazonaws.com. - (Your domain name is different based on the AZ ID, Amazon EFS file system ID, and AWS Region).
- Description: This is optional.
- Type: Choose Private hosted zone.
- VPCs to associate with the hosted zone > Region: Choose the Region in which the EKS cluster and Amazon EFS file system are located. In this example, it is the US West (N. California) Region.
- VPC ID: Choose the VPC in which the EKS cluster is located.
- Tags: This is optional.
- Choose Create Hosted zone.
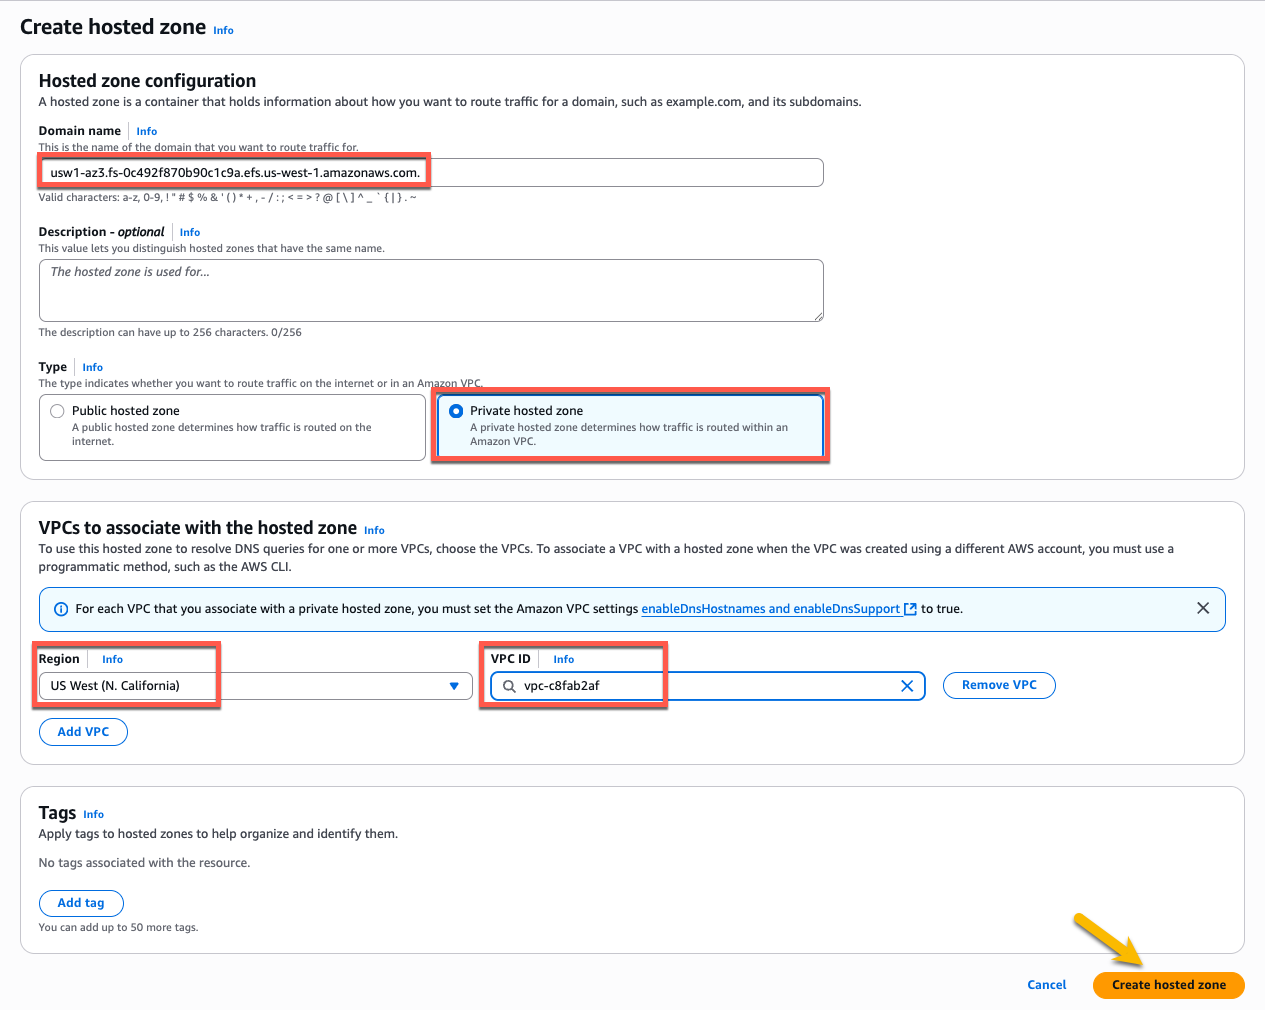
Figure 17: Adding details for private hosted zone for EFS AZ-ID domain name
- Create an A record for this hosted zone. Choose Create record. Enter the following configurations:
- Record name: Leave blank.
- Record type: Choose from the drop down A – Routes traffic to an IPv4 address and some AWS resources.
- Value: Enter the IP address of the mount target of the Amazon EFS file system corresponding to AZ ID usw1-az3 (Noted from step 2.1).
- Leave everything else as is.
- Choose Create records.
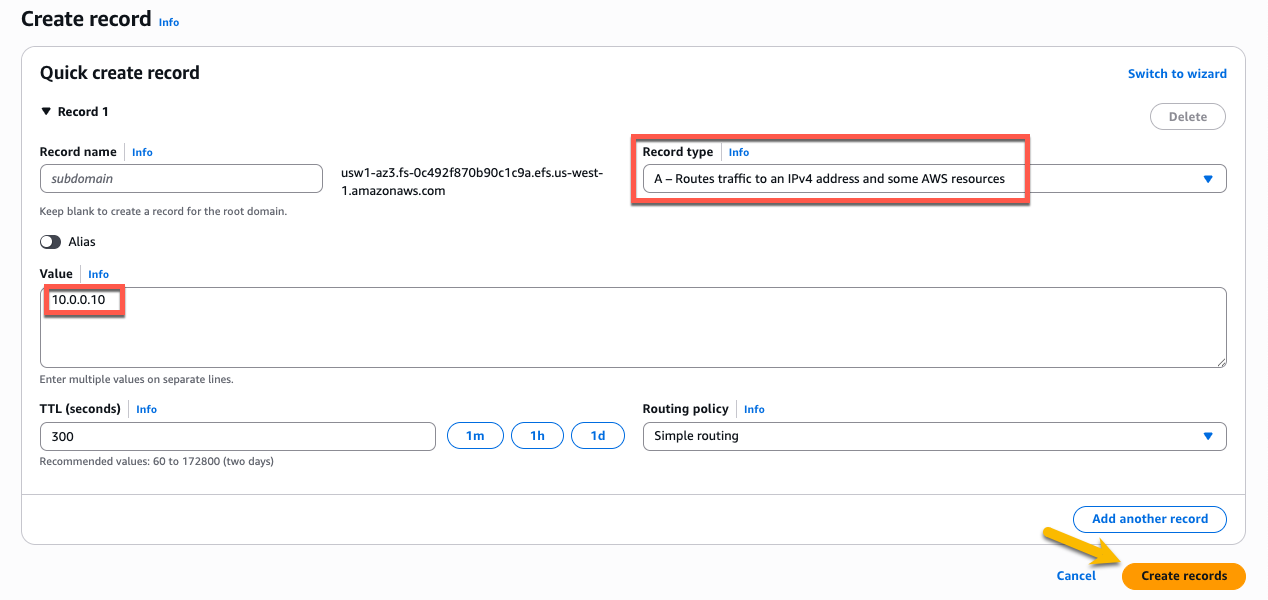
Figure 18: Creating an A record for the hosted zone correcponding to IP address to mount target
- Follow Steps 8.1 to 8.3 to create the hosted zone and A record for the AZ ID corresponding to usw1-az1:
usw1-az1.fs-0c492f870b90c1c9a.efs.us-west-1.amazonaws.com.
In this example, I am using the us-west-1 Region, which only has two AZs. If you are using other AWS Regions, then you may have more than two AZs. Therefore, make sure to create a hosted zone for each of the AZ IDs in that AWS Region corresponding to the mount targets created in those AZs for the Amazon EFS file system.
Step 9: Log in to the AWS Account 111111111111 and create an IAM role (Amazon EFS account)
1. Open an IDE or a terminal window that has AWS Command Line Interface (AWS CLI) installed. Make sure that you have sufficient permissions to run the AWS CLI commands against the resources. In this case, I am using AWS CloudShell, but you can use any terminal that has access to run AWS CLI commands on the resources in AWS account 111111111111.
2. First set the Amazon EFS account ID and Amazon EKS account ID as environment variables in the IDE. Make sure to replace 111111111111 and 222222222222 with the account IDs of your Amazon EFS file system and EKS cluster respectively:
3. Create an AWS Identity and Access Management (IAM) role with a cross-account trust relationship in the Amazon EFS account:
5. Download the IAM policy to describe mount targets:
6. Obtain the Amazon EFS file system Amazon Resource Name (ARN) using the following command. Make sure to replace <FS-ID> with your Amazon EFS file system ID:
7. Open the downloaded describe_mt.json file and replace the “*” next to resource field in this downloaded file with the Amazon EFS file system ARN obtained previously:
8. Create an IAM policy to describe the mount targets:
9. Attach it to the cross-account role that you created previously:
Step 10: Log in to the AWS account 222222222222 (Amazon EKS cluster account)
1. Open an IDE or a terminal window that has AWS CLI installed. Make sure that you use the role that created the EKS cluster to have proper permissions for running CLI commands against it. In this case, I use CloudShell, but you can use any terminal that has access to run AWS CLI commands on the resources in AWS account 222222222222.
2. First, set up the environment variables for the account IDs corresponding to the Amazon EFS file system and EKS cluster in this IDE as well. Make sure to replace 111111111111 and 222222222222 with the account IDs of your Amazon EFS file system and EKS cluster respectively:
3. Install kubectx:
4. Install eksctl:
5. Set kube-config context:
My example EKS cluster name is EKS-cross-account-cluster and the Region is us-west-1. Make sure that you use the appropriate cluster name and AWS Region as per your account.
6. Create an IAM OIDC identity provider for this newly created cluster EKS-cross-account-cluster. If you already have an IAM OIDC identity provider for your existing cluster, then you can skip this step.
7. Create an IAM role and trust policy needed to create the Amazon EFS CSI driver add-on for the EKS cluster. Furthermore, create the IAM service account here:
