AWS Storage Blog
Optimize Amazon EBS volumes to get the right performance at the right time
Business-critical applications depend on reliable storage performance. However, workloads aren’t static and can vary by time of day, day of week, or business cycle. Matching storage performance to these shifting demands is essential for maintaining application reliability without overspending. Under-provisioning can affect your applications when demand peaks, while provisioning too much for too long means paying for performance your workloads don’t actually need. The challenge is knowing how much performance to provision and when to provision it.
Amazon Elastic Block Store (Amazon EBS) Elastic Volumes modifications help you address this challenge by adjusting your volume configurations without disrupting your running applications. You can increase the size, change the type, and adjust the IOPS and throughput without detaching your volumes or restarting your instances. Combined with Amazon CloudWatch metrics that report average IOPS and throughput at one-minute intervals, you can observe your actual workload patterns and right-size your volumes to match real demand.
In this post, we demonstrate how to use Amazon CloudWatch metrics to understand your volume performance trends and configure your volumes optimally using the new Amazon EBS Elastic Volumes support for four modifications in 24 hours. By following this approach, you can replace static over-provisioning with targeted modifications that match your actual demand, reducing your storage costs while maintaining the performance your applications require.
Solution overview
To demonstrate this, we walk through an example of a fintech company running a self-managed distributed database on a set of 250 GiB Amazon EBS gp3 volumes. The cluster processes nightly batch reconciliation and handles high-concurrency transaction processing during peak morning hours. Previously, the customer took a conservative approach. To account for the six-hour cooldown period between modifications, they provisioned peak IOPS and throughput starting at 11:00 pm and kept it provisioned through noon the next day. This covered both workloads, but it also meant paying for peak performance for 13 hours, even when the workload only needed it for a portion of that time.
With the new enhancement to Amazon EBS Elastic Volumes modifications, you no longer need to wait six hours between modifications. You can initiate a new modification as soon as the previous one completes, up to four modifications in a 24-hour period. This enabled the fintech company to provision the exact IOPS and throughput needed for their nightly batch job, scale down afterward, and then scale up again for morning peak demand.
Now let’s walk through how to implement this using Amazon CloudWatch metrics and Elastic Volumes modifications.
Step 1: Use Amazon CloudWatch metrics to understand performance trends
To configure volume performance effectively, you first need to understand your workload’s actual requirements. Amazon EBS now publishes two new CloudWatch metrics — VolumeAvgIOPS and VolumeAvgThroughput — that report average IOPS and throughput of your volumes at one-minute intervals, at no additional cost. These metrics help you answer two key questions: “What IOPS and throughput does your workload require?” and “When does it need this higher performance, and for how long?”. For workloads that require finer-grained, per-second visibility into IOPS and throughput, Amazon EBS also offers Detailed Performance Statistics, higher-resolution metrics available directly on Nitro-based instances.
You can create a CloudWatch dashboard to visualize average IOPS and throughput trends over days or weeks. To view these metrics on the Amazon CloudWatch console:
- Open the CloudWatch console and select Dashboards from the navigation pane, then choose Create dashboard.
- Enter a name for your dashboard and choose Create dashboard.
- Add a widget to visualize your metrics. Choose Line or Stacked area for time-series graphs.
- In the Add metric graph dialog box, select the metric(s) to graph, and then choose Create widget. If a metric doesn’t appear in the dialog box because it hasn’t published data in more than 14 days, you can add it manually.
- Repeat steps 3 and 4 to add additional widgets as needed.
- Choose Save dashboard.
The following screenshot shows the fintech customer’s dashboard with VolumeAvgIOPS and VolumeAvgThroughput metrics.
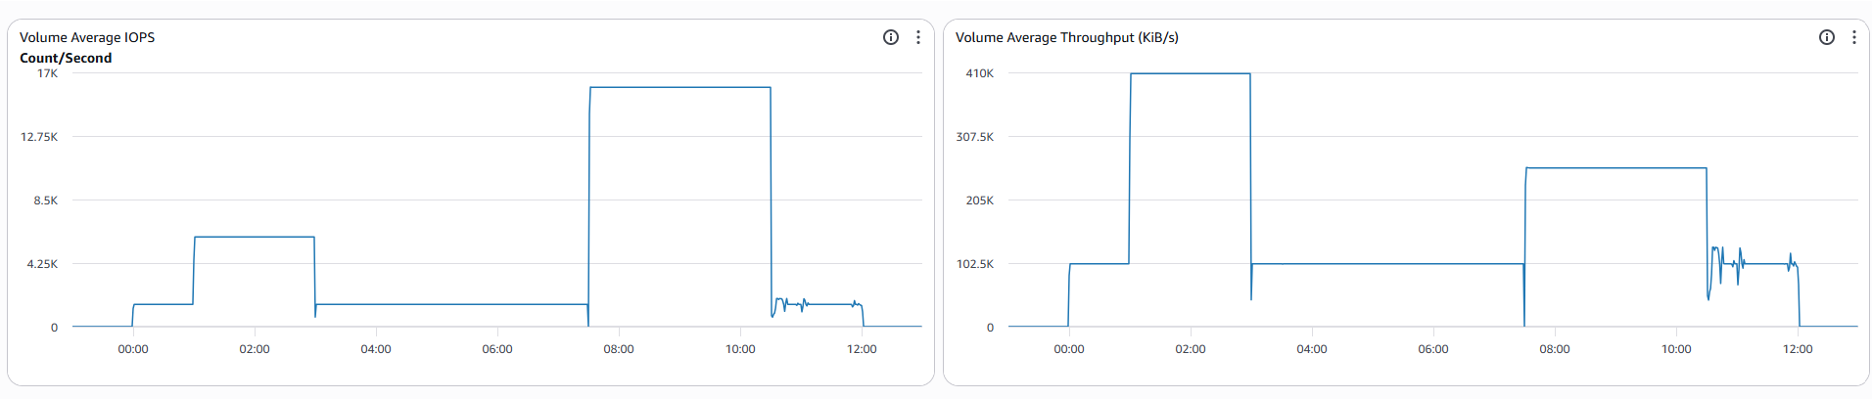
By monitoring the dashboard over several weeks, the customer identified two distinct high-performance windows each day:
- Nightly batch reconciliation processing (01:00–03:00 UTC): IOPS averages 6,000 and throughput averages 400 MiB/s.
- Morning peak hours (07:30–10:30 UTC): IOPS averages 16,000 and throughput averages 250 MiB/s.
Step 2: Configure volume performance to match workload needs
With a better understanding of your workload’s performance trends from Step 1, you can now plan your volume modifications to match your needs more accurately. Amazon EBS now allows you to perform a new volume modification immediately after the previous one is complete. You can perform up to four modifications in a rolling 24-hour window, which starts when you initiate the first modification. To initiate a modification, your volume must be in the in-use or available state, and all previous modifications for that volume must be completed. If you exceed the four-modification limit, you receive an error message that indicates when you can perform your next modification.
An error occurred (VolumeModificationRateExceeded) when calling the ModifyVolume operation: You've reached the maximum modification rate per volume limit. Wait until YYYY-MM-DDTHH:MM:SS.sssZ before you can issue the next modification request for this volume.
You can modify your EBS volume using the AWS Elastic Compute Cloud (Amazon EC2) console, AWS Command Line Interface (AWS CLI), or AWS SDKs. To modify a volume using the AWS console, complete the following steps:
- Open the Amazon EC2 console at https://console.aws.amazon.com/ec2/.
- In the navigation pane, choose Volumes.
- Select the volume to modify and choose Modify.
- The Modify volume screen displays the volume ID and the volume’s current configuration. Enter the new IOPS and throughput.
- After you change the volume settings, choose Modify. When prompted for confirmation, choose Modify.
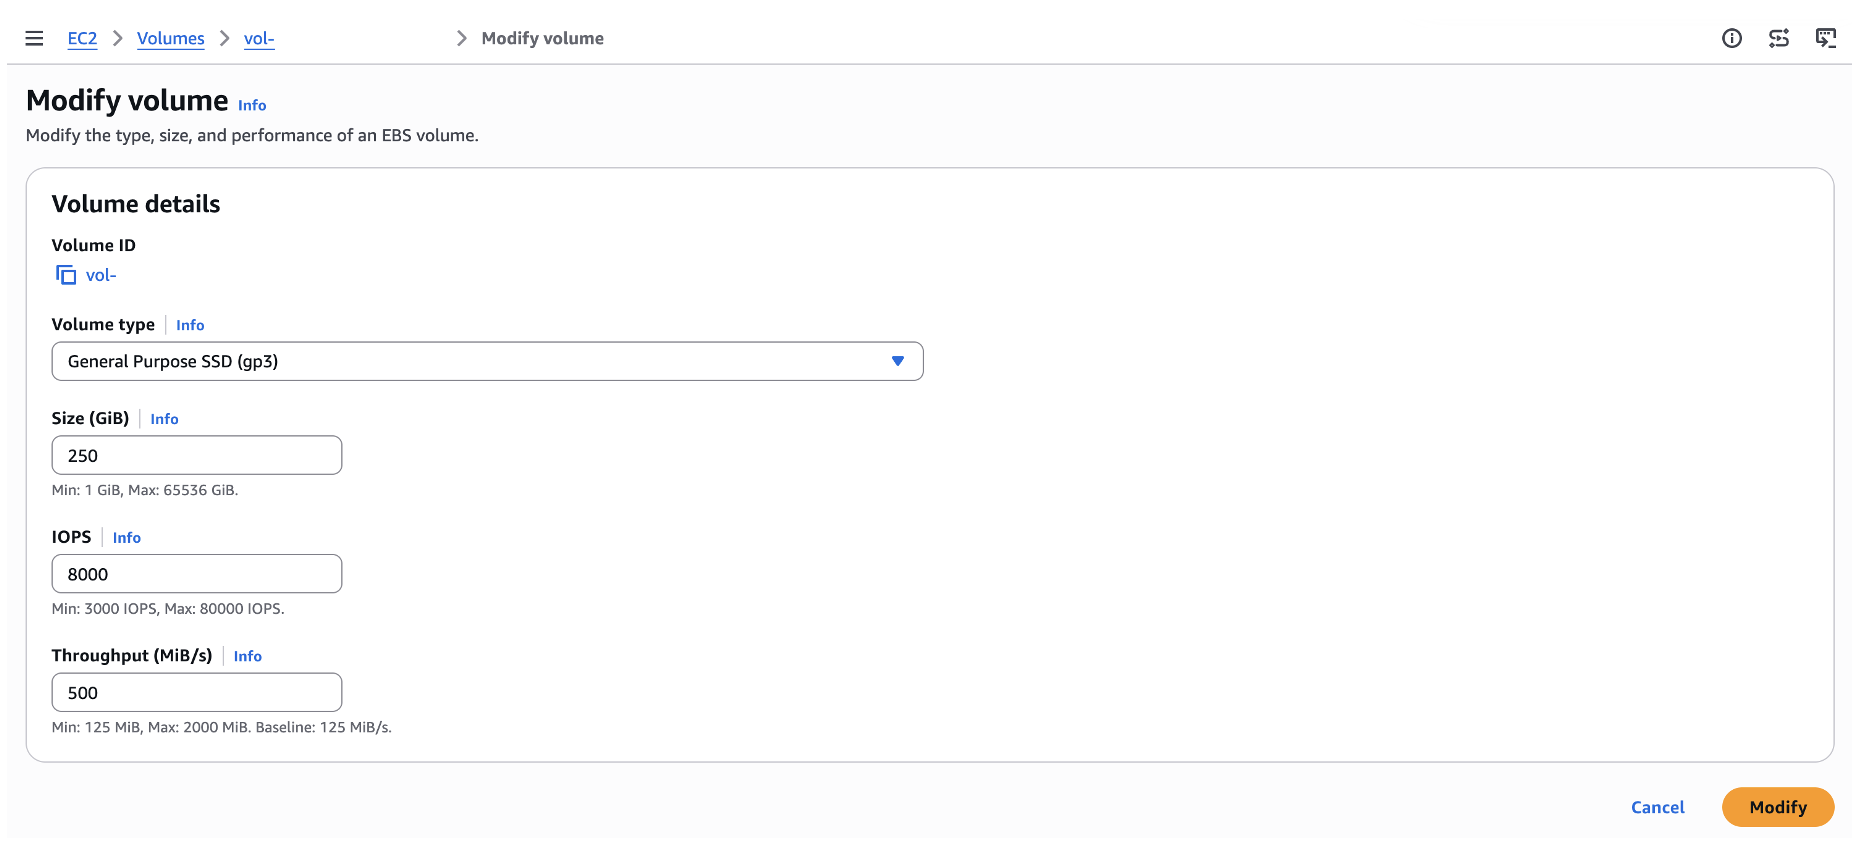
6. Monitor the modification progress. As shown in the following screenshot, the Volume state field on the Details tab contains information in the following format: Volume state - Modification state (Modification progress%).
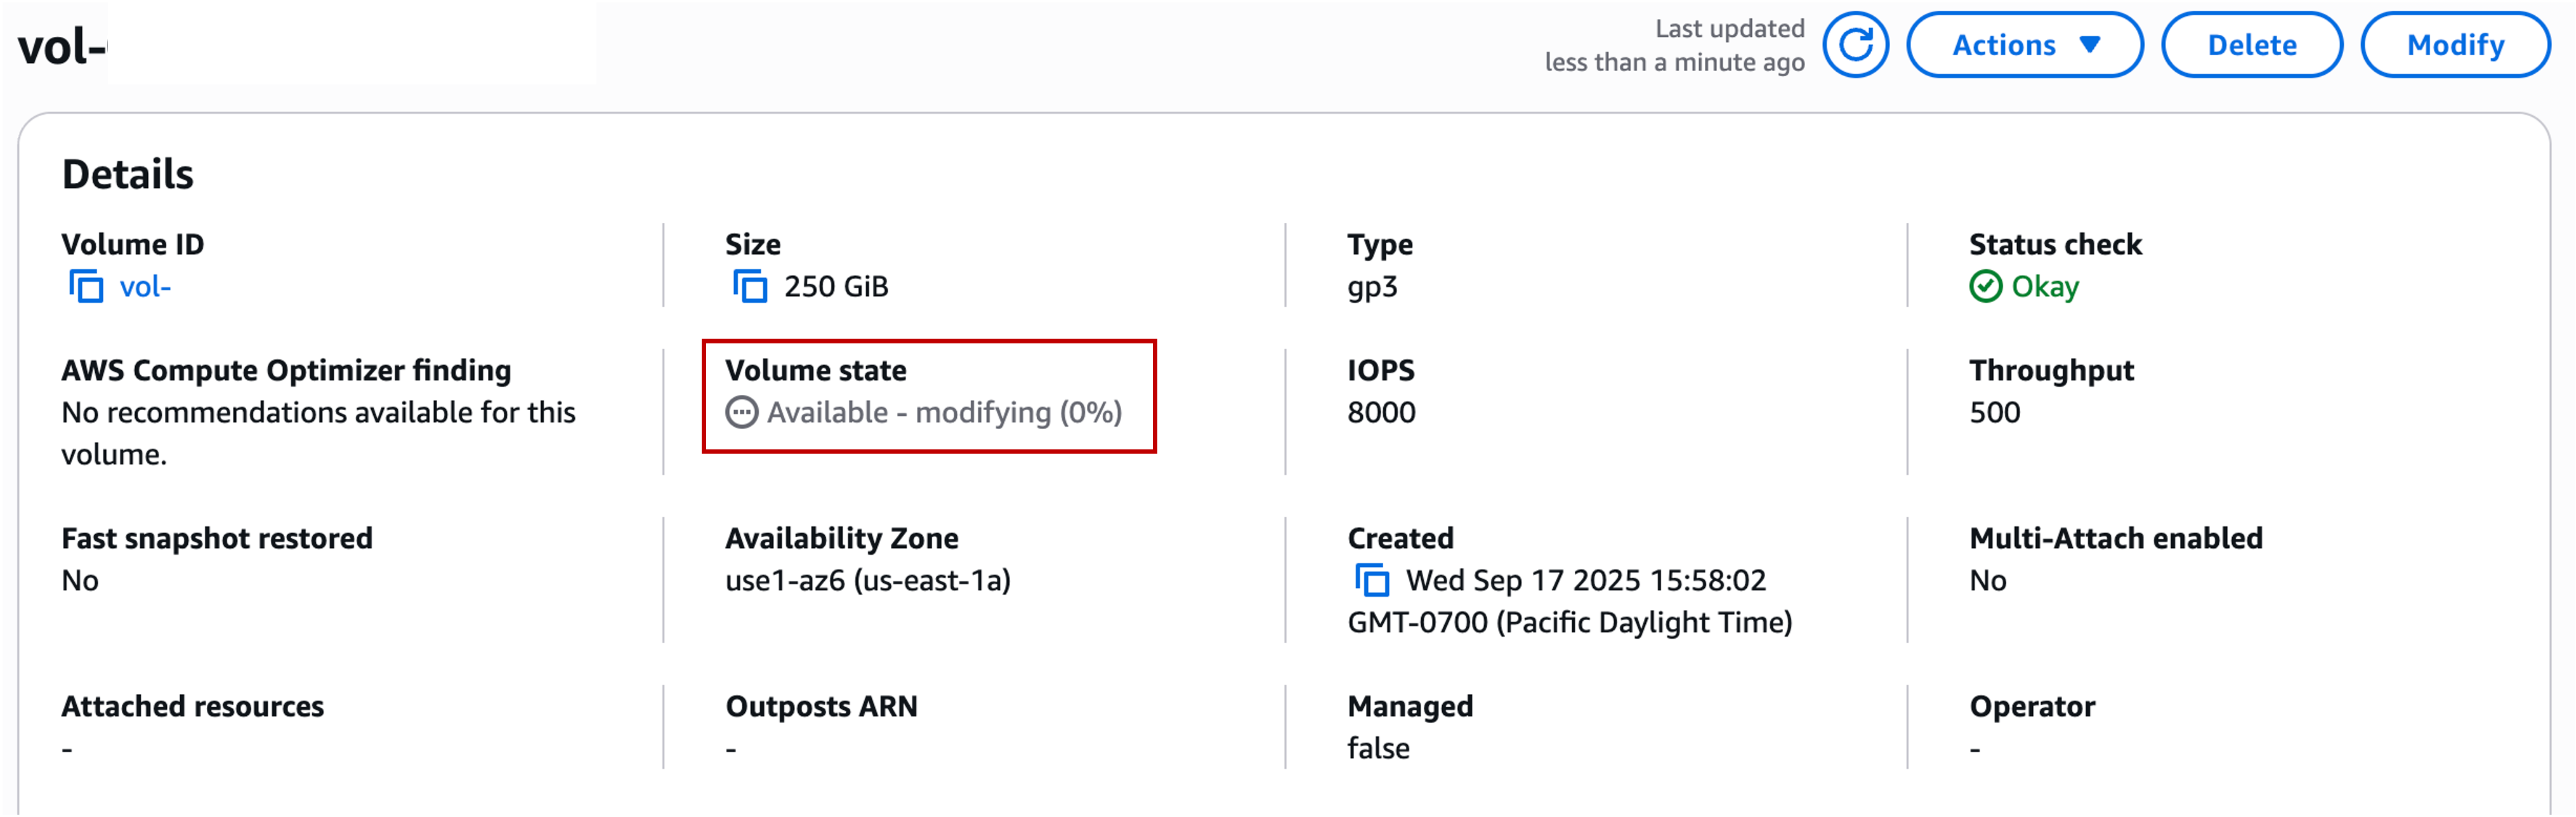
For detailed instructions on modifying volumes through the Amazon EC2 console, see Request Amazon EBS volume modifications.
This approach works best for workloads with consistent, recurring performance patterns, where you can schedule modifications ahead of known demand periods. Consider the following when modifying your volumes:
- Allow enough time for modifications to complete before your high-demand window begins. Size increases take effect in a few seconds, but the volume reaches full performance only when the modification completes. Volume modification is a best-effort operation and completion time varies. Start your modification early enough to ensure your volume reaches the required performance level before your workload needs it.
- Avoid multiple incremental modifications. Provision your volume for the performance your application needs in a single modification. Multiple incremental modifications can exhaust the four-modification limit and disrupt your production workflow.
- Wait for completion before the next modification. You must wait for the previous modification to complete before requesting the next one. Monitor modification progress using the
describe-volumes-modificationscommand or the Amazon EC2 console.
Step 3: Review the results
In our example, the customer provisioned higher performance only during the two windows that needed it, approximately 9.5 hours per day instead of the previous 13 hours. After implementing this modification schedule, they monitored volume performance during both windows to confirm no effect on their workloads. The following table summarizes their provisioning schedule.
| No. | Time (UTC) | Action | Provisioned IOPS | Provisioned throughput |
| 1 | 11:00 pm | Scale up for nightly batch job | 8,000 | 500 MiB/s |
| 2 | 03:00 am | Scale down to baseline | 3,000 | 125 MiB/s |
| 3 | 05:30 am | Scale up for morning peak | 20,000 | 300 MiB/s |
| 4 | 11:00 am | Scale down to baseline | 3,000 | 125 MiB/s |
The customer’s workloads continued to run without performance impact. Their ongoing schedule uses all four modifications on weekdays to cover both the nightly batch job and morning peak windows. On weekends, only the nightly batch job modifications run since there is no market-hours demand. By provisioning higher performance only during peak windows, the customer reduced their monthly volume cost by approximately 30%.
Conclusion
In this post, we showed how to use Amazon CloudWatch metrics — VolumeAvgIOPS and VolumeAvgThroughput — to understand your volume’s actual performance patterns, and how to use Elastic Volumes modifications to provision the right performance at the right time. In our example, the fintech company reduced their monthly volume cost by approximately 30% by provisioning higher performance only during peak windows rather than 13 hours every day.
Organizations across industries are using Amazon EBS Elastic Volumes modifications to match performance to demand and reduce costs. “Every AWS database in our fleet is currently powered and backed by EBS. Our work with the EBS team and the improvements they made to meet our needs have enabled our customers to scale faster. That flexibility lets us meet customers where they are and deliver increased value through our MongoDB Atlas offering.” — Ralph Capasso, VP Engineering, MongoDB.
You can apply this same approach to your own workloads, replacing static over-provisioning with targeted modifications that match your actual demand and reduce your storage costs. To get started, see Monitor your volumes using CloudWatch in the Amazon EBS User Guide, and Modify an EBS volume for details on Elastic Volumes modifications. Thank you for reading this post. If you have any comments or questions, please leave them in the comments section.