Containers
Cost optimization for Kubernetes on AWS
Since publication, we reduced the price for Amazon Elastic Kubernetes Service (EKS) by 50% to $0.10 per hour for each Kubernetes cluster that you run.
This post was contributed by AWS Container Hero, Casey Lee, Director of Engineering for Liatrio
The combination of Amazon EKS for a managed Kubernetes control plane and Amazon EC2 for elastic Kubernetes nodes offers an ideal environment to run containerized workloads. Not only does this enable builders to quickly create their Kubernetes clusters, it also allows builders to scale their clusters as needed to meet the demands of their users. However, care must be taken to ensure that the cost optimization pillar of the AWS Well-Architected Framework is realized.
There are many components involved with the total cost of running a Kubernetes cluster. The EKS control plane is the easiest to understand with a fixed cost of $0.20 per hour. Next, we have the EC2 instances that serve as the nodes in the Kubernetes cluster. There are multiple facets of EC2 instance cost including block storage and data transfer that we will avoid for now since these costs are highly dependent on the characteristics of the workload. Instead we will go deep on what is generally the largest facets of EC2 cost: Instance hours and instance price.
EC2 Cost = Instance Hours * Instance Price
In a Kubernetes cluster, the instance hours are directly proportional to the number of pods in the cluster and the resources allocated to those pods.
Instance Hours = Pod Hours * Pod Resources
In this post, we will review four techniques that were applied to a sample cluster to achieve over an 80% savings on EC2 usage:
- Auto Scaling – optimize instance hours by aligning the number of nodes in the cluster to the demand.
- Right Sizing – optimize pod resources by allocating the appropriate CPU and memory resources to pods.
- Down Scaling – optimize pod hours by terminating pods that are unnecessary during nights and weekends.
- Purchase Options – optimize instance price by replacing On-Demand Instance with Spot Instances.

Auto Scaling
The cost optimization pillar of the AWS Well-Architected Framework includes a section on Matching Supply and Demand, which recommends the following:
“… this (matching supply and demand) accomplished using Auto Scaling, which helps you to scale your EC2 instances and Spot Fleet capacity up or down automatically according to conditions you define”
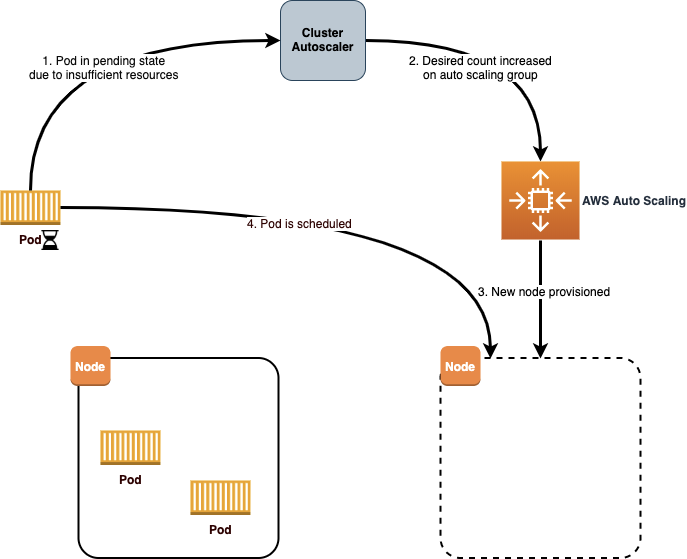
Therefore a prerequisite to cost optimization on a Kubernetes cluster is to ensure you have Cluster Autoscaler running. This tool performs two critical functions in the cluster. First, it will monitor the cluster for pods that are unable to run due to insufficient resources. Whenever this occurs, the Cluster Autoscaler will update the Amazon EC2 Auto Scaling group to increase the desired count, resulting in additional nodes in the cluster. Additionally, the Cluster Autoscaler will detect nodes that have been underutilized and reschedule pods onto other nodes. Cluster Autoscaler will then decrease the desired count for the Auto Scaling group to scale in the number of nodes.
The Amazon EKS User Guide has a great section on configuration of the Cluster Autoscaler. There are a couple things to pay attention to when configuring the Cluster Autoscaler:
IAM Roles for Service Account – Cluster Autoscaler will require access to update the desired capacity in the Auto Scaling group. The recommended approach is to create a new IAM role with the required policies and a trust policy that restricts access to the service account used by Cluster Autoscaler. The role name must then be provided as an annotation on the service account:
apiVersion: v1
kind: ServiceAccount
metadata:
  name: cluster-autoscaler
  annotations:
    eks.amazonaws.com/role-arn: arn:aws:iam::000000000000:role/my_role_name
Auto Scaling Group per AZ – When Cluster Autoscaler scales out, it simply increases the desired count for the Auto Scaling group, leaving the responsibility for launching new EC2 instances to the AWS Auto Scaling service. If an Auto Scaling group is configured for multiple Availability Zones, then the new instance may be provisioned in any of those Availability Zones.
For deployments that use persistent volumes you will need to provision a separate Auto Scaling group for each Availability Zone that you will use. This way, when Cluster Autoscaler detects the need to scale out in response to a given pod, it can target the correct Availability Zone for the scale-out based on persistent volume claims that already exist in a given Availability Zone.
When using multiple Auto Scaling groups, be sure to enable include the following argument in the pod specification for Cluster Autoscaler:
--balance-similar-node-groups=true
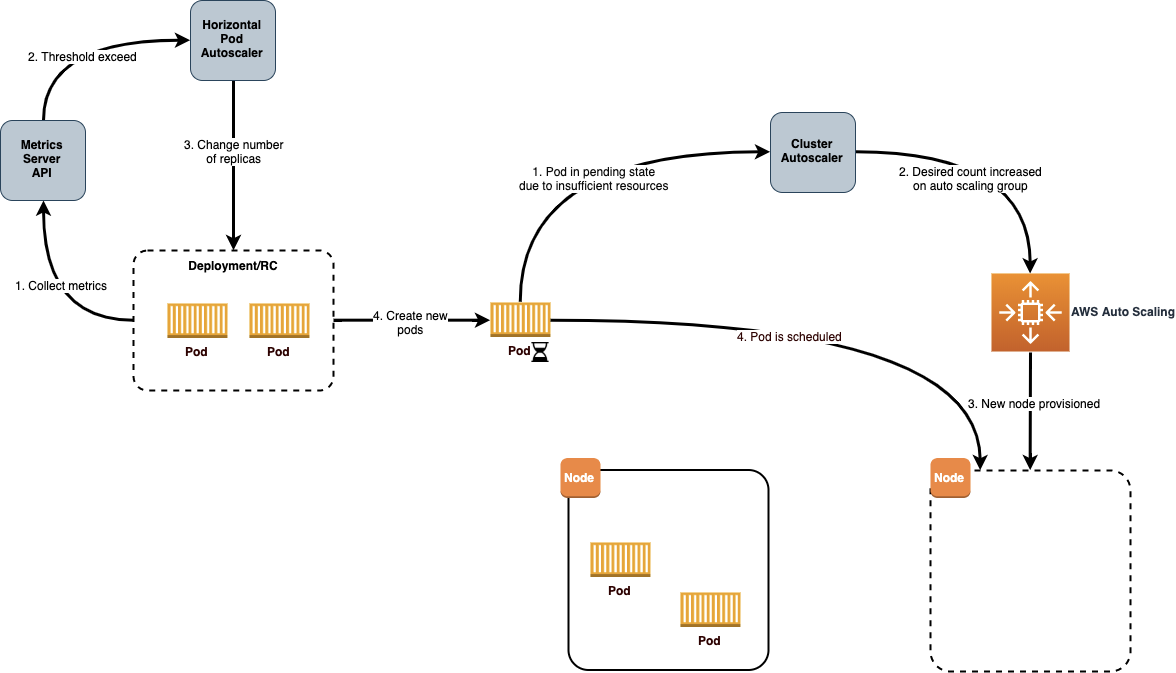
Now that Cluster Autoscaler is running in the cluster, you can have confidence that the Instance Hours will align closely to the demand from pods within the cluster. Next up is to use Horizontal Pod Autoscaler (HPA) to scale out or in the number of pods for a deployment based on specific metrics for the pods to optimize Pod Hours and further optimize our Instance Hours.

The HPA controller is included with Kubernetes, so all that is required to configure HPA is to ensure that the Kubernetes metrics server is deployed in your cluster and then defining HPA resources for your deployments. For example, the following HPA resource is configured to monitor the CPU utilization for a deployment named nginx-ingress-controller. HPA will then scale out or in the number of pods between 1 and 5 to target an average CPU utilization of 80% across all the pods:
apiVersion: autoscaling/v1
kind: HorizontalPodAutoscaler
metadata:
  name: nginx-ingress-controller
spec:
  scaleTargetRef:
    apiVersion: apps/v1
    kind: Deployment
    name: nginx-ingress-controller
  minReplicas: 1
  maxReplicas: 5
  targetCPUUtilizationPercentage: 80
The combination of Cluster Autoscaler and Horizontal Pod Autoscaler is an effective way to keep EC2 Instance Hours tied as close as possible to actual utilization of the workloads running in the cluster.
Right sizing
Going back to the cost optimization pillar of the AWS Well-Architected Framework, we find a section on Cost-Effective Resources, which describes Right Sizing as:
“… using the lowest cost resource that still meets the technical specifications of a specific workload”
With Kubernetes, right sizing is done by setting the compute resources, CPU, and memory allocated for the containers in our pods. Each container in a pod has both a requests and limits on the amount of CPU and memory that it will use.
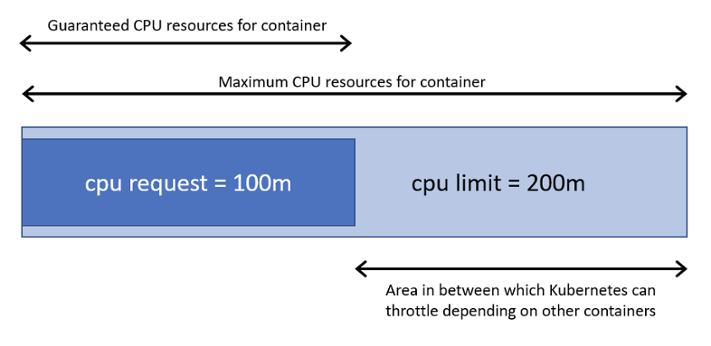
Care must be taken to try and set requests that align as close as possible to the actual utilization of these resources. If the value is too low, then the containers may experience throttling of the resources and impact the performance. However, if the value is too high, then there is waste, since those unused resources remain reserved for that single container. When actual utilization is lower than the requested value, the difference is called slack cost. A tool like kube-resource-report is valuable at visualizing the slack cost and right sizing the requests for the containers in a pod. Installation instructions demonstrate how to install via an included helm chart:
$ helm upgrade --install kube-resource-report chart/kube-resource-report.
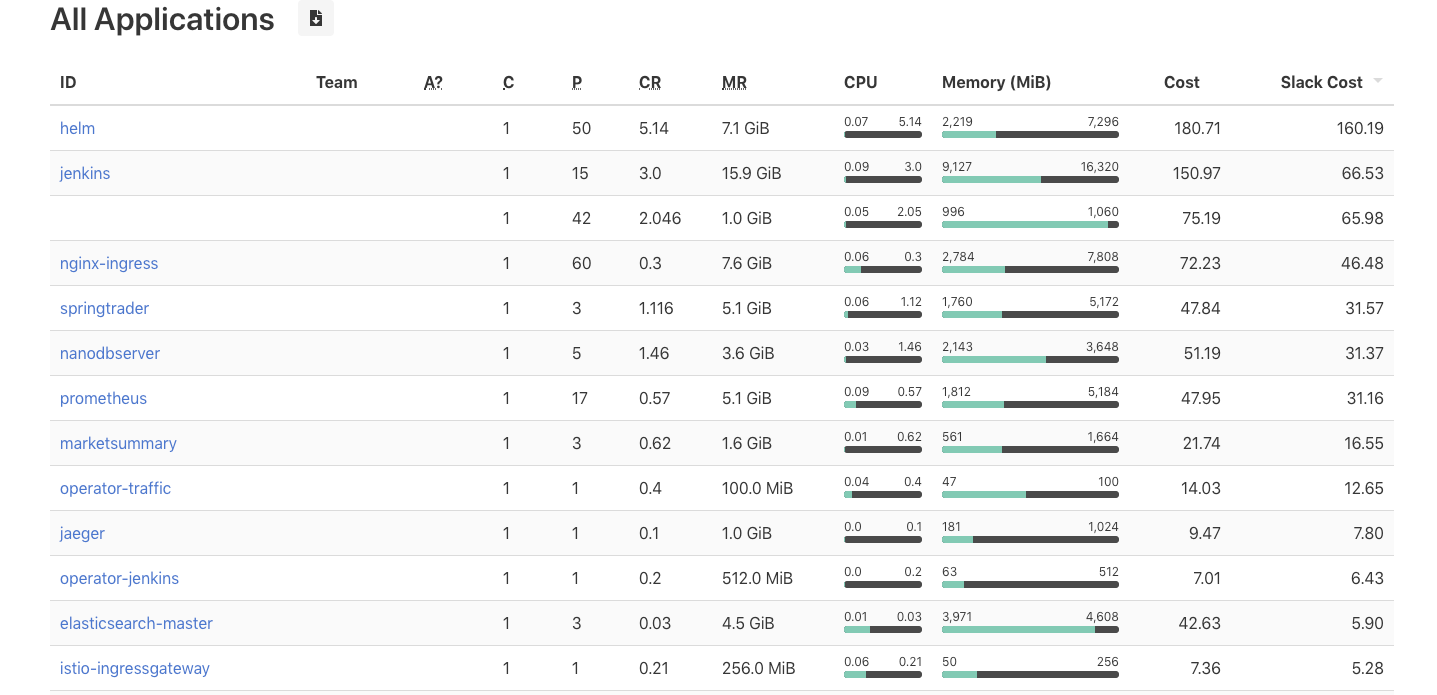
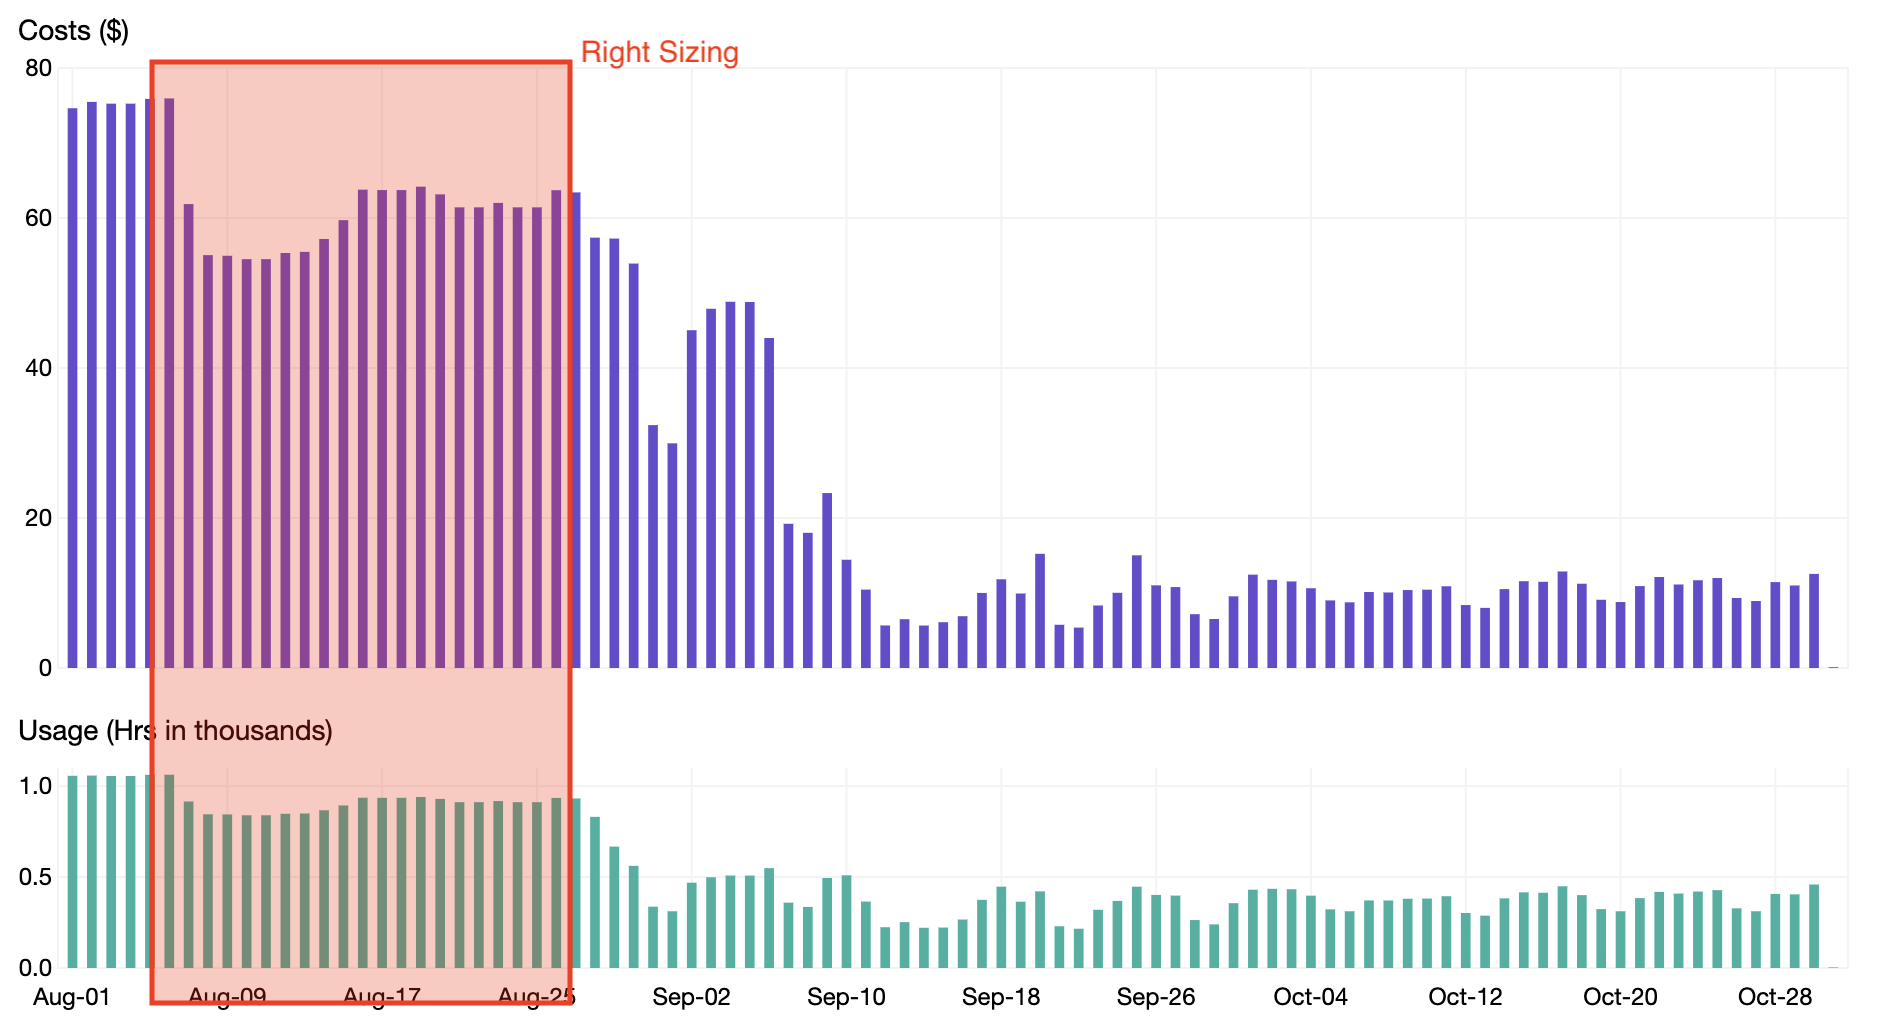
As seen in the screenshot above, an application like jenkins can be right sized to lower the CPU and memory requests and potentially save up to $66.53 in slack cost per month. When going through this process of right sizing Pod Resources for all applications in a Kubernetes cluster, we were able to realize a 20% savings as shown in the chart below.
Down scaling
In addition to demand based automatic scaling, the Matching Supply and Demand section of the AWS Well-Architected Framework cost optimization pillar includes a section, which recommends the following:
“Systems can be scheduled to scale out or in at defined times, such as the start of business hours, thus ensuring that resources are available when users arrive.”
For the sample cluster, there are many deployments that only need to be available during business hours. A tool named kube-downscaler can be deployed to the cluster to scale in and out the deployments based on time of day. The kube-downscaler is configured with a default uptime via an environment variable:
DEFAULT_UPTIME = Mon-Fri 05:00-19:00 America/Los_Angeles
In this case, all deployments will have the size set to 0 for all times outside of 5:00 AM to 7:00 PM, Monday to Friday. Individual namespaces and deployments can override their uptime through annotations. They can either set a different update with the downscaler/uptime annotation or even disable it altogether with downscaler/exclude.
As shown from the graphs below, the EC2 instances

Amazon CloudWatch – EC2 Instance Count

Grafana – Cluster CPU Utilization
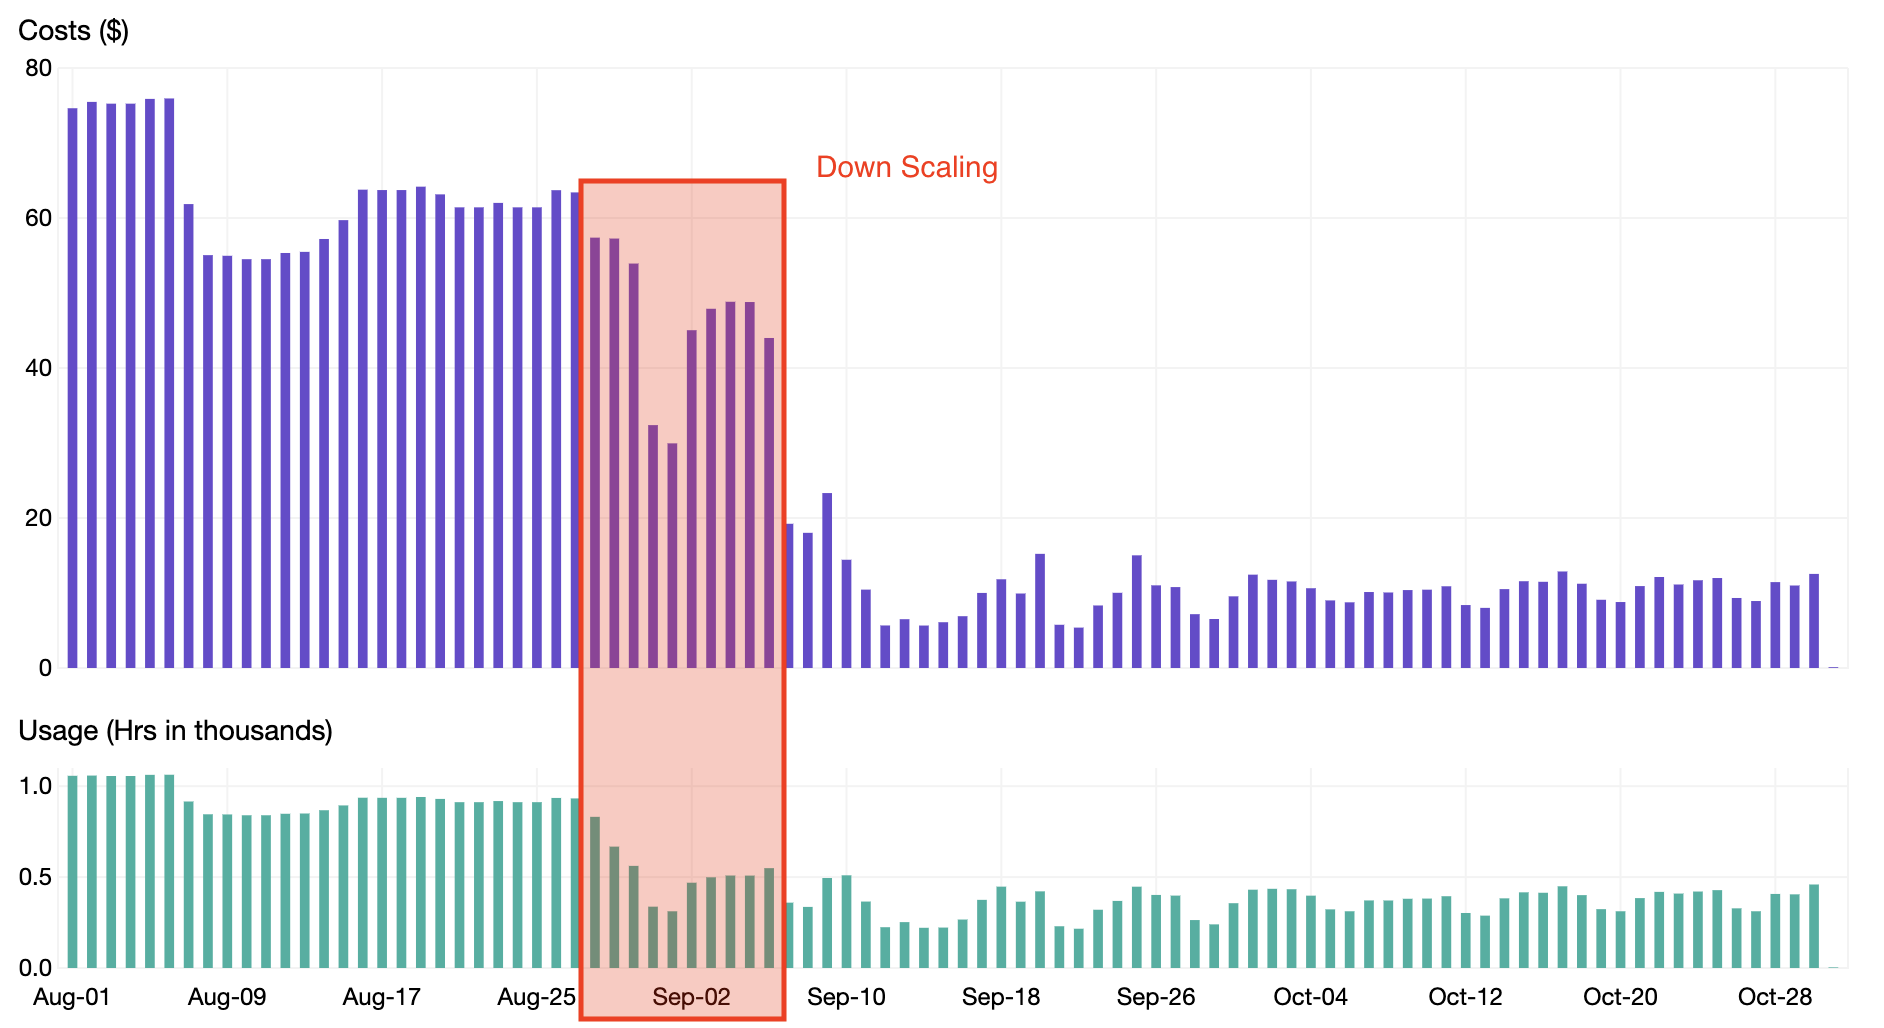
When enabling down scaling, we were able to reduce our Pod Hours and realize an additional 15% savings as shown in the chart below.
Purchase options
The final part of the cost optimization pillar of the AWS Well-Architected Framework that we will apply comes from the Purchasing Options sections with says:
“Spot Instances allow you to use spare compute capacity at a significantly lower cost than On-Demand EC2 instances (up to 90%).”
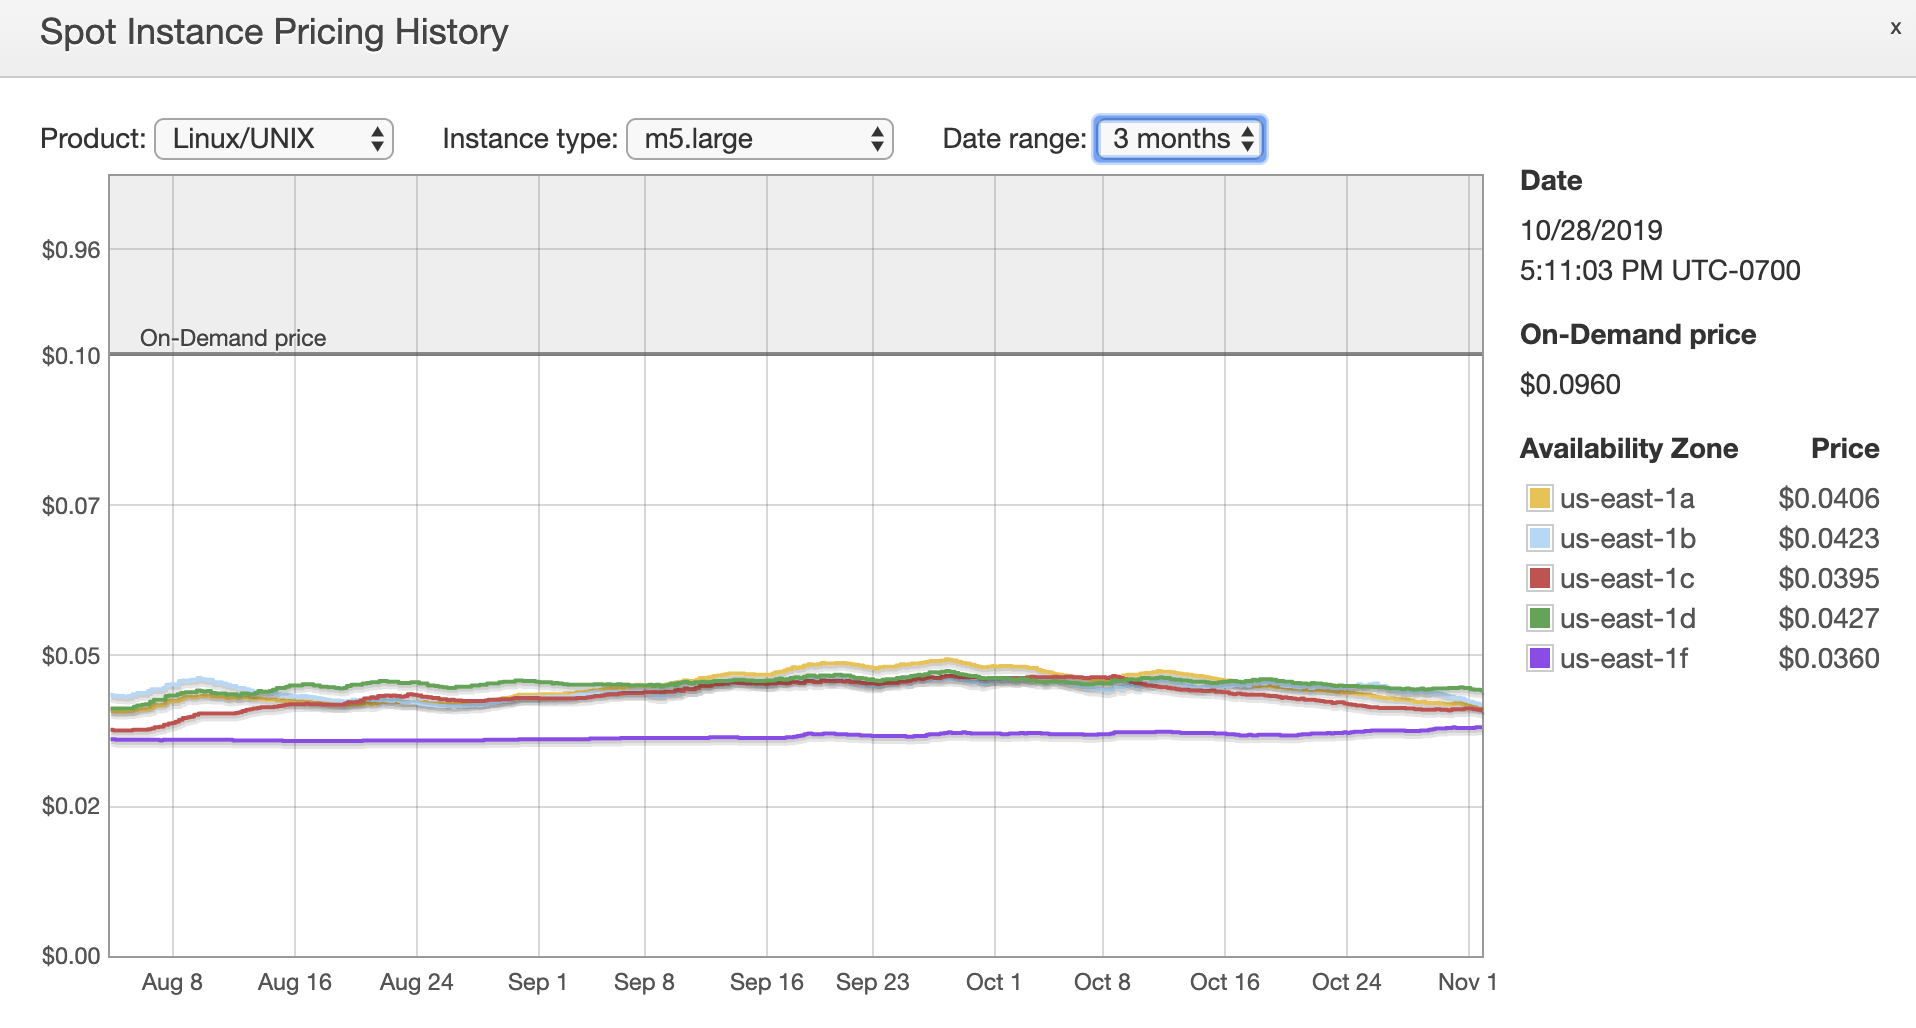
When viewing the Spot Instance pricing history in the EC2 console, we see that spot pricing for an m5.large instance type is consistently 55–60% less expensive than using On-Demand Instances.
To set up your nodes to run on Spot Instances instead of On-Demand Instances, review the AWS Compute blog post titled, “Run your Kubernetes Workloads on Amazon EC2 Spot Instances with Amazon EKS.” Rather than running the custom termination handler from the blog post, install the kube-spot-termination-notice-handler tool. This will provide a mechanism to safely reschedule those pods to other nodes when spot interruptions occur.
Most clusters will want to maintain an additional Auto Scaling group of On-Demand Instances, in addition to the spot Auto Scaling groups to schedule essential pods that are not tolerant of spot interruptions. When provisioning the nodes, pass additional arguments to the kubelet in each Auto Scaling group to label the nodes as either essential or preemptible:
- Essential:
--node-labels=kubernetes.io/lifecycle=essential - Preemptible:
--node-labels=kubernetes.io/lifecycle=preemptible
You can then use node affinity in the pod specification to ensure that pods are scheduled on the appropriate node:
affinity:
nodeAffinity:
requiredDuringSchedulingIgnoredDuringExecution:
nodeSelectorTerms:
- matchExpressions:
- key: "kubernetes.io/lifecycle"
operator: "In"
values:
- essential
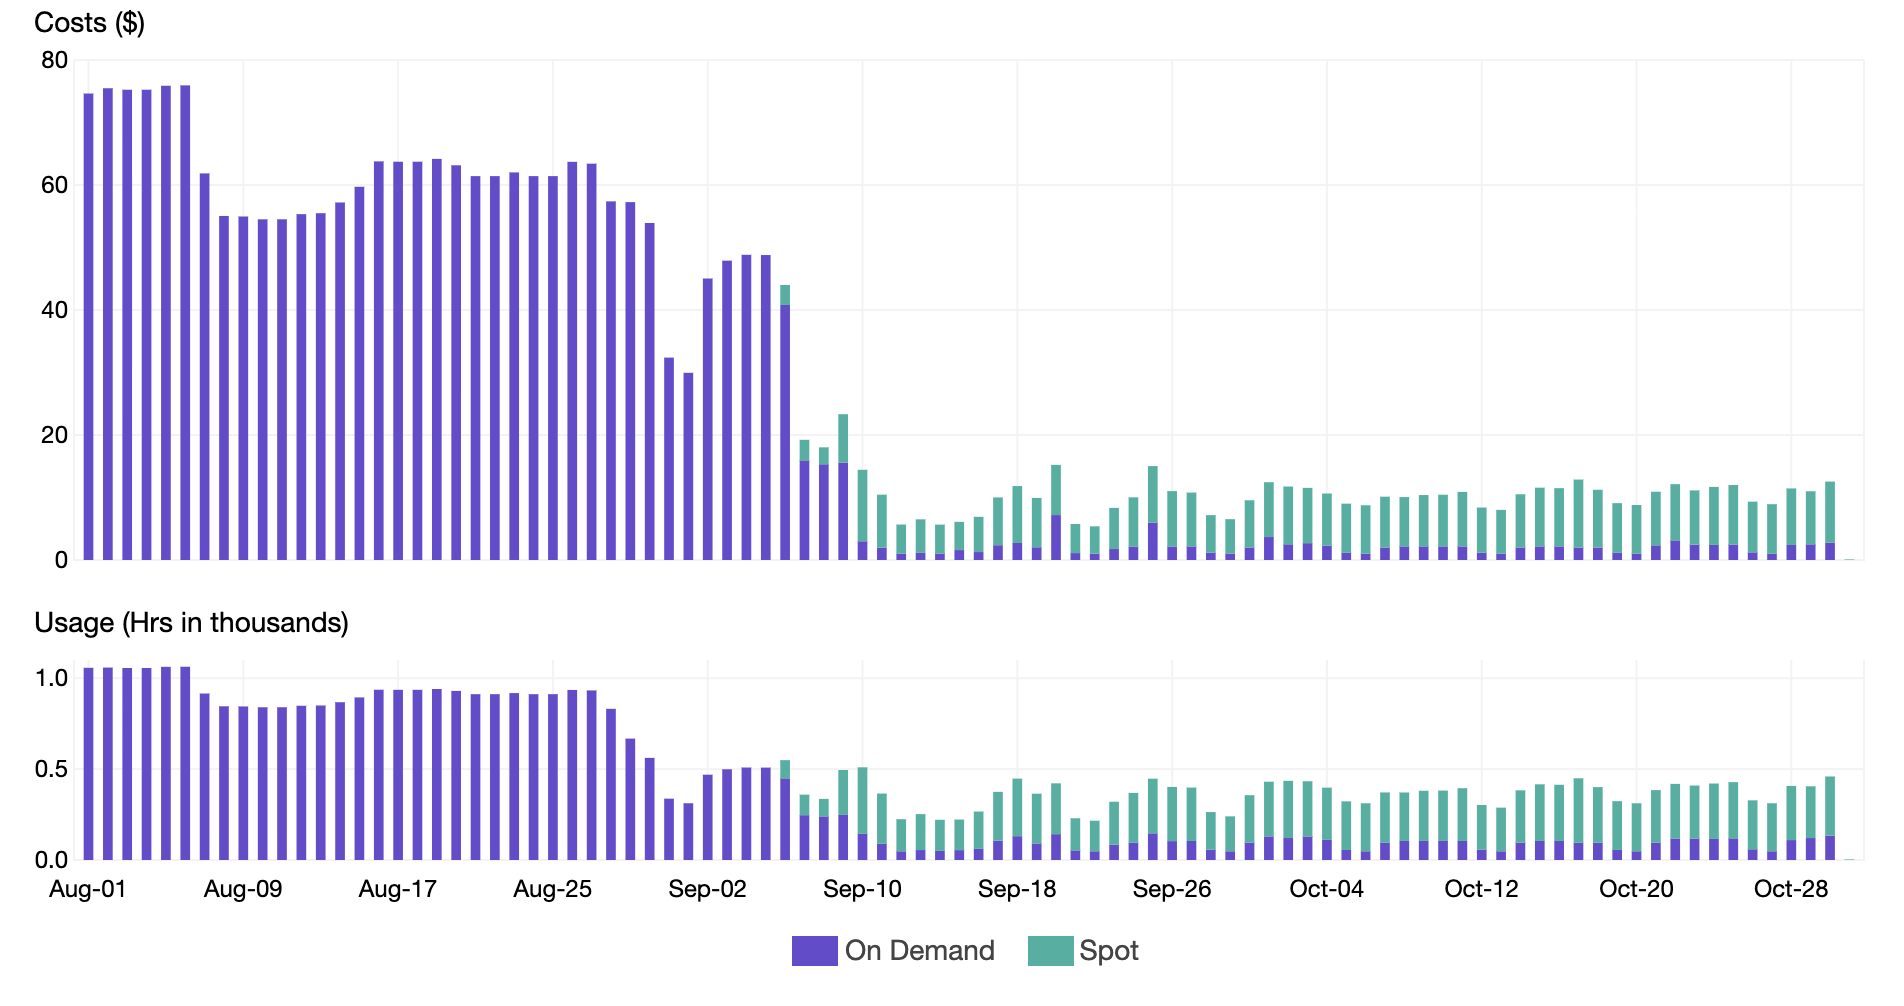
Upon moving the majority of the nodes to Spot Instances, we were able to reduce our Instance Price and realize an additional 40% savings as shown in the chart below. Notice how the usage remained the same during the transition to spot, but the price significantly dropped
Conclusion
We were able to save over 80% of the EC2 instance cost for our Kubernetes cluster through automatic scaling the nodes and pods within the cluster, right sizing the resources allocated to the containers in the pods, down scaling the deployments outside of business hours and finally by moving most of the pods over to Spot Instances. All of these techniques demonstrate best practices from the cost optimization pillar of the AWS Well-Architected Framework and also help customers run their Kubernetes workloads efficiently.