AWS Architecture Blog
Create Dynamic Contact Forms for S3 Static Websites Using AWS Lambda, Amazon API Gateway, and Amazon SES
In the era of the cloud, hosting a static website is cheaper, faster and simpler than traditional on premise hosting, where you always have to maintain a running server. Basically, no static website is truly static. I can promise you will find at least a “contact us” page in most static websites, which, by their very nature, are dynamically generated. And all businesses need a “contact us” page to help customers connect with business owners for services, inquiries or feedback. In its simplest form, a “contact us” page should collect a user’s basic information (name, e-mail id, phone number, short message and e-mail) and get shared with the business via email when submitted.
AWS provides a simplified way to host your static website in an Amazon S3 bucket using your own custom domain. You can either choose to register a new domain with AWS Route 53 or transfer your domain to Route 53 for hosting in five simple steps.
Obviously, you don’t want to spin-up a server to handle a simple “contact us” form, but it’s a critical element of your website. Luckily, in this post-cloud world, AWS delivers a serverless option. You can use AWS Lambda with Amazon API Gateway to create a serverless backend and use Amazon Simple Email Service to send an e-mail to the business owner whenever a customer submits any inquiry or feedback. Let’s learn how to do it.
Architecture Flow
Here, we are assuming a common website-to-cloud migration scenario, where you have registered your domain name with a 3rd party domain registrar and after migration of your website to Amazon S3. From there, you switched to Amazon Route 53 as your DNS provider. You contacted your DNS provider and updated the name server (NS) record to use the name servers in the delegation that you set in Amazon Route 53 (find step-by-step details in the AWS S3 development guide). Your email server still belongs to your DNS provider as you brought that in the package when you registered your domain with a multi-year contract.
Following is the architecture flow with detailed guidance.

In the above diagram, the customer is submitting their inquiry through a “contact us” form, which is hosted in an Amazon S3 bucket as a static website. Information will flow in three simple steps:
- Your “contact us” form will collect all user information and post to Amazon API Gateway restful service.
- Amazon API Gateway will pass collected user information to an AWS lambda function.
- AWS Lambda function will auto generate an e-mail and forward it to your mail server using Amazon SES.
Your “Contact Us” Form
Let’s start with a simple “contact us” form html code snippet:
The above form will ask the user to enter their name, phone, e-mail, and provide a free-form text box to write inquiry/feedback details and includes a submit button.
Later in the post, I’ll share the JQuery code for field validation and the variables to collect values.
Defining AWS Lambda Function
The next step is to create a lambda function, which will get all user information through the API Gateway. The lambda function will look something like this:
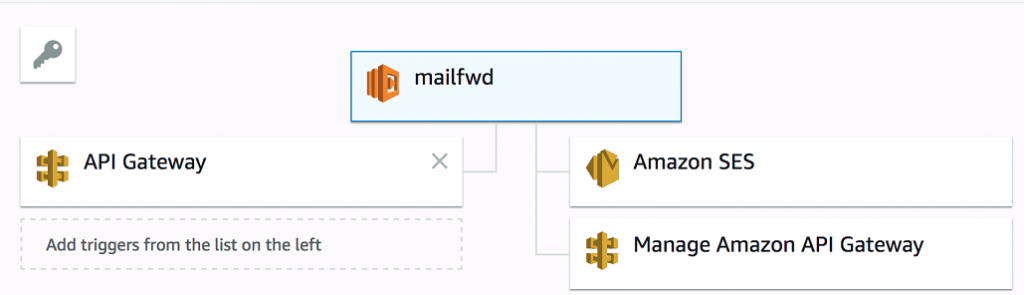
The AWS lambda function mailfwd is triggered from the API Gateway POST method, which we will create the next section and send information to Amazon SES for mail forwarding.
If you are new to AWS Lambda then follow these simple steps to Create a Simple Lambda Function and get yourself familiar.
- Go to the console and click on “Create Function” and select blueprints for hello-world nodejs6.10 version as shown in below screenshot and click on configure button at the bottom.

- To create your AWS Lambda function, select the “edit code inline” setting, which will have an editor box with the code in it, and replace that code (making sure to change contactus@example.com to your real e-mail address and update your actual domain in the response variable):
Now you can execute and test your AWS lambda function as directed in the AWS developer guide. Make sure to update the Lambda execution role and follow the steps provided in the Lambda developer guide to create a basic execution role.
Add following code under policy to allow Amazon SES access to AWS lambda function:
Creating the API Gateway
Now, let’s create the API Gateway that will provide a restful API endpoint for our AWS Lambda function, which we are going to create next. We will use this API endpoint to post user-submitted information in the “Contact Us” form — which will also get posted to the AWS Lambda function.
If you are new to API Gateway, follow these simple steps to create and test an API from the example in the API Gateway Console to familiarize yourself.
- Login to AWS console and select API Gateway. Click on create new API and fill your API name.

- Now go to your API name — listed in the left-hand navigation — click on the “actions” drop down, and select “create resource.”

- Select your newly-created resource and choose “create method.” Choose a POST. Here, you will choose our AWS Lambda Function. To do this, select “mailfwd” from the drop down.

- After saving the form above, Click on the “action” menu and choose “deploy API.” You will see final resources and methods something like below:

- Now get your Restful API URL from the “stages” tab as shown in the screenshot below. We will use this URL on our “contact us” HTML page to send the request with all user information.

- Make sure to Enable CORS in the API Gateway or you’ll get an error:”Cross-Origin Request Blocked: The Same Origin Policy disallows reading the remote resource at https://abc1234.execute-api.us-east-1.amazonaws.com/02/mailme. (Reason: CORS header ‘Access-Control-Allow-Origin’ missing).”
Setup Amazon SES
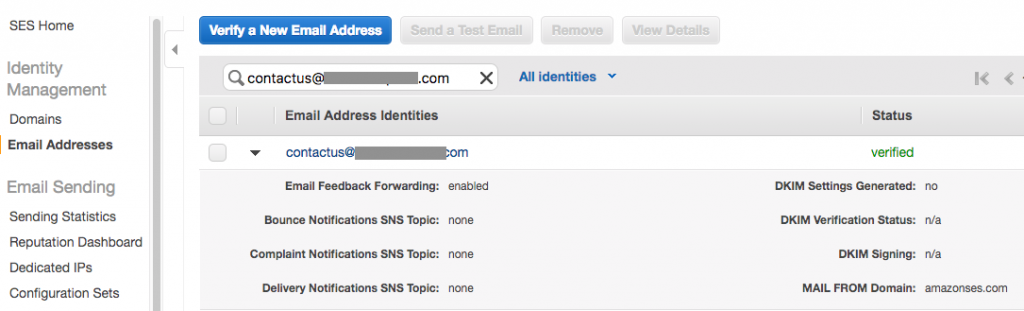
Amazon SES requires that you verify your identities (the domains or email addresses that you send email from) to confirm that you own them, and to prevent unauthorized use. Follow the steps outlined in the Amazon SES user guide to verify your sender e-mail.
Connecting it all Together
Since we created our AWS Lambda function and provided the API-endpoint access using API gateway, it’s time to connect all the pieces together and test them. Put following JQuery code in your ContactUs HTML page <head> section. Replace URL variable with your API Gateway URL. You can change field validation as per your need.
Now you should be able to submit your contact form and start receiving email notifications when a form is completed and submitted.
Conclusion
Here we are addressing a common use case — a simple contact form — which is important for any small business hosting their website on Amazon S3. This post should help make your static website more dynamic without spinning up any server.
Have you had challenges adding a “contact us” form to your small business website?