AWS Security Blog
Automatically block suspicious traffic with AWS Network Firewall and Amazon GuardDuty
According to the AWS Security Incident Response Guide, by using security response automation, you can increase both the scale and the effectiveness of your security operations. Automation also helps you to adopt a more proactive approach to securing your workloads on AWS. For example, rather than spending time manually reacting to security alerts, you can instead focus on activities such as enhancing application protection layers and improving your security program.
In this blog post, we’ll show you how to use AWS Network Firewall to automatically respond to potential security events within your Amazon Web Services (AWS) environment that are detected by Amazon GuardDuty. The goal is to rapidly contain the impact of security events, while providing additional time for follow-up investigation.
By coding the response steps using services like AWS Lambda and AWS Step Functions, your response time can be reduced down to minutes or even seconds. This response time is in contrast to manual response, which can often take hours or longer. This blog provides an example of using automation to scale your security processes in the cloud.
When you plan for responses to security events, it’s a best practice to document your response procedures in runbooks. Runbooks detail procedure steps and the order in which the steps are carried out. Steps can be either manual, or expressed in code and automated; implementing at least some of the steps in code ensures that those steps are carried out consistently.
Solution overview
The automation example we provide in this blog post is focused on blocking traffic to and from suspicious remote hosts, for example to IP addresses associated with known command and control servers for botnets. GuardDuty detection of unintended communication with remote hosts triggers a series of steps, including blocking of network traffic to those hosts by using Network Firewall, and notification of security operators.
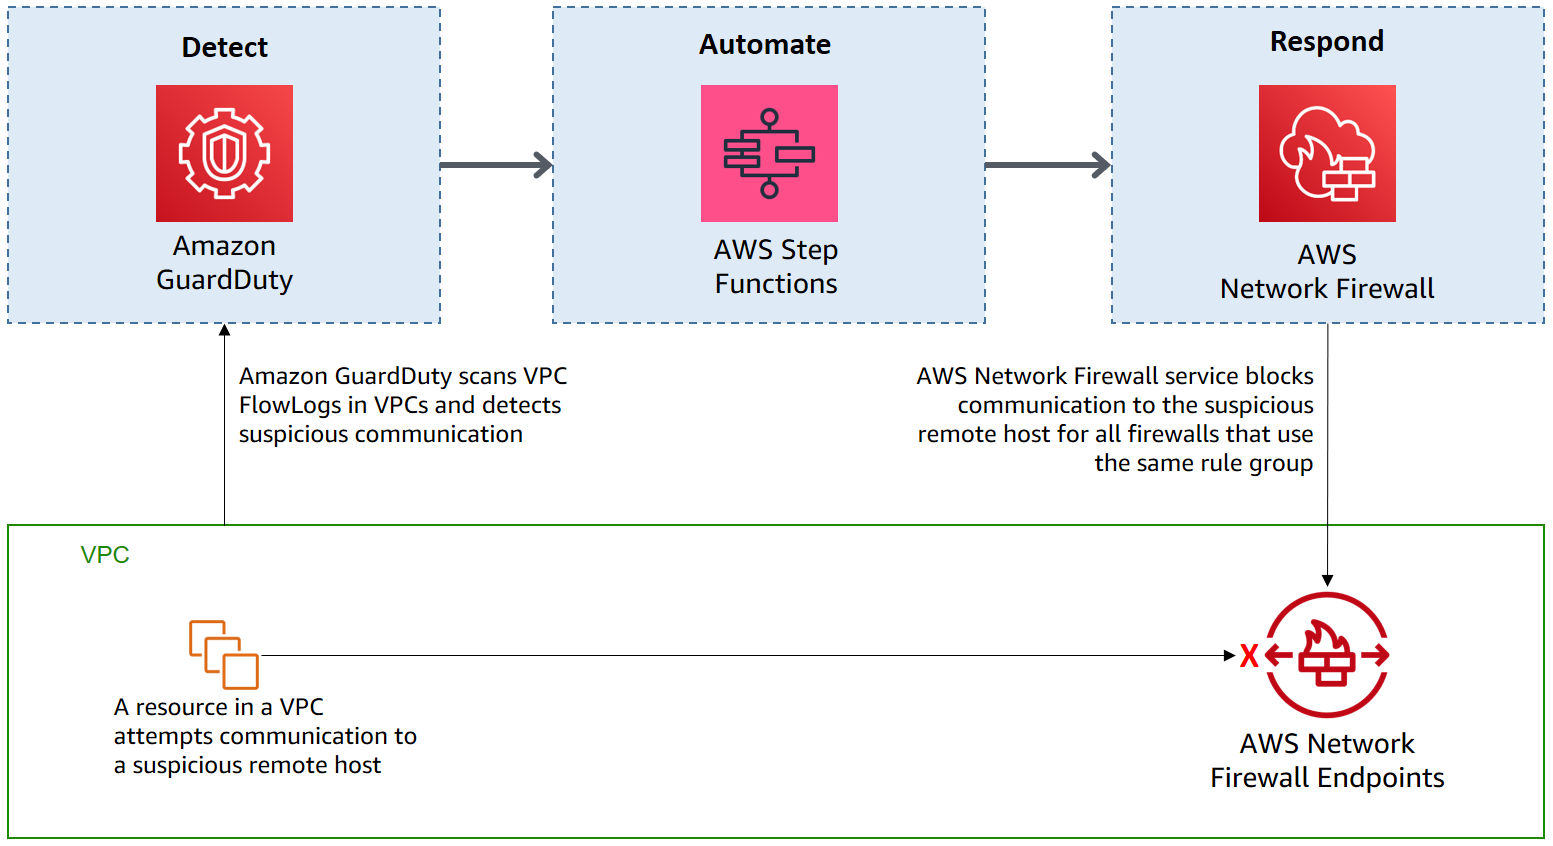
Figure 1: High-level solution overview
Here are the key building blocks in this blog post:
AWS Network Firewall is a managed service that makes it easy to deploy essential network protections for all of your virtual private clouds (VPCs). The service scales automatically with your network traffic so you don’t have to worry about deploying and managing any infrastructure. Network Firewall’s flexible rules engine lets you define firewall rules that give you fine-grained control over network traffic. In addition to inbound traffic filtering, Network Firewall provides URL, IP address, and domain-based outbound traffic filtering to help you meet compliance requirements, prevent unintended access to data, and block communication to unauthorized remote hosts.
There are three main components of Network Firewall:
- Rule group – Holds a reusable collection of criteria for inspecting traffic and for handling packets and traffic flows that match the inspection criteria. The solution in this blog post automatically adds rules to a stateless rule group when suspicious communication is detected. A periodic pruning process automatically removes rules from that rule group after a specified retention period.
- Firewall policy – Defines a reusable set of stateless and stateful rule groups, along with some policy-level behavior settings. You can use the rule group managed by this solution as part of one or more firewall policies.
- Firewall – Connects the inspection rules in the firewall policy to the VPC that the rules protect.
Amazon GuardDuty is a continuous security monitoring service that analyzes and processes data from Amazon Virtual Private Cloud (Amazon VPC) Flow Logs, DNS logs, AWS CloudTrail Management Events, and AWS CloudTrail S3 Data Events. Based on this data, GuardDuty provides analysis and detection by using threat intelligence feeds, signatures, anomaly detection, and machine learning in the AWS Cloud. In this solution, it is the detection of threats by GuardDuty that triggers the automated remediation procedure documented in this post.
AWS Step Functions is a serverless orchestration service that lets you combine AWS Lambda functions and other AWS services to build business-critical applications. This solution uses Step Functions and Lambda services to ensure that incident response steps run in the correct order. Step Functions service also provides retry and error-handling logic, while Lambda functions interact with networking controls to block traffic, and with a database to store data about blocked remote IP addresses.
How it works
Figure 2 shows the automated remediation workflow in detail.
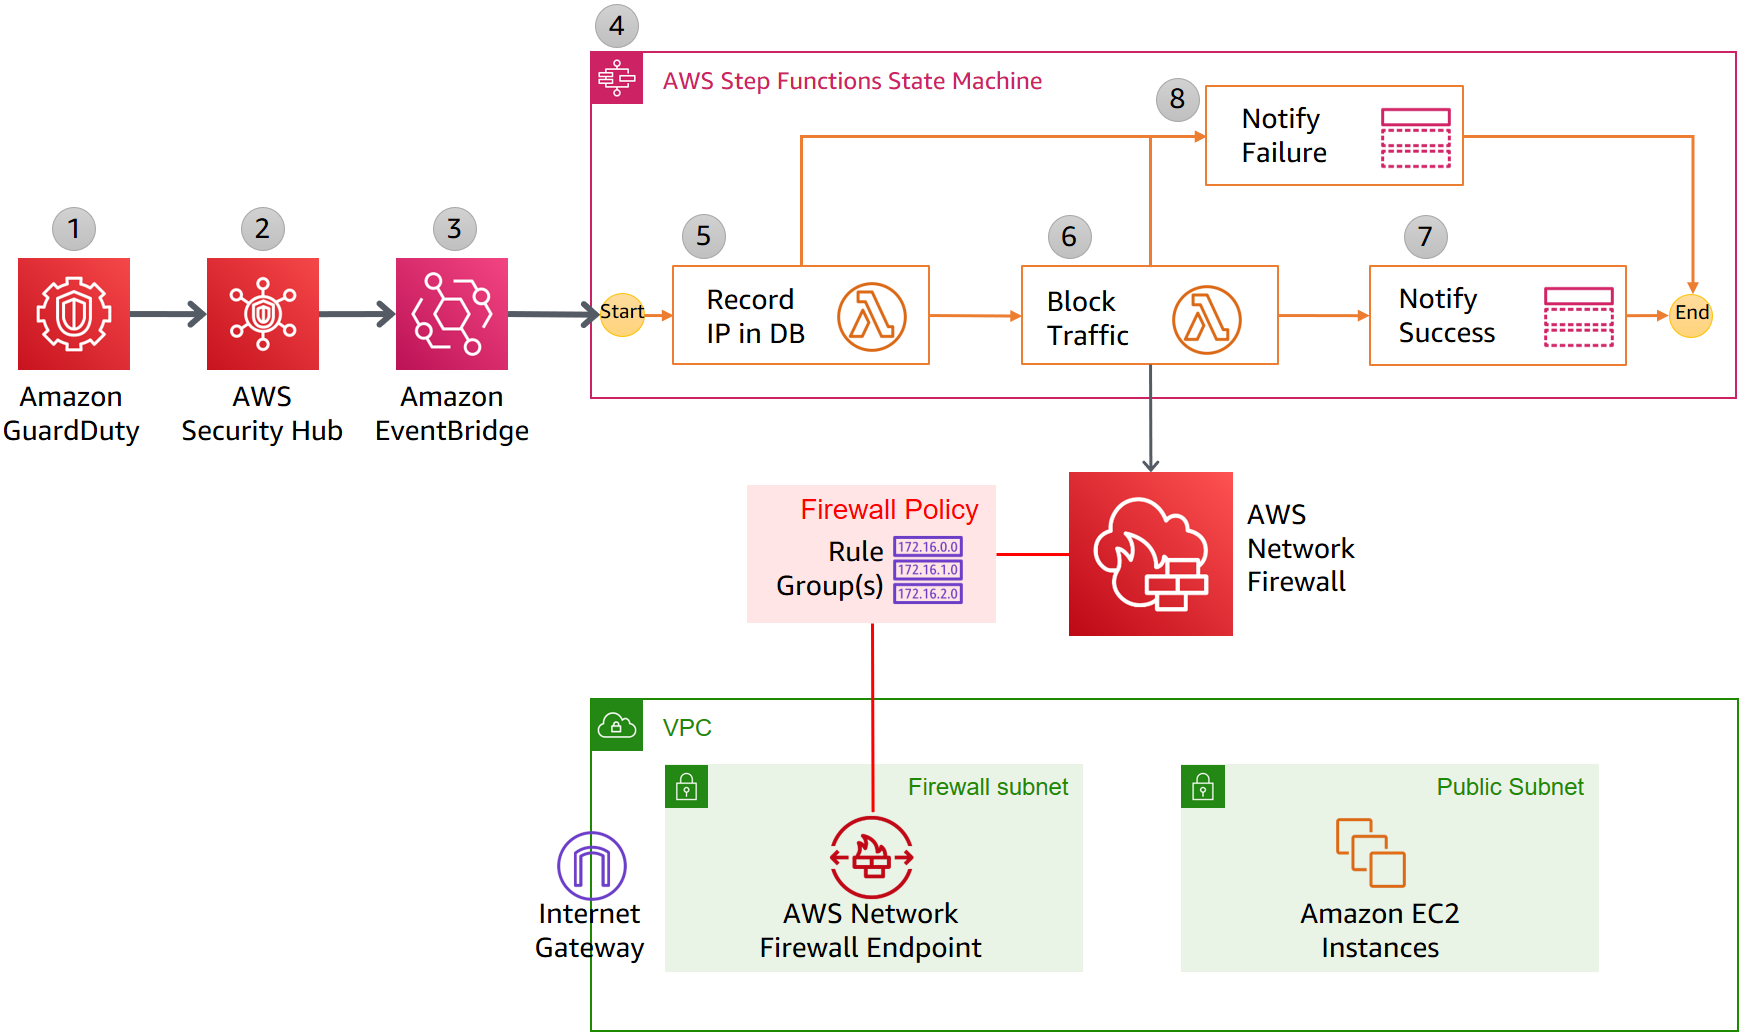
Figure 2: Detailed workflow diagram: Automatically block suspicious traffic with Network Firewall and GuardDuty
The solution is implemented as follows:
- GuardDuty detects unexpected behavior that includes a remote host IP address. GuardDuty generates a finding, in JSON format, that includes details such as the EC2 instance ID involved (if applicable), account information, type of attack, remote IP, and other details. Following is a sample finding (some fields removed for brevity).
- Security Hub ingests the finding generated by GuardDuty and consolidates it with findings from other AWS security services. Security Hub also publishes the contents of the finding to the default bus in Amazon EventBridge. Following is a snippet from a sample event published to Amazon EventBridge.
- EventBridge has a rule with an event pattern that matches GuardDuty events that contain the remote IP address. When an event matching the pattern is published on the default bus, EventBridge routes that event to the designated target, in this case a Step Functions state machine. Following is a snippet of AWS CloudFormation code that defines the EventBridge rule.
- The Step Functions state machine ingests the details of the Security Hub finding published in EventBridge and orchestrates the remediation response through a defined workflow. Figure 3 shows a graphical depiction of the state machine workflow.

Figure 3: AWS Step Functions state machine workflow
- The first step in the state machine, “Record IP in DB,” invokes a Lambda function that creates a record in an Amazon DynamoDB table with important details, such as the IP of the suspected malicious host and the timestamp of the last activity. The pruning state machine (discussed in the “Pruning of old records” section of this blog) uses that timestamp to remove stale entries from the Network Firewall. Following is an example item stored in the DynamoDB table (the CreatedAt field is a timestamp in Unix epoch time).

Figure 4: DynamoDB table entry
- The next step, “Block Traffic,” invokes a Lambda function that updates the Network Firewall rule group with a stateless rule blocking traffic to the remote IP address. Following is an example of a stateless rule that would be added to the Network Firewall rule group.

Figure 5: Sample rules in a Network Firewall rule group
If this step runs successfully, the state machine advances to the “Notify Success” step.
- The “Notify Success” step of the state machine uses an Amazon Simple Notification Service (Amazon SNS) topic to send out a message that the automatic remed
- If there was a failure in the “Record IP” or “Block Traffic” steps, then the state machine will run the “Notify Failure” step. The state machine publishes a message on the SNS topic that automated remediation workflow has failed to complete and that manual intervention may be required.
Now that you have an understanding of how the solution operates, you can start testing it in your AWS account.
Solution deployment
Setting up this solution includes these steps:
- Verify prerequisites in your AWS account.
- Deploy the CloudFormation template.
- Create a test Security Hub event.
- Confirm the entry in Network Firewall rule group.
- Confirm the SNS notification.
- Apply the rule group to resources by using Network Firewall.
Step 1: Verify prerequisites in your AWS account
The sample solution provided by this blog requires that you activate both GuardDuty and Security Hub in your AWS account. If either one of these services is not activated in your account, follow these steps:
- GuardDuty: Learn more about the free trial and pricing for this service, and follow the steps in the Amazon GuardDuty documentation to set up the service and start monitoring your account.
- Security Hub: Learn more about the free trial and pricing for this service, and follow the steps in the AWS Security Hub documentation to activate and configure the service.
Note: The solution is designed to be applied within an existing Network Firewall configuration. Although you can test this solution’s automated remediation actions without creating a firewall through Network Firewall, one is required to fully implement the solution. You can learn more about Network Firewall concepts and getting started in the documentation.
Step 2: Deploy the AWS CloudFormation template
For this next step, make sure you deploy the template within the AWS account and AWS Region where you want to monitor GuardDuty findings.
To deploy the CloudFormation stack
- Choose the Launch Stack button to launch a CloudFormation stack in your account:

- In the AWS CloudFormation console, select the Select Template form, and then choose Next.
- On the Specify Details page, provide the following input parameters. You can modify the default values to customize the solution for your environment.
Input parameter Input parameter description AdminEmail The email address to receive notifications. Must be a valid email address. There is no default value. RulegroupPriority The priority that will be used for rules added by this solution to a Network Firewall rule group. Select a value that won’t conflict with rules that are entered outside of this solution. The default value is 30000. RulegroupCapacity The default value is 2000. Note that each blocking rule created by this solution uses two units of capacity. For more information, see Rule group capacity in AWS Network Firewall. Retention How long to retain IP addresses in the block list (within the rule group). The default is 720 minutes (12 hours). PruningFrequency How often the pruning state machine acts to remove old records from the block list in the rule group. The default is every 15 minutes. Figure 6 shows an example of the values entered in the Parameters screen.

Figure 6: Sample AWS CloudFormation stack parameters
- After you’ve entered values for all of the input parameters, choose Next.
- On the Options page, keep the defaults, and then choose Next.
- On the Review page, in the Capabilities section, select the check box next to “I acknowledge that AWS CloudFormation might create IAM resources.” and then choose Create.

Figure 7: AWS CloudFormation capabilities acknowledgement
- While the stack is being created, check the email inbox that corresponds to the value you gave for the AdminEmail address parameter. Look for an email message with the subject “AWS Notification – Subscription Confirmation.” Choose the link to confirm the subscription to the SNS topic. You should see a confirmation message similar to the following.

Figure 8: Sample Amazon SNS subscription confirmation
Note: The stack will launch in the N. Virginia (us-east-1) Region. It takes approximately 15 minutes for the CloudFormation stack to complete. To deploy this solution into other AWS Regions, download the solution’s CloudFormation template and deploy it to the selected Region. Network Firewall isn’t currently available in all Regions. For more information about where it’s available, see the list of service endpoints.
After the Status field for the CloudFormation stack changes to CREATE_COMPLETE, as shown in Figure 9, the solution is implemented and is ready for testing.
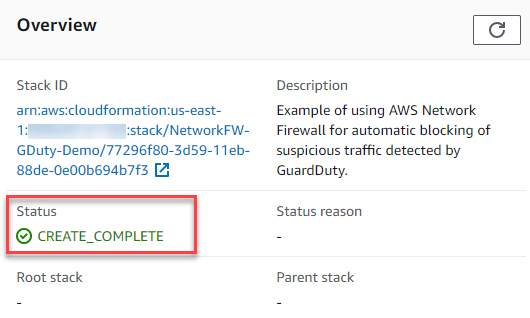
Figure 9: AWS CloudFormation stack completed deployment
Step 3: Create a test Security Hub event
After the CloudFormation stack has completed deployment, you can test the functionality by creating a test event in the same format as would be published by Security Hub.
To create a test run of the solution
- In the AWS Management Console, choose Services > CloudFormation > NetworkFW-GDuty-Demo stack.
- In the Outputs tab for the stack, look for the GuardDutytoFirewallStateMachine entry. It should look similar to the following screenshot.

Figure 10: AWS CloudFormation stack outputs
- Choose the link in the entry. You’ll be redirected to the Step Functions console, with the state machine already open, similar to the following screenshot. Choose Start execution.

Figure 11: AWS Step Functions state machine
- To facilitate testing, we’ve provided a test event file. On the Start execution page, in the Input section, paste the provided test event JSON file.
- Around line 55, find the eventLastSeen field and edit the timestamp to the current time in the UTC+0 time zone. Note the IP address 198.51.100.0 for the remote host identified in the GuardDuty finding in the test event on line 44. The solution should block traffic from that IP address in the following steps.

Figure 12: Sample input for the Step Functions state machine execution
- Choose Start execution to begin the processing of the test event.
- You can now track the state machine processing of the test event. The processing should complete within a few seconds. You can select different steps in the visual Graph inspector to view input and output data. The following example shows the input to the Block Traffic step that launches a Lambda function that interacts with Network Firewall.

Figure 13: The Step Functions state machine step details
Step 4: Confirm the entry in the Network Firewall rule group
Now that a test event was processed by the state machine, you can check whether the Network Firewall rule group would block traffic to the remote IP identified in the GuardDuty finding.
To validate entries in the Network Firewall rule group
- In the AWS Management Console, choose Services, and then choose VPC. In the Network Firewall section in the left navigation bar, choose Network Firewall rule groups.
- Choose the rule group created by the solution.

Figure 14: Selecting a Network Firewall rule group
- Confirm that the rules blocking the traffic from the source and to the destination IP address that you specified in the test event were created. The rule group list should look similar to the following screenshot.

Figure 15: Verifying entries in the Network Firewall rule group
Step 5: Confirm the SNS notification
In this step, you’ll view the SNS notification that was sent to the email address you set up.
Review the email inbox for the value you provided for the AdminEmail parameter and look for a message with the subject line “AWS Notification Message.” The contents of the message from Amazon SNS should be similar to the following.
Step 6: Apply the rule group to resources by using Network Firewall
The final task is to associate the rule group, with firewall policies attached, to the Network Firewall firewalls that you want to automatically update with this solution. To learn how to do this task, see Firewall policies in AWS Network Firewall.
After you have a properly constructed firewall policy, you can then apply those policies to Network Firewall to protect resources in your VPCs. See Deployment models for AWS Network Firewall to explore options for integrating Network Firewall with several different network architecture patterns.
Congratulations! You’ve successfully deployed and tested the automated remediation by using GuardDuty and Network Firewall. In order to fully implement this solution, you will need to add the rule group to a Network Firewall configuration within a VPC. If you haven’t deployed Network Firewall yet, you can learn more about concepts and getting started in the Network Firewall documentation.
Pruning of old records
A pruning state machine runs periodically to clear out old records from the block list. It removes records from both the DynamoDB table and the Network Firewall rule group. The retention period and the frequency of the pruning operation are configurable by using input parameters for the CloudFormation stack. If you review previous runs of the pruning state machine, you should be able to see a Graph inspector diagram similar to the following.
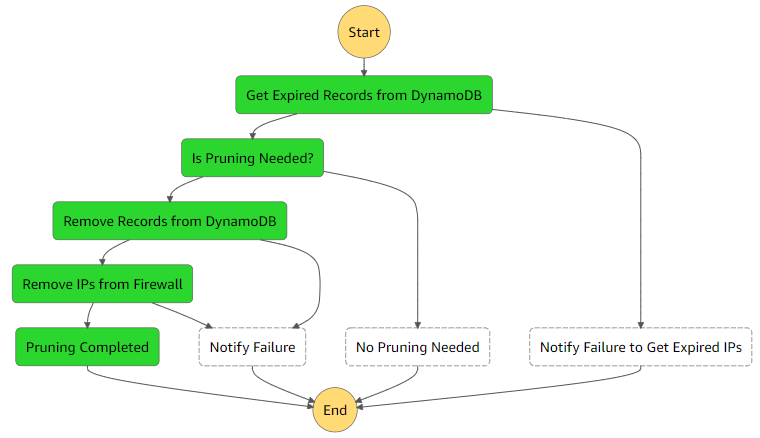
Figure 16: The Step Functions pruning state machine flow
Summary
You’ve learned how to integrate AWS Network Firewall and Amazon GuardDuty for automated remediation of security events. You can use this sample solution to automatically block communication to suspicious hosts discovered by GuardDuty, and you can apply those blocks across all configured Network Firewall firewalls within your account.
All of the code for this solution is available on GitHub. Feel free to play around with the code; we hope it helps you learn more about automated security remediation. You can adjust the code to better fit your unique environment or extend the code with additional steps. For example, you could modify the solution to use a stateful rule group to enable logging of traffic filtering, or you could add a step to create a ticket in an incident management system for better tracking and documentation of the incident response process.
If you have comments about this blog post, submit them in the Comments section below. If you have questions about using this solution, start a thread in the Network Firewall or GuardDuty forums, or contact AWS Support.
Want more AWS Security how-to content, news, and feature announcements? Follow us on Twitter.