AWS Database Blog
Reduce Resource Consumption by Consolidating Your Sharded System into Aurora
Ed Murray is a manager at Amazon Web Services.
When faced with the prospect of scaling your relational workload, you have generally had two options available: scale up or scale out. Scaling up is easy—just buy a bigger database host. Scaling out is more difficult. It requires you to shard your database into several physically independent pieces that can each run on its own host.
Despite the difficulty, it has been a recent trend for people to scale out. Availability of commodity hardware coupled with the increased need for system resources has made the effort required to shard a workload worthwhile. One drawback of a sharded system is the added administration costs: If you have four shards, you have four databases to manage. Even so, in many cases scaling out was more cost-effective than scaling up, especially with the advent of managed database services such as Amazon RDS that virtually eliminate the administrative requirements of a relational database.
But wait—what’s with the word was? With the advent of Amazon Aurora, scaling up might be back on the table. Amazon Aurora is an incredibly scalable, MySQL compatible, managed database service. Aurora offers instance sizes from 2 vCPUs and 4 GiB of memory all the way up to 32 vCPUs and 244 GiB of memory. Amazon Aurora automatically grows storage as needed, from 10 GB up to 64 TB. You can also add up to 15 low latency read replicas across three Availability Zones to further scale read capacity. The best part about that is, the storage is shared with your read replicas!
You might, in fact, save bunches of money by consolidating your sharded system into a single Aurora instance or fewer shards running on Aurora. That is exactly what this blog post is all about.
Getting initial data into Aurora for sharding
Most sharded systems follow a standard pattern: Data is divided based on some key, such as customer ID, and distributed across shards by using some mapping function. There are variations—for example, some systems keep reference data in a separate system or in a single shard, and some replicate the reference data to all shards. No matter how data is divided, the complexity in sharding typically lies in the application layer, making the consolidation of shards a relatively easy exercise.
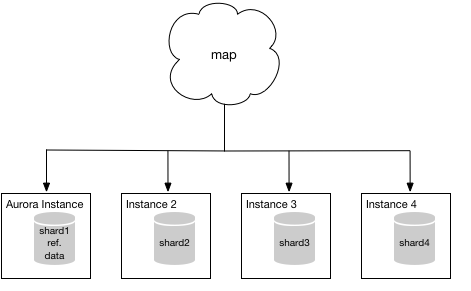
Now you’re probably thinking, “Okay sure, but exactly how do I get my data in to Aurora?” For discussion purposes, let’s assume you are running on MySQL and have a system that consists of four clean shards. By clean, I mean no shard contains data that technically belongs in another shard. Let’s also assume that one shard contains nonsharded reference data. Your sharded system looks something like the following diagram—the “map” shown represents the application mapping traffic to each individual shard.

Because you’re running on MySQL, you can use one of the methods listed in the Aurora documentation to establish a beachhead in Aurora. For simplicity, it’s probably easier to migrate instance 1 first because it contains the additional reference data. However, it doesn’t really matter all that much which shard you choose to migrate first. Once the migration is complete, your mapping function will point to your Aurora instance instead of instance 1 and your system will look something like the following diagram.
Migrating the rest of your data
At this point, you should evaluate how well Aurora is handling your particular workload and make any required adjustments. Once you’re satisfied with your configuration, you’re ready to migrate another shard, say shard2, into your Aurora instance… but how?
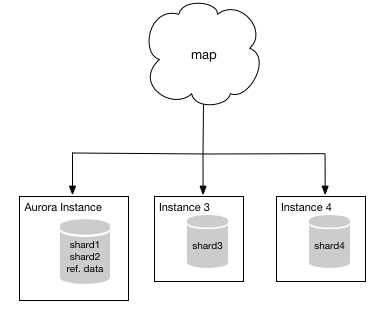
Enter AWS Database Migration Service (AWS DMS)! AWS DMS was built for just these situations. You can use DMS to copy the data from shard2 into your new Aurora instance. Even better, you can do so while continuing to take transactions in shard2. DMS will collect these transactions and apply them to your Aurora instance after the bulk data has been completely loaded. DMS will continue moving transactions from shard2 to your Aurora instance, keeping the two in sync, until you are ready to use your Aurora instance instead of shard2. When you are ready to “flip” between shard2 and your Aurora instance, you simply stop taking transactions in shard2, let DMS apply the final few transactions to your Aurora instance, and update your map to direct traffic previously meant for shard2 to your Aurora instance. When you’ve done so, your system will look something like the following.
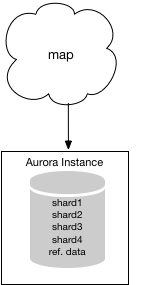
From this point, you can use the Database Migration Service to migrate your final two shards into your Aurora instance. The resulting system will look like the following.
Dealing with shards that aren’t clean
Great! You’ve now migrated your sharded system into a single Aurora instance and saved a bunch of money! But we made a couple of assumptions. We assumed your shards were clean and your source database was MySQL. What if those assumptions aren’t true?
Let’s take a look at the case where your shards aren’t clean. For example, suppose your system initially consisted of two shards and at some point you split those two shards into four shards. As part of the resharding process, you simply made copies of shard 1 and 2 to create shards 3 and 4 and updated your mapping function. The result is something like the following.

The diagram looks more complicated than the situation is. Ideally, when resharding like this you purge the data that is no longer pertinent to the shard—the grayed-out data. However, it’s not always required and sometimes can be difficult, so people tend to leave it alone. This approach results in “dirty” shards—shards that hold redundant data that is dormant and not used. When you try to consolidate these shards, you run into issues where the rows of active data collide with those duplicate stagnant rows that should have been deleted.
What to do? You can purge those stagnant rows prior to performing your shard consolidation. However, it might be difficult to identify the rows that are stagnant, especially if your mapping function consists of a hash of an ID value (a fairly common practice).
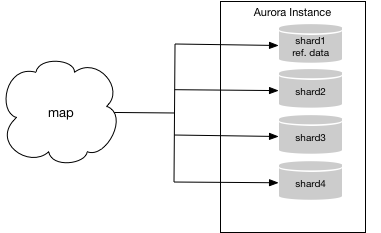
Don’t despair! There might be another option! If the data within each of your shards is contained within a single database, you can use DMS to consolidate each shard of your system into a single MySQL database within your Aurora instance. You can then use your existing mapping scheme to direct transactions to the appropriate database within your Aurora instance. Using our example, the resultant Aurora instance looks something like the following.
Using databases other than MySQL
One of the other assumptions we made was that your sharded system uses MySQL for a database engine. What if it doesn’t? What if you use Oracle or Microsoft SQL Server? Fear not! The AWS Schema Conversion Tool can help!
As stated in the documentation, “The AWS Schema Conversion Tool makes heterogeneous database migrations easy by automatically converting the source database schema and a majority of the custom code to a format compatible with the target database.” Often, sharded systems don’t include a significant amount of business logic embedded in the database by using stored procedures and triggers. This business logic has usually already been moved to the application. If you’re running a sharded system on a database engine that is supported as a source by the AWS Schema Conversion Tool, it might be worth your while to investigate whether a conversion and consolidation to Aurora is feasible. Not only will you benefit from the consolidation, you’ll also benefit from the migration to an open source platform.
Digging deeper
Interested in digging a little deeper? Excellent! We’ve put together an exercise to illustrate how you can use AWS Database Migration Service to help consolidate your sharded database into one or more Aurora instances. For our example, we use a sharded version of the MySQL sample database provided by the DMS team. We’ve made this sharded version available to you as RDS snapshots so you can follow along and provided full instructions. The required snapshots are publicly available and are called mysql-sampledb-master-shard, mysql-sampledb-shard1, and mysql-sampledb-shard2, as described in the instructions.