Networking & Content Delivery
Implementing dynamic origin modification in Amazon CloudFront – Part 2
In part one of this post, we introduced two methods, Amazon CloudFront Functions and Lambda@Edge, for executing custom code at CloudFront edge Locations to modify request origins dynamically. This second post provides step-by-step setup instructions and code samples for implementing the two approaches for a subscription-based routing use case:
- CloudFront Functions with query string parameters
- Lambda@Edge with request body parameters in a multi-tenant environment
The code examples in this post are intended for educational purposes and to demonstrate concepts. They should not be used in production environments without implementing proper security measures, including but not limited to authentication, authorization, input validation, and encryption. Always follow Amazon Web Services (AWS) security best practices and conduct thorough security reviews when implementing any solution.
Dynamic origin selection using CloudFront Functions and KeyValueStore
The following sections walk through dynamic origin selection using CloudFront Functions and KeyValueStore.
Recap of the use case
In our use case, a global e-commerce platform needs to route requests based on subscription tiers. The platform maintains separate application instances to control performance, security, and customization for each tier. Each request includes the subscription tier as a header parameter or cookie.
CloudFront Functions is ideal for this use case because:
- It has lightweight, fast routing decision logic using only query string parameters (no HTTP body access needed).
- KeyValueStore provides fast, low-latency lookups at the edge.
Setup and configuration
- Create origins for the distribution:
- Create three APIs using Amazon API Gateway by importing the example PetStore API—one for each subscription tier: basic, standard, and premium.
- Configure the POST method integration to include the tier type in the API response. Follow the steps in this tutorial to create a mock integration.
The POST method is used here to maintain consistency between CloudFront Functions and Lambda@Edge scenarios, because the following Lambda@Edge scenario needs the POST method to access data from the request body.
- Create a CloudFront distribution:
- Configure the basic tier API endpoint as the default origin.
- Set appropriate cache behaviors.
Only static origins need to be configured in the CloudFront distribution. Origins for dynamic selection do not need explicit configuration in the CloudFront distribution.
- Create a CloudFront KeyValueStore as explained in this post, as shown in the following figure. This serves as the lookup table for mapping subscription tiers to origin.
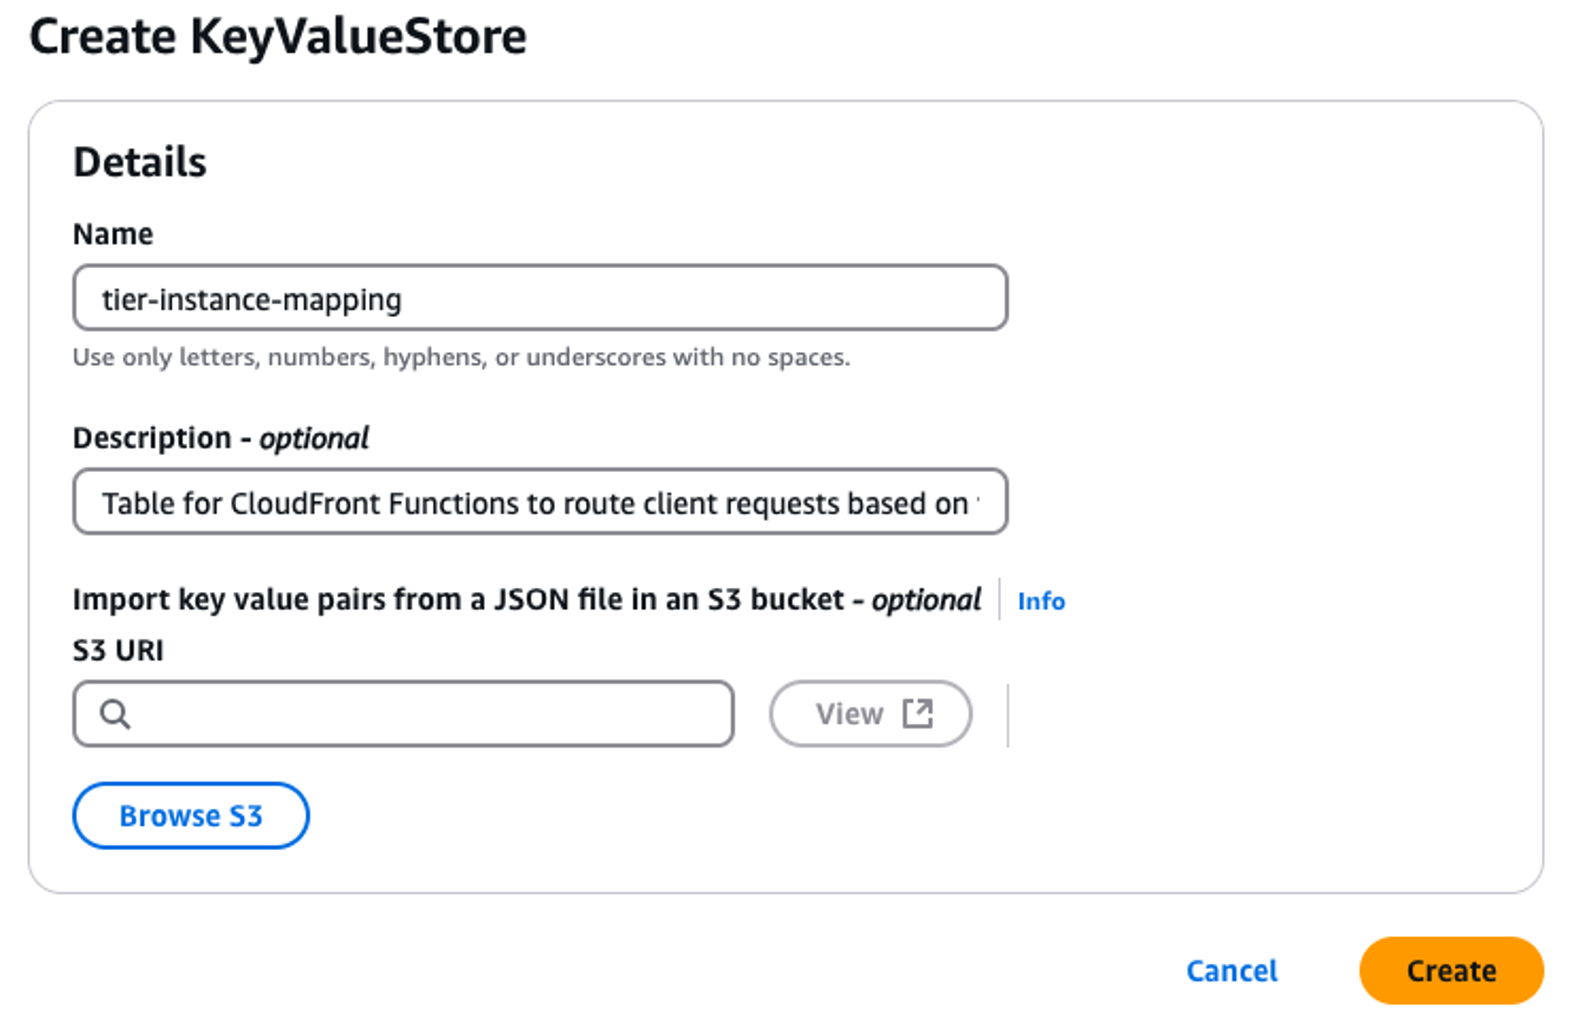
Figure 1: Create a CloudFront KeyValueStore
- Configure the mapping between tiers and API Gateway endpoints, as shown in the following figure.
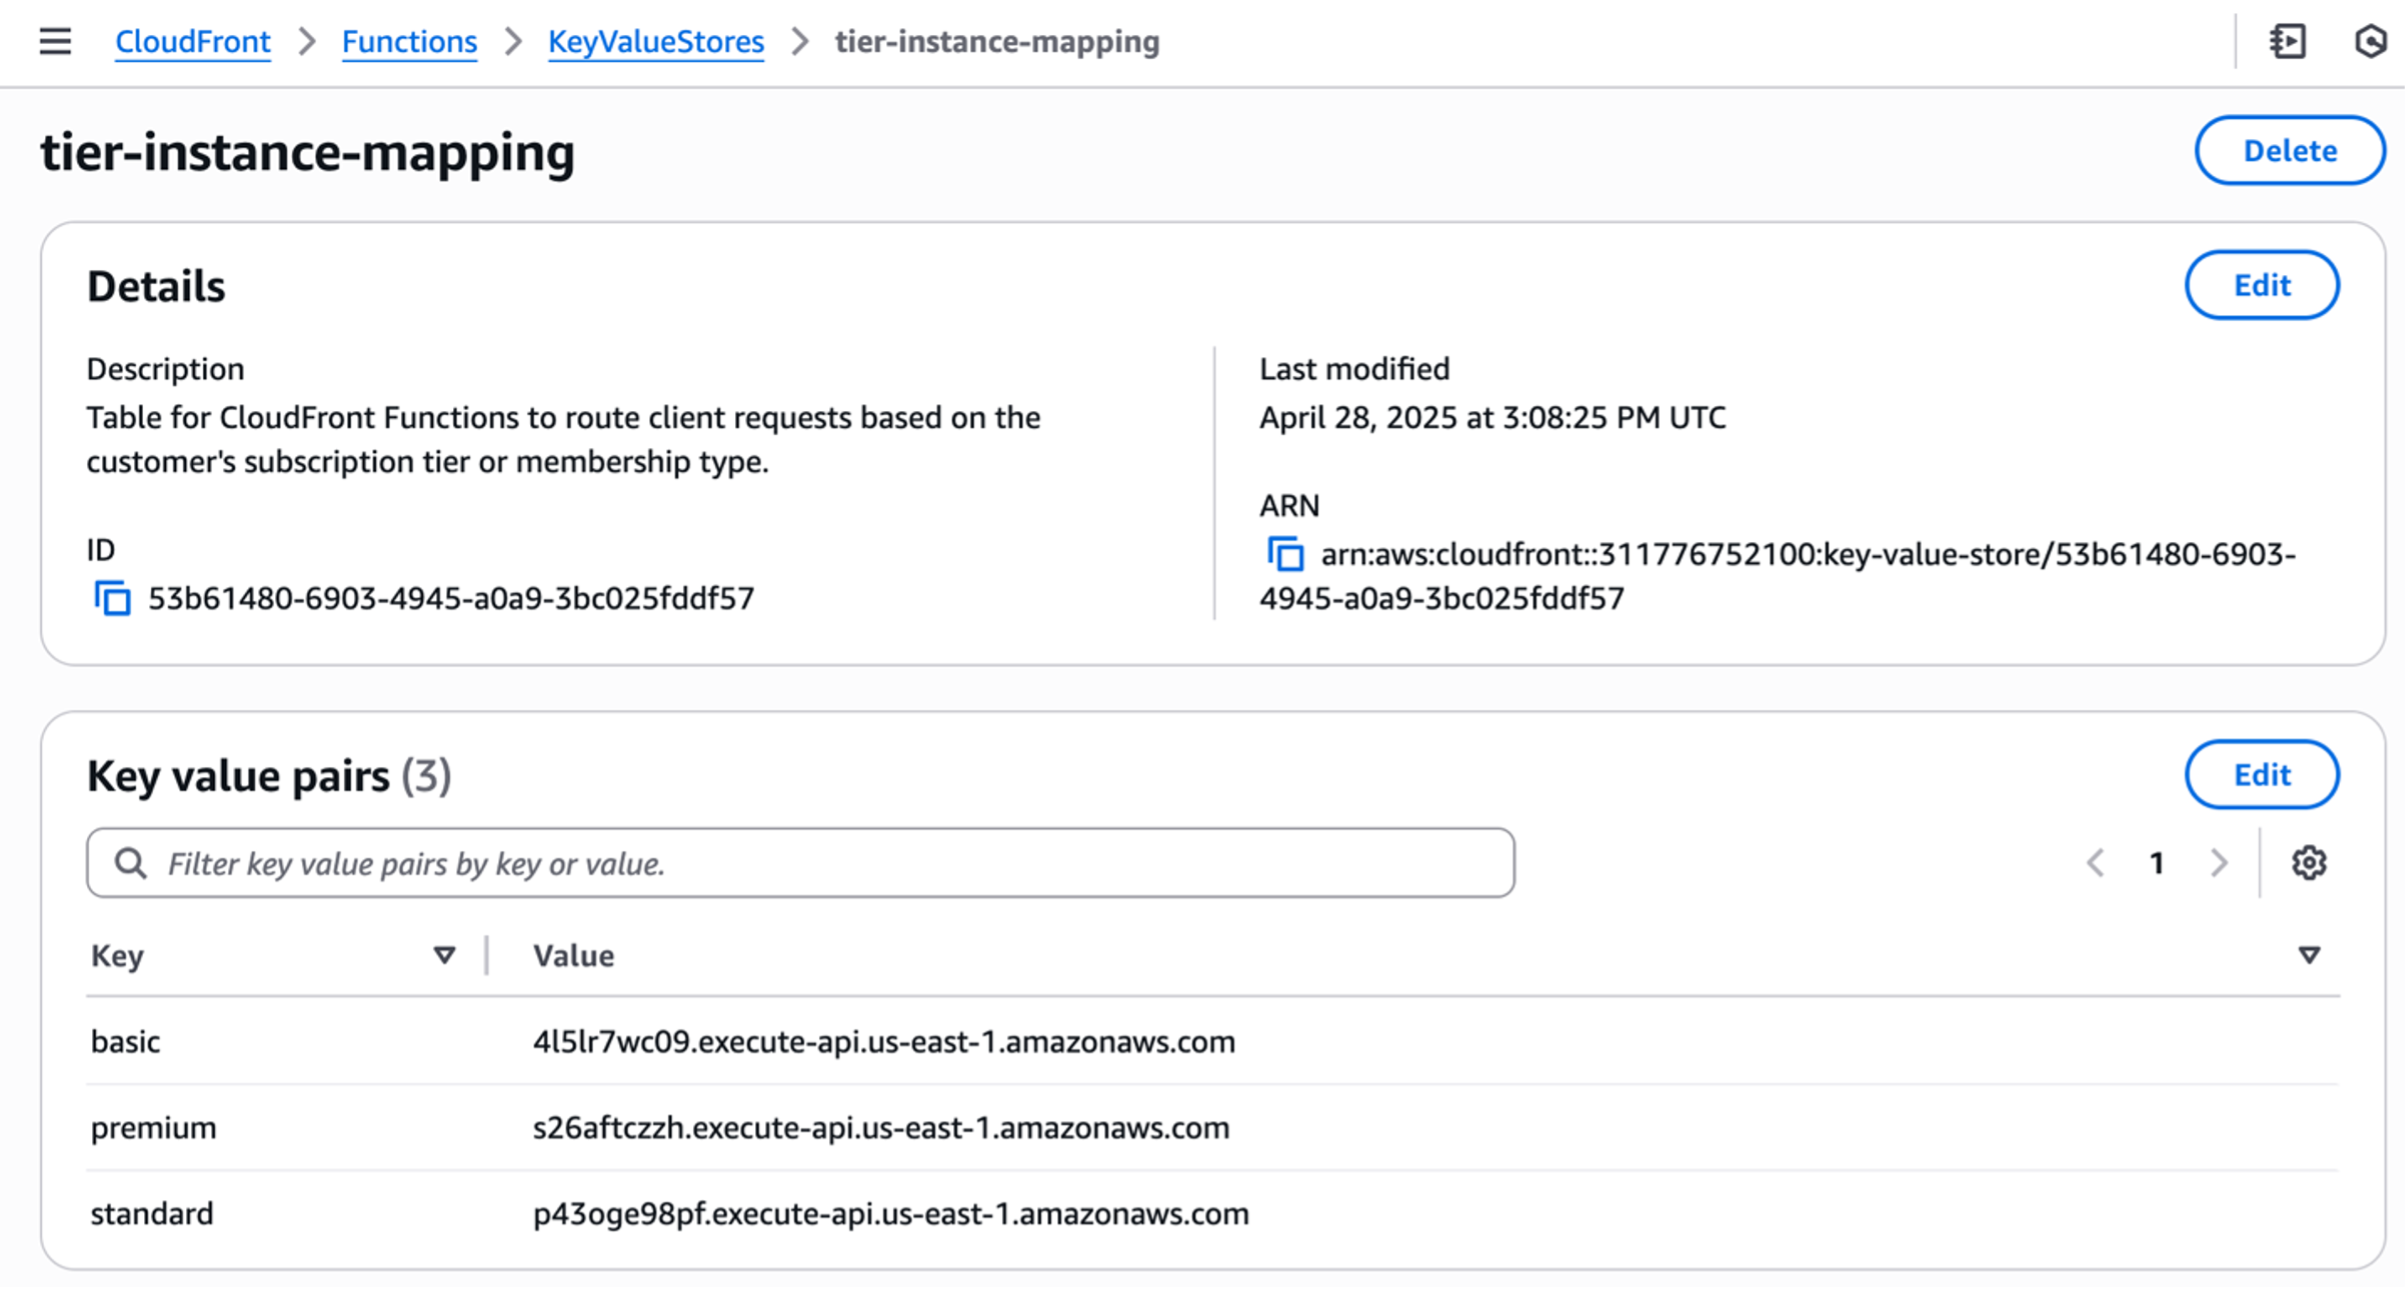
Figure 2: Key value pairs mapping customer tier to API backend
- Create the CloudFront Function, as shown in the following figure.
- In the CloudFront console, navigate to CloudFront Functions.
- Choose Create function.
- Enter a descriptive Name and optional Description.
- Choose the cloudfront-js-2.0 runtime.
The cloudfront-js-2.0 runtime is necessary for dynamic origin selection.
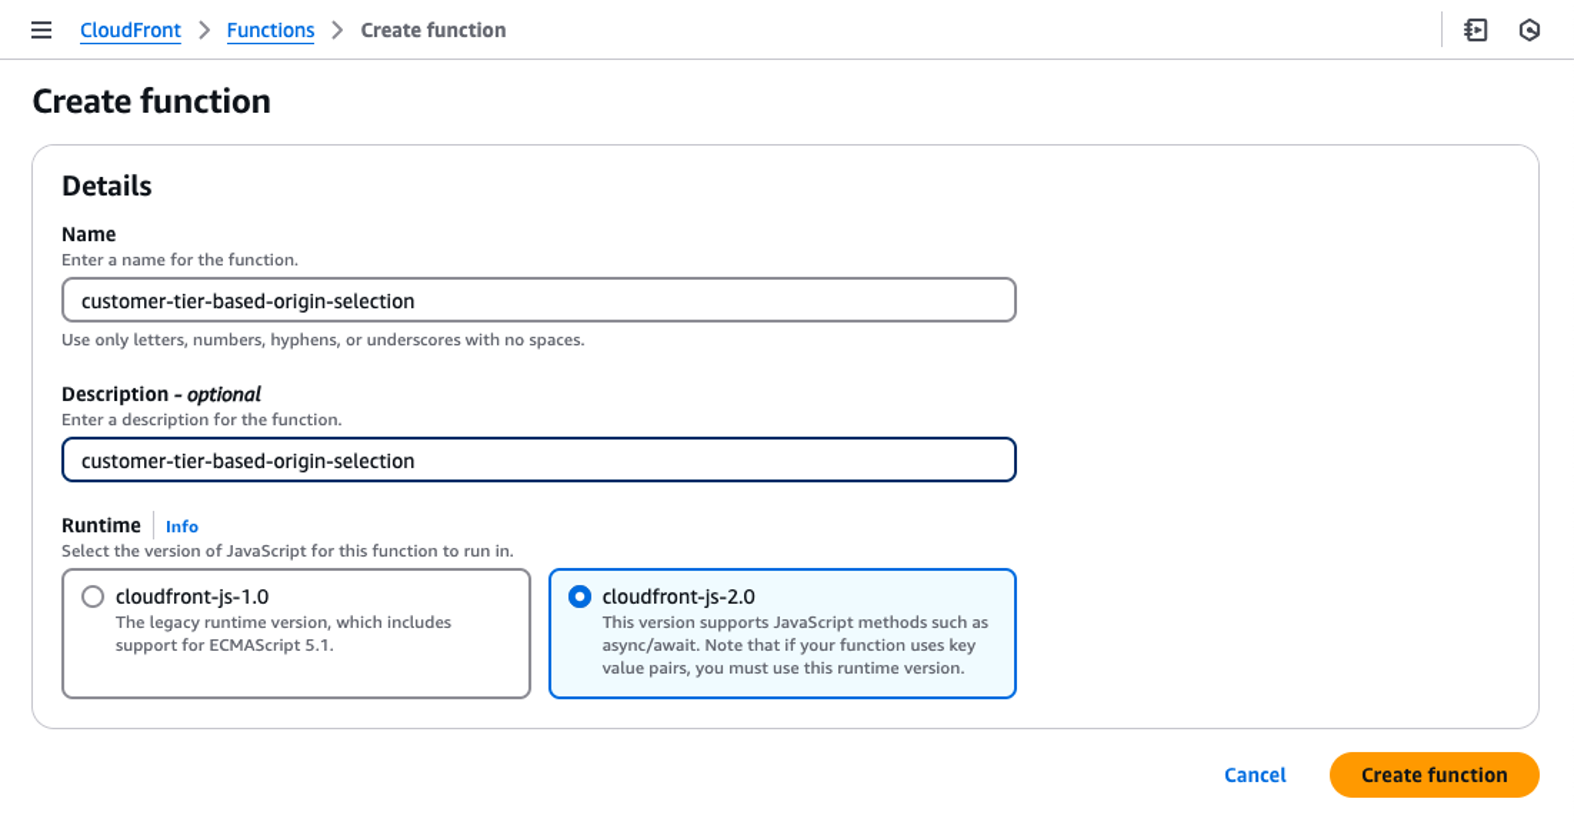
Figure 3: Create CloudFront function
- Associate the KeyValueStore created in the first step.
- Add the function code:
// This is the new module introduced which provides functions to modify origin import cf from 'cloudfront'; const kvsHandle = cf.kvs(); async function handler(event) { // Customer tier is passed in the request in the query string. Key name is: CTIER const request = event.request; const queryString = request.querystring; const customerTier = queryString.CTIER ? queryString.CTIER.value.toLowerCase() : null; // Input validation // In production, implement robust validation, potentially storing valid tiers in KeyValueStore for easier management and updates if (!validateCustomerTier(customerTier)) { console.log("Invalid or missing customer tier"); return request; // Or handle invalid tier as appropriate } console.log("Customer tier: " + customerTier); // Maintain basic tier requests to default origin if (customerTier != 'basic') { try { const origin = await kvsHandle.get(customerTier); cf.updateRequestOrigin({"domainName": origin}); console.log(`Origin updated for ${customerTier} traffic to ${origin}`); } catch (err) { console.log(err); // Depending on requirements, you might want to throw the error or handle it differently } } else { console.log("Request was for basic tier; no change to origin"); } return request; } // Dummy function for customer tier validation function validateCustomerTier(tier) { const validTiers = ['basic', 'standard', 'premium']; return validTiers.includes(tier); } - Deploy the function:
- Test the code using the built-in testing panel.
- Publish the validated code.
- Associate it with the CloudFront distribution as a Viewer request trigger, as shown in the following figure.
- Wait for the distribution deployment to complete.
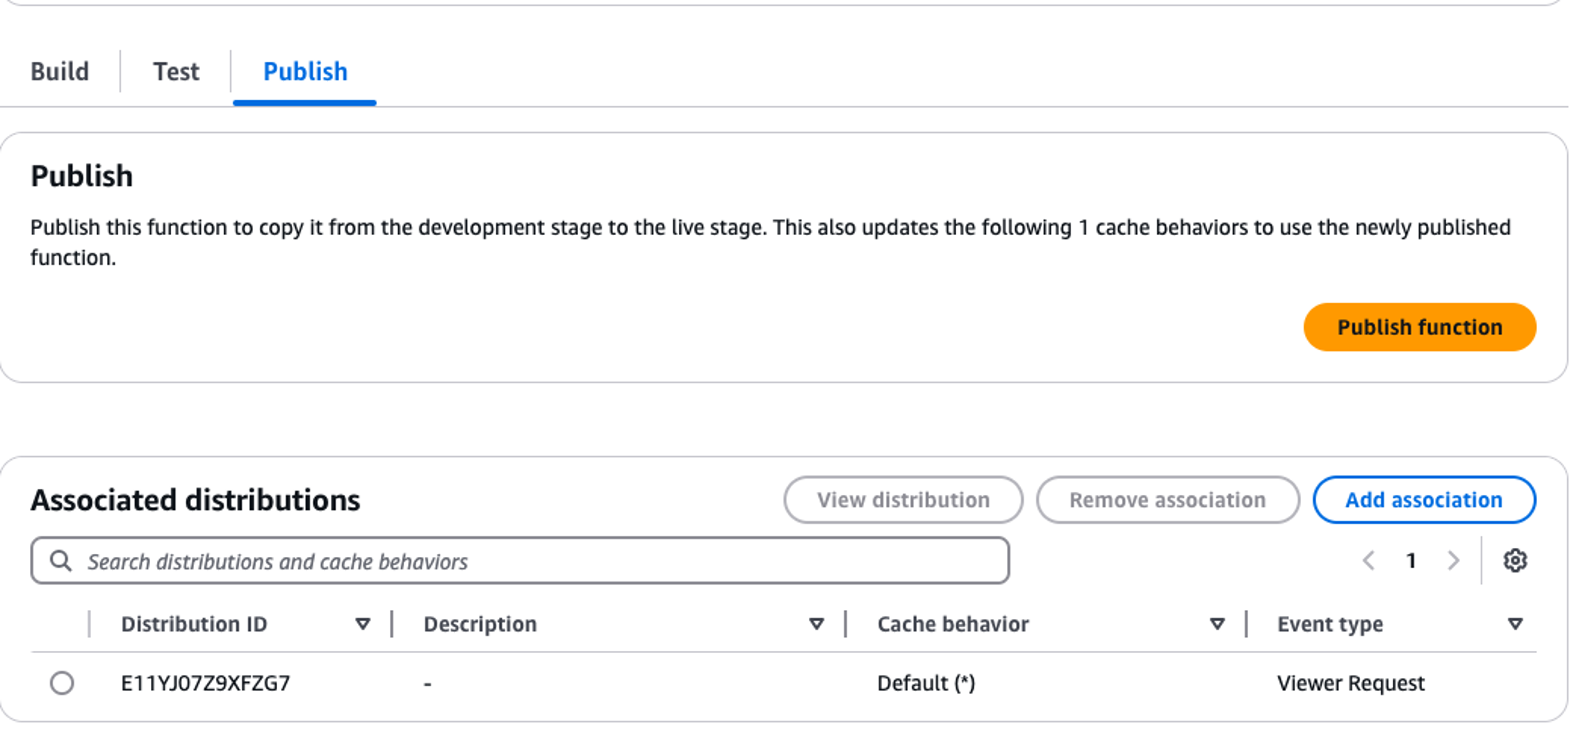
Figure 4: Associate the function with CloudFront distribution
Testing
When CloudFront receives a request:
- The CloudFront edge location executes the CloudFront Functions as the viewer request event.
- The function extracts the tier from query string parameter CTIER.
- KeyValueStore provides the corresponding origin.
- CloudFront routes the request to the appropriate API endpoint.
CloudFront Functions executes at the viewer request event, before cache lookup, which enables origin modification for every request regardless of cache status.
The following are test examples using cURL:
Dynamic origin selection using Lambda@Edge and Amazon DynamoDB
The following sections walk through dynamic origin selection using Lambda@Edge and Amazon DynamoDB.
Use case recap
Global e-commerce platform routes users to customer-specific backends based on tenant and account information. The request payload contains both the tenant ID and subscription tier. The application maintains these mapping in DynamoDB.
Lambda@Edge is ideal for this use case because:
- Routing decisions need the HTTP request body data, and CloudFront Functions cannot access request bodies.
- Integration with DynamoDB is needed.
Setup and configuration
- Create the origins for your distribution:
- Continue using the three APIs from the previous example.
- Each API represents a different subscription tier.
- Configure the CloudFront distribution:
- Disable caching to make sure that each request triggers the Lambda@Edge function.
- Use the AllViewerExceptHostHeader policy for proper
Hostheader handling. - Lambda@Edge triggers only on cache misses. Disable caching during testing to make sure that your function executes for each request.
- Create a DynamoDB table, as shown in the following figure:
- Configure tenantId as the partition key and accountID as the sort key.
- Add attributes for backend mapping.
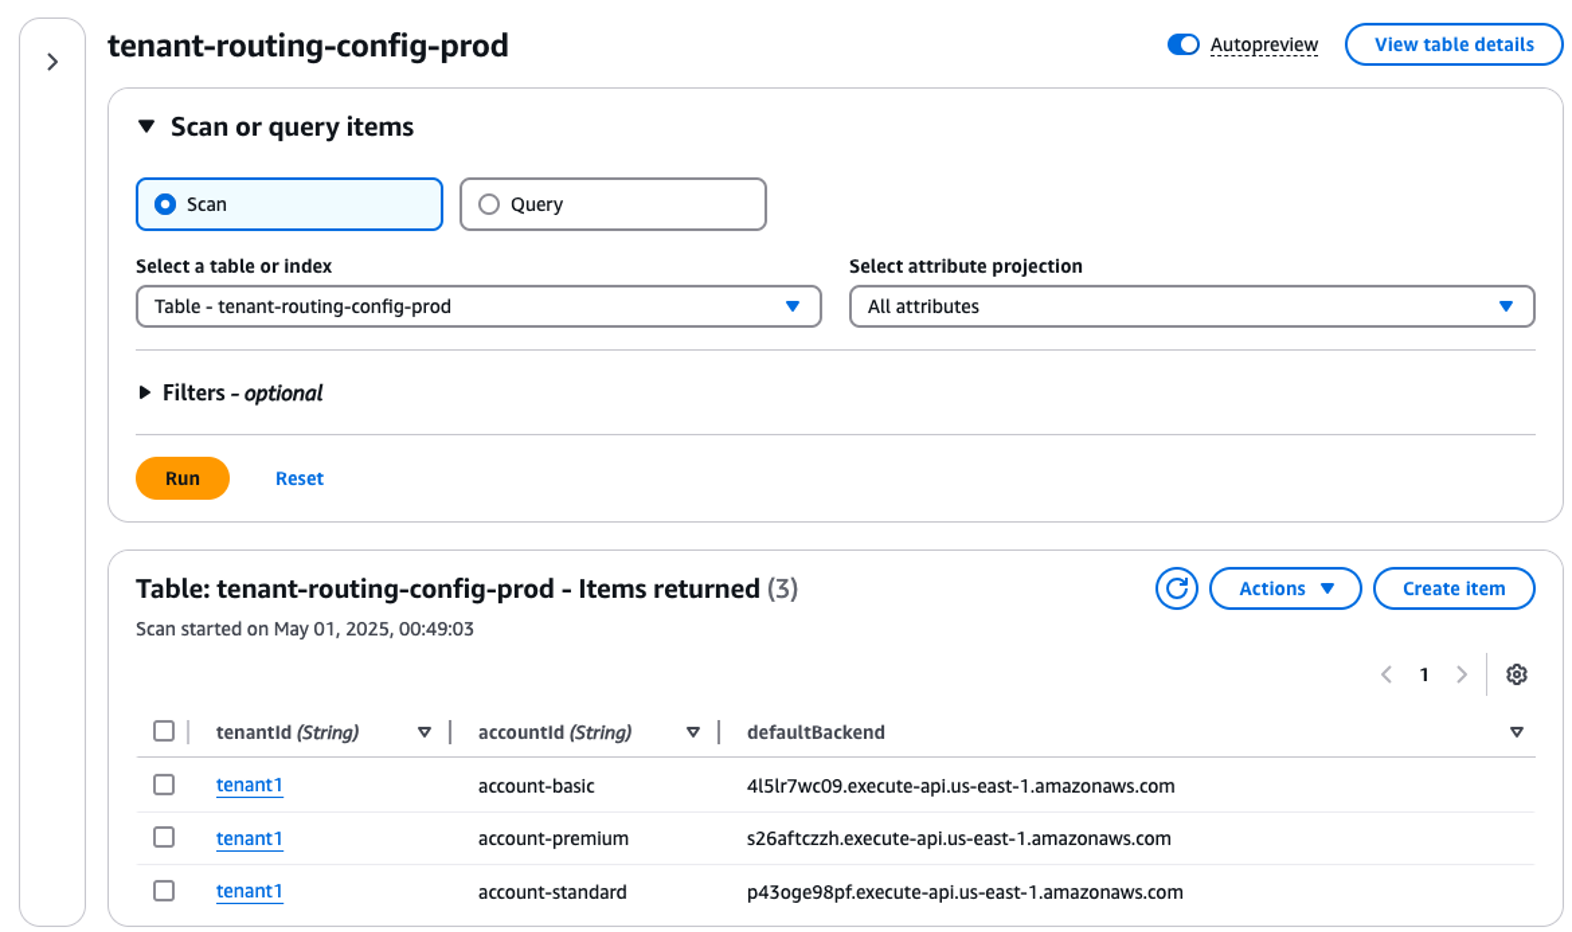
Figure 5: Create a DynamoDB table
- Create a Lambda@Edge function
- Note: You must create Lambda@Edge in US East (N. Virginia) Region (us-east-1)
- Choose Create function > Author from scratch.
- Choose the latest Node.js runtime.
- Create a new execution role.
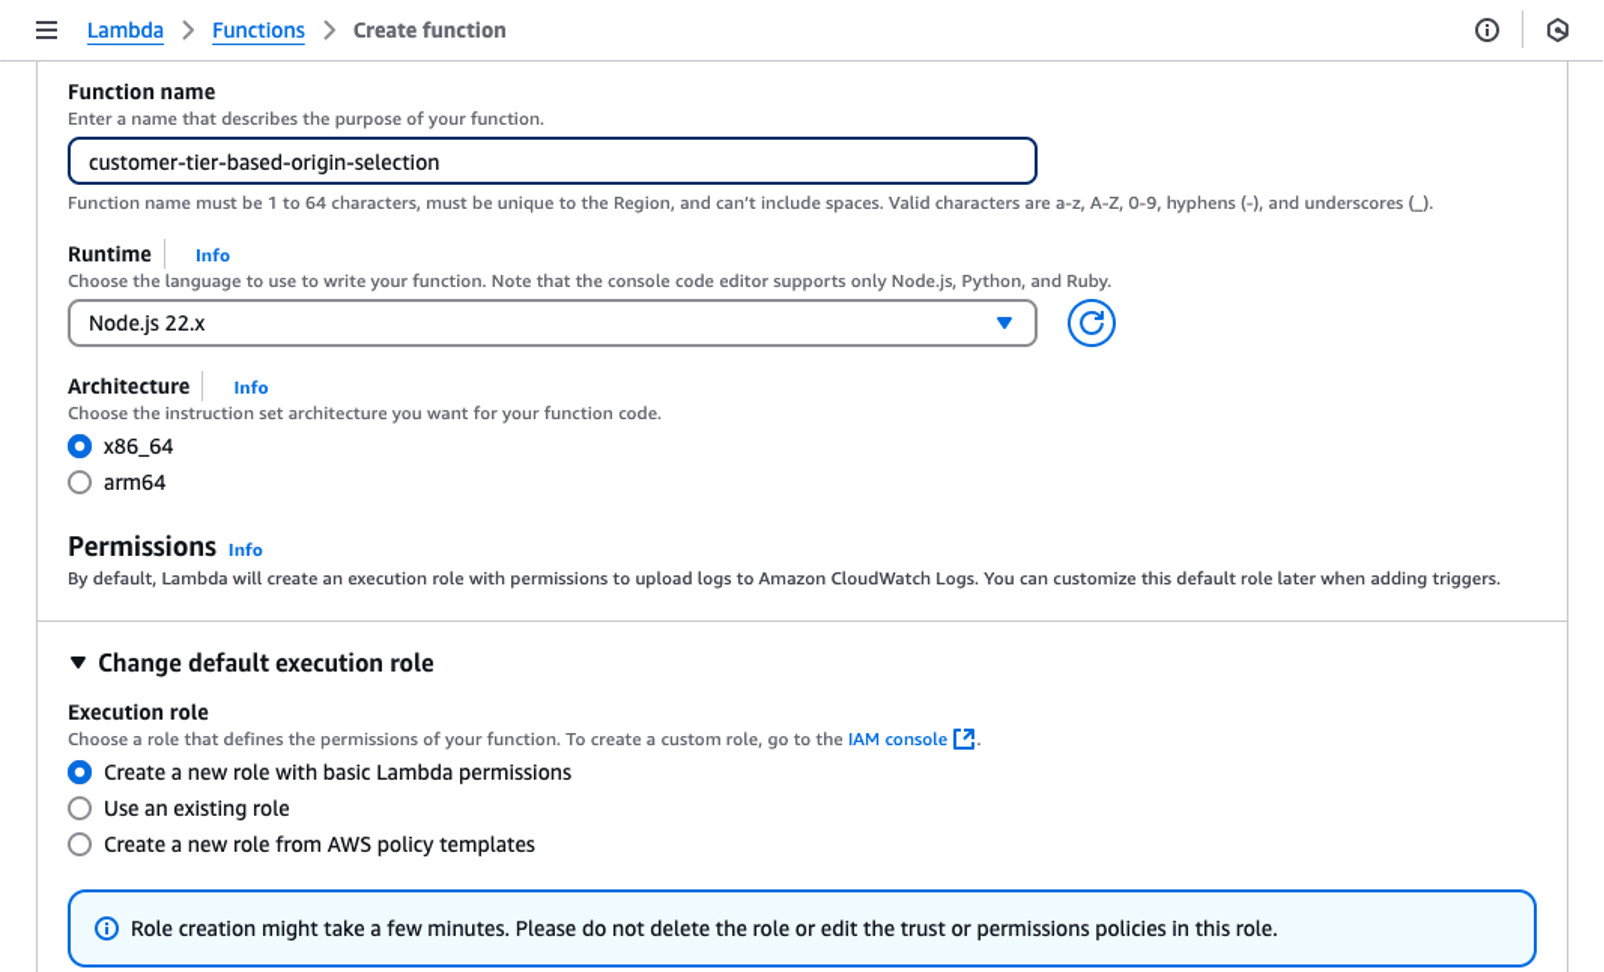
Figure 6: Create a new Lambda function
- Configure the AWS Identity and Access Management (IAM) permissions for the AWS Lambda execution role.
- Navigate to the IAM console after creating the Lambda function and search for the newly created role.
- Attach an AWS managed policy named “AmazonDynamoDBReadOnlyAccess”.
- Update the trust policy to include the Lambda@Edge service principal:
- Write the Lambda function code:
'use strict'; import { DynamoDBClient } from "@aws-sdk/client-dynamodb"; import { DynamoDBDocumentClient, GetCommand } from "@aws-sdk/lib-dynamodb"; const client = new DynamoDBClient({region: 'us-east-1'}); const dynamoDb = DynamoDBDocumentClient.from(client); const tableName = "tenant-routing-config-prod"; export const handler = async (event, context) => { const request = event.Records[0].cf.request; try { //parse request body const body = Buffer.from(request.body.data, 'base64').toString(); const accountInfo = JSON.parse(body); //Extract tenant and account id const tenantId = accountInfo.tenantId; const accountId = accountInfo.accountId; // Input validation // In production, implement thorough validation here, including regex checks if necessary validateInput(tenantId, accountId); console.log(`tenantId: ${tenantId}, accountId: ${accountId}`); const params = { TableName: tableName, Key: { tenantId: tenantId, accountId: accountId } }; const command = new GetCommand(params); const result = await dynamoDb.send(command); if (!result.Item){ throw new Error('No tenant found'); } //Determine the backend origin const config = result.Item; console.log(`config: ${JSON.stringify(config)}`); const backendOrigin = config.defaultBackend; console.log(`backendOrigin: ${backendOrigin}`); //update cloudfront request; remember to update all parameters even if you are not changing them request.origin = { custom: { customHeaders: {}, domainName: backendOrigin, keepaliveTimeout: 5, path: '', port: 443, protocol: 'https', readTimeout: 30, sslProtocols: ['TLSv1.2'] } }; //update host header request.headers['host'] = [{ key: 'host', value: backendOrigin}]; console.log(`request: ${JSON.stringify(request)}`); return request; } catch (err) { console.log(err); return request; } } // Dummy function for input validation function validateInput(tenantId, accountId) { // Placeholder for input validation logic console.log("Validating input: ", tenantId, accountId); } - The Lambda@Edge function:
- Decodes and parses the base64-encoded request body.
- Queries DynamoDB using tenant and account information.
- Updates both origin configuration and host header.
- Falls back to default origin on errors.
- Deploy the function:
- Test using the Lambda console’s test feature. Use this event structure to send test request.
- Publish a new version.
- Associate with CloudFront as an Origin Request trigger. The reason for this is that CloudFront hasn’t determined the origin, and
request.origindoesn’t exist before this event. - Choose the Include body option
Notes
- Lambda@Edge needs a published version number.
- The function Amazon Resource Name (ARN) configured in the CloudFront distribution must include the version number.
- Include body must be chosen for request body access.
- The Lambda@Edge function can be associated either by editing the CloudFront distribution or through the Lambda console, as shown in the following figures.
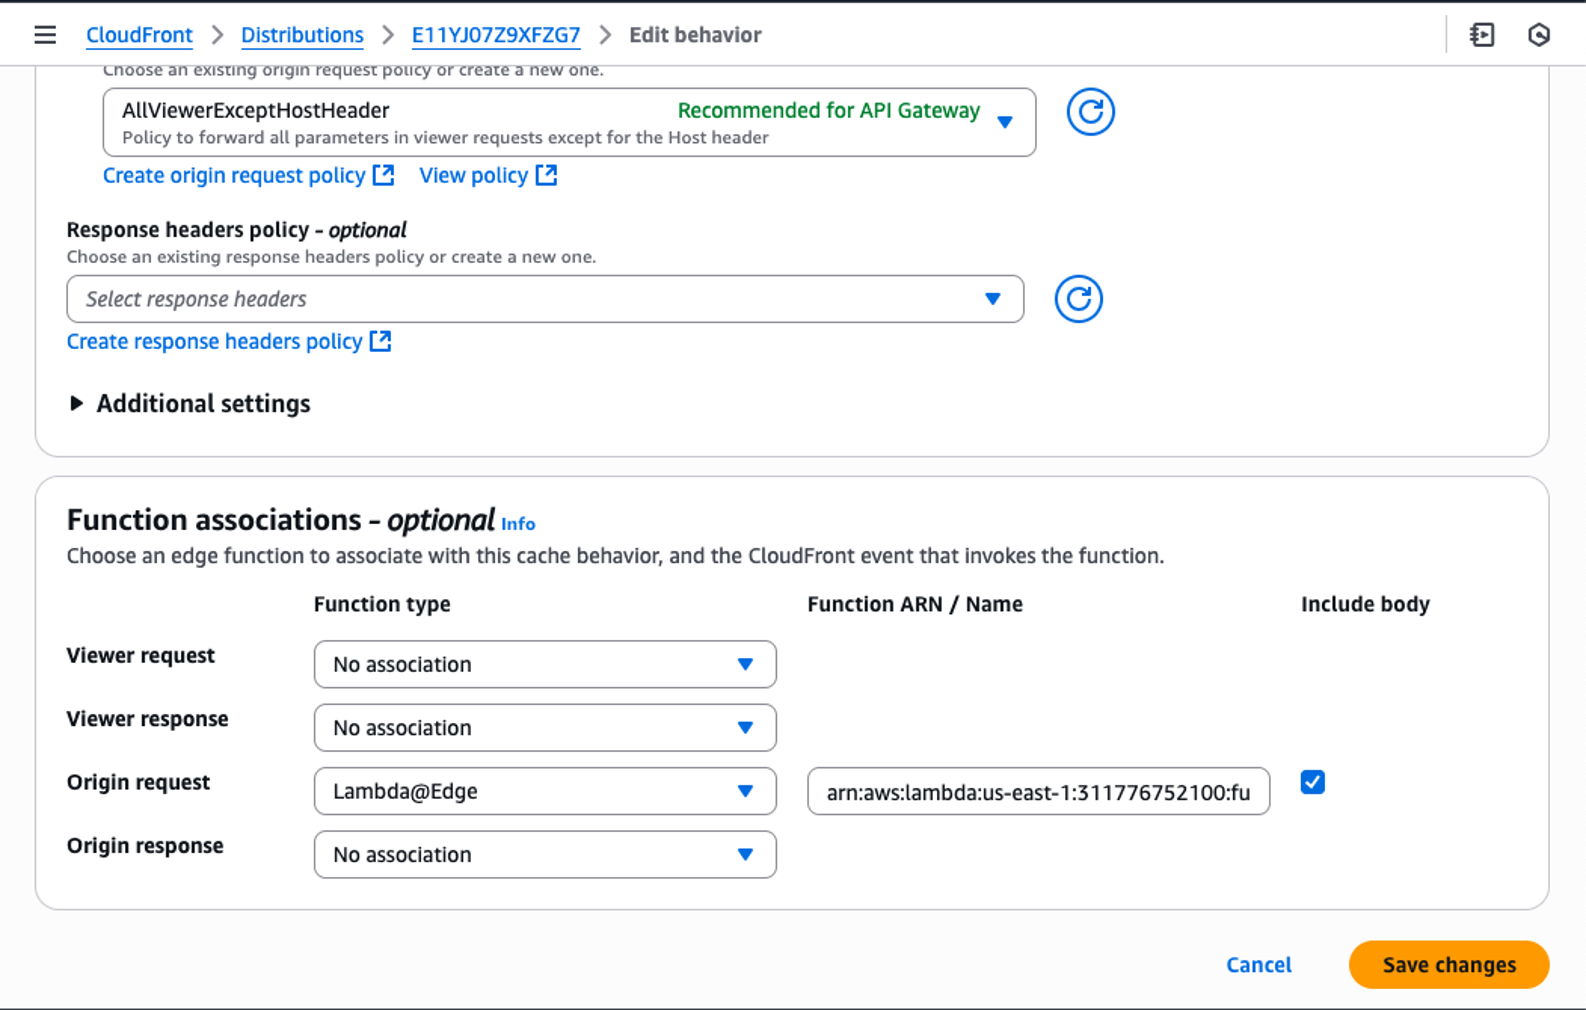
Figure 7: Associate the Lambda@Edge function in the distribution
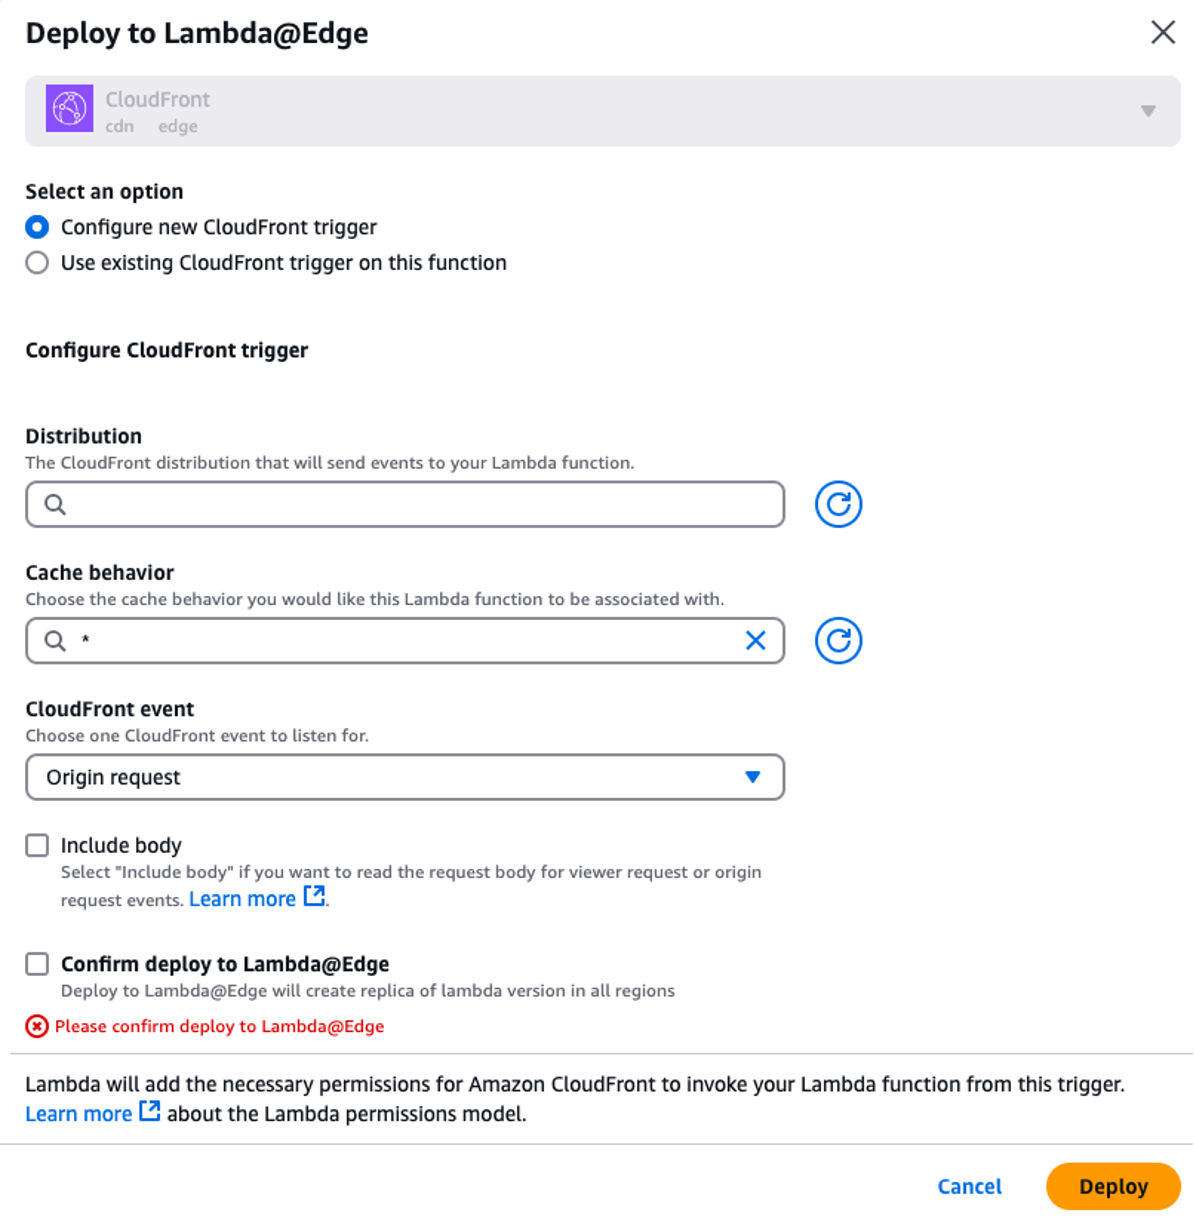
Figure 8: Add CloudFront trigger from the Lambda console
Testing
Each request follows this flow:
- Request arrives at a CloudFront edge location.
- The cache miss results in the edge location forwarding the request to a regional edge cache (REC).
- The cache miss at the REC triggers the origin request event.
- The Lambda@Edge function running at the REC executes and modifies the origin.
- The REC forwards the request to the appropriate backend.
The following are test examples using cURL:
- Basic tier request
Response:
- Standard tier request
Response:
- Premium tier request
Response:
There are two key differences from the CloudFront Functions example:
- Executes at the origin request instead of the viewer request.
- Supports complex logic and external service integration.
Conclusion
The dynamic origin modification capabilities of Amazon CloudFront, implemented through CloudFront Functions and Lambda@Edge, enable sophisticated content delivery optimization. CloudFront Functions provide low-latency, cost-effective routing for generic use cases, while Lambda@Edge supports more complex logic when needed. You can use these methods to enhance your CloudFront distributions to deliver improved performance, cost-efficiency, and user experiences tailored to your specific application needs.
To maximize your content delivery strategy, stay updated on the latest CloudFront features. For those new to CloudFront, refer to Getting Started with Amazon CloudFront. For more on edge customization, consult the CloudFront Functions and Lambda@Edge documentation.
About the authors

Aish Gopalan
Aish Gopalan is a Principal Solutions Architect at AWS, providing transformative architectural guidance to enterprise customers. She specializes in transforming customer journey focusing on resilient and scalable cloud operating model. Primarily an individual contributor, she has worn multiple hats ranging from Solutions Architect, Application Architect, Cloud Transformation Delivery Lead and Developer in her 19 year+ software journey.

Nikhil Patne
Nikhil is a Senior Technical Account Manager at AWS, providing strategic technical guidance to Healthcare & Life Sciences customers. He specializes in Content Delivery Networks, Edge Computing solutions, and Cloud Networking architectures helping customers architect cost-effective, high-performance systems that strengthen security postures, build resilient infrastructures, and accelerate digital transformation outcomes.

Deepak Garg
Deepak is a Solutions Architect at AWS, where he helps customers design and implement cloud solutions. With experience in Content Delivery Networks and Telecommunications, he is passionate about diving deep into AWS services and enabling customers to achieve their cloud transformation goals.