AWS Startups Blog
Building a VPC with the AWS Startup Kit
The AWS Startup Kit provides resources to help startups begin building applications on AWS. Included with the Startup Kit is a set of AWS CloudFormation templates that create fundamental cloud infrastructure building blocks. For purposes of this post, we’ll look at the building blocks that relate to an Amazon Virtual Private Cloud (Amazon VPC), a bastion host, and an (optional) relational database. The templates are available on GitHub at https://github.com/awslabs/startup-kit-templates. With respect to the above-mentioned building blocks, they create the following architecture:
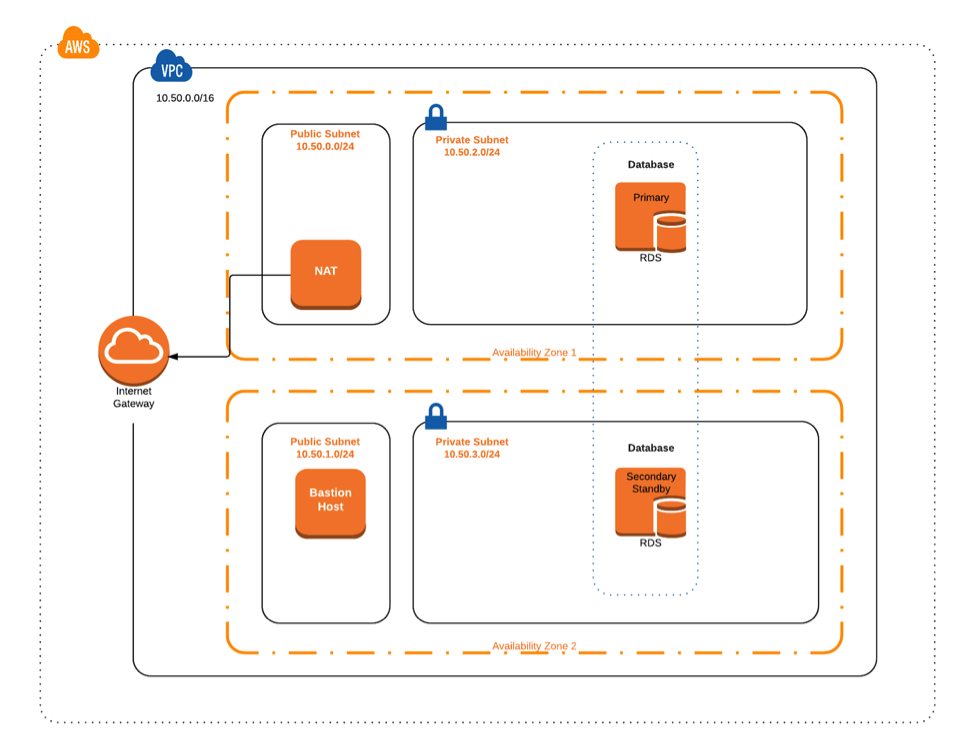 Before you work with the templates, you should be familiar with basic VPC concepts. If not, see the VPC documentation. The VPC template is the foundation for everything you build on AWS with the Startup Kit. It creates a VPC with the following network resources:
- Two public subnets, which have routes to a public Internet gateway.
- Two private subnets, which do NOT have routes to the public Internet gateway.
- A NAT Gateway to allow instances in private subnets to communicate with the public Internet, for example, to pull down patches and upgrades, and access AWS services that have public endpoints (though some AWS services may be accessed entirely privately).
- Two route tables, one for public subnets and the other for private subnets.
- Security groups for an app, load balancer, database, and bastion host.
The bastion host template creates a bastion host that provides SSH access to resources you place in private subnets for greater security. Resources placed in private subnets could include application instances, database instances, analytics clusters, and other resources you do not want to be discoverable via the public Internet. For example, along with enabling proper authentication and authorization controls, placing database instances in private subnets can help avoid security problems risked by exposing databases to the public Internet.
After you’ve created your VPC and bastion host, you can optionally create a relational database using the database template. Either a MySQL or PostgreSQL database is created in the Amazon Relational Database Service (Amazon RDS), which automates much of the heavy lifting of database setup and maintenance. Following best practices, the database is created in your VPC’s private subnets and is concealed from the public Internet.
The README of the GitHub repository has detailed template usage instructions.
Managing Your Infrastructure with CloudFormation
You can manage your infrastructure on AWS entirely via the AWS console. However, there are many advantages to following an “infrastructure as code” approach using CloudFormation or similar tools.
CloudFormation provides an easy way to create and manage a collection of related AWS resources, allowing you to provision and update them in an orderly and predictable fashion. Here are some of the benefits of using CloudFormation to manage your infrastructure:
- Dependencies between resources are managed for you by CloudFormation, so you don’t need to figure out the order of provisioning.
- You can version control your infrastructure like your application code by keeping your CloudFormation templates in Git or another source control solution.
- You can parameterize your templates so you can deploy the same stack with variations for different environments (test or prod) or different regions.
Over time, you might find you need to add new resources to the existing resources provided by the Startup Kit templates. For example, if you need to run 1,000 or more instances, you will exhaust the IP addresses available in the existing subnets and will need to add more subnets. Add new resources by modifying the templates and committing the changes in your source control repository, rather than making changes through the AWS console. This makes it easier to track the changes and roll them back if necessary.
For details about the capabilities of CloudFormation and how to write templates, see the CloudFormation documentation. You can declare resources using a straightforward YAML (or JSON) syntax. For example, the following snippet from the VPC template shows the simple syntax for creating the top-level VPC resource. As used in the snippet, CloudFormation’s FindInMap and Ref functions enable dynamic lookup of the CIDR block for the VPC and the name of the VPC stack, respectively:
  VPC:
    Type: AWS::EC2::VPC
    Properties:
      CidrBlock: !FindInMap [CIDRMap, VPC, CIDR]
      EnableDnsSupport: true
      EnableDnsHostnames: true
      Tags:
      - Key: Name
        Value: !Ref "AWS::StackName"
Connecting to Your Instances and Database
In general, it is best to avoid connecting into your instances by using SSH to manage them individually. Instead, manage your instances using a higher-level management service such as AWS Elastic Beanstalk or AWS OpsWorks. For example, when you need to connect to instances for debugging purposes, you can connect via the bastion host created by the bastion template. One way to do this is to use SSH agent forwarding. For details about how to set this up on your local computer, consult the relevant AWS blog post.
Because the database is in a private subnet, it also is necessary to connect to it via the bastion host using a method such as TCP/IP over SSH. For an example of how to do this with MySQL Workbench, see the relevant documentation and the following screenshot.
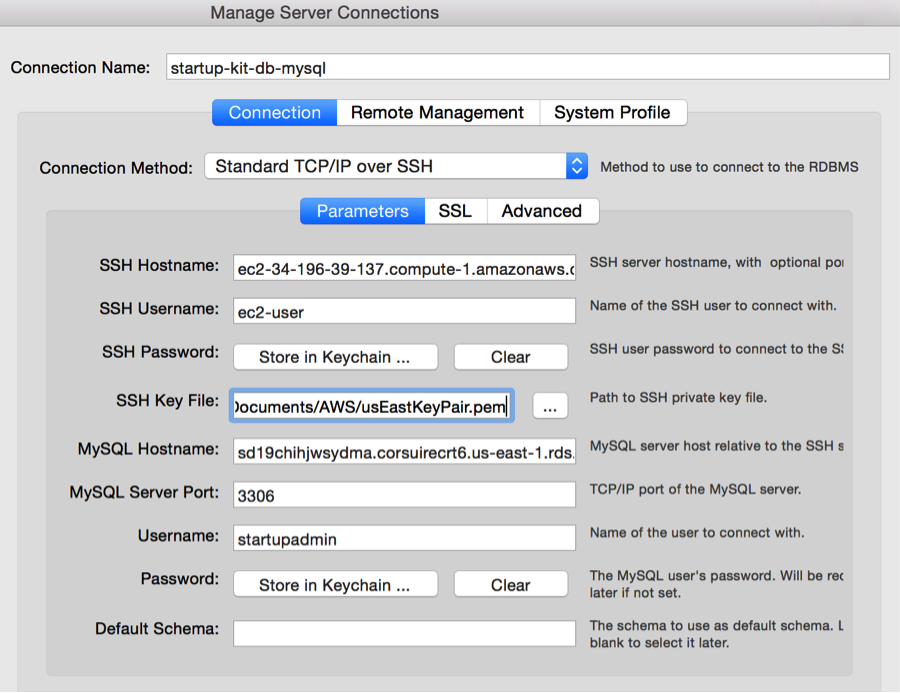
In the Manage Server Connections dialog box for your database connection, fill in the following values:
- For SSH Hostname, type the public DNS name of your bastion host.
- For SSH Username, type ec2-user.
- Ignore the SSH Password
- For SSH Key File, type the path to the EC2 key pair you created.
- For MySQL Hostname, type RdsDbURL from the Outputs tab for the database stack in the CloudFormation console.
- For MySQL Server Port, type 3306.
- For the Username and Password fields, enter the values you chose when you created the database.
Next Steps
After you’ve created your VPC-related infrastructure with the Startup Kit templates, you can add on top of it applications, analytics clusters, and other components using any technologies of your choice. For example, if you’re building an application such as a web app or RESTful API, Elastic Beanstalk can help automate the process of setting up, managing, and scaling your application. Alternatives include AWS Fargate, which is a fully managed solution for Dockerized applications.
Whichever technologies you use, be sure to place load balancer resources in the public subnets of your VPC, and spin up application instances in your private subnets. Also, make sure to assign the relevant security group created by the VPC template to each of your components. Check the Outputs tab of the VPC stack in the CloudFormation console for the IDs of the security groups, which are prefixed with sg-. Here’s how the security groups should be assigned:
- The ELBSecurityGroup should be assigned to load balancers, such as Application Load Balancers or Classic Load Balancers. This security group allows load balancers to talk to application instances.
- The AppSecurityGroup should be assigned to application instances, such as RESTful API servers or web servers. This security group allows those instances to talk to the database as well as the load balancer, and receive SSH traffic from the bastion host.
Besides the fundamental infrastructure templates discussed in this blog post, the Startup Kit also includes the Startup Kit Serverless Workload. Watch out for more Startup Kit information in the near future!
Special thanks to Itzik Paz for providing the architecture diagram at the top of this post