AWS for Industries
Automating claims adjudication workflows using Amazon Textract and Amazon Comprehend Medical
When a medical claim is submitted, the insurance provider must process the claim to determine the correct financial responsibility of the insurance provider and the patient. The process to determine this is broadly known as claims adjudication. It involves creating a claims processing workflow that checks each claim for authenticity, correctness, and validity based on coverage. Some of the steps in this workflow involve working with unstructured data (data that is not represented as rows and columns) which requires manual steps in the workflow to extract the information buried in the unstructured notes. According to the 2018 CAHQ index report, there were approximately 6.1 billion medical claims submitted in 2018, which represents a 4 percent increase in the volume from 2017, and it’s expected to continue rising in subsequent years. To process such volumes in a cost effective and scalable manner, healthcare payers are increasingly looking at machine learning to reduce dependency on humans and rely on automation as much as possible. Additionally, analyzing and interpreting health claim data is powerful in driving improvements in population health to address issues related to cost, quality and outcomes. According to the CDC report analyzing claim documents will help identify certain behaviors that would help in preventing or delaying the development of a medical condition. Healthcare is a data intense industry, and customers are looking for ways to automate and analyze these data.
Amazon Web Services provides a comprehensive list of machine learning and analytics services that allow developers, irrespective of their background, to start integrating machine learning and analytics technology into their applications. Through this blog, we are attempting to demonstrate how we can use two of our AI services, Amazon Textract and Amazon Comprehend Medical to automate a claims adjudication workflow and run analytics on top this extracted entities using Amazon Athena. We understand that not all claims adjudication workflows are same so we attempt to present this in an easily deployable package that you can replicate and customize for your own workflows.
Before you get started
Before we dive into the solution, it’s important to make a note of a few points:
- In addition to the above two core services from AWS, we use a few other services in the solution. These include Amazon Simple Storage Service (S3), AWS Lambda, Amazon SQS, Amazon SNS, Amazon Athena, and Amazon QuickSight . If you are not familiar with any of these services, please take a moment to read through the documentation of these services so you can understand their use in the solution.
- All services used in this solution are HIPAA eligible. To know more about AWS HIPAA compliance, please look at our AWS HIPAA compliance page.
- We expect familiarity with Python for understanding the scripts provided with this blog and AWS CloudFormation for understanding the deployment package.
With that out of the way, let’s look at our claims adjudication workflow in more detail.
Workflow summary and architecture
For the purposes of our post, we used a completed claim form in PNG format as the starting point of the workflow. This form is checked for accuracy and validity based on the data in the form. For claims that fail validation, an email notification is generated for the originator notifying them to correct the errors. Once the claim is validated, a record of the claim is maintained as a list that is visible to end users as a report. The workflow also includes an analytics component that extracts clinically relevant information from the aggregated list of claims. This dashboard allows you to analyze claims across clinical entities present in the claims. The idea is to make this workflow completely automated and event based, with no human intervention.
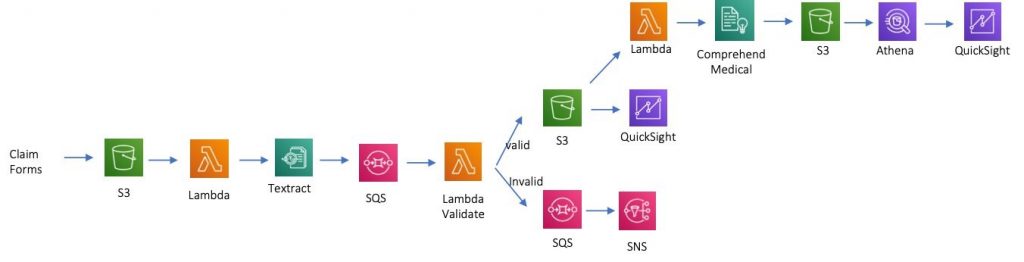
The architecture diagram above showcases the AWS services used to build a server-less event-based architecture for this workflow. Here are the details of each component:
- Amazon S3 is used as a platform to store the healthcare claim documents in PNG format.
- Amazon Textract is used to extract the entities and relationships from the claim documents.
- The extracted entities go through syntax as well as domain level validation using AWS Lambda function. If validation is successful, all key-values are extracted and stored in S3 as CSV files. If the validation fails, the user gets an email notification sent using Amazon Simple Notification Service.
- Amazon QuickSight is used to visualize all the claims data CSV.
- Amazon Comprehend Medical extracts medically relevant details from the claim forms. In our case, we are limiting this to the medical procedure that is mentioned in the claim form. The extracted entities by comprehend medical are stored as CSV file in S3.
- Amazon Athena is used to query and join clinical procedure with claims data to perform aggregated analysis.
- Finally, Amazon QuickSight is used to visualize the analysis in a dashboard.
The code repository for this solution is available at GitRepo in case you want to review the code for this solution. You can clone this repository and customize the steps and logic as per your requirements.
Deploying the solution
Now that you know the details of our solution and the associated architecture, let’s go ahead and deploy. Note that this example uses the us-east-1 (N. Virginia) AWS Region.
Launching your AWS CloudFormation stack
We use an AWS CloudFormation stack to deploy the solution. The CloudFormation stack creates the resources needed by the solution. These include a S3 bucket, two SQS queues, an SNS Topic, three Lambda functions, and the necessary AWS Identity and Access Management (IAM) roles.
- Download CloudFormation template and save to your local disk
- Log into the AWS Management Console with your IAM user name and password
- Go to CloudFormation and Create Stack or Click on Launch Stack
- On the Create Stack page Select Upload a template file and upload the CloudFormation template downloaded in Step-1, choose Next.
- On the next page, provide a name for the stack. Enter an email address and choose Next.

- On the options page, leave everything as the default and choose Next.
- On the Review page, scroll down and select the check box “I acknowledge that AWS CloudFormation might create IAM resources wit custom names.” Choose Create.

- Wait for the stack to complete executing. You can examine various events from the stack creation process in the Events tab. After the stack creation is complete, look at the Resources tab to see all the resources created by the CloudFormation template.
- Open the Outputs tab to look at the output of the CloudFormation stack.

- Download update CloudFormation template and save to your local disk.
- Go to the deployed Stack in Step-9 and choose Update.
- Select Replace current template and Upload the file from Step-10 and Click Next.

- On the Next page leave everything as default and choose Next.
- Follow Step-6 until Step-9 mentioned above.
Executing a Claim validation workflow
To run a validation process using a valid claim form
- Right click and download the following sample PNG form in a local folder on your computer.
- Create Folder “input” in S3 Bucket. You can find out the name of the S3 bucket from the outputs tab of your CloudFormation template.
- Upload the PNG form downloaded in Step-1 into the S3 bucket’s “input” prefix.

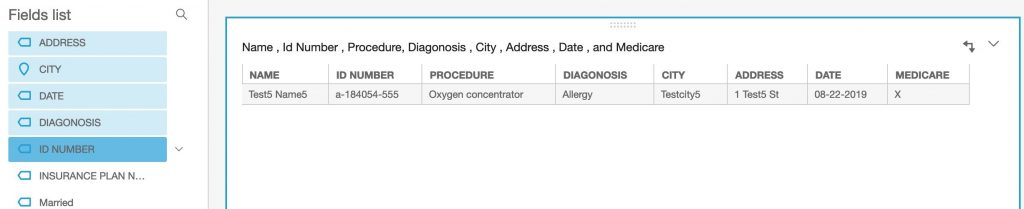
- Examine the CSV file in the S3 bucket’s “result” prefix. This CSV file should contain the fields extracted from the PNG file using Amazon Textract.

- Examine the CSV file in the S3 bucket’s “procedureresult” prefix. This CSV file should contain the fields extracted from “PROCEDURE” key from the sample template using Amazon Comprehend Medical

To run a validation process using an invalid claim form
For claims that fail validation, an email notification is sent to the user notifying them to fix the errors. To replicate this use case, use the sample PNG form as an example, which has an invalid Claim ID.
- Download and save the image as .png file and run the steps 1 and 2 mentioned above.
- Check your email for message from Amazon SNS. This time, instead of a CSV file in the “result” bucket, you should see an email notification instead.

- Optionally, Check the AWS Lambda execution logs in Amazon CloudWatch
Analyzing and Visualizing Claim data
To setup analytics from claim data
- Follow steps to integrate S3 claim data with Amazon Athena
- Add fields for idnumber, category, and text as String
idnumber, category, and text are fields in the CSV file parsed by Amazon Comprehend Medical and uploaded to “procedureresult” folder in S3 bucket. - Run the query using Amazon Athena Query Editor

To setup a visualization for the claim procedure field
- Follow these steps to create data set using Amazon Athena data
- Define the visualization by selecting the parameters on the left.


To setup a visualization for the claim data
- Follow these steps to create data set using Amazon S3 for claim document entities
- Define visualization by selecting the parameters on the left
Conclusion
Machine learning allows organizations to increase operational efficiency by automating redundant manual tasks. In this post, we demonstrated an end-to-end workflow for a claims adjudication system that uses the capabilities of machine learning-based automation. We want to point out that integrating machine learning in your workflows requires a paradigm change. Models are built on probabilistic approaches that provide a likelihood of something being correct, whereas a computer program (or for that matter, a human) will always provide a deterministic answer. Here are some concluding thoughts on how to make this a smooth transition:
- You cannot automate everything. Tasks requiring analytical thinking may still require human intervention. Always have provisions of human intervention in your workflow when needed.
- Pick the tasks which exhibit a standard pattern, are repeatable and require no analytical skills as potential candidates for automation first.
- Choose between machine learning based automation and a rule-based automation. For example, we chose to use machine learning based automation for extracting information from forms and recognizing medical procedures in the form but we relied on rule-based automation for validating the form.
- For tasks using machine learning based automation, always monitor the underlying model performance by analyzing accuracy scores. Remember that models tell you the likelihood of the output and this likelihood may change over time as the model is exposed to new data (re-training). Set thresholds where needed to supplement model output with humans for re-validation.
In a disruptive world where speed and agility are paramount, machine learning provides the competitive advantage that organizations should evaluate.