AWS Architecture Blog
Scope workloads and share resilience policies with AWS Resilience Hub
A resilience plan is useful only while it reflects the application you run. After a migration or deployment, a service can acquire a new dependency while its documented recovery objectives stay the same. In a shared Kubernetes cluster, even deciding which resources belong to that service can take investigation.
On September 18, 2026, the Next generation of AWS Resilience Hub introduced three capabilities to help you keep workload scope and resilience requirements aligned with your running environment:
- Amazon Elastic Kubernetes Service (Amazon EKS) label support for service input sources selects Kubernetes resources using the labels that already describe your workloads.
- Generative AI-powered Dependency Insights analyzes a service’s discovered dependencies and highlights the patterns worth reviewing.
- Resilience policy sharing through AWS Organizations lets a central team define resilience requirements once and make them available to member accounts.
In this post, you follow a team reviewing the resilience of a sample workload named checkout on Amazon EKS, representing an online store’s checkout service. The team starts by defining which Kubernetes resources belong to checkout, using labels to distinguish it from inventory in the same namespace. This establishes the resource boundary for the resilience review.
With that boundary defined, the team examines discovered dependencies and uses Dependency Insights to prioritize findings for investigation. A cross-Region dependency becomes a concrete question about whether checkout’s recovery design accounts for the services it requires to operate. The service owner then works with a central resilience team to validate the recovery requirements and apply a shared policy. Maintaining those requirements centrally gives teams a common definition to adopt across accounts, while policy events help the central team track adoption.
You perform these steps using the console or the AWS Command Line Interface (AWS CLI). The workload generates synthetic traffic to demonstrate dependency discovery.
About the application model: In the Next generation of Resilience Hub, the primary unit of assessment is a service. Services can be grouped into systems, and user journeys describe paths through them. See the key changes and the overview of the new hierarchy in the Next generation of Resilience Hub.
Prerequisites
To follow the examples, you need:
- Access to the Next generation of AWS Resilience Hub in a supported AWS Region.
- An Amazon EKS cluster with sample, labeled workloads and permission to configure access to the cluster.
- If you follow the CLI examples, install or update the AWS CLI using the installation and update instructions. Your installation must support the resiliencehubv2 commands. These examples use Bash.
- An AWS Identity and Access Management (IAM) role that Resilience Hub can assume, with the
AWSResilienceHubV2AssessmentExecutionPolicymanaged policy attached. The console can create this role when you create a service. - Kubernetes RBAC permissions and an EKS access entry that grant this role access to Kubernetes resources. The permissions guide provides the manifest and commands.
- For policy sharing, an organization with all features enabled and access to its management account.
The examples use two accounts: a workload account containing the EKS cluster and Resilience Hub service, and a management account that owns the shared policy.
For the CLI examples, configure profiles named workload and management for the respective accounts. Replace the example cluster ARN and other placeholders with your own values, and set the Region:
Each command uses --profile to select the account. Follow either the console steps or their CLI equivalents for each operation.
Amazon EKS label support for service input sources
A service input source tells Resilience Hub where to discover a service’s resources. Input sources can be AWS CloudFormation stacks, Terraform state files, resource tags, or Amazon EKS clusters. For an EKS input source, you select the namespaces to include. With this launch, you can also use Kubernetes label selectors to filter resources within those namespaces.
A namespace can contain workloads owned by different teams. With labels, you can select checkout’s resources without including inventory or reorganizing the namespace for an assessment. You use the same labels your teams already maintain.
How it works
Specify the cluster and one or more namespaces, then add label selectors to filter resources within each namespace. A selector contains a key, an operator, and values. Selectors within a namespace use AND logic: an object must match all of them. Without a selector, Resilience Hub discovers every supported object in the selected namespaces.
Checkout and inventory share the production namespace. Their resources carry app=checkout and app=inventory, respectively. Selecting production with app In checkout includes checkout’s Deployment and ReplicaSet and excludes inventory.
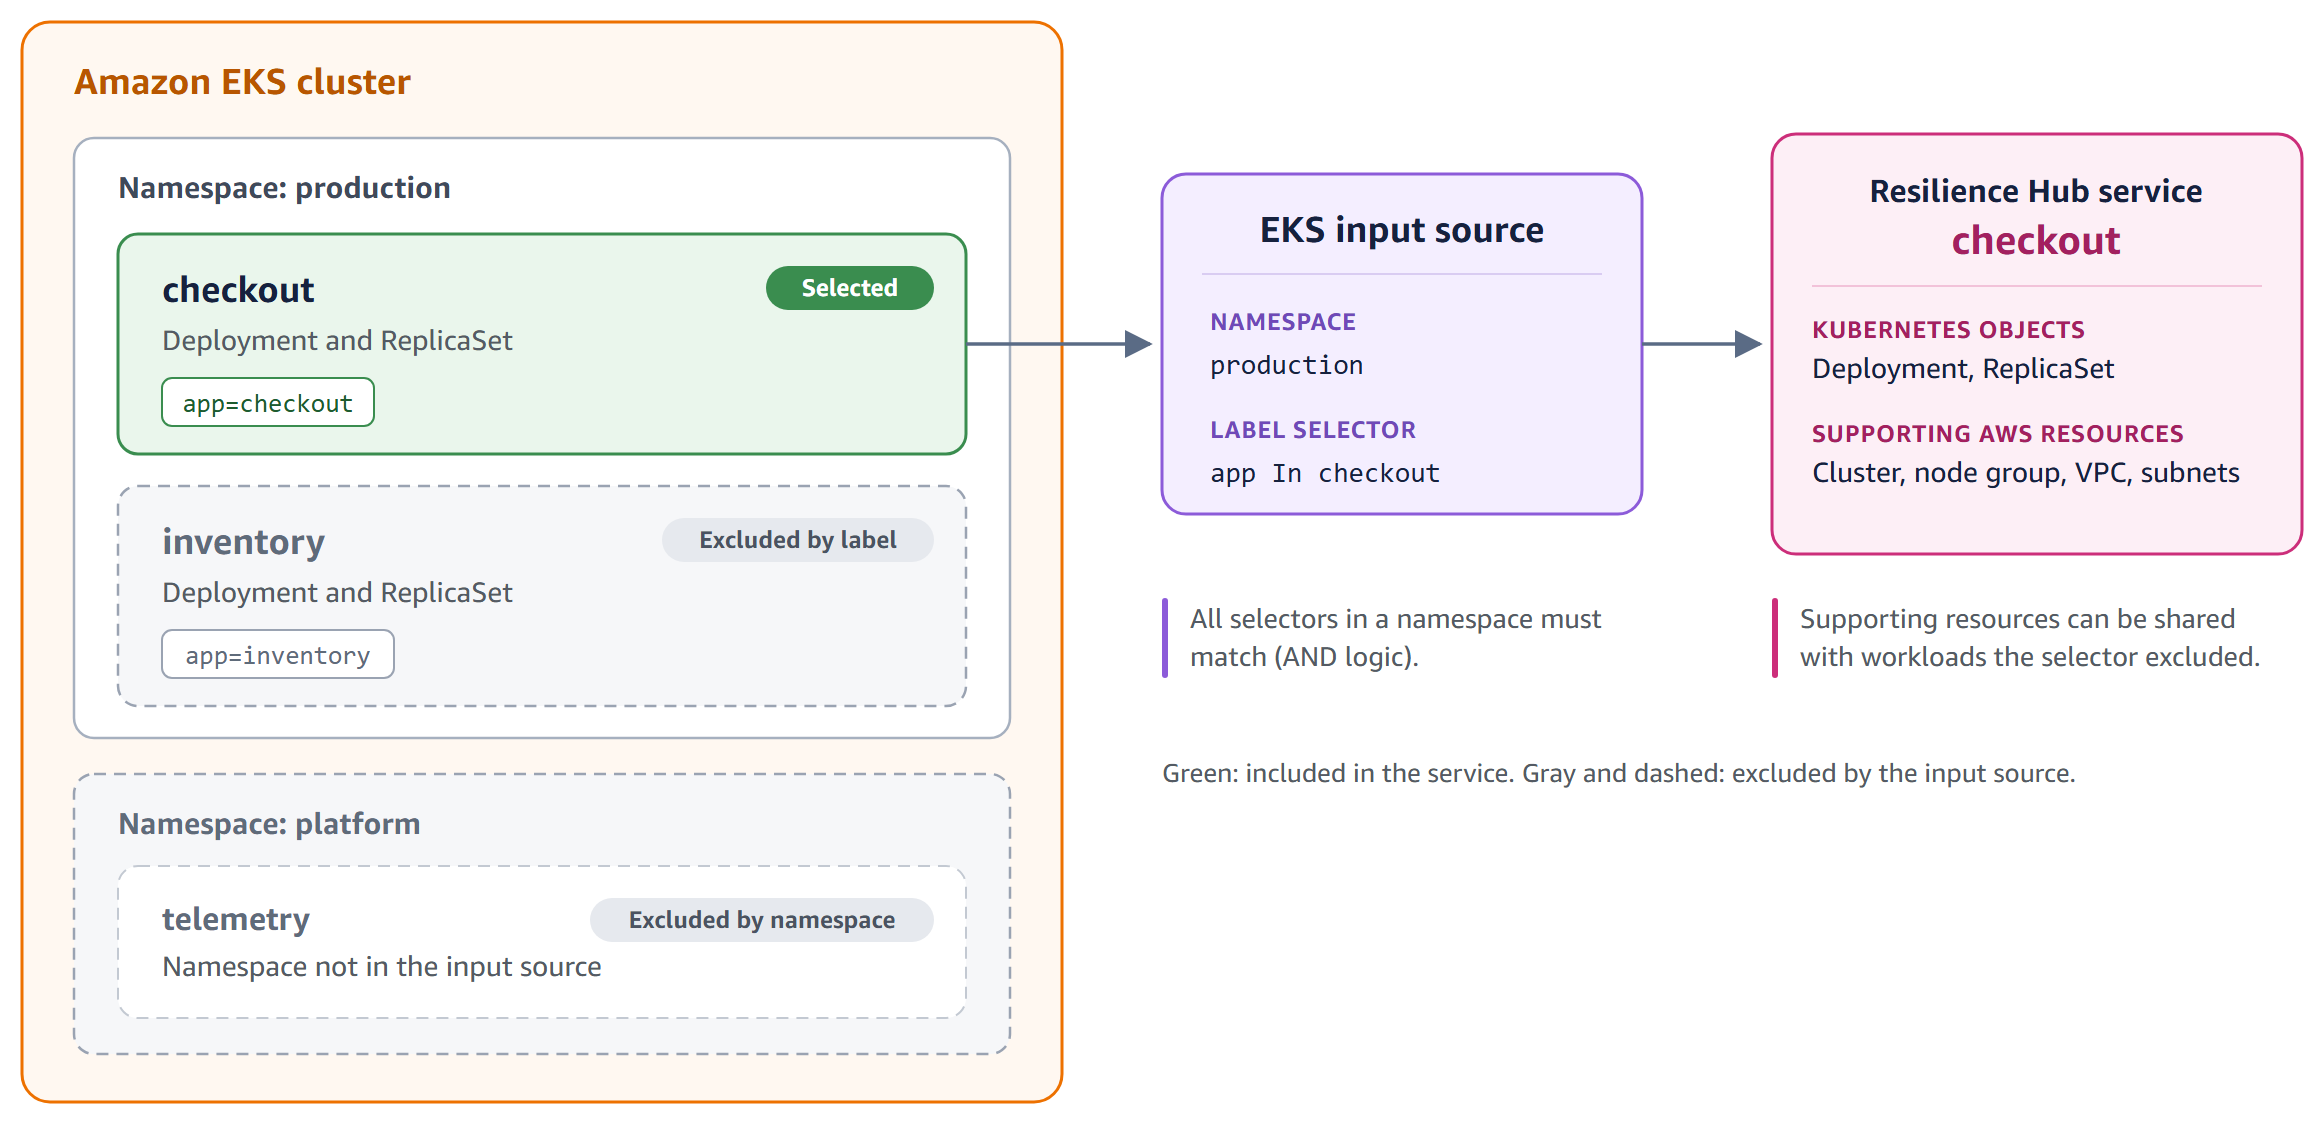
Figure 1: Selecting checkout resources with a Kubernetes label
The resource list also includes supporting AWS infrastructure, such as the cluster, node group, virtual private cloud (VPC), and subnets. Labels select Kubernetes objects. They don’t make that shared infrastructure exclusive to checkout.
How to use it
In the Resilience Hub console:
- Choose Create service and enter a name. Under Permission, choose Create default role to create an IAM role with the required AWS permissions, or choose Use another role to select an existing role.
- Under Service resource discovery, choose Amazon EKS cluster and enter the cluster ARN.
- Choose Configure namespaces, enter
production, and add a label selector with keyapp, operatorIn, and valuecheckout. - Choose Save, select Enable dependency discovery for this service, then choose Create service. Resource discovery starts automatically.
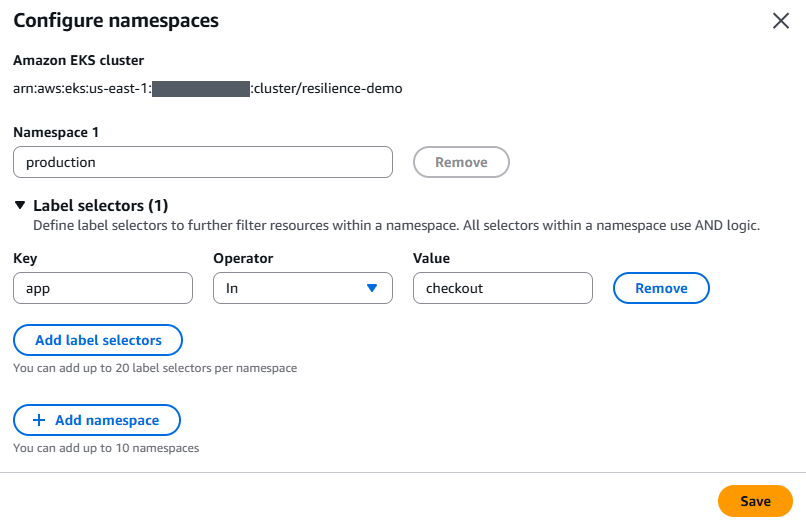
Figure 2: Scoping the checkout service to one namespace and one label
If you prefer to use the AWS CLI instead of the console, run the following commands to create the service and add its EKS input source.
Skip this block if you already created the service using the preceding console steps.
The console displays selector operators as In, NotIn, Exists, and NotExists. In the API, use IN, NOT_IN, EXISTS, and DOES_NOT_EXIST, respectively.
In the following command, replace ResilienceHubRole with your service’s IAM role name.
After resource discovery completes, you can use the following command to list the discovered resource types. If you created the service on the console, first set SERVICE_ARN to that service’s ARN.
Generative AI-powered Dependency Insights
Dependency Insights uses generative AI to summarize discovered dependencies and highlight patterns that warrant resilience review. It provides an overview and categorized findings.
The Resources list describes the service’s components. The Dependencies list shows endpoints discovered through DNS activity, including AWS service endpoints in other Regions and external APIs. When that list grows to hundreds of entries, Dependency Insights helps you prioritize what to investigate.
How it works
Dependency Insights builds on dependency discovery, an optional, separately priced feature. Dependency discovery analyzes DNS activity through Amazon Route 53 Resolver and does not require installing an agent in your workload. It examines up to 35 days of available history and continues monitoring for changes. The dependency list shows each endpoint’s name, location, and when it was first and last seen.
Dependency Insights analyzes this list, filters out common service activity that typically does not indicate resilience risk, and highlights patterns such as these:
| Pattern | What to investigate |
| Cross-Region dependencies | Whether a call to another Region is intentional, and how it affects recovery |
| New dependencies | Whether an endpoint first observed within the last seven days changes the documented architecture |
| Third-party dependencies | How the service behaves when an external provider is unavailable |
| Uneven usage | Whether activity reflects a scheduled job or a dependency used only at certain times |
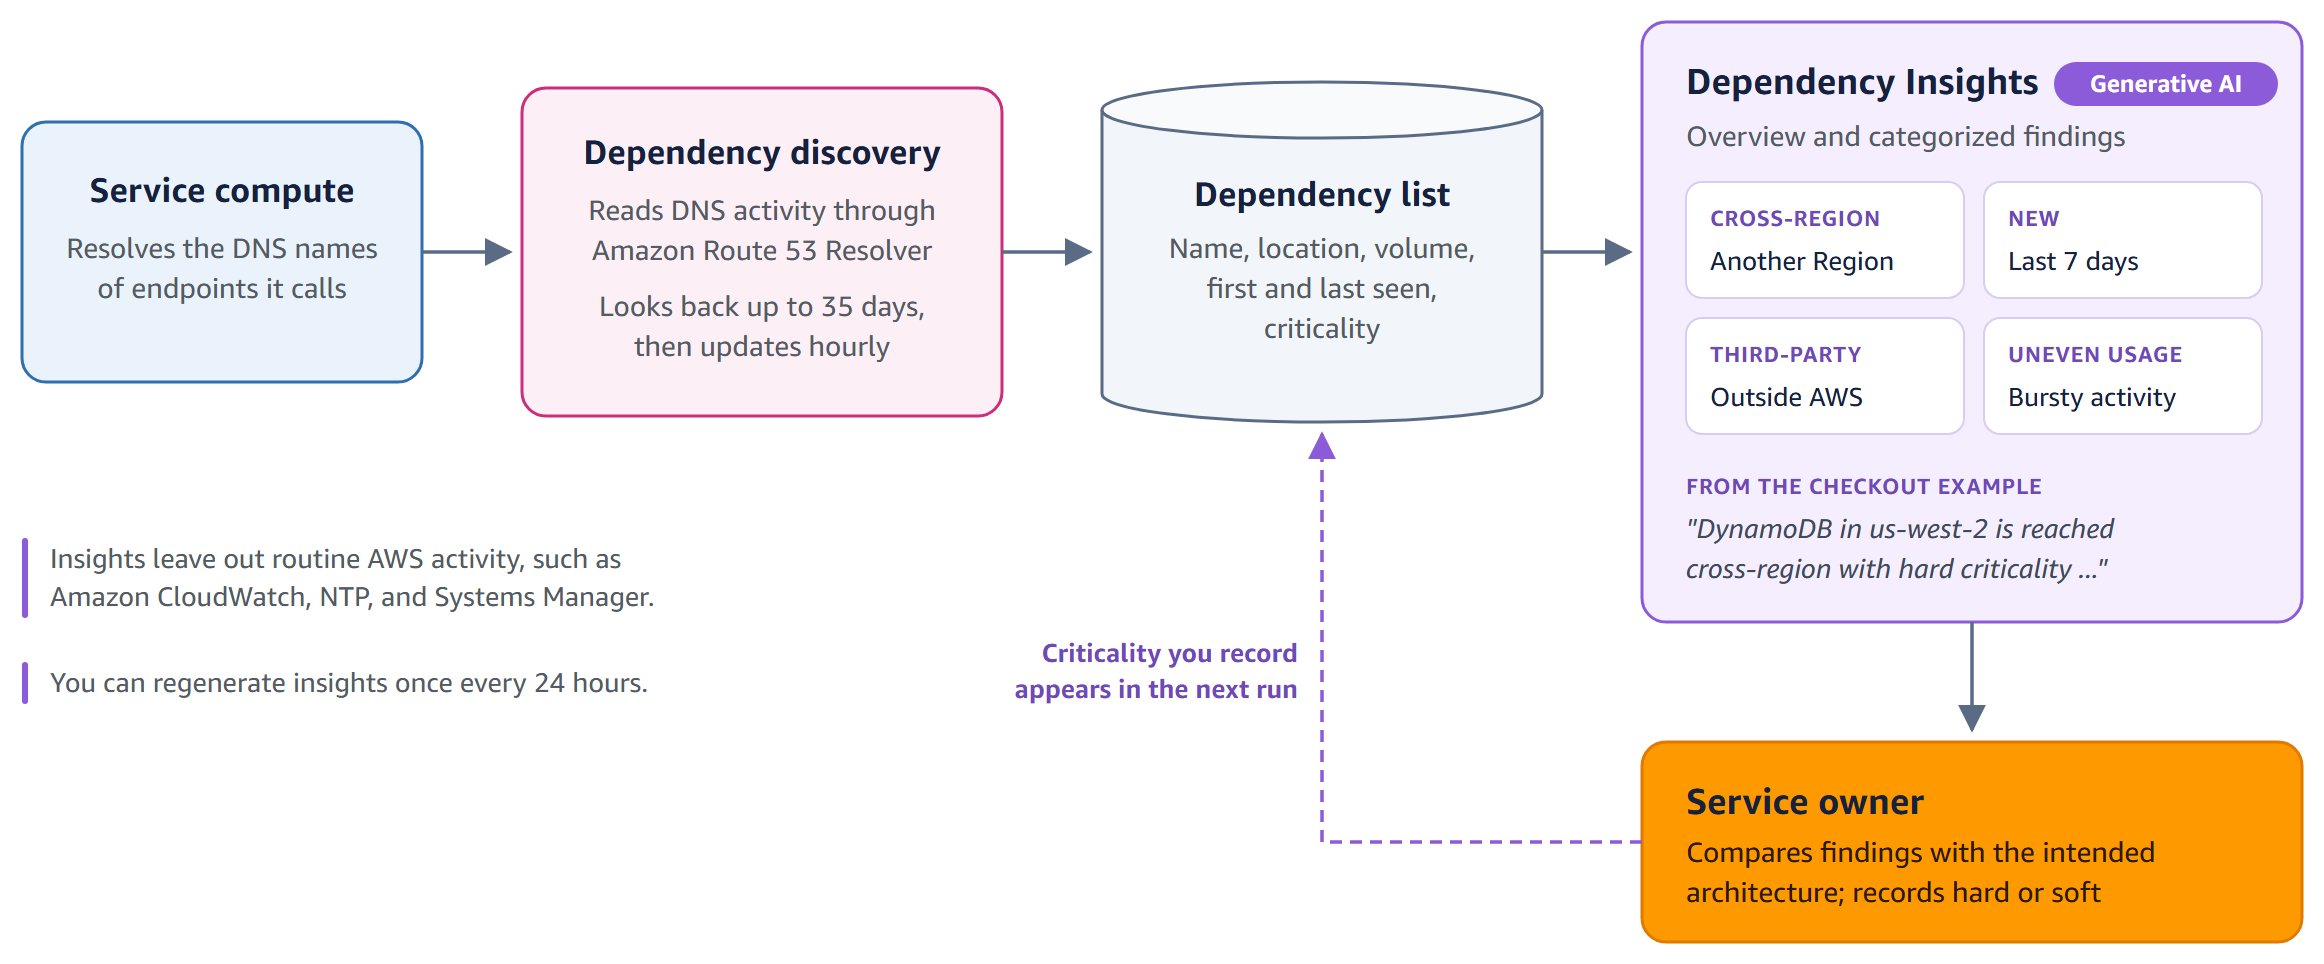
Figure 3: Turning dependency data into a focused review
Insights prioritize review. They don’t prescribe fixes or list every dependency. Use the full dependency list when you need detail. A new workload’s insights reflect only the history it has generated.
How to use it
In the Resilience Hub console, wait for initial dependency discovery to complete before generating insights:
- Open the service. On the Assessment tab, scroll to the Dependencies section to review discovered dependencies.
- Choose Generate insights.
- Read the overview and compare each finding with the intended architecture.
You can regenerate insights once every 24 hours. This limit applies whether you generate them through the console or the AWS CLI.
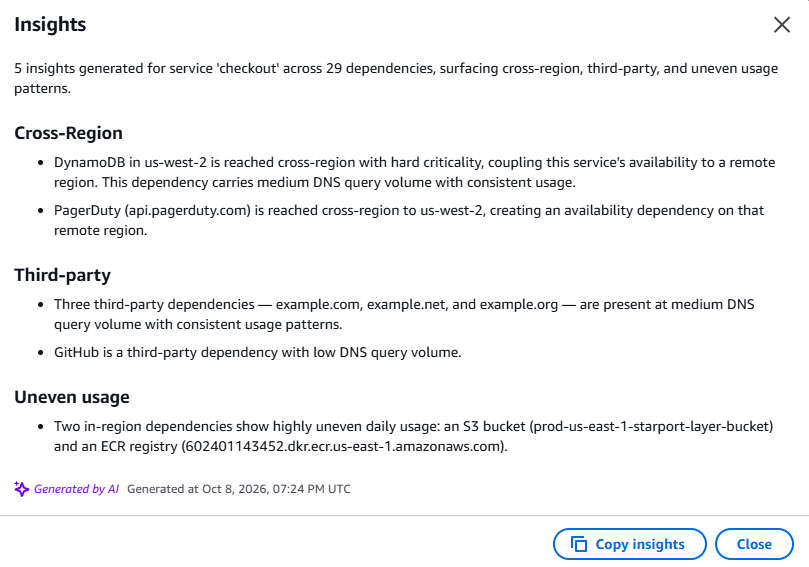
Figure 4: Dependency Insights for the checkout service
If you prefer the AWS CLI, use the following commands instead of the console steps. Set SERVICE_ARN to your service’s ARN.
Enable dependency discovery only if it is not already enabled. After initial discovery completes, review the dependency list and generate insights. If you already generated insights on the console, skip start-dependency-insights and use get-dependency-insights to retrieve the existing result.
Generation can complete asynchronously. Run get-dependency-insights again if the returned status is IN_PROGRESS.
The checkout service produced five insights across 29 dependencies. The following response shows the generated overview and all five findings:
The first finding identifies a cross-Region Amazon DynamoDB dependency. If checkout requires that dependency to accept orders, a disruption in the remote Region could prevent it from operating even when its Amazon EKS resources remain healthy. The service owner should verify which operations require the table and review how those operations behave when it is unavailable. That review determines whether the dependency fits the recovery design or whether the architecture needs to change. DNS activity alone cannot answer that question.
The uneven-usage finding points to container image infrastructure. Image downloads during pod startup can produce bursts of DNS activity. This is a pattern to investigate, rather than evidence that your application has an outage.
Classify a dependency as hard if the service fails without it, or soft if the service degrades but keeps running. In the sample environment, we had classified the DynamoDB dependency as hard using the following command. The comment describes an illustrative failure assumption, which requires validation through testing:
Resilience policy sharing through AWS Organizations
After reviewing checkout’s dependencies, the service owner can validate its recovery requirements with the business and the central site reliability engineering (SRE) team. Dependency findings inform that discussion. They don’t automatically determine the policy targets.
The central SRE team can codify the agreed requirements into a resilience policy, defining availability and recovery targets for critical services. The management account or a delegated administrator can share that policy across the organization so service owners can apply the centrally maintained requirements without creating separate copies.
The policy owner can review attachment and detachment events to track adoption. If a service stops using the policy, the SRE team can engage its owner to understand why and determine whether different requirements are appropriate. Application owners remain responsible for meeting the targets.
How it works
A policy can combine four target types: availability, recovery from an Availability Zone disruption, recovery from a Regional disruption, and data recovery. The recovery time objective (RTO) specifies the targeted recovery time. The recovery point objective (RPO) specifies the tolerable period of data loss.
When sharing is on, the policy appears in every member account alongside the account’s own policies, and its ARN shows which account owns it. Each service owner chooses whether to apply it. If a requirement must apply regardless of that choice, associate the policy with a system containing the relevant services instead, as described in Applying resilience policies across accounts.
The owning account can review a timeline of the services that start or stop using the policy. Turning sharing off stops evaluating member services against the policy and removes it from the services that used it, so coordinate changes with the teams involved.
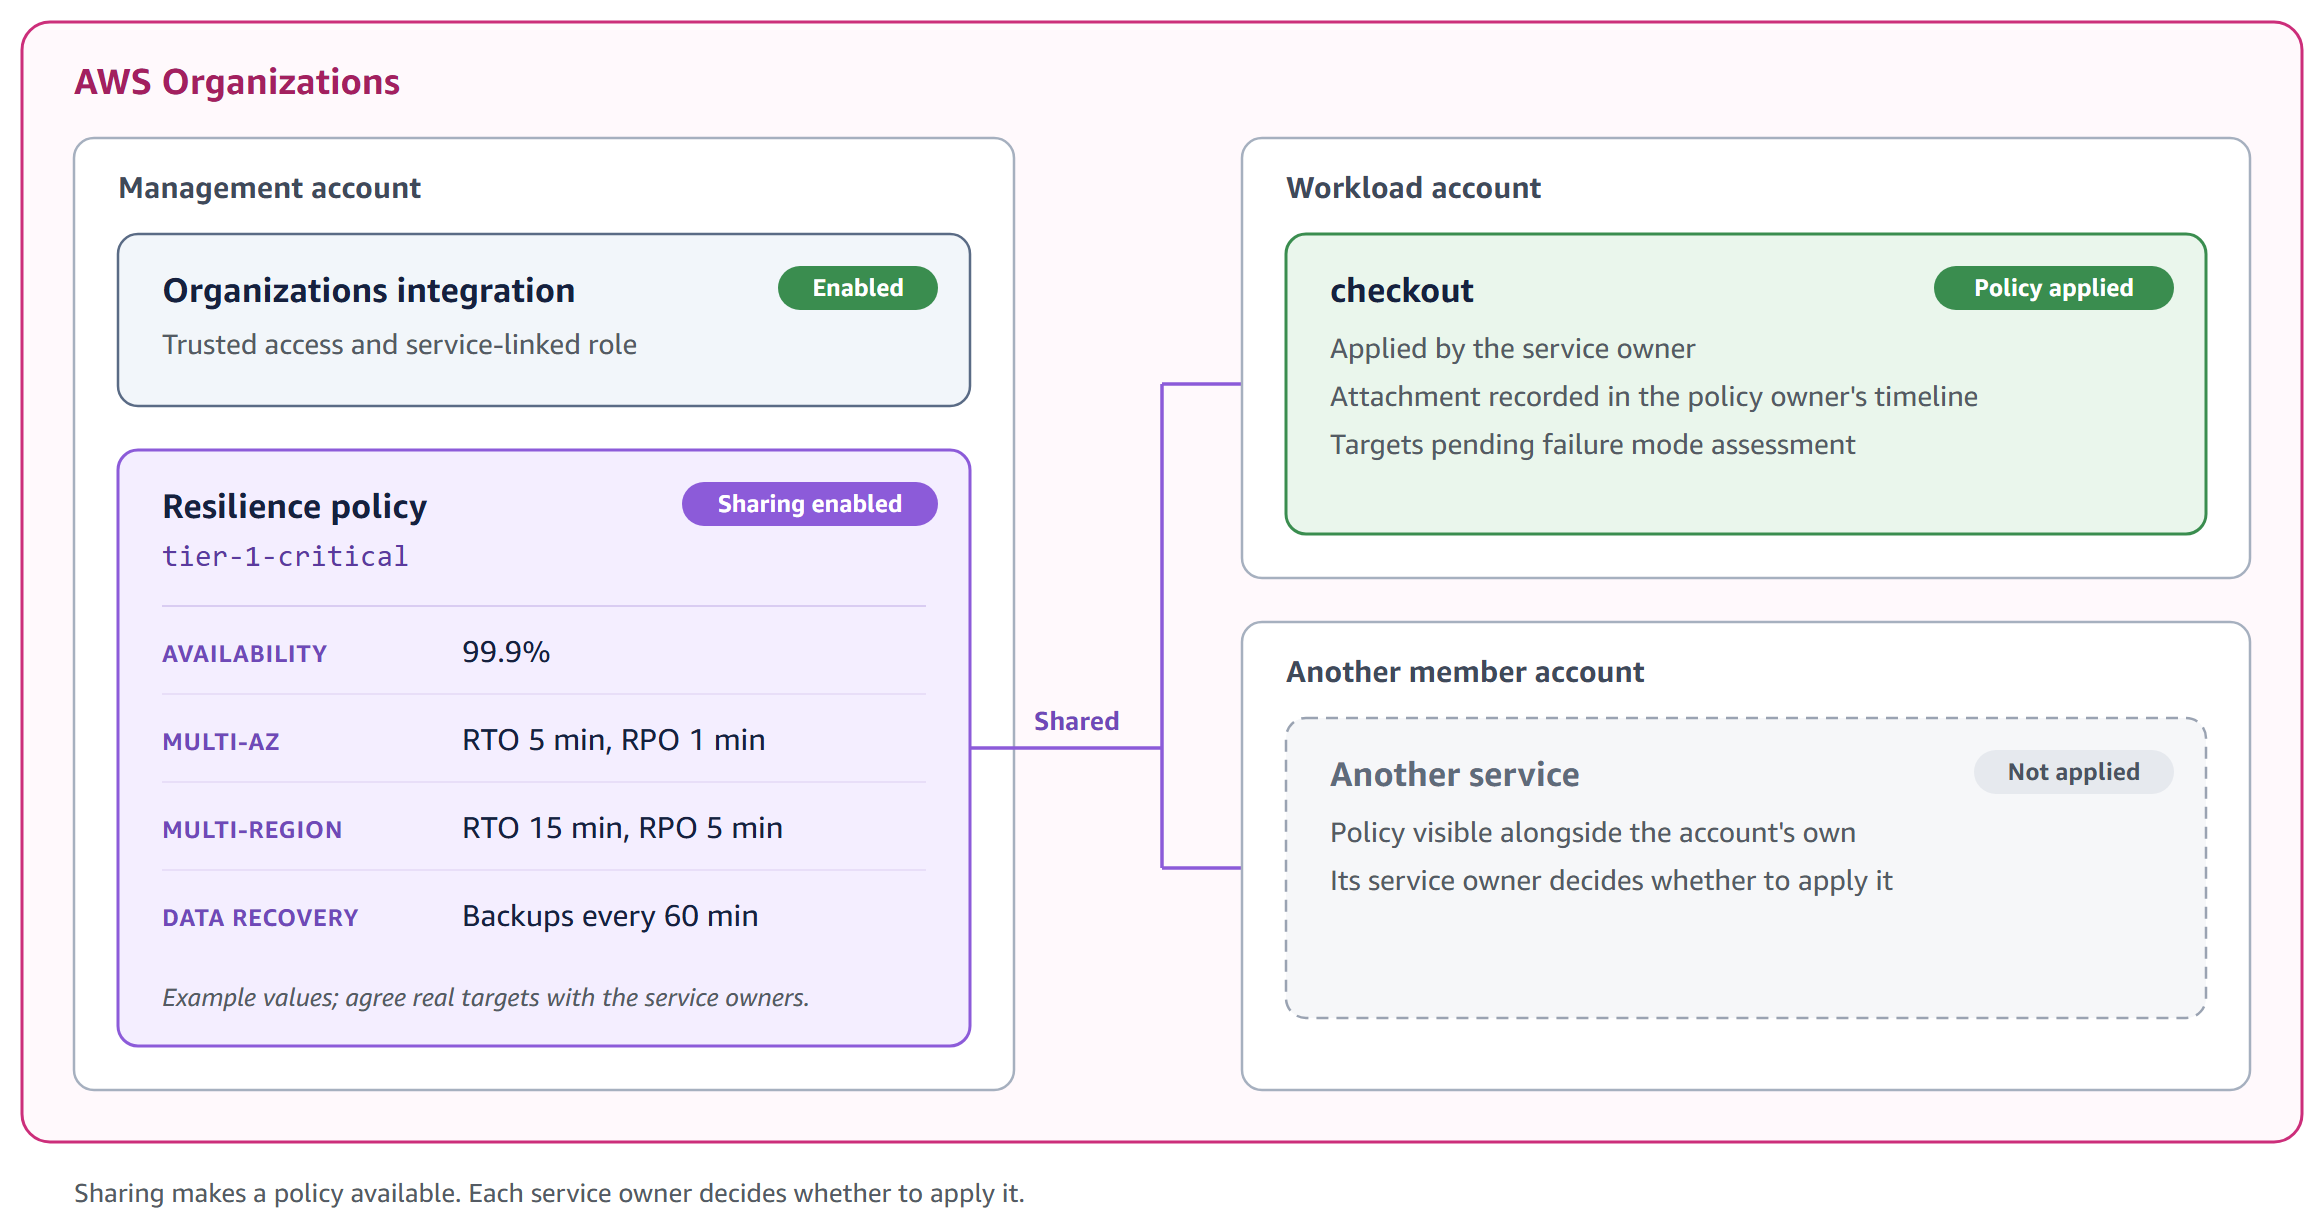
Figure 5: One policy definition, shared with member accounts
How to use it
The organization integration is a one-time setup in the management account:
- In the Resilience Hub console, open AWS Organizations settings.
- Select Enable trusted access and create a service-linked role, then choose Create integration.
To confirm that the service-linked role exists in a member account:
Next, create the policy in the management account with sharing turned on. Policy names can contain letters, numbers, hyphens, and underscores, but no spaces. The following targets are examples. Agree on real values with the business and service owners. This example uses an availability target of 99.9 percent.
In the workload account, find the shared policy and apply it to the service. On the console, choose Change policy on the service and select the shared policy. With the AWS CLI:
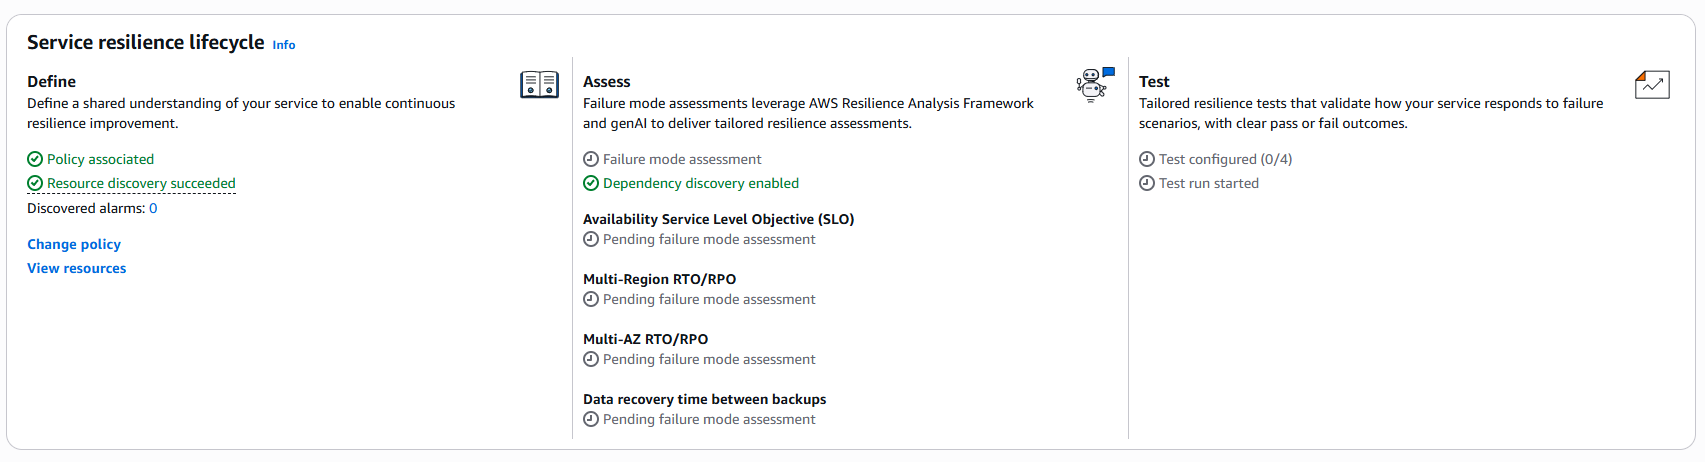
Figure 6: Policy targets are defined. Assessment of those targets is still pending
Back in the management account, the policy owner can confirm adoption:
An attachment event confirms adoption, not compliance. After we applied the shared policy, the console changed each target from Not defined in policy to Pending failure mode assessment. A failure mode assessment and appropriate resilience testing are needed to determine whether the service meets those targets.
Things to know
- Shared clusters. Labels decide which Kubernetes objects belong to a service. On a cluster that several workloads share, review the discovered dependencies to confirm they belong to the service, as described in the guidance for shared EKS clusters.
- What DNS-based discovery can’t see. Connections made directly by IP address aren’t discovered, AWS Lambda functions need VPC connectivity to be covered, and very infrequent calls might not appear in initial results. See Coverage and known limitations.
- Timing. Results reflect the history available to the service. Give a new workload time to build history before drawing conclusions from its insights. You can regenerate insights once every 24 hours.
Cleanup
If you created resources to try these capabilities, remove them when you finish. Turning sharing off also removes the policy from every member service that uses it, so only do this for a demonstration policy:
Delete the EKS cluster as well if you created it only for this walkthrough.
Conclusion
Start with a service whose architecture and ownership you know. Use EKS labels to check its Kubernetes resource boundary, then review Dependency Insights against its intended behavior. If several teams maintain the same requirements separately, consider a shared policy.
You can use the capabilities together or independently. Label support applies to EKS workloads. Dependency Insights and policy sharing also support services beyond EKS. Insights focus the investigation. Your architecture review determines what to change.
Further reading
- What changes with Next generation Resilience Hub
- Viewing discovered dependencies
- Dependency Insights considerations
- Sharing a policy across your organization
- Setting up Organizations integration