AWS News Blog
New Automation Features In AWS Systems Manager

|
Today we are announcing additional automation features inside of AWS Systems Manager. If you haven’t used Systems Manager yet, it’s a service that provides a unified user interface so you can view operational data from multiple AWS services and allows you to automate operational tasks across your AWS resources.
With this new release, it just got even more powerful. We have added additional capabilities to AWS Systems Manager that enables you to build, run, and share automations with others on your team or inside your organisation — making managing your infrastructure more repeatable and less error-prone.
Inside the AWS Systems Manager console on the navigation menu, there is an item called Automation if I click this menu item I will see the Execute automation button.

When I click on this I am asked what document I want to run. AWS provides a library of documents that I could choose from, however today, I am going to build my own so I will click on the Create document button.

This takes me to a a new screen that allows me to create a document (sometimes referred to as an automation playbook) that amongst other things executes Python or PowerShell scripts.
The console gives me two options for editing a document: A YAML editor or the “Builder” tool that provides a guided, step-by-step user interface with the ability to include documentation for each workflow step.
So, let’s take a look by building and running a simple automation. When I create a document using the Builder tool, the first thing required is a document name.

Next, I need to provide a description. As you can see below, I’m able to use Markdown to format the description. The description is an excellent opportunity to describe what your document does, this is valuable since most users will want to share these documents with others on their team and build a library of documents to solve everyday problems.

Optionally, I am asked to provide parameters for my document. These parameters can be used in all of the scripts that you will create later. In my example, I have created three parameters: imageId, tagValue, and instanceType. When I come to execute this document, I will have the opportunity to provide values for these parameters that will override any defaults that I set.

When someone executes my document, the scripts that are executed will interact with AWS services. A document runs with the user permissions for most of its actions along with the option of providing an Assume Role. However, for documents with the Run a Script action, the role is required when the script is calling any AWS API.
You can set the Assume role globally in the builder tool; however, I like to add a parameter called assumeRole to my document, this gives anyone that is executing it the ability to provide a different one.

You then wire this parameter up to the global assumeRole by using the {{assumeRole}}syntax in the Assume role property textbox (I have called my parameter name assumeRole but you could call it what you like, just make sure that the name you give the parameter is what you put in the double parentheses syntax e.g.{{yourParamName}}).

Once my document is set up, I then need to create the first step of my document. Your document can contain 1 or more steps, and you can create sophisticated workflows with branching, for example based on a parameter or failure of a step. Still, in this example, I am going to create three steps that execute one after another. Again you need to give the step a name and a description. This description can also include markdown. You need to select an Action Type, for this example I will choose Run a script.

With the ‘Run a script’ action type, I get to run a script in Python or PowerShell without requiring any infrastructure to run the script. It’s important to realise that this script will not be running on one of your EC2 instances. The scripts run in a managed compute environment. You can configure a Amazon CloudWatch log group on the preferences page to send outputs to a CloudWatch log group of your choice.
In this demo, I write some Python that creates an EC2 instance. You will notice that this script is using the AWS SDK for Python. I create an instance based upon an image_id, tag_value, and instance_type that are passed in as parameters to the script.

To pass parameters into the script, in the Additional Inputs section, I select InputPayload as the input type. I then use a particular YAML format in the Input Value text box to wire up the global parameters to the parameters that I am going to use in the script. You will notice that again I have used the double parentheses syntax to reference the global parameters e.g. {{imageId}}
In the Outputs section, I also wire up an output parameter than can be used by subsequent steps.

Next, I will add a second step to my document . This time I will poll the instance to see if its status has switched to ok. The exciting thing about this code is the InstanceId, is passed into the script from a previous step. This is an example of how the execution steps can be chained together to use outputs of earlier steps.
def poll_instance(events, context):
    import boto3
    import time

    ec2 = boto3.client('ec2')

    instance_id = events['InstanceId']

    print('[INFO] Waiting for instance to enter Status: Ok', instance_id)

    instance_status = "null"

    while True:
    res = ec2.describe_instance_status(InstanceIds=[instance_id])

    if len(res['InstanceStatuses']) == 0:
        print("Instance Status Info is not available yet")
        time.sleep(5)
        continue

    instance_status = res['InstanceStatuses'][0]['InstanceStatus']['Status']

    print('[INFO] Polling get status of the instance', instance_status)

    if instance_status == 'ok':
        break

    time.sleep(10)

    return {'Status': instance_status, 'InstanceId': instance_id}
To pass the parameters into the second step, notice that I use the double parentheses syntax to reference the output of a previous step. The value in the Input value textbox {{launchEc2Instance.payload}} is the name of the step launchEc2Instance and then the name of the output parameter payload.

Lastly, I will add a final step. This step will run a PowerShell script and use the AWS Tools for PowerShell. I’ve added this step purely to show that you can use PowerShell as an alternative to Python.
You will note on the first line that I have to Install the AWSPowerShell.NetCore module and use the -Force switch before I can start interacting with AWS services.
All this step does is take the InstanceId output from the LaunchEc2Instance step and use it to return the InstanceType of the Amazon ECS instance.

It’s important to note that I have to pass the parameters from LaunchEc2Instance step to this step by configuring the Additional inputs in the same way I did earlier.
Now that our document is created we can execute it. I go to the Actions & Change section of the menu and select Automation, from this screen, I click on the Execute automation button. I then get to choose the document I want to execute. Since this is a document I created, I can find it on the Owned by me tab.
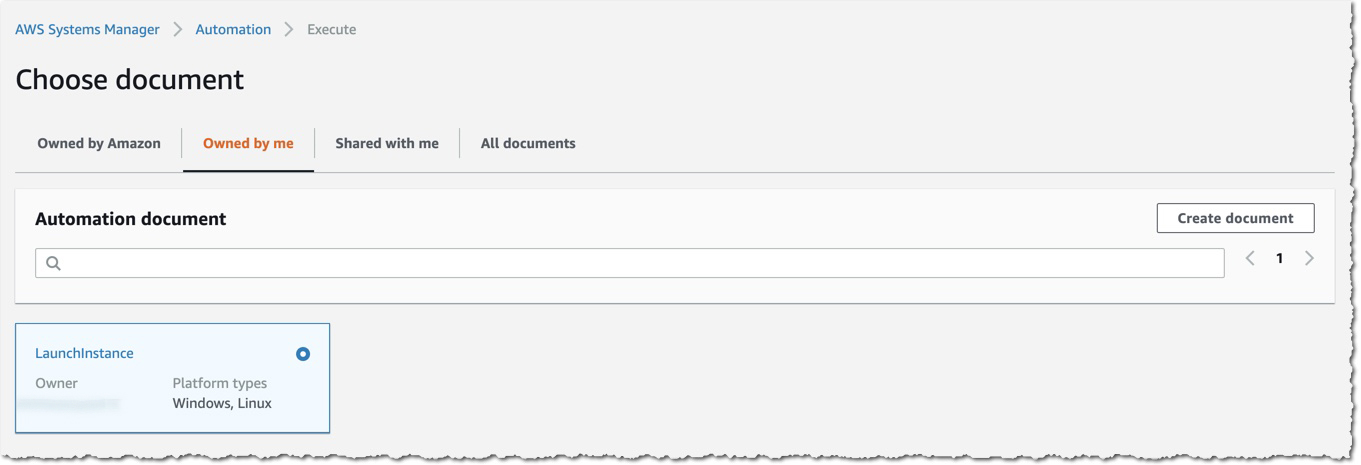
If I click the LaunchInstance document that I created earlier, I get a document details screen that shows me the description I added. This nicely formatted description allows me to generate documentation for my document and enable others to understand what it is trying to achieve.

When I click Next, I am asked to provide any Input parameters for my document. I add the imageId and ARN for the role that I want to use when executing this automation. It’s important to remember that this role will need to have permissions to call any of the services that are requested by the scripts. In my example, that means it needs to be able to create EC2 instances.
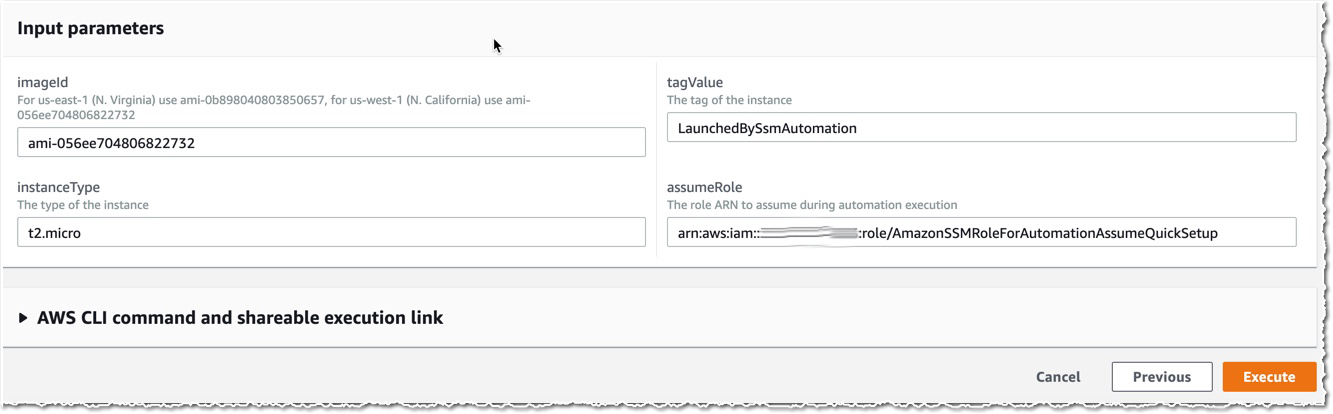
Once the document executes, I am taken to a screen that shows the steps of the document and gives me details about how long each step took and respective success or failure of each step. I can also drill down into each step and examine the logs. As you can see, all three steps of my document completed successfully, and if I go to the Amazon Elastic Compute Cloud (Amazon EC2) console, I will now have an EC2 instance that I created with tag LaunchedBySsmAutomation.

These new features can be found today in all regions inside the AWS Systems Manager console so you can start using them straight away.
Happy Automating!
— Martin;