AWS Big Data Blog
Encrypt data in transit using a TLS custom certificate provider with Amazon EMR
Many enterprises have highly regulated policies around cloud security. Those policies might be even more restrictive for Amazon EMR where sensitive data is processed.
EMR provides security configurations that allow you to set up encryption for data at rest stored on Amazon S3 and local Amazon EBS volumes. It also allows the setup of Transport Layer Security (TLS) certificates for the encryption of data in transit.
When in-transit encryption is enabled, EMR supports the following components by default:
- Hadoop MapReduce Encrypted Shuffle.
- Secure Hadoop RPC set to Privacy and using SASL, which is activated in EMR when data at rest encryption is enabled.
- Secure Hadoop RPC set to Privacy and using SASL. This is activated in EMR when data at rest encryption is enabled in the security configuration.
- Presto internal communication between nodes using SSL/TLS. This applies only to EMR version 5.6.0 and later.
- Tez Shuffle Handler using TLS.
- Internal RPC communication between Apache Spark
- HTTP protocol communication with user interfaces, such as Spark History Server and HTTPS-enabled file servers encrypted using Spark’s Secure Sockets Layer (SSL) configuration.
For more information about EMR in-transit encryption, see Encryption Options.
A security configuration provides the following options to specify TLS certificates:
- As a path to a .zip file in an S3 bucket that contains all certificates
- Through a custom certificate provider as a Java class
In many cases, company security policies prohibit storing any type of sensitive information in an S3 bucket, including certificate private keys. For that reason, the only remaining option to secure data in transit on EMR is to configure the custom certificate provider.
In this post, I guide you through the configuration process, showing you how to secure data in transit on EMR using the TLS custom certificate provider.
Required knowledge
To walk through this solution, you should know or be familiar with:
- Writing and compiling Java code.
- The AWS SDK for Java.
- Other AWS services, such as IAM, AWS Systems Manager Parameter Store, and AWS Lambda.
Solution overview
The custom certificate provider is a Java class that implements the TLSArtifactsProvider interface and compiles it into a JAR file. The TLSArtifactsProvider interface is available in the AWS SDK for Java version 1.11.+.
The TLSArtifactsProvider interface provides the TLSArtifacs method, which as argument expects certificates.
To make this solution work, you need a secure place to store certificates that can also be accessed by Java code.
In this example, use Parameter Store, which supports encryption using the AWS Key Management Service (AWS KMS) key.
Another way would be to store encrypted certificates in Amazon DynamoDB.
The following diagram and steps show the configuration process from the Java standpoint:

- During bootstrap, EMR downloads the Java JAR file from the S3 bucket, and runs it on each node.
- Java invokes the Lambda function, requesting the value of a specific parameter key.
- Lambda calls Parameter Store to get the value. The value returned by Systems Manager remains encrypted.
- Lambda returns the encrypted value back to Java.
- Java decrypts the value using an AWS KMS API call.
- The decrypted value is converted to the correct format of the certificate.
- The process repeats for all certificates.
- Certificates are returned back to EMR through the TLSArtifactsProvider interface.
In this example, for the master node, I used a certificate signed by a certificate authority (CA) and wildcard self-signed certificate for slave nodes. Depending on requirements, you can use CA certificates for all nodes or only a self-signed wildcard certificate.
Implementing in-transit encryption
This section walks you through all aspects of implementation and configuration for in-transit encryption using a custom certificate provider.
Create a self-signed wildcard certificate
To create a self-signed wildcard certificate, you can use OpenSSL:
This command creates a self-signed, 4096-bit certificate.
Explanation of parameter:
-keyout – The output file in which to store the private key.
-out – The output file in which to store the certificate.
-days – The number of days for which to certify the certificate.
-subj – The subject name for a new request. The CN must match the domain name specified in DHCP that is assigned to the virtual private cloud (VPC). The default is ec2.internal. The “*” prefix is the wildcard certificate.
-nodes – Allows you to create a private key without a password, which is without encryption.
For more information, see req command.
Upload certificates
To upload certificates to the Parameter Store, run the following AWS Command Line Interface (AWS CLI) command for each certificate file, including private keys:
The following are examples of uploaded CA and self-signed certificate files:
The following are examples of uploading certificates when the wildcard certificate is used on all nodes:
Using the Lambda function
The Lambda function in this solution is a broker that allows Java JAR to retrieve certificates from Parameter Store.
Create a new role for the Lambda function, using the following command:
Grant permissions to Parameter Store, using the following command:
Create a new Lambda function:
To create a new Lambda function, open the AWS Management Console, choose Lambda, and choose Create function. On the Create function page, complete the form as shown in the following screenshot:
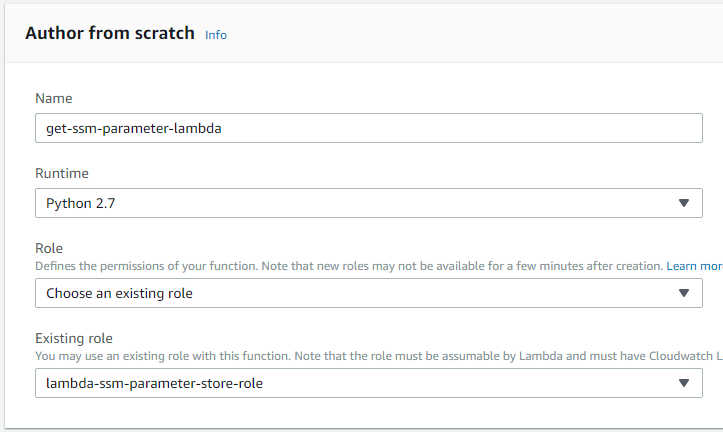
Choose runtime as Python 2.7, and specify the role that you created for the Lambda function.
When the new function is created, add the following code in the Function code section:
Change the timeout to 1 minute, and then save the function.
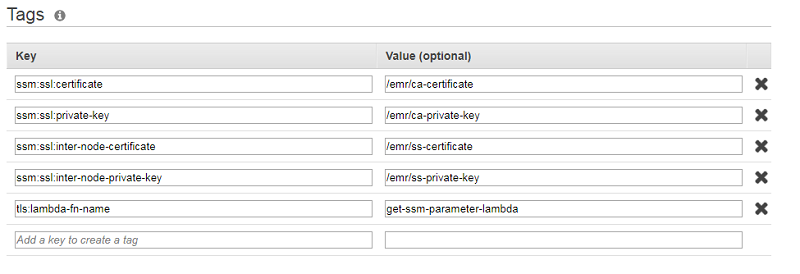
Tag resources
For the Java class to call the Lambda function, you must provide information about the function name and names of parameter keys under which the certificates are stored.
To reuse the same Java JAR with different certificates and configurations, provide those values to Java through EMR tags, rather than embedding them in Java code.
In this example, I used the following tags:
- ssm:ssl:certificate – The name of the Systems Manager parameter key storing the CA-signed certificate.
- ssm:ssl:private-key – The name of the Systems Manager parameter key storing the CA-signed certificate private key.
- ssm:ssl:inter-node-certificate – The name of the Systems Manager parameter key storing the self-signed certificate.
- ssm:ssl:inter-node-private-key – The name of the Systems Manager parameter key storing the self-signed certificate private key.
- tls:lambda-fn-name – The name of the Lambda function. In this example, this is get-ssm-parameter-lambda.
Use the Java class flow
This section describes the flow in the Java code only. You can download the full code alone with the compiled JAR file from GitHub. For more information, see the Java folder in the emr-tls-security GitHub repo.
Important
Because of EMR dependencies, all other methods must be implemented based on the AWS SDK for Java version 1.10.75. These dependencies do not include the TLSArtifactsProvider interface that should be imported from the AWS SDK for Java version 1.11.170 (aws-java-sdk-emr-1.11.170.jar).
All necessary dependencies are included in the example project.
The following is an example of the basic structure of the Java class, with an implementation of the TLSArtifactsProvider interface:
The code to add is related to getting certificates from a secure location.
In the provided code example from GitHub, the following logic was implemented. I’ve listed the methods used in each step.
- Read the names of the Systems Manager parameter key. Also read the name of the AWS Lambda function from the EMR tags (see “Tagging” section) – readTags()
- Invoke the Lambda function to download certificates from Parameter Store – callLambda():
- Decrypt the values returned by Lambda using the KMS API call – decryptValue().
- Assign decrypted values to local variables.
- If needed, save CA-signed certificates to a local disk. For more information, see Other Communication – Hue section later in this post– createDirectoryForCerts() and writeCert().
- Convert certificates to an X509 format – getX509FromString().
- Convert the private key to the correct format – getPrivateKey().
- Call the getTlsArtifacts() method to provide certificates in arguments.
You can use a wildcard certificate for all nodes without changing code. Reference the same Systems Manager parameter key in ssm:ssl:certificate/ssm:ssl:private-key, and in the ssm:ssl:inter-node-certificate/ ssm:ssl:inter-node-private-key in EMR tags.
If the implemented methods in the example code meet requirements, you can use the provided Java JAR file in the EMR security configuration, as described in the next section. Otherwise, any changes in code require a compile of Java code into a JAR file.
Create the EMR security configuration
Before creating the security configuration, upload the compiled Java JAR file to an S3 bucket.
To create the security configuration:
- Log in to the Amazon EMR console.
- Choose Security configurations, Create.
- Type a name for your new security configuration; for example, emr-tls-ssm
- Select In-transit encryption.
- Under TLS certificate provider, for Certificate provider type, choose Custom.
- For S3 object, type the path to the uploaded Java JAR file.
- For Certificate provider class, type the name of the Java class. In the example code, the name is emrtls.
- Configure the At-rest encryption, as required.
- Choose Create.

Modify the instance profile role
Applications running on EMR assumes and uses the EMR role for EC2 to interact with other AWS services.
To grant Java permissions to invoke Lambda, and to decrypt certificates, add the following policy to your EC2 instance profile role:
Note
Before creating the policy, update resources with the correct Amazon Resource Name (ARN) for the Lambda function and KMS key.
Other available configurations
In addition to the applications that natively support in-transit encryption in EMR, the custom TLS certificate provider can also be used to secure communication (HTTPS) for other applications like Presto, Hue, and Zeppelin.
The sections that follow describe the configuration of each application that works with the certificates set up by the TLS security configuration.
Presto
For Presto, most configuration is done by EMR when TLS certificates are applied.
Depending on the type of certificates used, there are two additional configurations that must be added:
- When the CA-signed certificate with a single common name (not wildcard) is set on the master node, additional configurations are required:
- The certificate common name must be registered in DNS. The EMR cluster must be able to resolve that name to the IP address of the master node. One solution would be to run a script on the bootstrap action to register the IP address of the EMR master node and name in DNS.
- The Discovery URI in the Presto configuration file must match the certificate common name. The value of uri must be changed on all nodes. This can be accomplished by two provided scripts.
Each script must be uploaded to an S3 bucket to which the EMR cluster has permission.
The first script, emr-presto-conf.sh, must be run on the EMR bootstrap action, as follows where the value of “Args” is the certificate common name:The PrestoConfiguration bootstrap action downloads and runs a script (presto-update-dicovery-uri.sh) as a background process. This script waits for the Presto server to be installed and then modify the configuration files.
Before uploading the emr-presto-conf.sh script to the Amazon S3 bucket, change the path to “presto-update-dicovery-uri.sh”
Both scripts can be downloaded from GitHub:
https://github.com/aws-samples/emr-tls-security/tree/master/scripts - Launch an EMR cluster
- Create all resources
- Lambda function
- IAM policy
- security group
- security configuration
- EMR cluster
- HTTPS connection to the Presto UI
- Using the Presto CLI
- Connect (SSH) to the EMR master node
- Create a test Hive table by running the following command:
- Run the following Presto command:
2. When a self-signed wildcard certificate is used on the master node, the certificate must be added to the Java default truststore. This can be accomplished by running the following script:
The previous script can be run on the EMR step. The following is an AWS CloudFormation snippet:
Hue
To configure access to the Hue UI over HTTPS, the path to the certificate and private key files must be specified in the hue.ini file. Because our Java class has methods, createDirectoryForCerts() and writeCert(), which support exporting TLS certificates to the local disk, the remaining configuration should point to those files in the hue.ini file.
This configuration can be applied by adding the following configuration to the EMR cluster:
The port for the HTTPS connection to Hue remains the same. The default is: 8888
Zeppelin
Unlike Hue, Zeppelin configuration files reference certificates from the Java keystore.
Because EMR already added all certificates to the Java keystore, the only modification needed is to reference the same Java keystore files and password in zeppelin-site.xml.
The path to the Java keystore and the password can be read directly from the Presto configuration file.
This configuration can be done by running the following script on EMR:
The previous script sets the HTTPS port in Zeppelin to 7773, which can be changed as needed.
GitHub example
On GitHub, you can download an example of the CloudFormation templates that can be used to launch an EMR cluster with all the security features discussed in this post.
The following is an example of the AWS CLI command required to launch an EMR cluster with security features.
Before running this command, you must change the <key pair name>, <subnet id> and <security group id> values to the correct one.
Note
Before running any of the provided examples, the certificates must be uploaded to the Parameter Store.
For test purposes, you can download the shell script from:
https://github.com/aws-samples/emr-tls-security/blob/master/scripts/upload-certificates.sh
This script uploads self-signed certificates issued for *.ec2.internal to the Parameter Store. Make sure that the DNS associated with your VPC, where you launch the EMR cluster, matches the certificate.
Use the following command:
sh upload-certificates.sh <KMS key ID> <AWS Region>
Where:
KMS key ID – is the identifier of the KMS key that is used to encrypt certificates.
AWS Region – is the Region where certificates are uploaded.
Validation
There are a few methods to validate whether the TLS certificate was installed correctly.
Hue
To test the HTTPS connection to Hue from the browser, connect to https://<EMR URL or IP>:8888
Zeppelin
To test the HTTPS connection to Zeppelin from the browser, connect to https://<EMR URL or IP>:7773Port 7773 is the one used in this example. If you changed it, make sure you’re connecting to the port under which the Zeppelin is running on your EMR cluster.
There’s something to remember in both of these scenarios. If the certificate doesn’t match the provided URL (or when you created a self-signed certificate), you get a warning message in the browser that the certificate is invalid.
Presto
You can test Presto using one of the following methods:
To test the connection to Presto UI from the browser, connect to https://<EMR URL or IP>:8446
To test the certificate using the Presto CLI, follow these steps:
Change ‘master-node-url’ to the correct value.
If the command succeeds, you should see 3 as the command output.
Conclusion
Amazon EMR security configurations provide options to encrypt data at rest, but also data in transit.
This post demonstrated how to create and apply the TLS custom certificate provider to an EMR cluster to secure data in-transit without storing certificate’s private key in an S3 bucket. For a company with strict policies, this might be the only solution to encrypt data in-transit.
Additional Reading
If you found this post useful, be sure to check out Build a Multi-Tenant Amazon EMR Cluster with Kerberos, Microsoft Active Directory Integration and IAM Roles for EMRFS and Encrypt Data At-Rest and In-Flight on Amazon EMR with Security Configurations.
About the Author
 Remek Hetman is a Senior Cloud Infrastructure Architect with Amazon Web Services Professional Services. He works with AWS enterprise customers, providing technical guidance and assistance for Infrastructure, DevOps, and Big Data to help them make the best use of AWS services. Outside of work, he enjoys spending his time actively, and pursuing his passion – astronomy.