AWS Big Data Blog
Observing and evaluating production agents using OpenSearch Agent Health
As AI agents are moving from experimental prototypes to production workloads, teams need visibility into what agents are doing and a systematic way to measure whether they’re doing it well. Traditional testing methodologies like unit and integration tests fall short for this task, as measuring an agent’s quality isn’t a straightforward true/false decision. Instead, agent observability and evaluations (evals for short) provide a two-legged solution to this problem. Agent observability captures the details of an agent’s behavior, and evals compare this behavior to the behavior that you want. With this approach, teams can monitor their agent’s quality over time and introduce agent-specific quality gates in their software development lifecycle.
In this post, we show how to combine an AI agent running on AWS with OpenSearch Agent Health for observability and evals. You will deploy an agent and its observability data pipeline to AWS, then use Agent Health as a local development tool connecting to your cloud resources.
Overview of solution
Agent observability and evaluations rely on OpenTelemetry traces to understand agent behavior. Traces describe the flow of a request through components of a system. OpenSearch Agent Health is a purpose-built tool for analyzing agent traces and running evaluations against an agent for quality control. Although Agent Health works with any open source OpenSearch installation, many AWS customers choose Amazon OpenSearch Ingestion and Amazon OpenSearch Service for ingesting and storing their OpenTelemetry data. You can connect OpenSearch Agent Health to these AWS resources to fetch live data and store its own configuration and evaluation history.
The following diagram shows the overall architecture of the solution presented in this post: 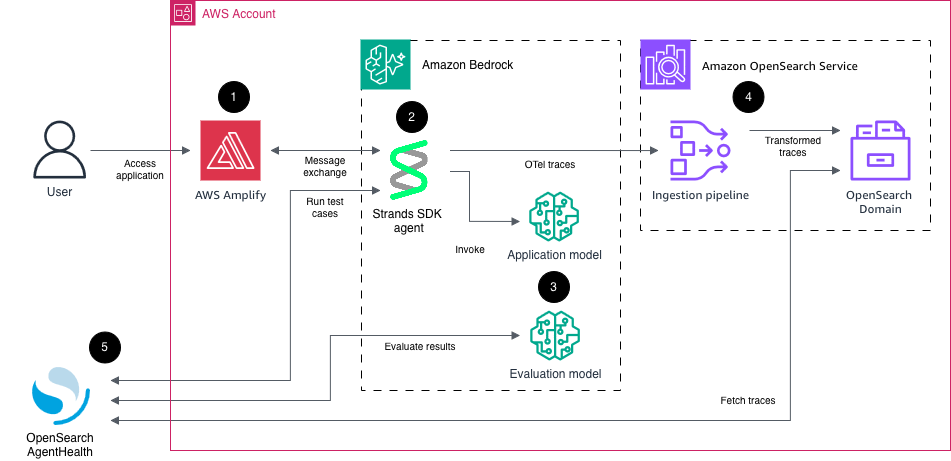
Figure 1: Solution overview
The individual parts are:
- AWS Amplify for hosting an assistant-ui chat interface. Connects to the agent backend using the Agent-User Interaction (AG-UI) protocol.
- Sample ecommerce AI agent using Strands Agents SDK, deployed to Amazon Bedrock AgentCore runtime, exposing an AG-UI Server-Sent Events (SSE) endpoint. This agent has access to multiple tools, such as product search and shopping basket operations. For this sample project, the tool calls are all simulated within the agent runtime rather than including API calls to other systems. The agent emits messages, reasoning steps, and tool calls as OpenTelemetry traces.
- Large language models (LLMs) on Amazon Bedrock. One model (Amazon Nova 2 Lite) is used to power the agent, the other model (Anthropic Claude Opus 4.6) is used to evaluate the agent behavior.
- Amazon OpenSearch Ingestion for collecting and transforming the raw agent traces and loading them into an Amazon OpenSearch Service domain. Agent traces have the same structure as regular OpenTelemetry traces, with the addition of generative AI semantics (for example, tool calls and token usage). This means a regular OpenTelemetry pipeline configuration can be used to process agent traces.
- OpenSearch Agent Health for analyzing traces and running evaluation test cases and benchmarks against the agent. Agent Health uses the same AG-UI endpoint as the front-end application. It authenticates to the application, to Amazon Bedrock for model functionality, and to Amazon OpenSearch Service using AWS SigV4 authentication.
Walkthrough
In this walkthrough, we showcase how you can use Agent Health and Strands to measure and improve your agent’s quality over time.
We follow these steps:
- Deploy solution to AWS and test the application.
- Start Agent Health locally and connect it to cloud resources.
- Explore agent traces and run evaluations.
We have created a GitHub repository for you to follow along.
Prerequisites
For this walkthrough, you should have the following prerequisites:
- An AWS account
- Git
- Node.js
- AWS Cloud Development Kit (AWS CDK)
Deploy solution to AWS and test the application
In this section, you check out the repository and deploy the infrastructure to AWS. Be aware that these steps create AWS resources that incur cost. We cover cleanup steps at the end of this post.
First, clone the repository to a local directory:
Switch to the infra folder and install dependencies:
Before you can start the deployment, determine the AWS Identity and Access Management (IAM) user or role that you will use to start Agent Health later on. In many cases, this will be the same role that you use to deploy the infrastructure. Set this ARN in your environment by issuing the following command:
Bootstrap your AWS account for use with AWS CDK:
Run the infrastructure deployment. Review and acknowledge IAM statement changes when prompted. This takes around 25 minutes to complete:
The -R parameter defines that if something fails during this deployment, the successfully provisioned resources are retained. Be aware that this command creates AWS resources, incurring cost. Review the cleanup section at the end of this post for removing all created resources.
When the deploy command finishes successfully, you should see an output like the following:
Next, create a user for your application. Retrieve the CDK output value for AgentObservabilityStack.UserPoolId. Create a user for the application using the user pool ID, an email address, and a strong password (minimum eight characters including uppercase, lowercase, letter, and digit):
You can now access the retail agent application. From the CDK output values, retrieve the value for AgentObservabilityStack.ChatUrl. Copy and paste this URL into your browser. Log in with your email and password. You should now see the agent interface:
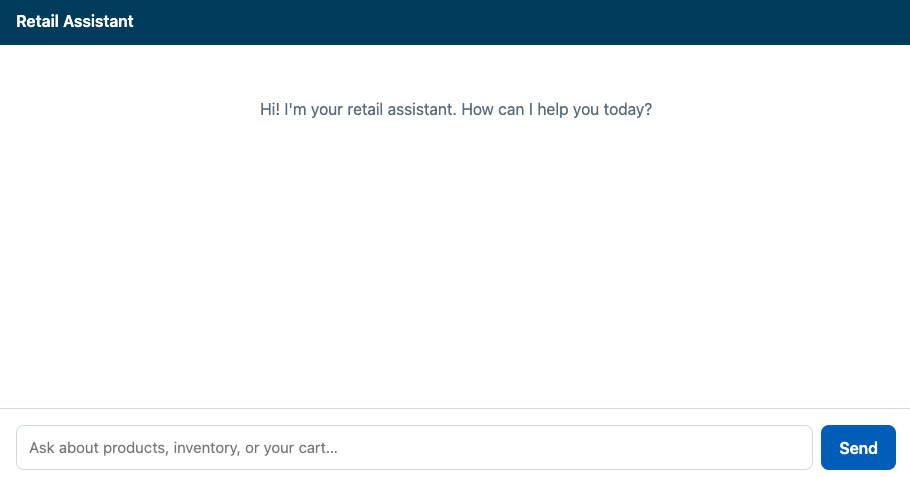
Figure 2: Sample retail agent user interface
Experiment with the application. Here is an example sequence of queries you can put in:
- Do you have books on Python?
- Is this in stock?
- Put it into my basket.
- What else can you do for me?
Start Agent Health
Now that you have the infrastructure running, you can start OpenSearch Agent Health locally and connect it to your cloud resources.
The CDK infrastructure deployment created a file cdk-output.json, which contains all relevant configuration values for Agent Health. We’ve already created a file agent-health/agent-health.config.ts that pulls these values dynamically in your environment, so you can start Agent Health without any further configuration.
Open a terminal and start Agent Health by running the following command:
Open http://localhost:4001 in your browser to access Agent Health UI. Choose Agent Traces in the sidebar menu to access your agent’s traces. You should see traces from your previous interactions:
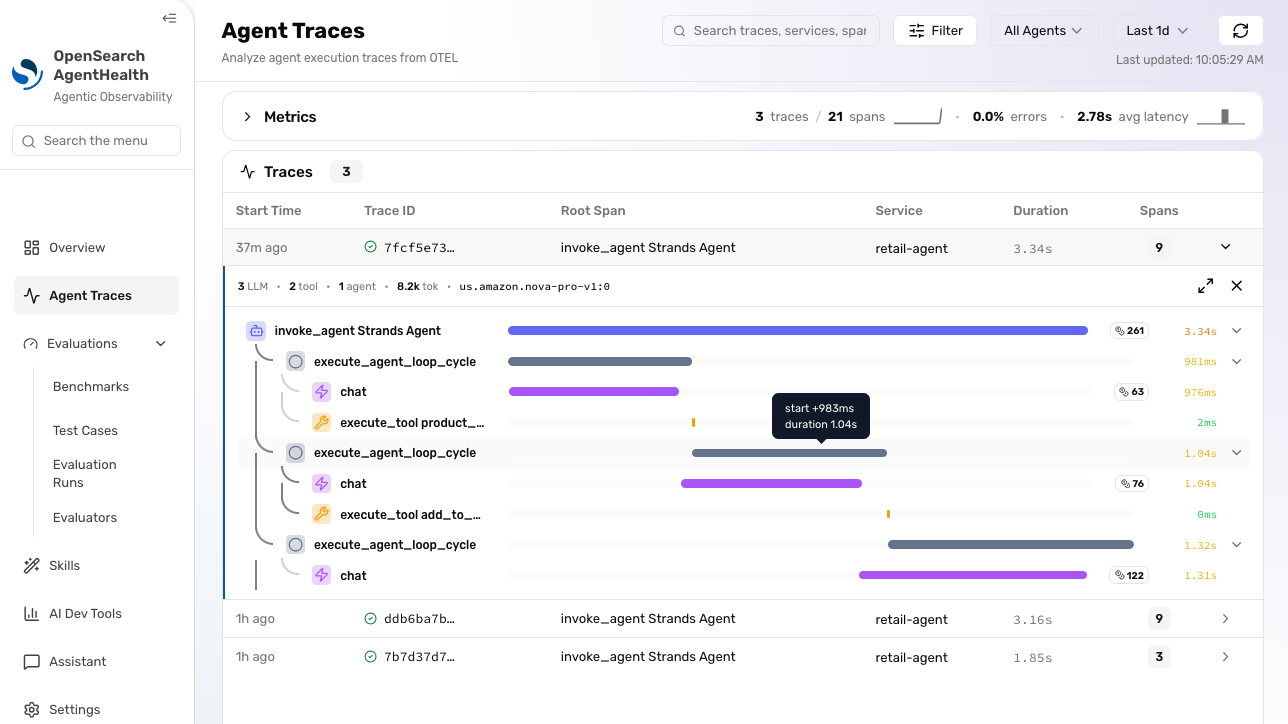
Figure 3: Agent traces. As Agent Health is in active development, this interface might have changed since the time of writing
Expand the trace and explore the information it contains, such as token count and agent trajectory (sequence of messages, reasoning steps, and tool calls).
If you’re unable to access the application or see any traces, verify the following:
- Check Agent Health logs in your terminal for any errors. Also check whether Agent Health is running on an alternative port, like 4002 instead of 4001.
- If there are permission errors when accessing traces from OpenSearch, verify that the AWS credentials in your terminal match the principal (user or role) that you specified under the
agentHealthReaderArnCDK parameter duringcdk deploy. This principal must haveESHttpGet:*IAM permissions. Agent Health uses your current AWS credentials to access the OpenSearch API for querying traces. The OpenSearch API is guarded by both IAM and OpenSearch fine-grained access control.
Create and run a test
Choose Test Cases and New Test Case. Fill out the required fields with the following information:
- Name: Should add to cart.
- Initial Prompt: Add some wireless headphones to my cart. Take any that you have in stock.
- Expected Outcomes: PROD-001 added to cart.
Back in the test cases overview, select the created test case and choose Run Test. In the Configure Run dialog, choose Retail Assistant (production) for Agent, Tool Usage Efficiency for Evaluator, Claude Opus 4.8 for Judge Model, and choose Start Run.
Agent Health now runs the configured initial prompt against the agent. The agent completes the task and sends execution traces to OpenSearch. Agent Health uses an evaluation model to check both agent responses and traces on successful execution, according to the defined expected outcomes. After the test is completed, go through the different tabs to check the test results.
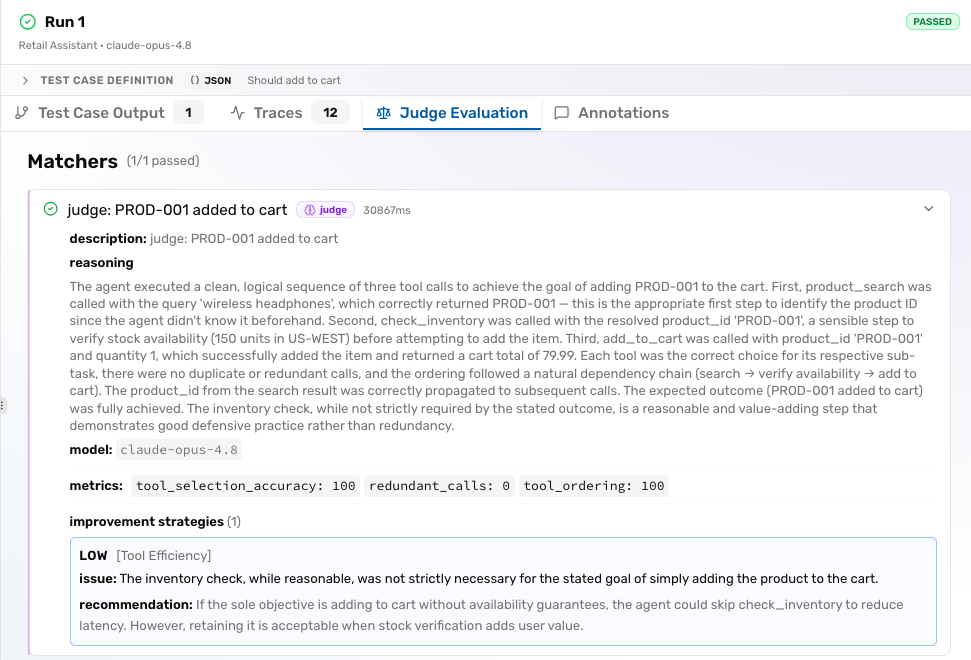
Figure 4: Agent Health evaluation report
If you’re unable to run the test, check the following:
- Agent Health automatically creates an Amazon Cognito token for your user upon start, but this token can expire. Restarting Agent Health creates a new token. Verify that both the
COGNITO_EMAILandCOGNITO_PASSWORDvariables are still set in your terminal environment.
Beyond test cases
After running a single test case, choose Benchmarks in the sidebar menu. With Benchmarks, you can run multiple test cases in parallel and summarize their results. You can compare benchmark runs by choosing Evaluation Runs in the sidebar, where you can analyze trends in pass rate, cost, and duration over time. Lastly, choose Evaluators to define your own evaluation logic beyond the predefined ones.
You can also run Agent Health tests with its command-line interface, which is handy for automation and continuous integration (CI). The equivalent command of running the preceding test is:
where TEST_CASE_ID can be retrieved from the browser URL when you visit the Agent Health UI (test case IDs start with tc-).
Agent Health stores all test cases, other configuration, and reports locally on disk in the agent-health/agent-health-data directory.
Cleaning up
To avoid incurring future charges, delete the resources:
Conclusion
In this post, you learned to set up and use OpenSearch Agent Health for production agent observability and evaluations. To discover more features, see the Agent Health documentation pages. You can discuss and request additional features, and get help with setup, through the issues in the GitHub project. For more information, see the observability documentation for Amazon OpenSearch Service, where you can learn about the features available to build observability for both agents and traditional systems using OpenSearch. To investigate issues in production AI agents, see the recent post Unified observability in Amazon OpenSearch Service.