AWS Big Data Blog
Orchestrate end-to-end scalable ETL pipeline with Amazon SageMaker workflows
Amazon SageMaker Unified Studio serves as a collaborative workspace where data engineers and scientists can work together on end-to-end data and machine learning (ML) workflows. SageMaker Unified Studio specializes in orchestrating complex data workflows across multiple AWS services through its integration with Amazon Managed Workflows for Apache Airflow (Amazon MWAA). Project owners can create shared environments where team members jointly develop and deploy workflows, while maintaining oversight of pipeline execution. This unified approach makes sure data pipelines run consistently and efficiently, with clear visibility into the entire process, making it seamless for teams to collaborate on sophisticated data and ML projects.
This post explores how to build and manage a comprehensive extract, transform, and load (ETL) pipeline using SageMaker Unified Studio workflows through a code-based approach. We demonstrate how to use a single, integrated interface to handle all aspects of data processing, from preparation to orchestration, by using AWS services including Amazon EMR, AWS Glue, Amazon Redshift, and Amazon MWAA. This solution streamlines the data pipeline through a single UI.
Example use case: Customer behavior analysis for an ecommerce platform
Let’s consider a real-world scenario: An e-commerce company wants to analyze customer transactions data to create a customer summary report. They have data coming from multiple sources:
- Customer profile data stored in CSV files
- Transaction history in JSON format
- Website clickstream data in semi-structured log files
The company wants to do the following:
- Extract data from these sources
- Clean and transform the data
- Perform quality checks
- Load the processed data into a data warehouse
- Schedule this pipeline to run daily
Solution overview
The following diagram illustrates the architecture that you implement in this post.
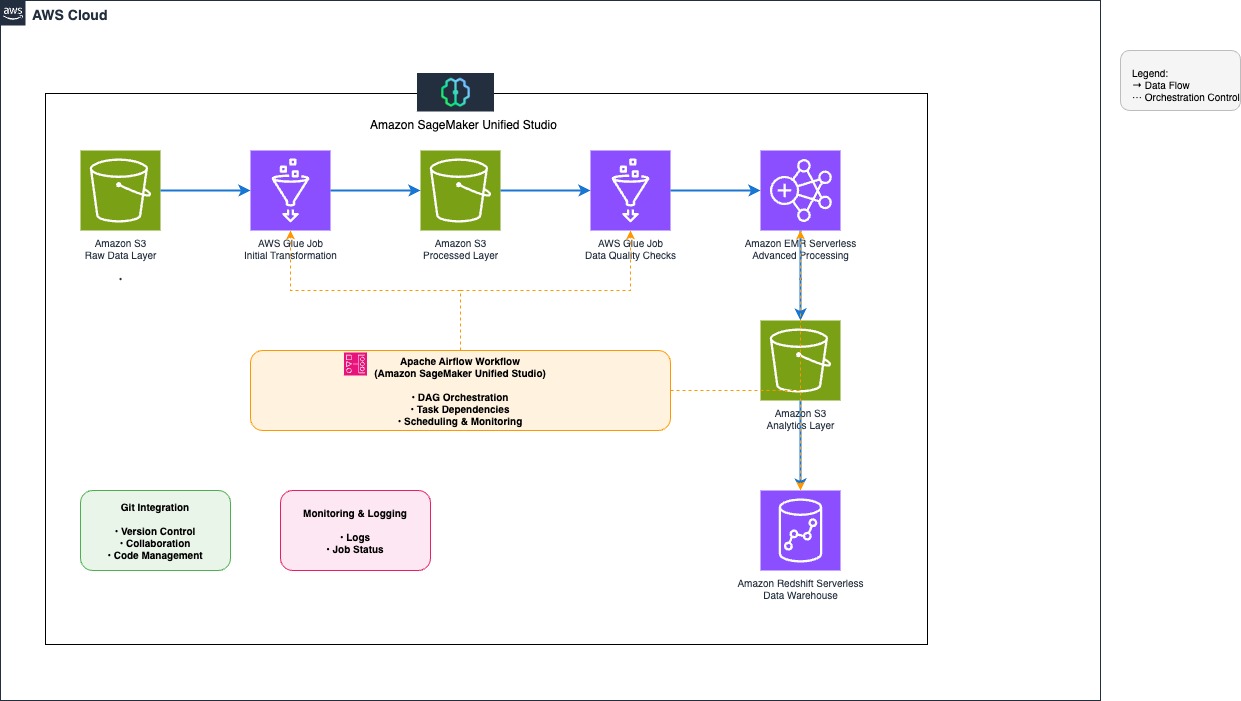
The workflow consists of the following steps:
- Establish a data repository by creating an Amazon Simple Storage Service (Amazon S3) bucket with an organized folder structure for customer data, transaction history, and clickstream logs, and configure access policies for seamless integration with SageMaker Unified Studio.
- Extract data from the S3 bucket using AWS Glue jobs.
- Use AWS Glue and Amazon EMR Serverless to clean and transform the data.
- Implement data quality validation using AWS Glue Data Quality.
- Load the processed data into Amazon Redshift Serverless.
- Create and manage the workflow environment using SageMaker Unified Studio with Identity Center–based domains.
Note: Amazon SageMaker Unified Studio supports two domain configuration models: IAM Identity Center (IdC)–based domains and IAM role–based domains. While IAM-based domains enable role-driven access management and visual workflows, this post specifically focuses on Identity Center–based domains, where users authenticate via IdC and projects access data and resources using project roles and identity-based authorization.
Prerequisites
Before beginning, ensure you have the following resources:
- An AWS account.
- AWS IAM Identity Center enabled in your AWS account with users and groups created. For detailed instructions, see Getting started with IAM Identity Center and Access Amazon SageMaker Unified Studio.
Configure Amazon SageMaker Unified Studio domain
This solution requires SageMaker Unified Studio domain in the us-east-1 AWS Region. Although SageMaker Unified Studio is available in multiple Regions, this post uses us-east-1 for consistency. For a complete list of supported Regions, refer to Regions where Amazon SageMaker Unified Studio is supported.
Complete the following steps to configure your domain:
- Sign in to the AWS Management Console, navigate to Amazon SageMaker, and open the Domains section from the left navigation pane.
- On the SageMaker console, choose Create domain, then choose Quick setup.
- If the message “No VPC has been specifically set up for use with Amazon SageMaker Unified Studio” appears, select Create VPC. The process redirects to an AWS CloudFormation stack. Leave all settings at their default values and select Create stack.
- Under Quick setup settings, for Name, enter a domain name (for example, etl-ecommerce-blog-demo). Review the selected configurations.
- Choose Continue to proceed.
- On the Create IAM Identity Center user page, create an SSO user (account with IAM Identity Center) or select an existing SSO user to log in to the Amazon SageMaker Unified Studio. The SSO selected here is used as the administrator in the Amazon SageMaker Unified Studio.
- Choose Create domain.
For detailed instructions, see Create a SageMaker domain and Onboarding data in Amazon SageMaker Unified Studio.

After you have created a domain, popup will appear with the message: “Your domain has been created! You can now log in to Amazon SageMaker Unified Studio”. You can close the popup for now.
Create a project
In this section, we create a project to serve as a collaborative workspace for teams to work on business use cases. Complete the following steps:
- Choose Open Unified Studio and sign in with your SSO credentials using the Sign in with SSO option.
- Choose Create project.
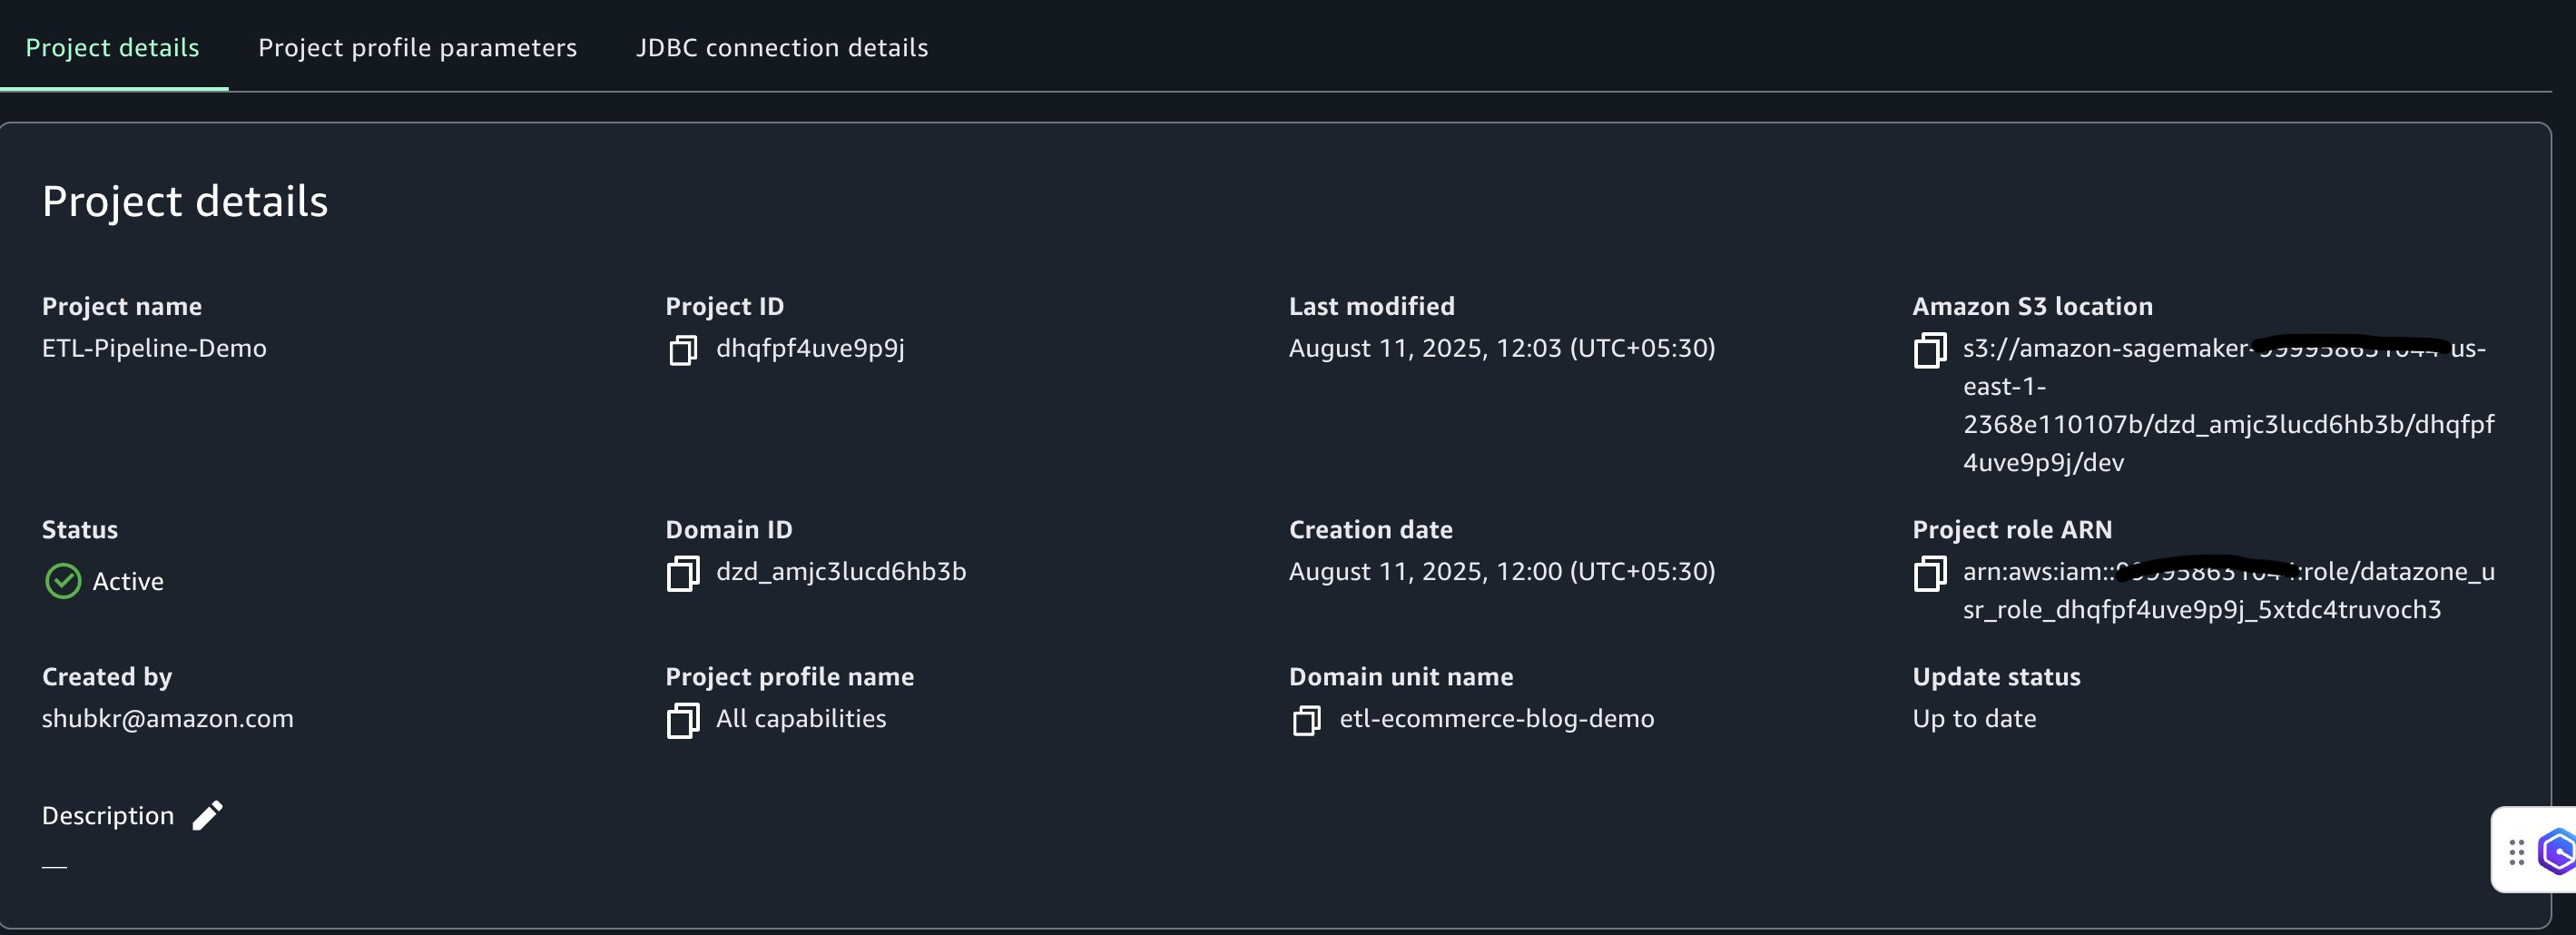
- Name the project (for example,
ETL-Pipeline-Demo) and create it using the All capabilities project profile. - Choose Continue.
- Keep the default values for the configuration parameters and choose Continue.
- Choose Create project.
Project creation might take a few minutes. After the project is created, the environment will be configured for data access and processing.
Integrate S3 bucket with SageMaker Unified Studio
To enable external data processing within SageMaker Unified Studio, configure integration with an S3 bucket. This section walks through the steps to set up the S3 bucket, configure permissions, and integrate it with the project.
Create and configure S3 bucket
Complete the following steps to create your bucket:
- In a new browser tab, open the AWS Management Console and search for S3.
- On the Amazon S3 console, choose Create Bucket .
- Create a bucket named
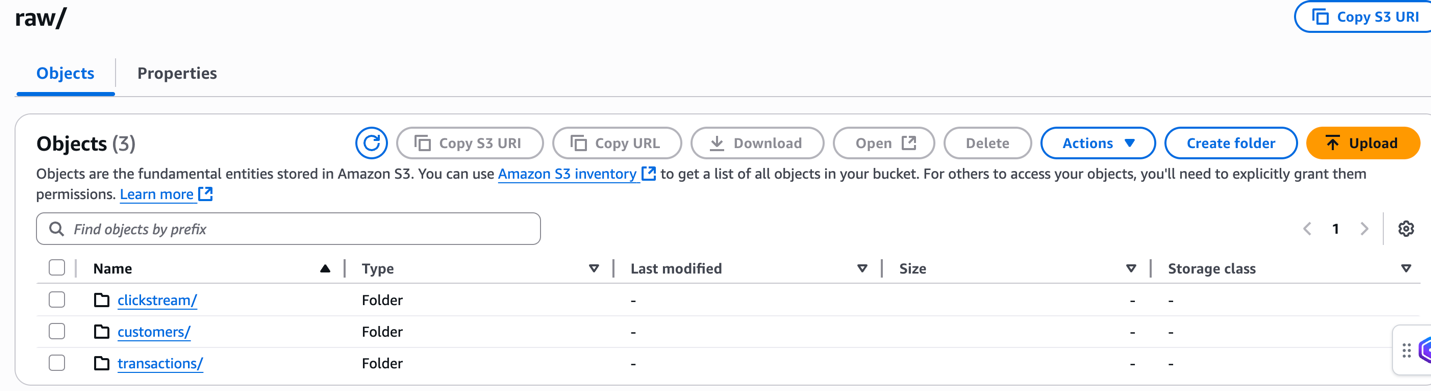
ecommerce-raw-layer-bucket-demo-<Account-ID>-us-east-1. For detailed instructions, see create a general-purpose Amazon S3 bucket for storage. - Create the following folder structure in the bucket. For detailed instructions, see Creating a folder:
raw/customers/raw/transactions/raw/clickstream/processed/analytics/
Upload sample data
In this section, we upload sample ecommerce data that represents a typical business scenario where customer behavior, transaction history, and website interactions need to be analyzed together.
The raw/customers/customers.csv file contains customer profile information, including registration details. This structured data will be processed first to establish the customer dimension for our analytics.
The raw/transactions/transactions.json file contains purchase transactions with nested product arrays. This semi-structured data will be flattened and joined with customer data to analyze purchasing patterns and customer lifetime value.
The raw/clickstream/clickstream.csv file captures user website interactions and behavior patterns. This time-series data will be processed to understand customer journey and conversion funnel analytics.
For detailed instructions on uploading files to Amazon S3, refer to the Uploading objects.
Configure CORS policy
To allow access from the SageMaker Unified Studio domain portal, update the Cross-Origin Resource Sharing (CORS) configuration of the bucket:
- On the bucket’s Permissions tab, choose Edit under Cross-origin resource sharing (CORS).

- Enter the following CORS policy and replace
domainUrlwith the SageMaker Unified Studio domain URL (for example,https://<domain-id>.sagemaker.us-east-1.on.aws). The URL can be found at the top of the domain details page on the SageMaker Unified Studio console.
For detailed information, see Adding Amazon S3 data and gain access using the project role.
Grant Amazon S3 access to SageMaker project role
To enable SageMaker Unified Studio to access the external Amazon S3 location, the corresponding AWS Identity and Access Management (IAM) project role must be updated with the required permissions. Complete the following steps:
- On the IAM console, choose Roles in the navigation pane.
- Search for the project role using the last segment of the project role Amazon Resource Name (ARN). This information is located on the Project overview page in SageMaker Unified Studio (for example,
datazone_usr_role_1a2b3c45de6789_abcd1efghij2kl).
- Choose the project role to open the role details page.
- On the Permissions tab, choose Add permissions, then choose Create inline policy.
- Use the JSON editor to create a policy that grants the project role access to the Amazon S3 location
- In the JSON policy below, replace the placeholder values with your actual environment details:
- Replace
<BUCKET_PREFIX>with the prefix of S3 bucket name (for example,ecommerce-raw-layer) - Replace
<AWS_REGION>with the AWS Region where your AWS Glue Data Quality rulesets are created (for example,us-east-1) - Replace
<AWS_ACCOUNT_ID>with your AWS account ID
- Replace
- Paste the updated JSON policy into the JSON editor.
- Choose Next.
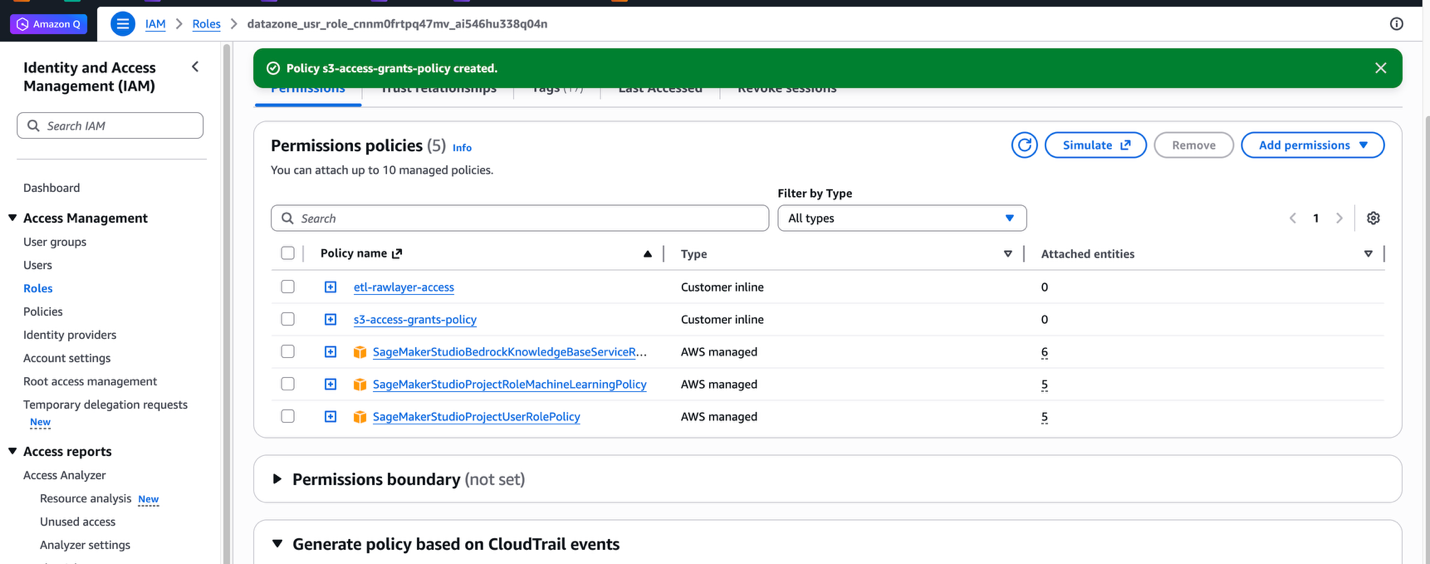
- Enter a name for the policy (for example,
etl-rawlayer-access), then choose Create policy. - Choose Add permissions again, then choose Create inline policy.
- In the JSON editor, create a second policy to manage S3 Access Grants:Replace
<BUCKET_PREFIX>with the prefix of S3 bucket name (for example,ecommerce-raw-layer) and paste this JSON policy. - Choose Next.
- Enter a name for the policy (for example,
s3-access-grants-policy), then choose Create policy.
For detailed information about S3 Access Grants, see Adding Amazon S3 data.
Add S3 bucket to project
After you add policies to the project role for access to the Amazon S3 resources, complete the following steps to integrate the S3 bucket with the SageMaker Unified Studio project:
- In SageMaker Unified Studio, open the project you created under Your projects.
- Choose Data in the navigation pane.
- Select Add and then Add S3 location.
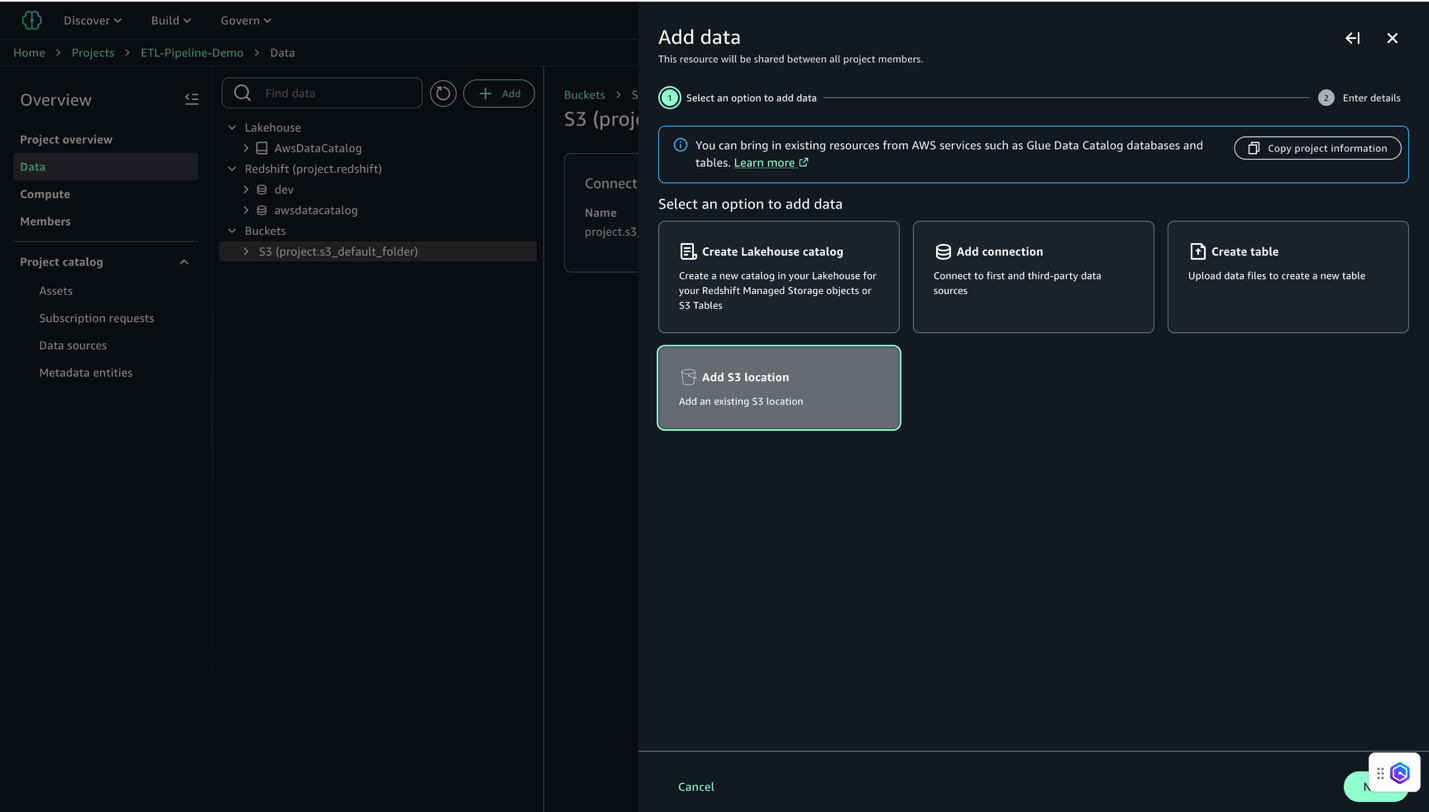
- Configure the S3 location:
- For Name, enter a descriptive name (for example,
E-commerce_Raw_Data). - For S3 URI, enter your bucket URI (for example,
s3://ecommerce-raw-layer-bucket-demo-<Account-ID>-us-east-1/). - For AWS Region, enter your Region (for this example,
us-east-1). - Leave Access role ARN blank.
- Click Add S3 Location
- For Name, enter a descriptive name (for example,
- Wait for the integration to complete.
- Verify the S3 location appears in your project’s data catalog (on the Project overview page, on the Data tab, locate the Buckets pane to view the buckets and folders).
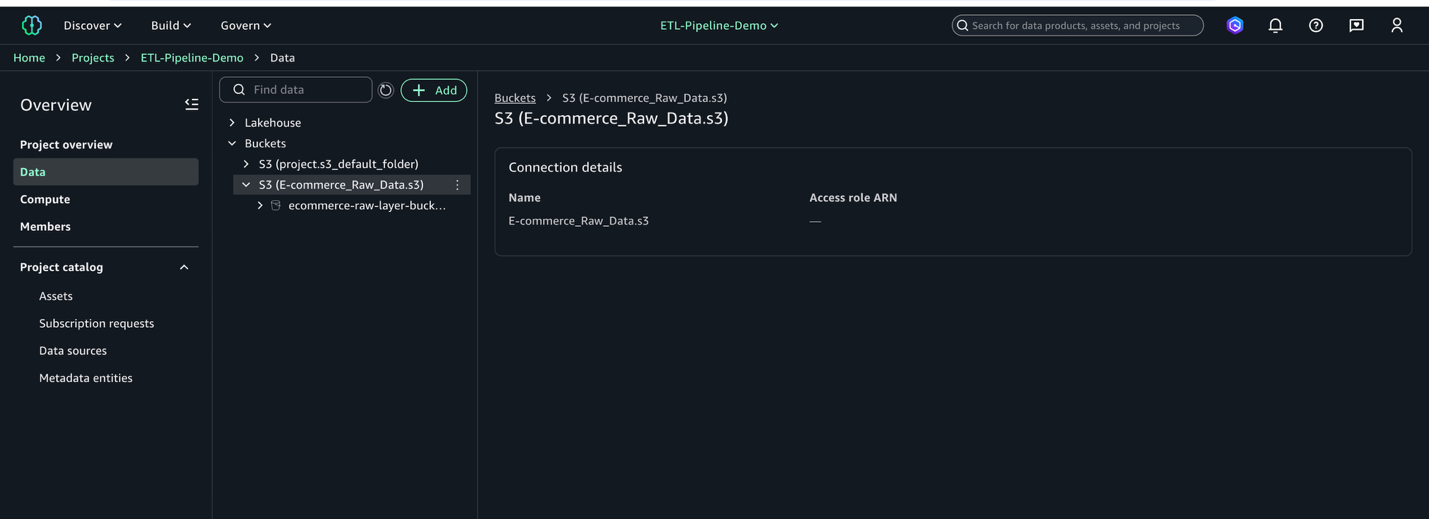
This process connects your S3 bucket to SageMaker Unified Studio, making your data ready for analysis.
Create notebook for job scripts
Before you can create the data processing jobs, you must set up a notebook to develop the scripts that will generate and process your data. Complete the following steps:
- In SageMaker Unified Studio, on the top menu, under Build, choose JupyterLab.
- Choose Configure Space and choose the instance type ml.t3.xlarge. This makes sure your JupyterLab instance has at least 4 vCPUs and 4 GiB of memory.
- Choose Configure and Start Space or Save and Restart to launch your environment.
- Wait a few moments for the instance to be ready.
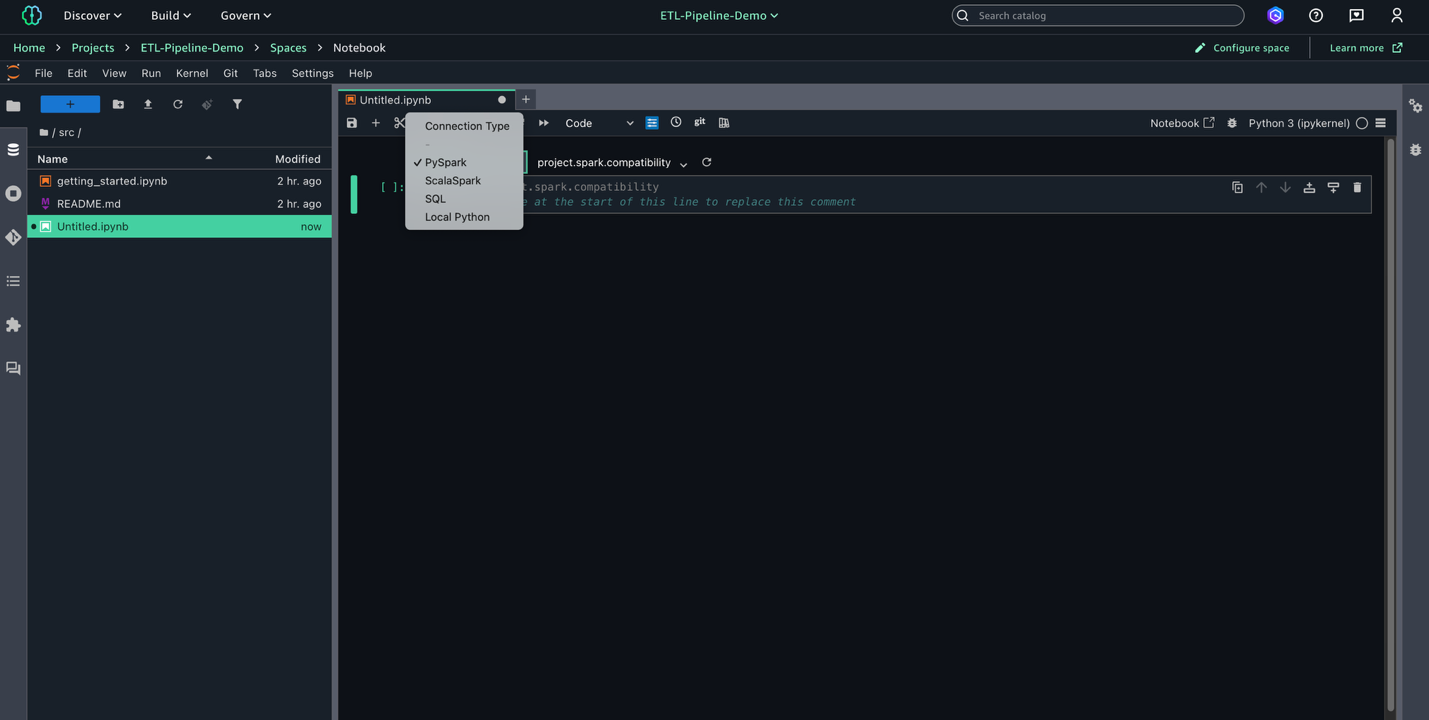
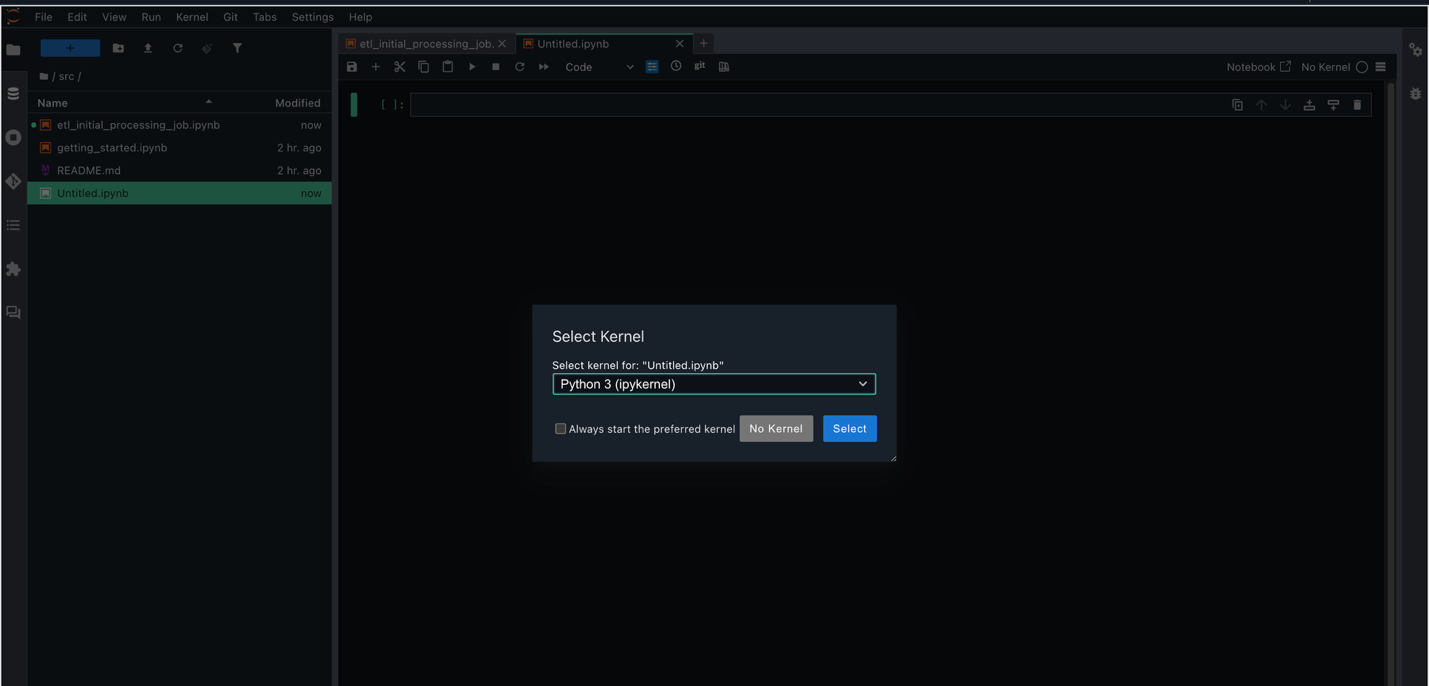
- Choose File, New, and Notebook to create a new notebook.
- Set Kernel as Python 3, Connection type as PySpark, and Compute as
Project.spark.compatibility.
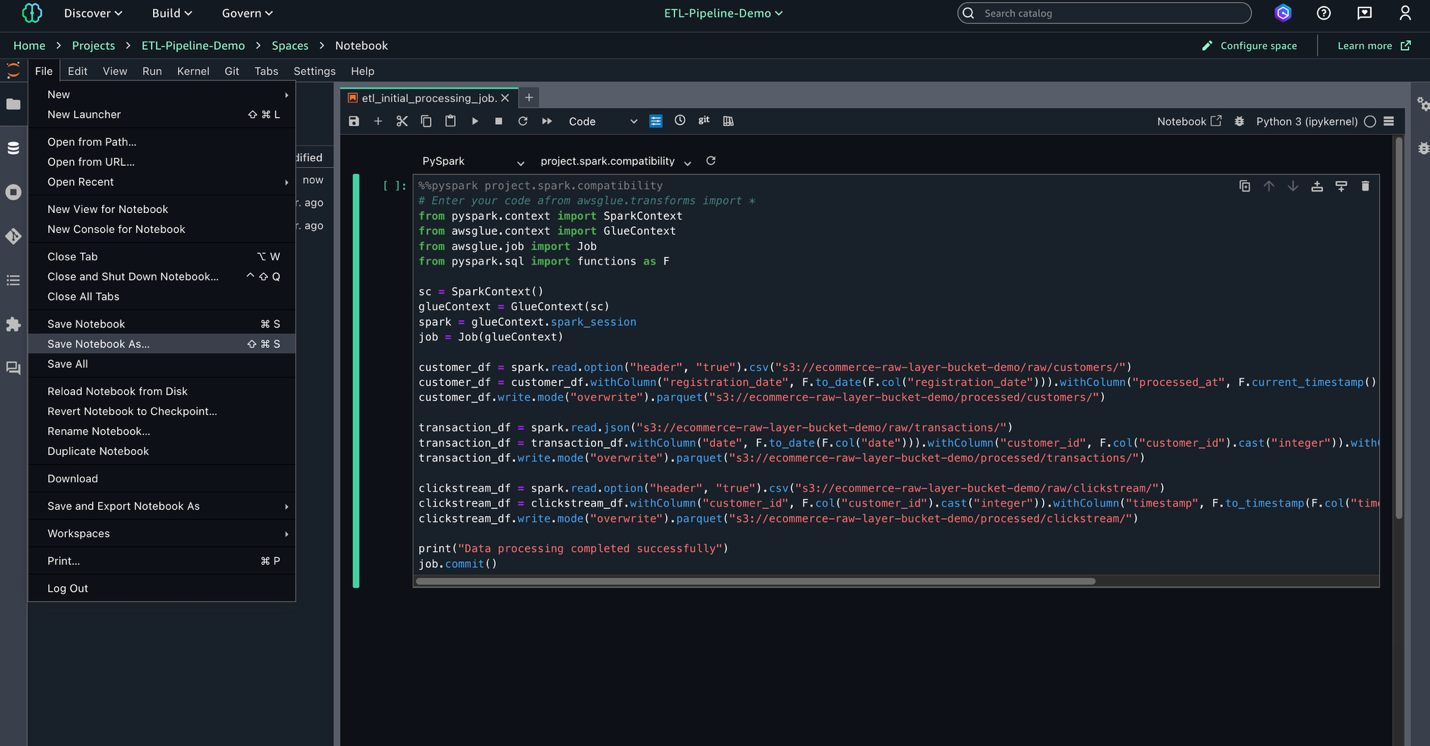
- In the notebook, enter the following script to use later for your AWS Glue job. This script processes raw data from three sources in the S3 data lake, standardizes dates, and converts data types before saving the cleaned data in Parquet format for optimal storage and querying.
- Replace
<Bucket-Name>with the name of actual S3 bucket in script:This script processes customer, transaction, and clickstream data from the raw layer in Amazon S3 and saves it as Parquet files in the processed layer.
- Choose File, Save Notebook As, and save the file as
shared/etl_initial_processing_job.ipynb.
Create notebook for AWS Glue Data Quality
After you create the initial data processing script, the next step is to set up a notebook to perform data quality checks using AWS Glue. These checks help validate the integrity and completeness of your data before further processing. Complete the following steps:
- Choose File, New, and Notebook to create a new notebook.
- Set Kernel as Python 3, Connection type as PySpark, and Compute as
Project.spark.compatibility.
- In this new notebook, add the data quality check script using the AWS Glue
EvaluateDataQualitymethod. Replace<Bucket-Name>with the name of actual S3 bucket in script: - Choose File, Save Notebook As, and save the file as
shared/etl_data_quality_job.ipynb.
Create and test AWS Glue jobs
Jobs in SageMaker Unified Studio enable scalable, flexible ETL pipelines using AWS Glue. This section walks through creating and testing data processing jobs for efficient and governed data transformation.
Create initial data processing job
This job performs the first processing job in the ETL pipeline, transforming raw customer, transaction, and clickstream data and writing the cleaned output to Amazon S3 in Parquet format. Complete the following steps to create the job:
- In SageMaker Unified Studio, go to your project.
- On the top menu, choose Build, and under Data Analysis & Integration, choose Data processing jobs.

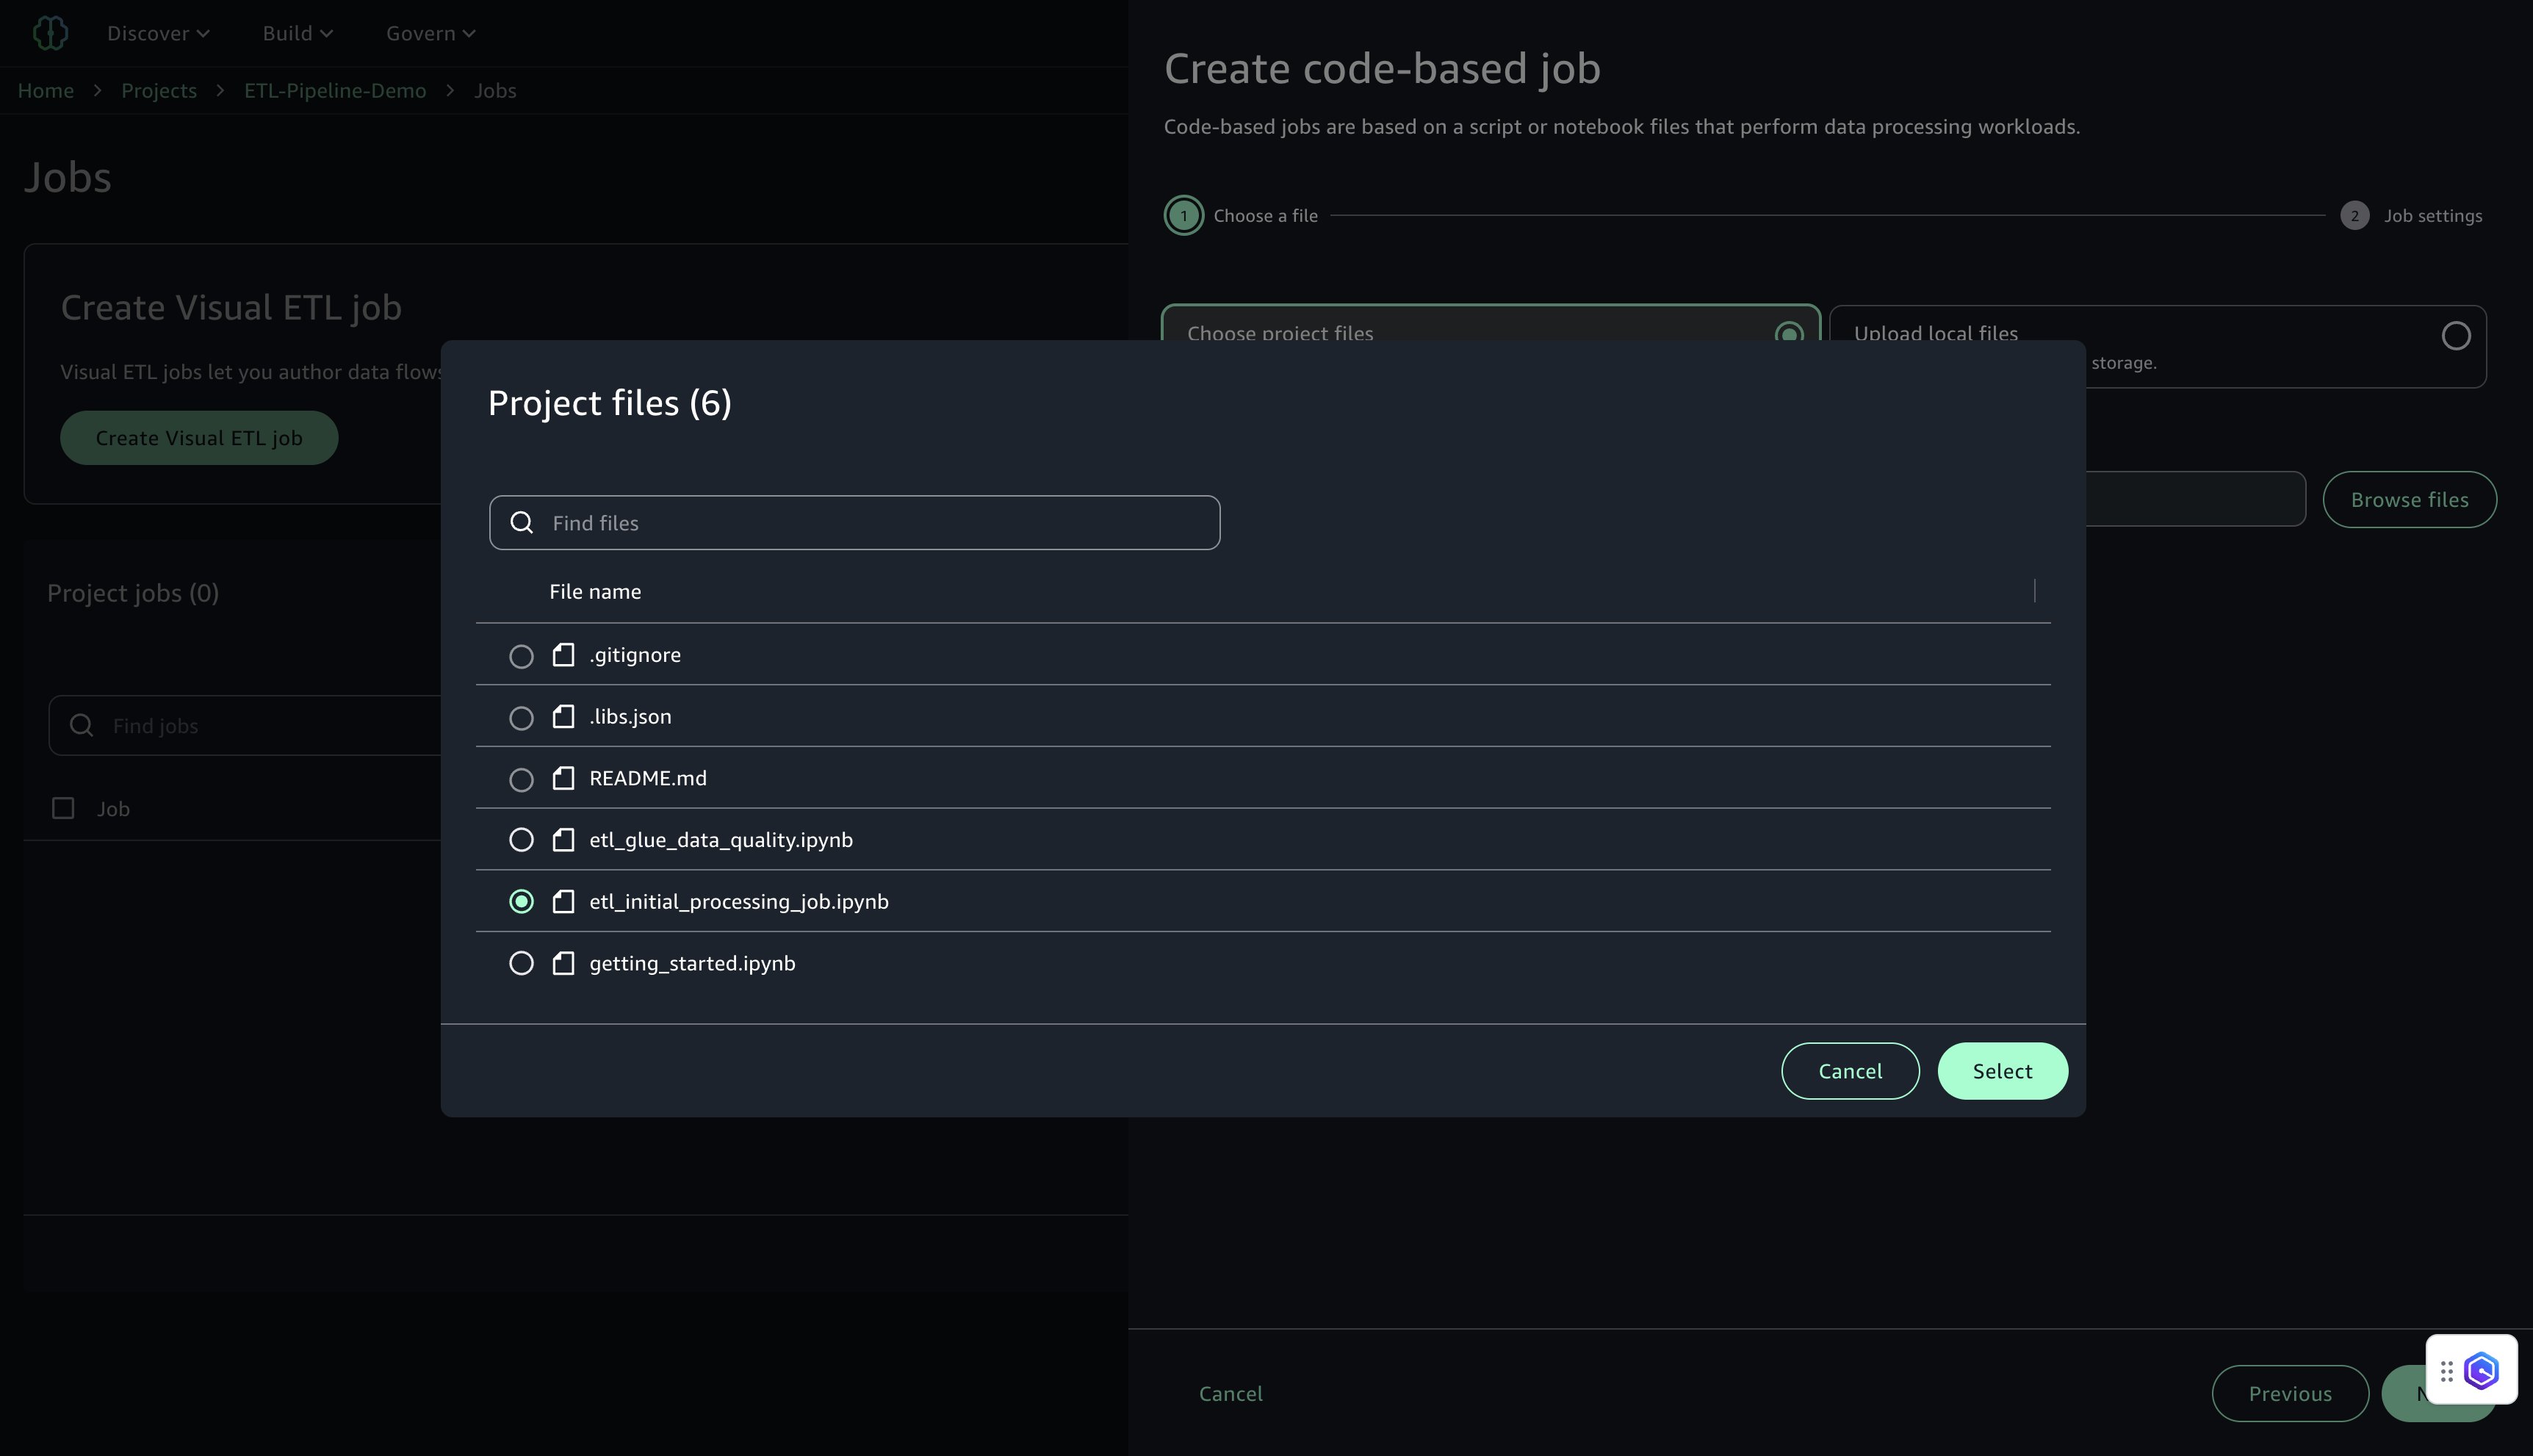
- Choose Create job from notebooks.
- Under Choose project files, choose Browse files.
- Locate and select
etl_initial_processing_job.ipynb(the notebook saved earlier in JupyterLab), then choose Select and Next.
- Configure the job settings:
- For Name, enter a name (for example,
job-1). - For Description, enter a description (for example,
Initial ETL job for customer data processing). - For IAM Role, choose the project role (default).
- For Type, choose Spark.
- For AWS Glue version, use version 5.0.
- For Language, choose Python.
- For Worker type, use G.1X.
- For Number of Instances, set to 10.
- For Number of retries, set to 0.
- For Job timeout, set to 480.
- For Compute connection, choose
project.spark.compatibility. - Under Advanced settings, turn on Continuous logging.
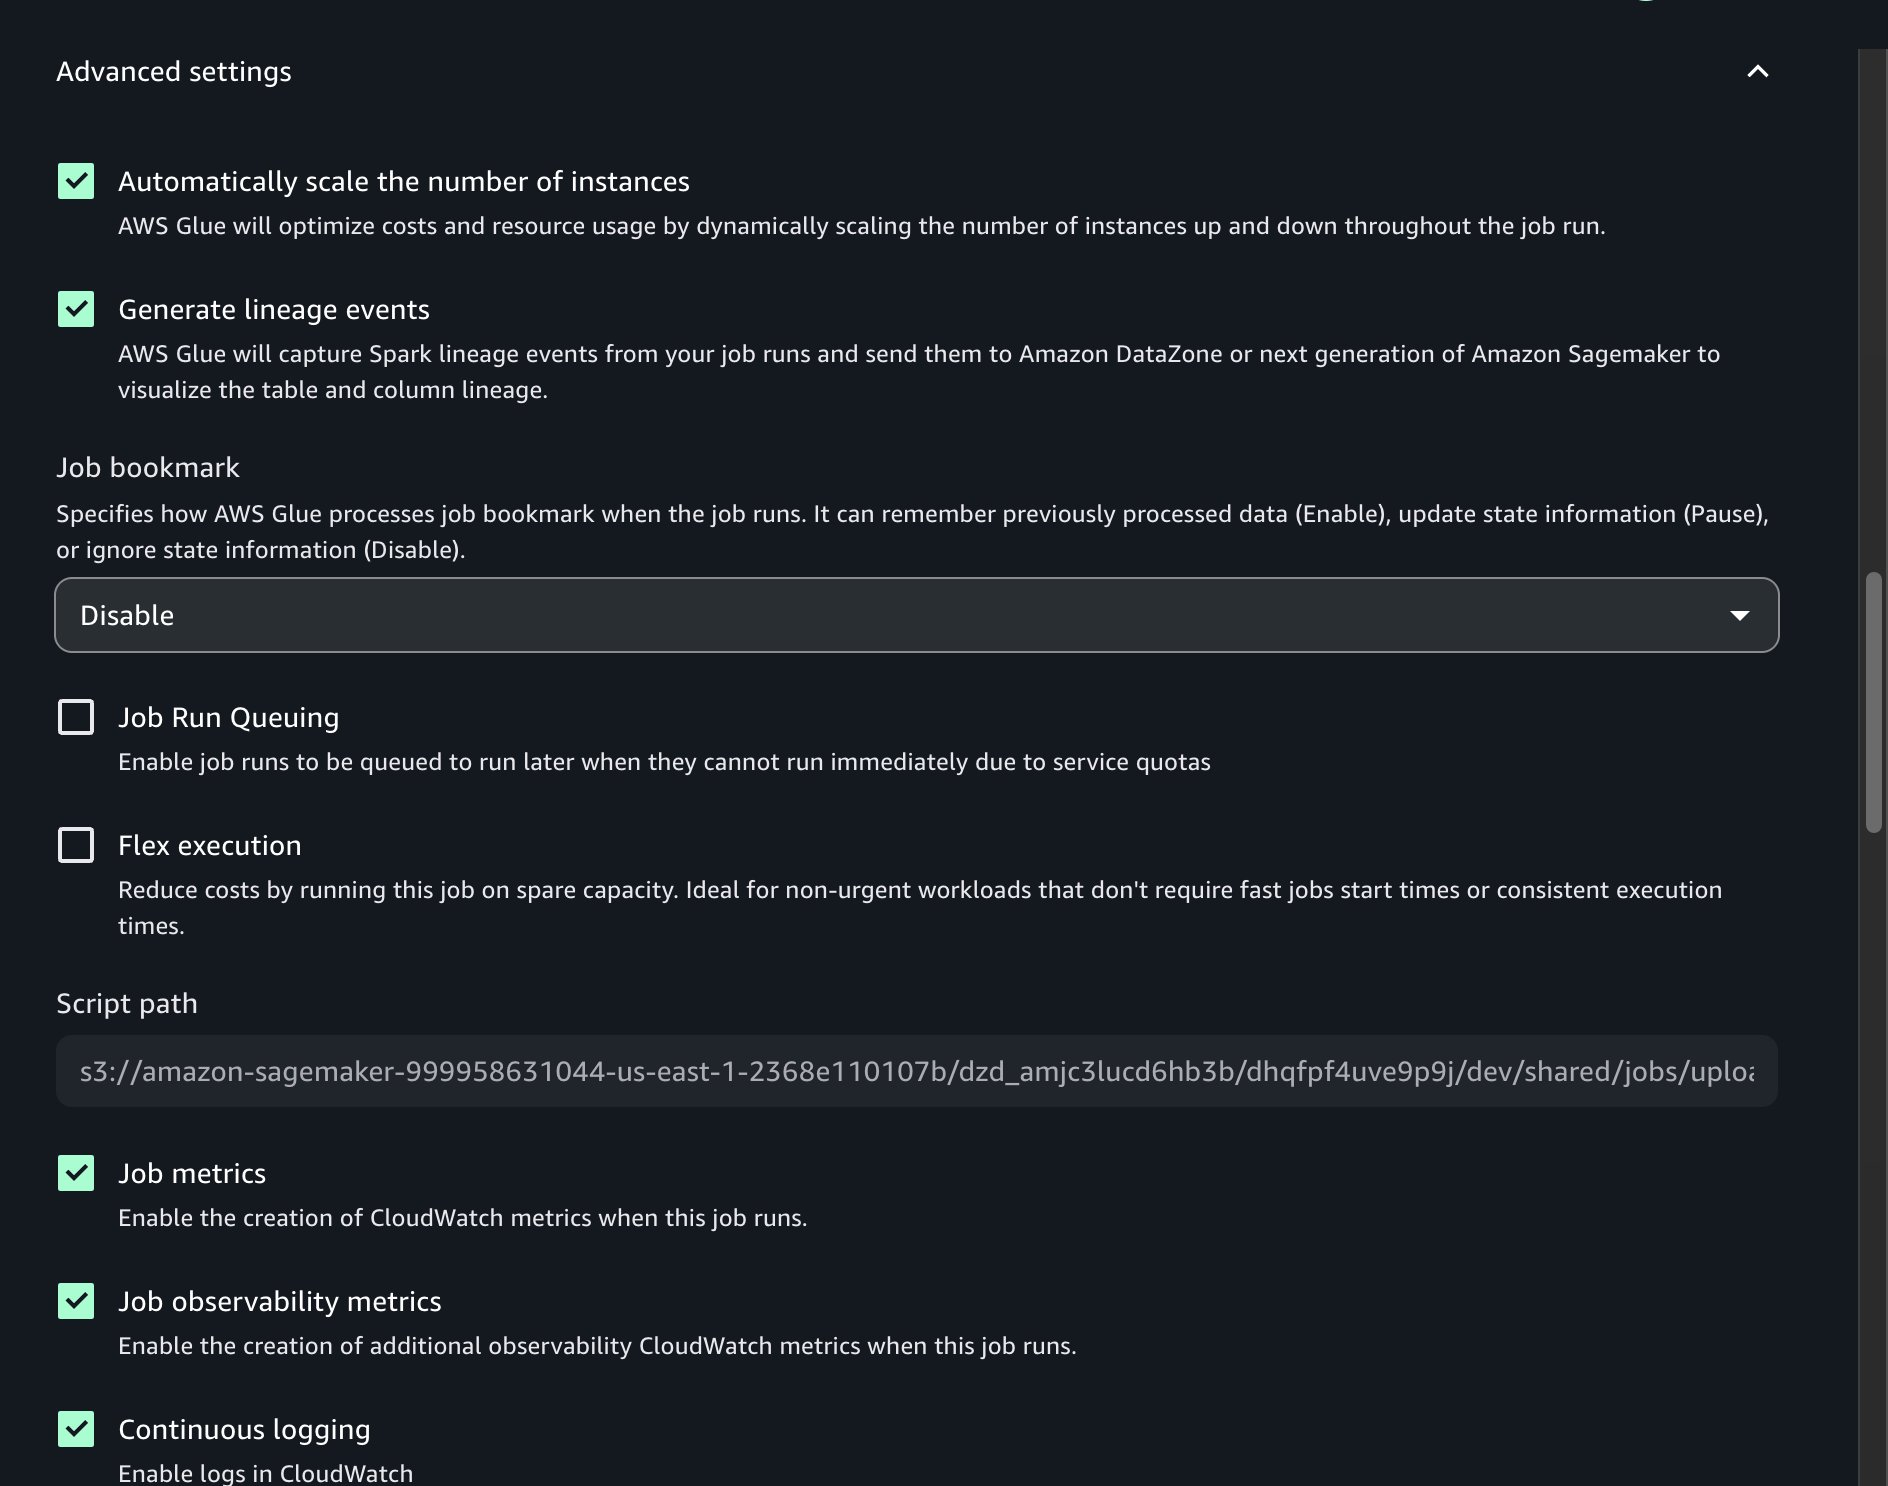
- For Name, enter a name (for example,
- Leave the remaining settings as default, then choose Submit.
After the job is created, a confirmation message will appear indicating that job-1 was created successfully.
Create AWS Glue Data Quality job
This job runs data quality checks on the transformed datasets using AWS Glue Data Quality. Rulesets validate completeness and uniqueness for key fields. Complete the following steps to create the job:
- In SageMaker Unified Studio, go to your project.
- On the top menu, choose Build, and under Data Analysis & Integration, choose Data processing jobs.
- Choose Create job, Code-based job, and Create job from files.
- Under Choose project files, choose Browse files.
- Locate and select
etl_glue_data_quality.ipynb, then choose Select and Next. - Configure the job settings:
- For Name, enter a name (for example,
job-2). - For Description, enter a description (for example,
Data quality checks using AWS Glue Data Quality). - For IAM Role, choose the project role.
- For Type, choose Spark.
- For AWS Glue version, use version 5.0.
- For Language, choose Python.
- For Worker type, use G.1X.
- For Number of Instances, set to 10.
- For Number of retries, set to 0.
- For Job timeout, set to 480.
- For Compute connection, choose
project.spark.compatibility. - Under Advanced settings, turn on Continuous logging.
- Leave the remaining settings as default, then choose Submit.
After the job is created, a confirmation message will appear indicating that job-2 was created successfully.
Test AWS Glue jobs
Test both jobs to make sure they execute successfully:
- In SageMaker Unified Studio, go to your project.
- On the top menu, choose Build, and under Data Analysis & Integration, choose Data processing jobs.
- Select
job-1and choose Run job. - Monitor the job execution and verify it completes successfully.
- Similarly, select
job-2and choose Run job. - Monitor the job execution and verify it completes successfully.
Add EMR Serverless compute
In the ETL pipeline, we use EMR Serverless to perform compute-intensive transformations and aggregations on large datasets. It automatically scales resources based on workload, offering high performance with simplified operations. By integrating EMR Serverless with SageMaker Unified Studio, you can simplify the process of running Spark jobs interactively using Jupyter notebooks in a serverless environment.
This section walks through the steps to configure EMR Serverless compute within SageMaker Studio and use it for executing distributed data processing jobs.
Configure EMR Serverless in SageMaker Unified Studio
To use EMR Serverless for processing in the project, follow these steps:
- In the navigation pane on Project Overview, choose Compute.
- On the Data processing tab, choose Add compute and Create new compute resources.
- Select EMR Serverless and choose Next.
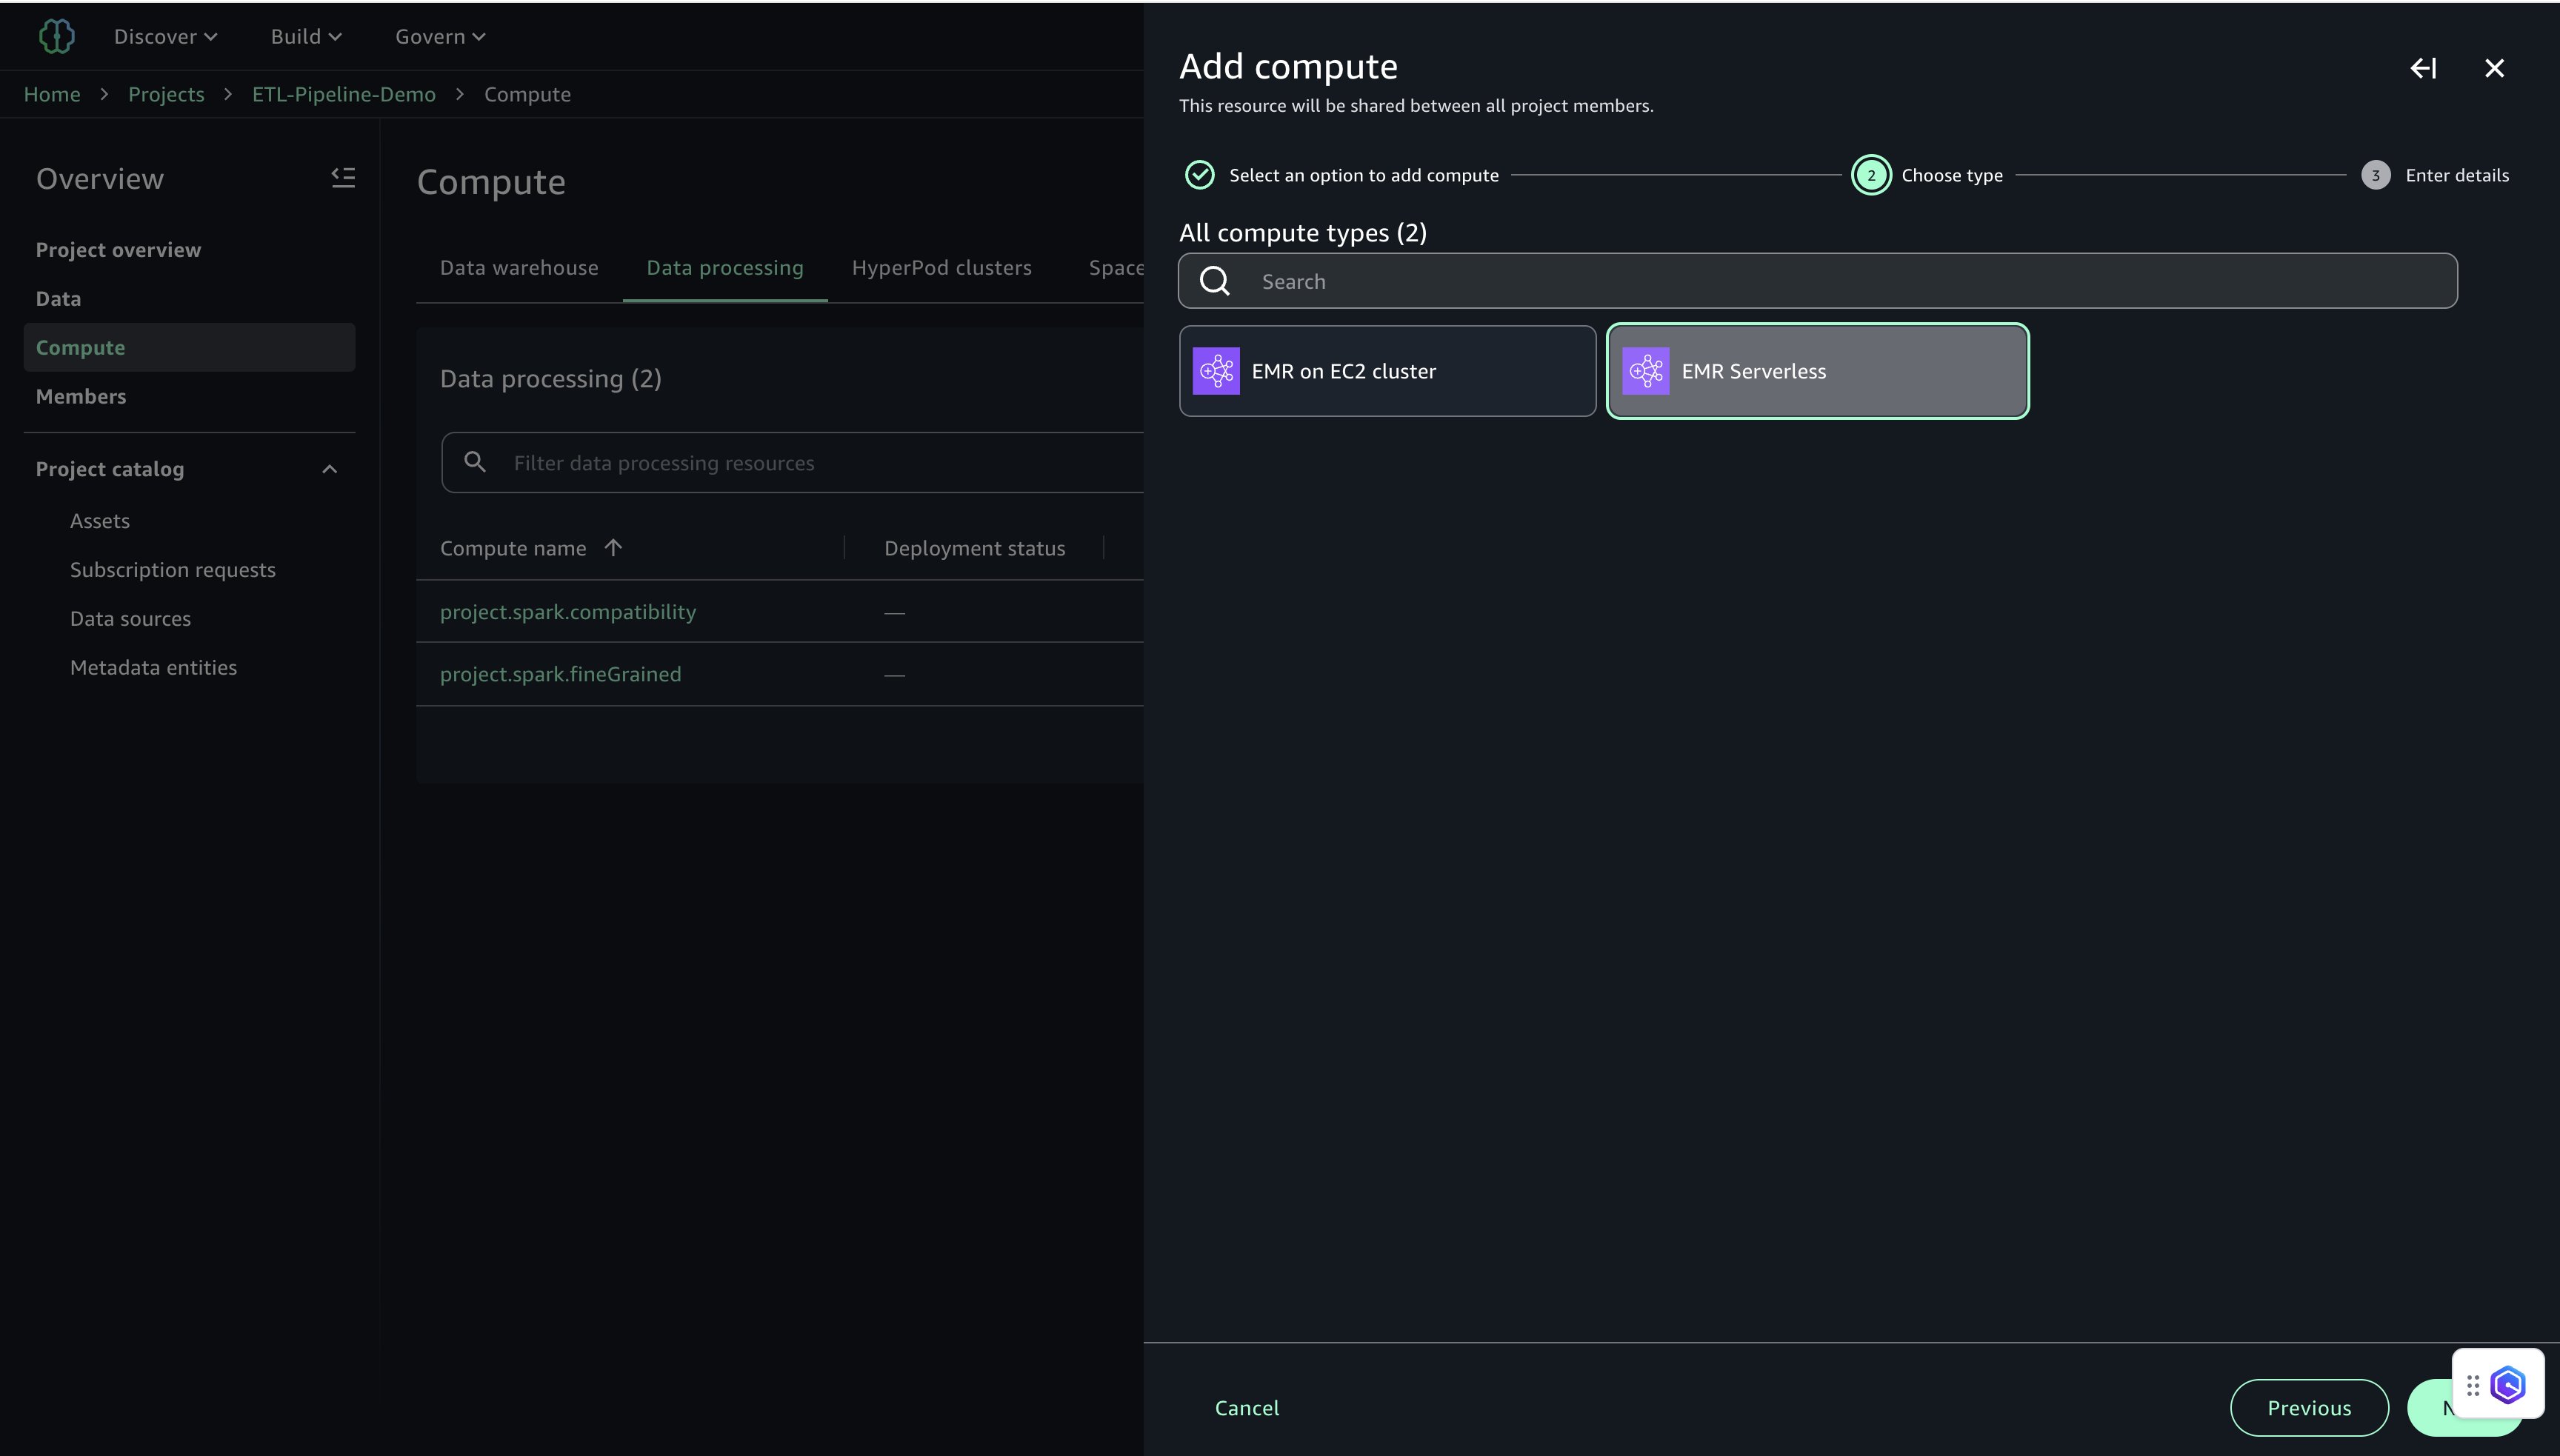
- Configure EMR Serverless settings:
- For Compute name, enter a name (for example,
etl-emr-serverless). - For Description, enter a description (for example,
EMR Serverless for advanced data processing). - For Release label, choose emr-7.8.0.
- For Permission mode, choose Compatibility.
- Choose Add Compute to complete the setup.
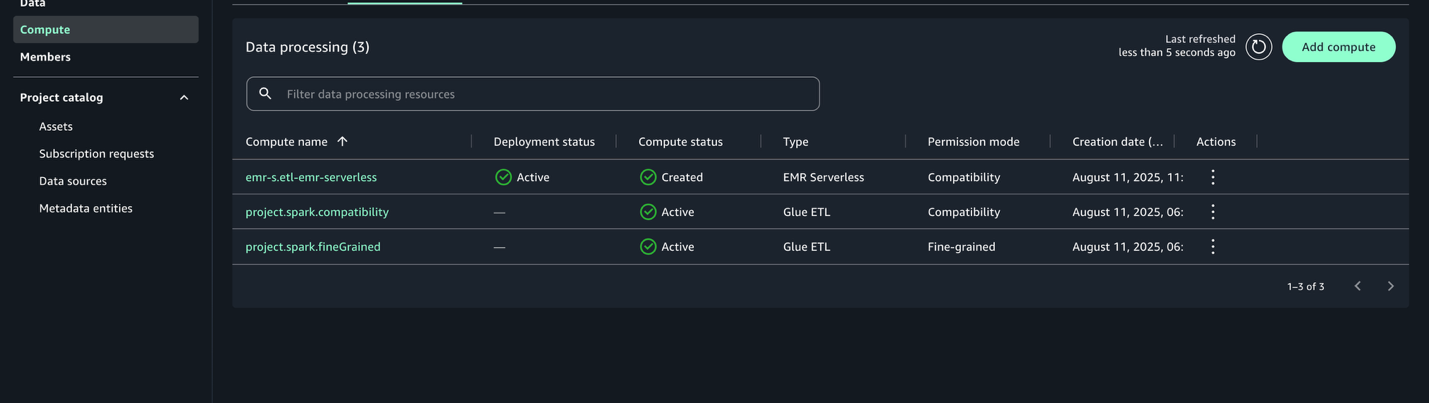
After it’s configured, the EMR Serverless compute will be listed with the deployment status Active.
Create and run notebook with EMR Serverless
After you create the EMR Serverless compute, you can run PySpark-based data transformation jobs using a Jupyter notebook to perform large-scale data transformations. This job reads cleaned customer, transaction, and clickstream datasets from Amazon S3, performs aggregations and scoring, and writes the final analytics outputs back to Amazon S3 in both Parquet and CSV formats.Complete the following steps to create a notebook for EMR Serverless processing:
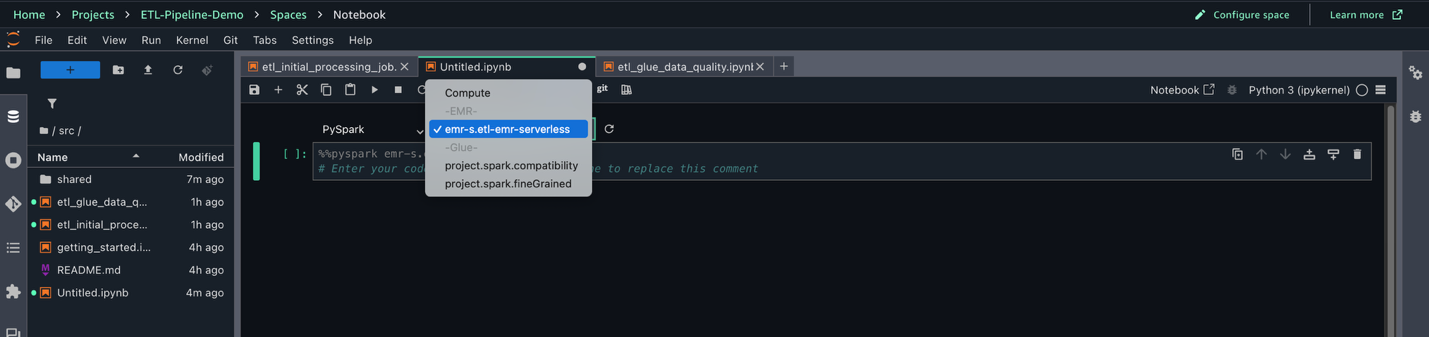
- On the top menu, under Build, choose JupyterLab.
- Choose File, New, and Notebook.
- Set Kernel as Python 3, Connection type as PySpark, and Compute as
emr-s.etl-emr-serverless.
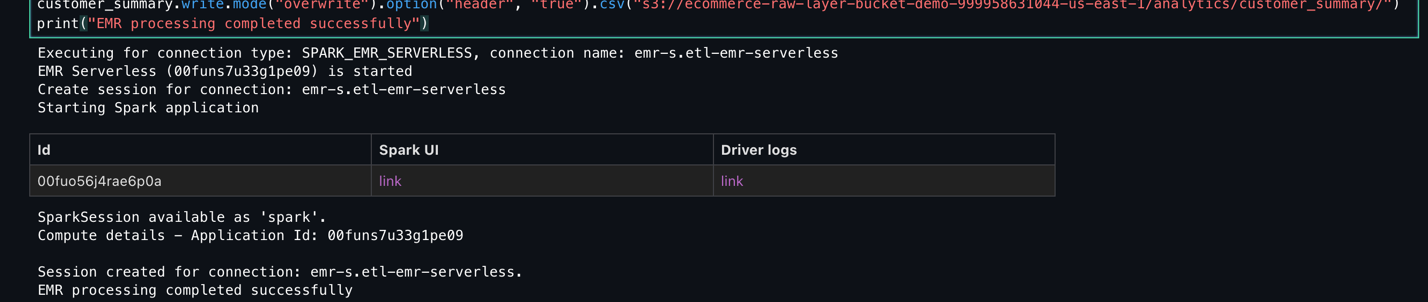
- Enter the following PySpark script to run your data transformation job on EMR Serverless. Provide the name of your S3 bucket:
- Choose File, Save Notebook As, and save the file as
shared/emr_data_transformation_job.ipynb. - Choose Run Cell to run the script.
- Monitor the Script execution and verify it completes successfully.
- Monitor the Spark job execution and ensure it completes without errors.
Add Redshift Serverless compute
With Redshift Serverless, users can run and scale data warehouse workloads without managing infrastructure. It is ideal for analytics use cases where data needs to be queried from Amazon S3 or integrated into a centralized warehouse. In this step, you add Redshift Serverless to the project for loading and querying processed customer analytics data generated in earlier stages of the pipeline. For more information about Redshift Serverless, see Amazon Redshift Serverless.
Set up Redshift Serverless compute in SageMaker Unified Studio
Complete the following steps to set up Redshift Serverless compute:
- In SageMaker Unified Studio, choose the Compute tab within your project workspace (
ETL-Pipeline-Demo). - On the SQL analytics tab, choose Add compute, then choose Create new compute resources to begin configuring your compute environment.
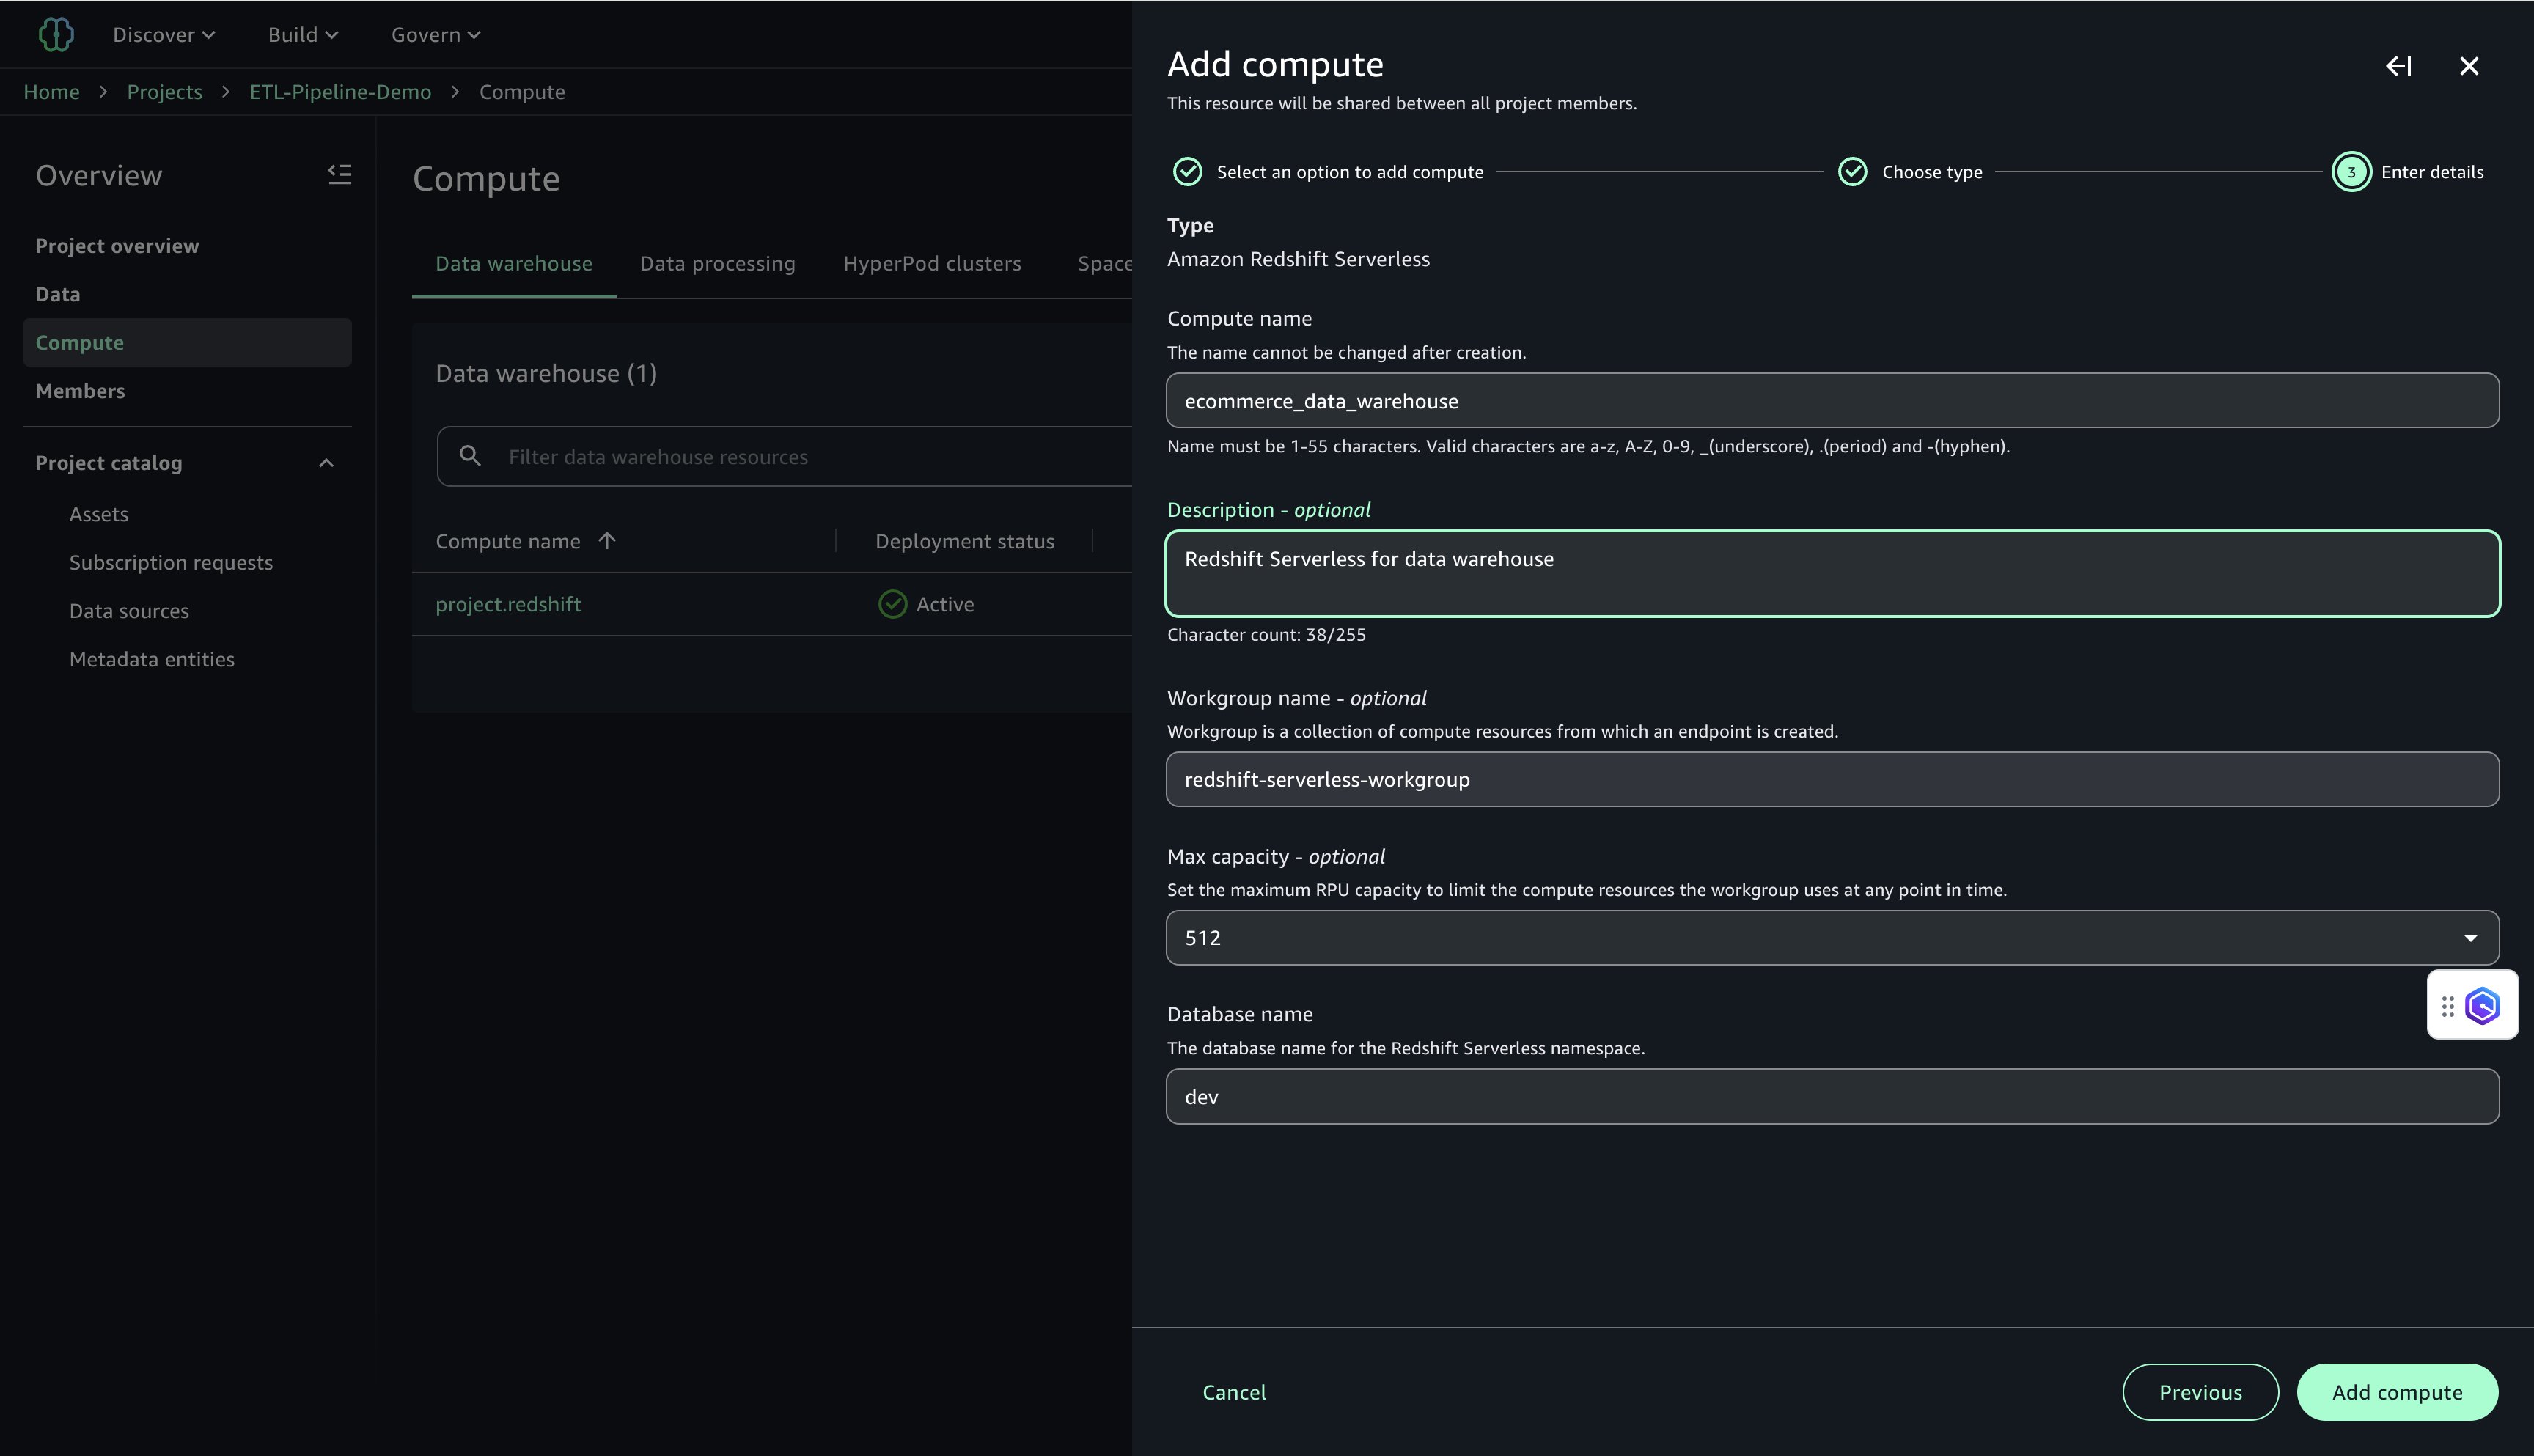
- Select Amazon Redshift Serverless.
- Configure the following:
- For Compute name, enter a name (for example,
ecommerce_data_warehouse). - For Description, enter a description (for example,
Redshift Serverless for data warehouse). - For Workgroup name, enter a name (for example,
redshift-serverless-workgroup). - For Maximum capacity, set to 512 RPUs.
- For Database name, enter
dev.
- For Compute name, enter a name (for example,
- Choose Add Compute to create the Redshift Serverless resource.
After the compute is created, you can test the Amazon Redshift connection.
- On the Data warehouse tab, confirm that
redshift.ecommerce_data_warehouseis listed.
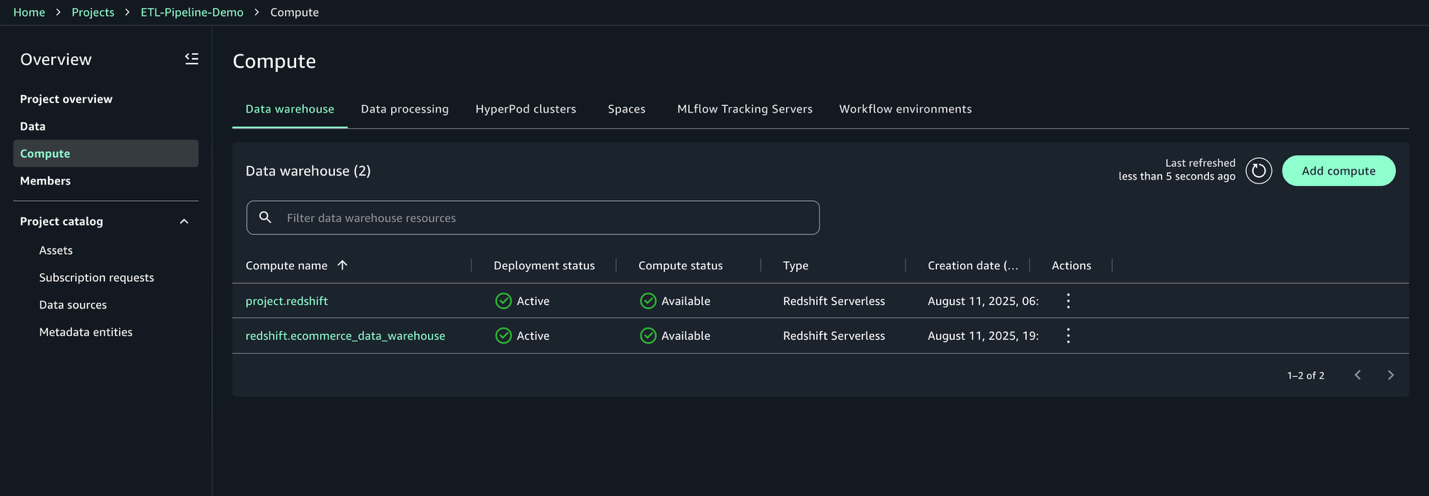
- Choose the compute:
redshift.ecommerce_data_warehouse. - On the Permissions tab, copy the IAM role ARN. You use this for the Redshift COPY command in the next step.

Create and execute querybook to load data into Amazon Redshift
In this step, you create a SQL script to load the processed customer summary data from Amazon S3 into a Redshift table. This enables centralized analytics for customer segmentation, lifetime value calculations, and marketing campaigns. Complete the following steps:
- On the Build menu, under Data Analysis & Integration, choose Query editor.
- Enter the following SQL into the querybook to create the
customer_summarytable in the public schema: - Choose Add SQL to add a new SQL script.
- Enter the following SQL into the querybook
Note: We truncate the
customer_summarytable to remove existing records and ensure a clean, duplicate-free reload of the latest aggregated data from S3 before running the COPY command. - Choose Add SQL to add a new SQL script.
- Enter the following SQL to load the data into Redshift Serverless from your S3 bucket. Provide the name of your S3 bucket and IAM role ARN for Amazon Redshift:
- In the Query Editor, configure the following:
- Connection:
redshift.ecommerce_data_warehouse - Database:
dev - Schema:
public
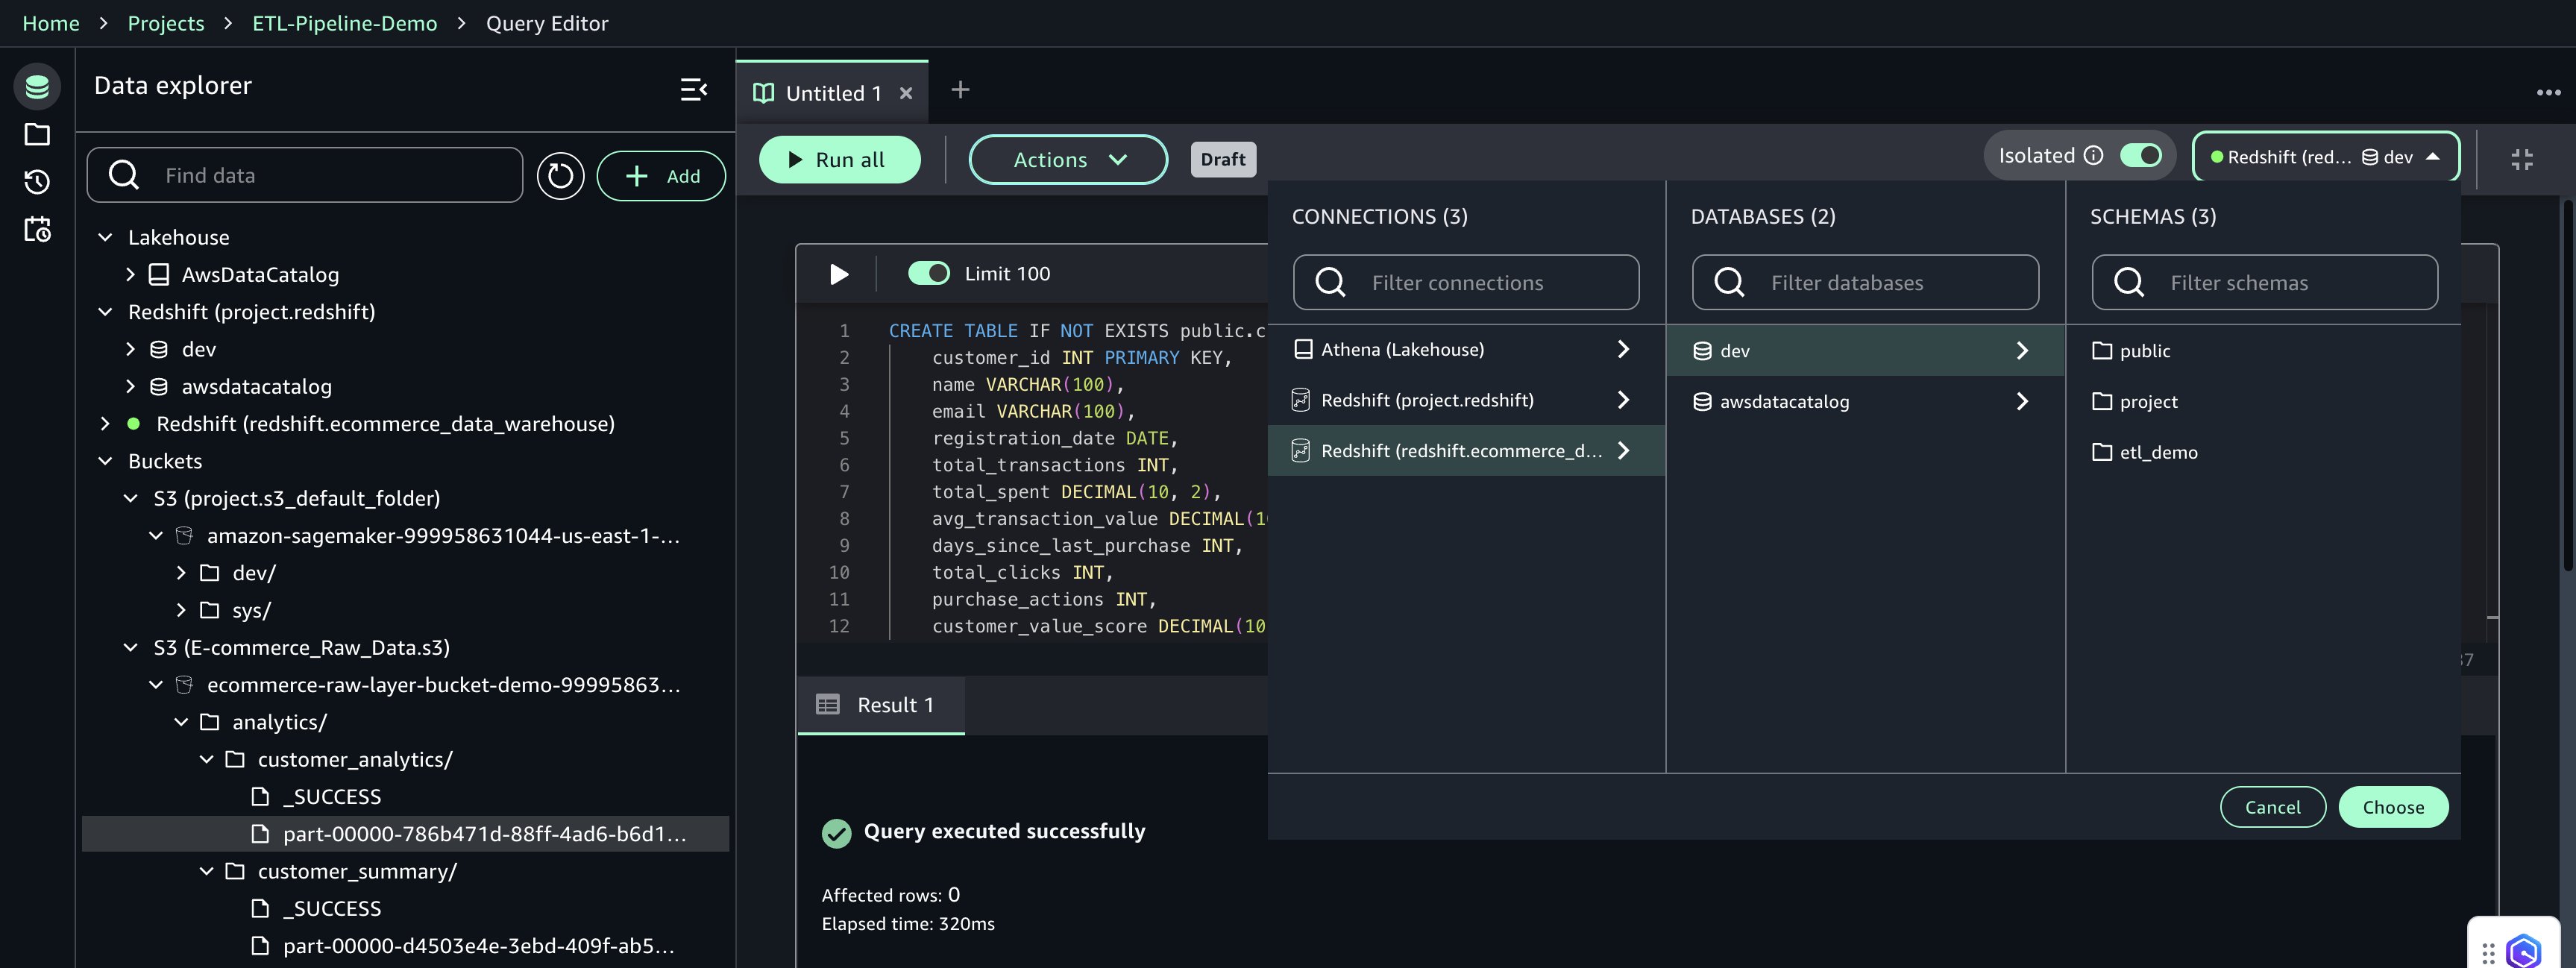
- Connection:
- Choose Choose to apply the connection settings.
- Choose Run Cell for each cell to create the
customer_summarytable in the public schema and then load data from Amazon S3. - Choose Actions, Save, name the querybook
final_data_product, and choose Save changes.
This completes the creation and execution of the Redshift data product using the querybook.
Create and manage the workflow environment
This section describes how to create a shared workflow environment and define a code-based workflow that automates a customer data pipeline using Apache Airflow within SageMaker Unified Studio. Shared environments facilitate collaboration among project members and centralized workflow management.
Create the workflow environment
Workflow environments must be created by project owners. After they’re created, members of the project can sync and use the workflows. Only project owners can update or delete workflow environments. Complete the following steps to create the workflow environment:
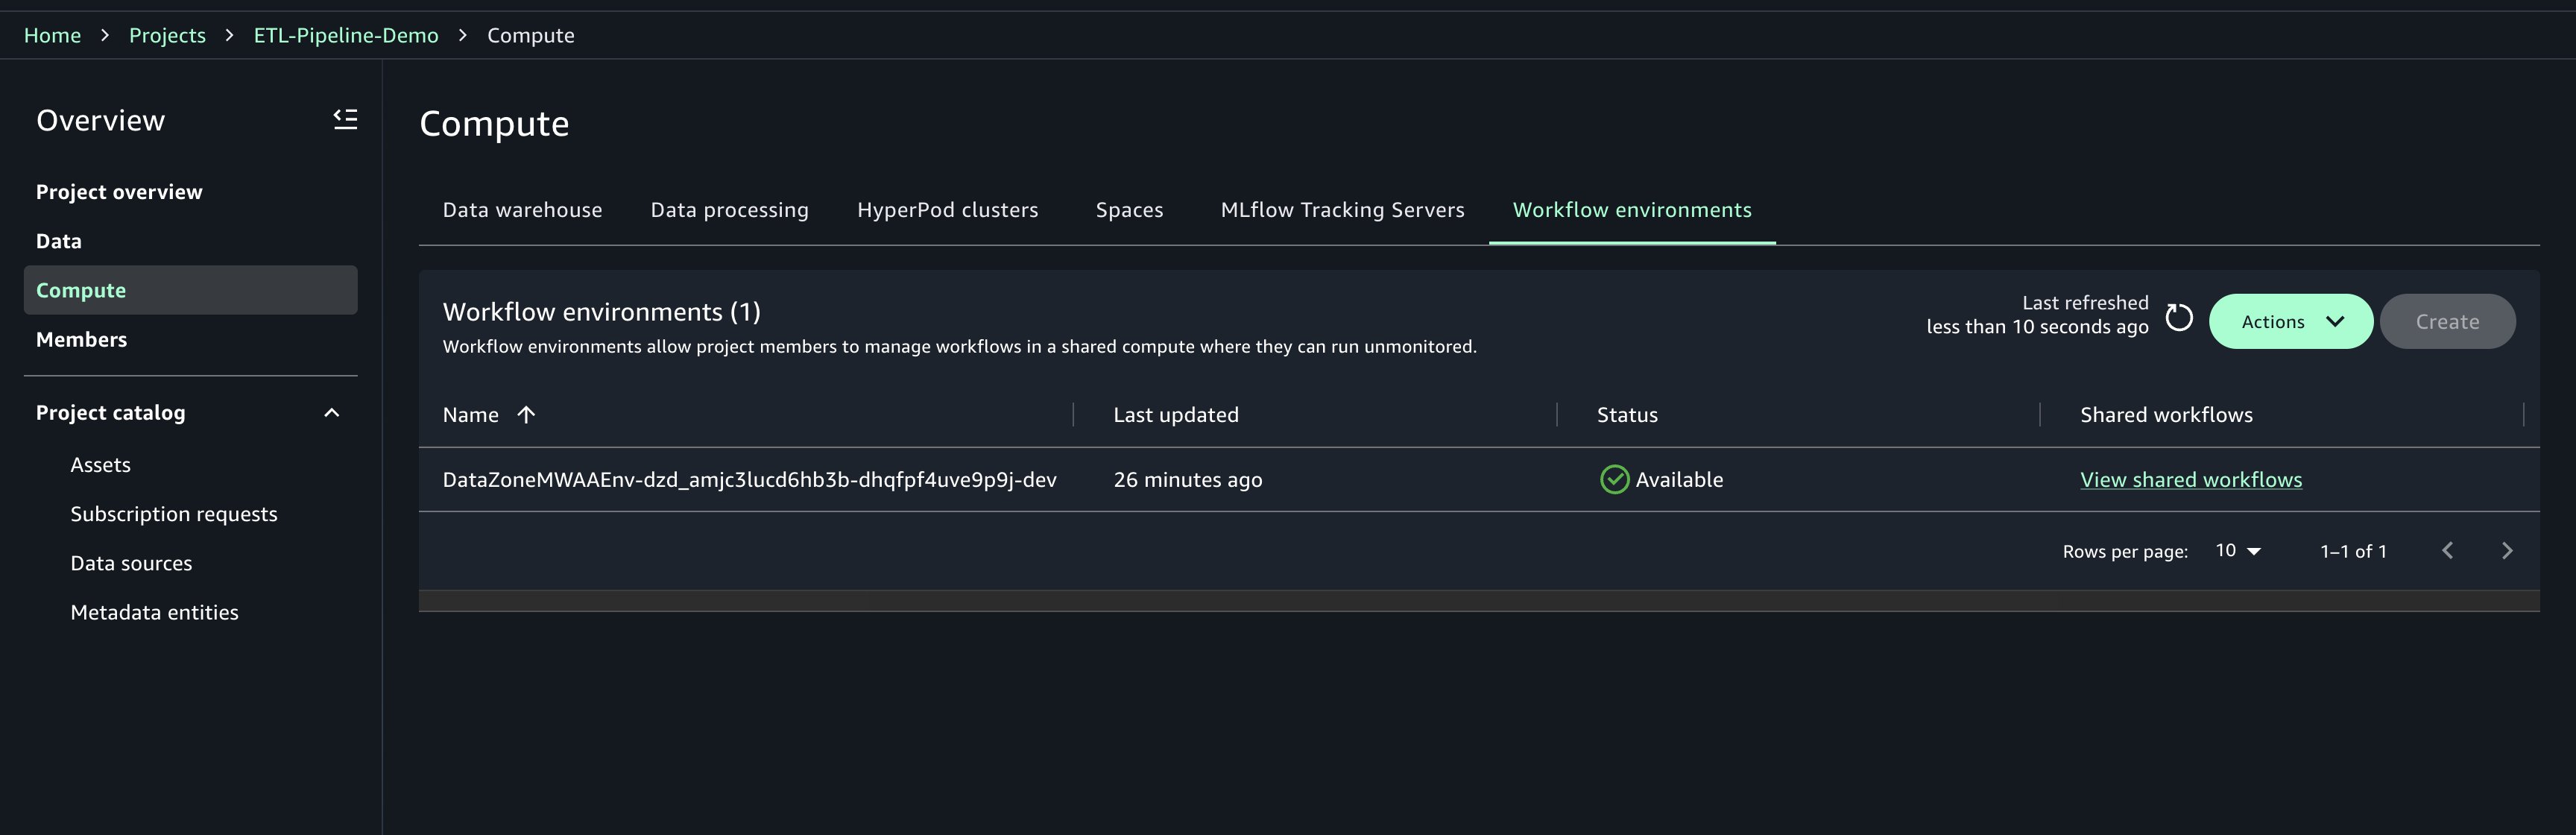
- Choose Compute for your project.
- On the Workflow environments tab, choose Create.
- Review the configuration parameters and choose Create workflow environment.
- Wait for the environment to be fully provisioned before proceeding It will take around 20 minutes to provision.
Create the code-based workflow
When the workflow environment is ready, define a code-based ETL pipeline using Airflow. This pipeline automates daily processing tasks across services like AWS Glue, EMR Serverless, and Redshift Serverless.
- On the Build menu, under Orchestration, choose Workflows.
- Choose Create new workflow, then choose Create workflow in code editor.
- Configure Space and choose the instance type ml.t3.xlarge. This ensures your JupyterLab instance has at least 4 vCPUs and 4 GiB of memory.
- Choose Configure and Restart Space to launch your environment.

The following script defines a daily scheduled ETL workflow that automates several actions:
- Initial data transformation using AWS Glue
- Data quality validation using AWS Glue (EvaluateDataQuality)
- Advanced data processing with EMR Serverless using a Jupyter notebook
- Loading transformed results into Redshift Serverless from a querybook
- Replace the default DAG template with the following definition, ensuring that job names and input paths match the actual names used in your project:
- Choose File, Save python file, name the file
shared/workflows/dags/customer_etl_pipeline.py, and choose Save.
Deploy and run the workflow
Complete the following steps to run the workflow:
- On the Build menu, choose Workflows.
- Choose the workflow
customer_etl_pipelineand choose Run.
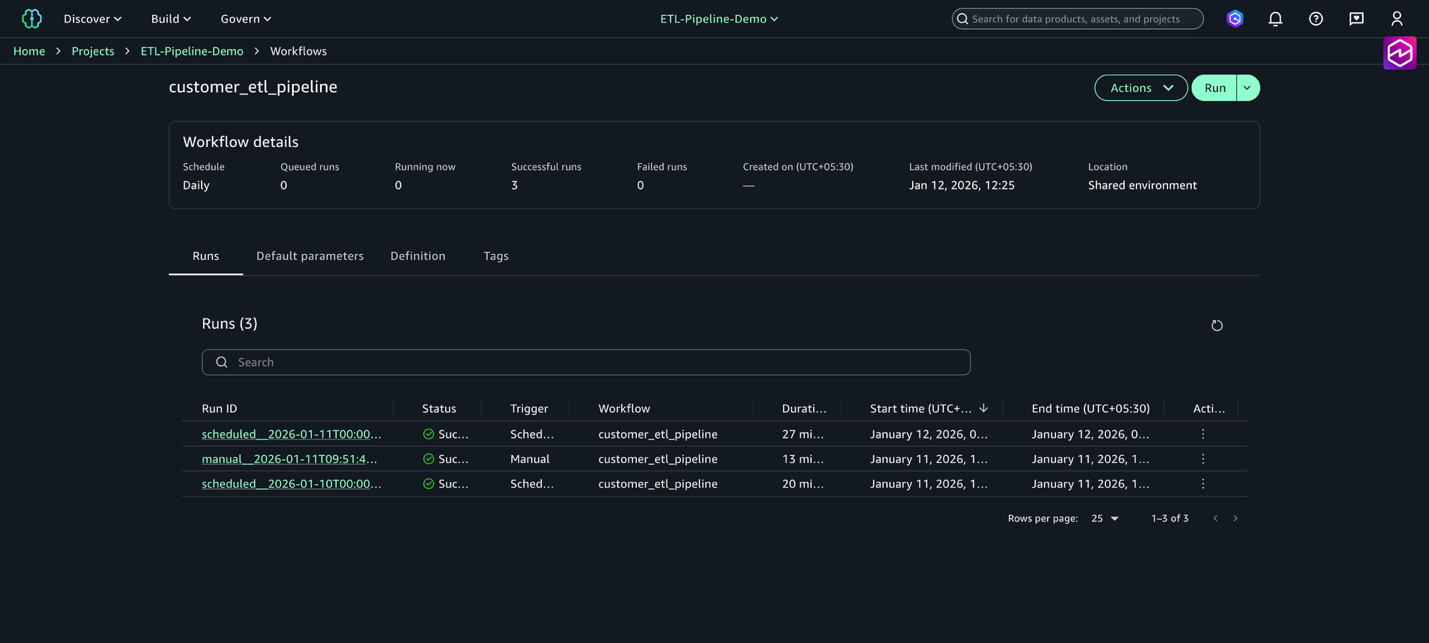
Running a workflow puts tasks together to orchestrate Amazon SageMaker Unified Studio artifacts. You can view multiple runs for a workflow by navigating to the Workflows page and choosing the name of a workflow from the workflows list table.
To share your workflows with other project members in a workflow environment, refer to Share a code workflow with other project members in an Amazon SageMaker Unified Studio workflow environment.
Monitor and troubleshoot the workflow
After your Airflow workflows are deployed in SageMaker Unified Studio, monitoring becomes essential for maintaining reliable ETL operations. The integrated Amazon MWAA environment provides comprehensive observability into your data pipelines through the familiar Airflow web interface, enhanced with AWS monitoring capabilities. The Amazon MWAA integration with SageMaker Unified Studio offers real-time DAG execution tracking, detailed task logs, and performance metrics to help you quickly identify and resolve pipeline issues. Complete the following steps to monitor the workflow:
- On the Build menu, choose Workflows.
- Choose the workflow
customer_etl_pipeline. - Choose View runs to see all executions.
- Choose a specific run to view detailed task status.
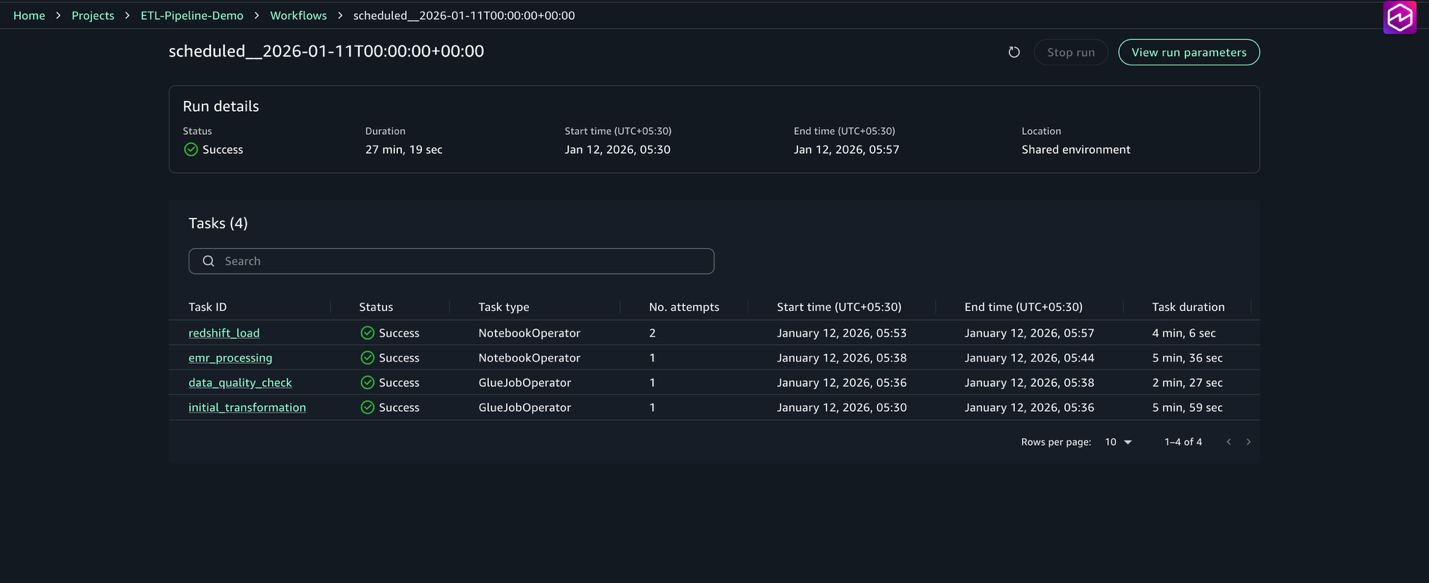
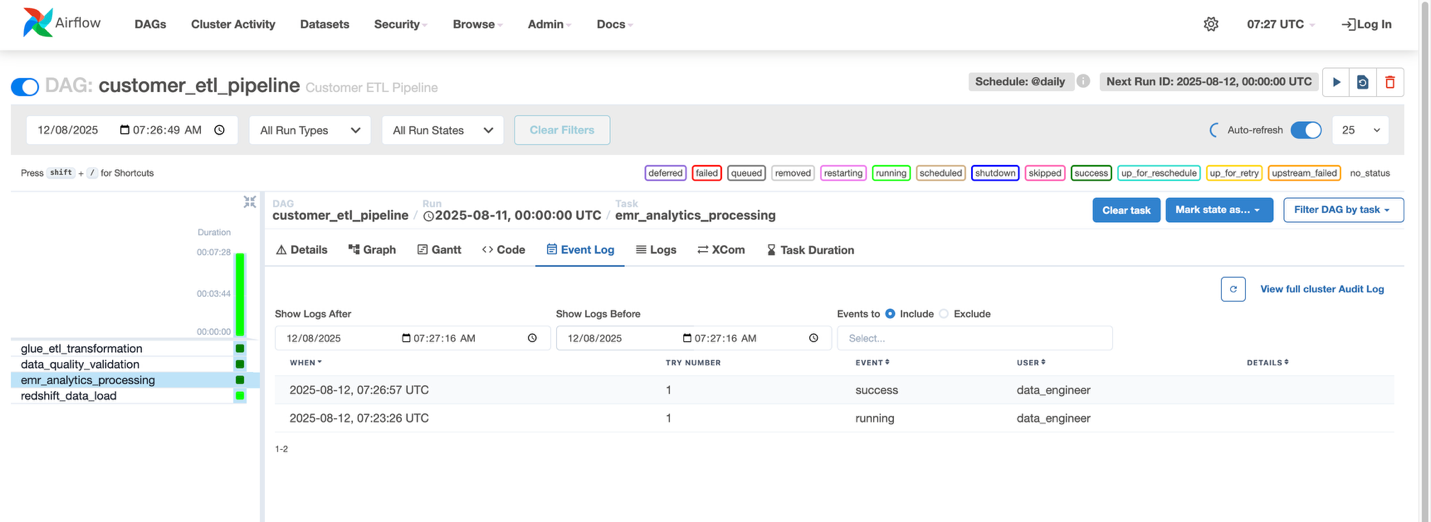
For each task, you can view the status (Succeeded, Failed, Running), start and end times, duration, and logs and outputs. The workflow is also visible in the Airflow UI, accessible through the workflow environment, where you can view the DAG graph, monitor task execution in real time, access detailed logs, and view the status.
- Go to Workflows and select the workflow named customer_etl_pipeline.
- From the Actions menu, choose Open in Airflow UI.
After the workflow completes successfully, you can query the data product in the query editor.
- On the Build menu, under Data Analysis & Integration, choose Query editor.
- Run
select * from "dev"."public"."customer_summary"
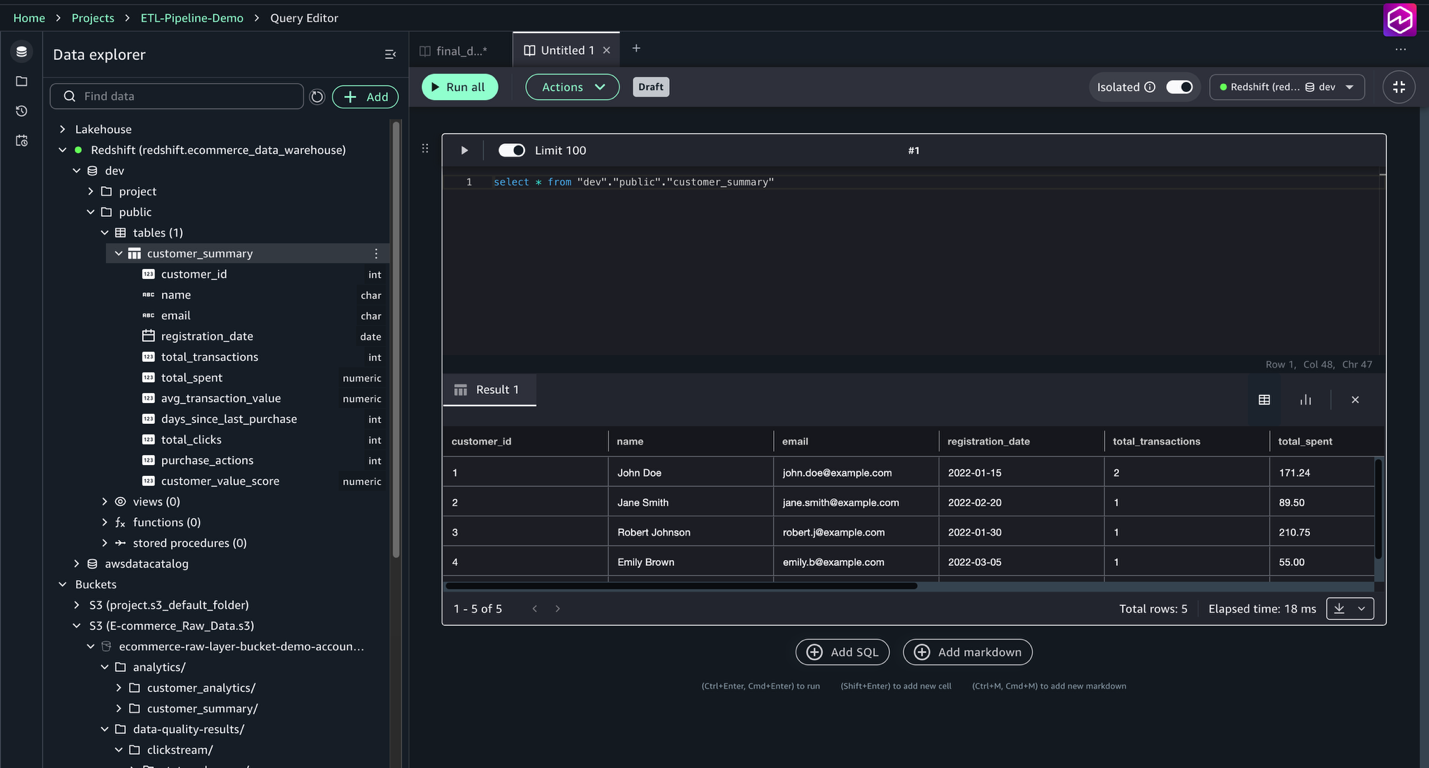
Observe the contents of the customer_summary table, including aggregated customer metrics such as total transactions, total spent, average transaction value, clicks, and customer value scores. This allows verification that the ETL and data quality pipelines loaded and transformed the data correctly.
Clean up
To avoid unnecessary charges, complete the following steps:
- Delete a workflow environment.
- If you no longer need it, delete the project.
- After you delete the project, delete the domain.
Conclusion
This post demonstrated how to build an end-to-end ETL pipeline using SageMaker Unified Studio workflows. We explored the complete development lifecycle, from setting up fundamental AWS infrastructure—including Amazon S3 CORS configuration and IAM permissions—to implementing sophisticated data processing workflows. The solution incorporates AWS Glue for initial data transformation and quality checks, EMR Serverless for advanced processing, and Redshift Serverless for data warehousing, all orchestrated through Airflow DAGs. This approach offers several key benefits: a unified interface that consolidates necessary tools, Python-based workflow flexibility, seamless AWS service integration, collaborative development through Git version control, cost-effective scaling through serverless computing, and comprehensive monitoring tools—all working together to create an efficient and maintainable data pipeline solution.
By using SageMaker Unified Studio workflows, you can accelerate your data pipeline development while maintaining enterprise-grade reliability and scalability. For more information about SageMaker Unified Studio and its capabilities, refer to the Amazon SageMaker Unified Studio documentation.