AWS Contact Center
Assist agents and enrich system metrics with Amazon Connect
Agents are a core part of a contact centre. At peak times, they manage long queues and look through multiple systems for the information requested by their customers. During a call, agents may need to reconfirm information with the customer that they already gave in the Interactive Voice Response (IVR) system. This may include the reason for their call and their authentication information. For some inquiries, agents could be required to follow a certain process or say specific language. The agent may need to look up this information, taking additional time. At the end of calls, agents may be required to categorise each call. In busy periods, this is an additional task to complete before assisting the next customer. We know that agent time is valuable, so how can we assist agents to deliver better customer service?
We created a custom agent Contact Control Panel (CCP) page, with features to support agents and help them find information. The CCP page displays key attributes collected in the IVR, prompts agent actions through an agent checklist, automates call tagging, and provides a view of contact centre statistics.
This blog post demonstrates how to deploy a custom CCP page in React with the features described earlier. We illustrate the features of the custom CCP Page in the context of a contact centre that enables callers to book a hotel stay. The code provided is general and can be adapted to suit your use case. The CCP stores data collected in Amazon S3 and you can analyse this data to gain insight about your contact centre.
Solution Overview
The following is a high-level diagram of the solution.
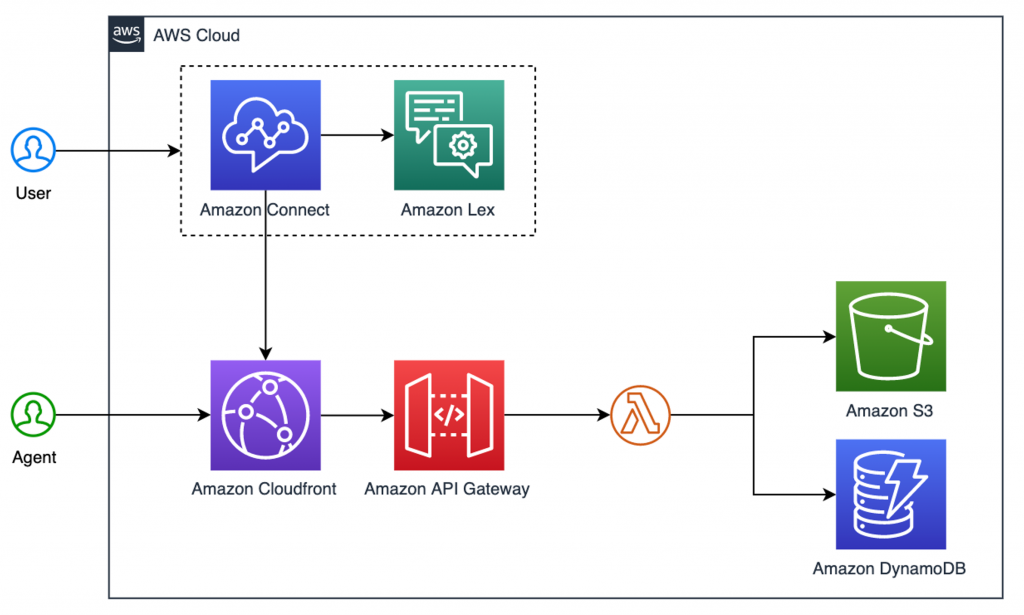
Figure 1: Solution architecture.
In this solution, the customer calls the contact centre and interacts with the Amazon Connect IVR system, which uses Amazon Lex to collect responses vocally. The audio from Amazon Connect is streamed over WebRTC to the agent’s browser with the Custom CCP Dashboard open. For a production workload, we recommend the Dashboard be hosted in a private Amazon S3 bucket fronted by Amazon CloudFront, though this demo can also be run locally. The Custom CCP Dashboard establishes a connection with Amazon API Gateway and AWS Lambda functions to interact with data in Amazon S3 and Amazon DynamoDB.

Figure 2: The CCP user interface used in an example contact centre.
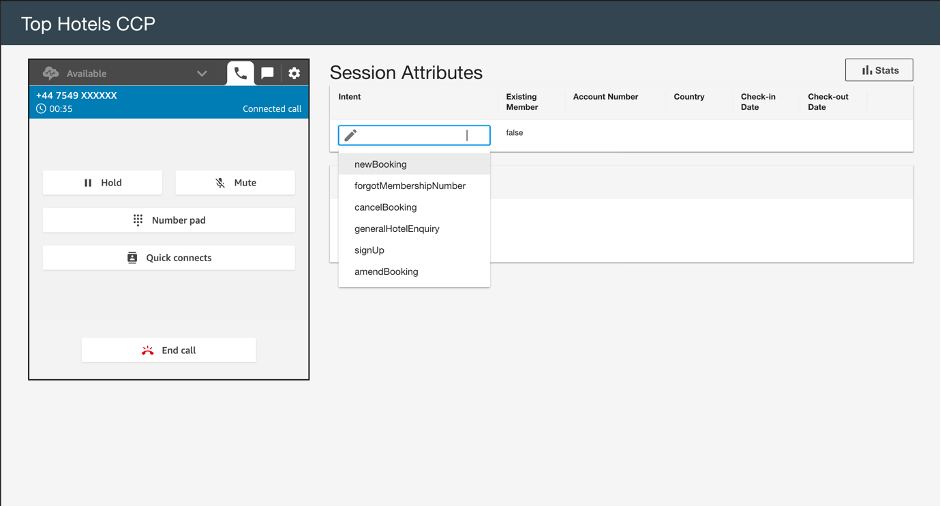
Figure 3: The agent can alter the intent
When an agent answers a call, there are a couple features to note. Session attributes collected in the IVR are displayed at the top of the page, enabling agents to know what has already been shared by the customer. With this information, the agent doesn’t need to prompt the customer again. If you are using an Amazon Lex bot, save intents and session attributes from Amazon Lex into contact attributes for display. The intent shown is the intent returned by Amazon Lex, which can be altered by the agent. In the sample hotel booking contact centre, we used Amazon Lex to collect information about a holiday. By showing this on the CCP page, the agent can quickly and easily book the holiday, saving both the agent and customer valuable time. A custom checklist is shown based on customer intent, highlighting key actions for an agent.
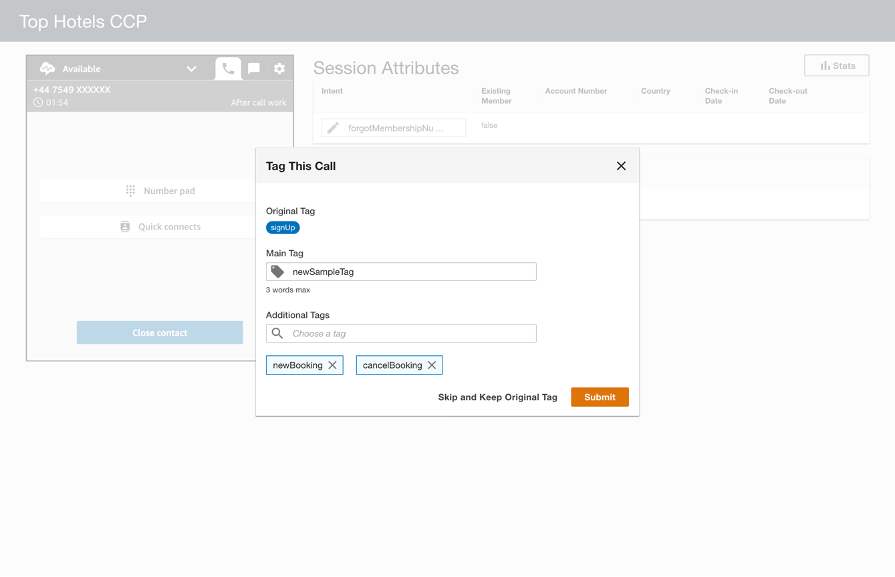
Figure 4: Setting call disposition. The main tag is auto-populated and the agent can add additional tags.
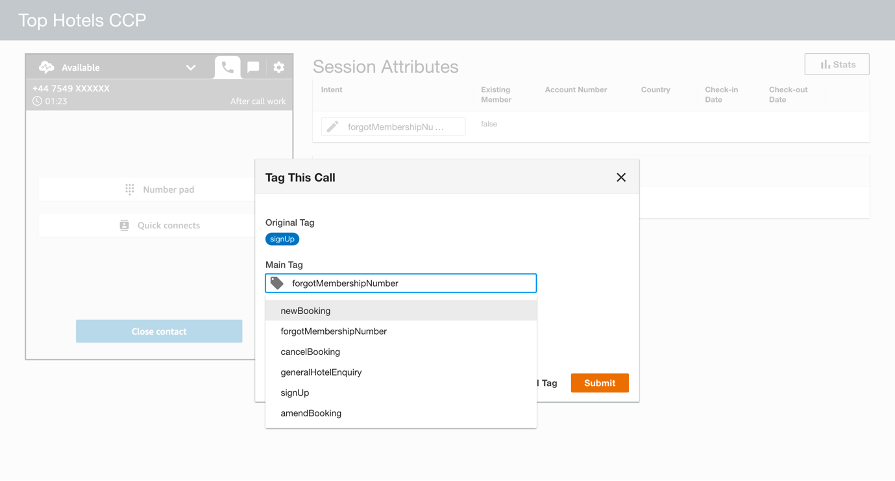
Figure 5: The agent is able to edit the main tag.
After a call has concluded, the agent is asked to tag the call. We have built a custom feature to set call disposition, which can be used to determine popular inquiries of the day. The main tag section is auto-populated with the theme, helping the agent to complete the tags quickly.
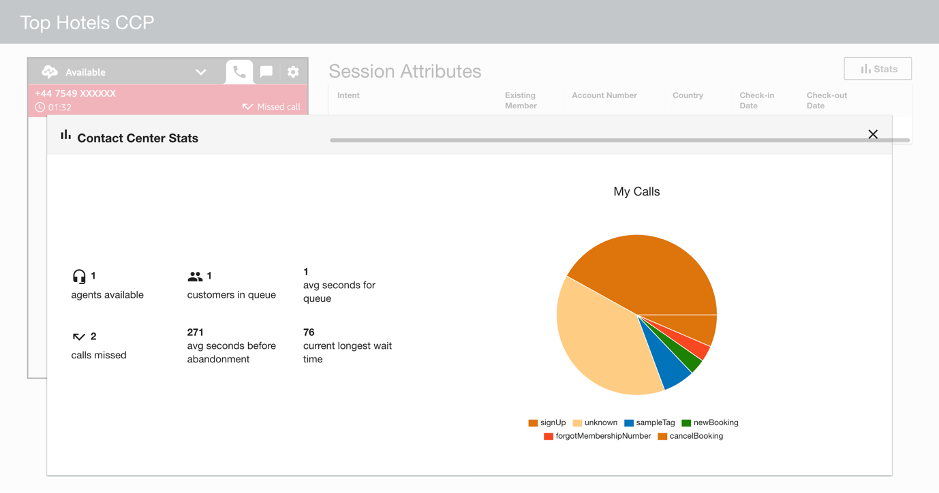
Figure 6: Contact centre statistics. These are viewed by clicking on the “Stats” button from the CCP Page.
Additionally, the agent can view call statistics at any time. Statistics about agent availability, queues, and missed calls are shown. We have also created a pie chart to visualise the call themes of the day.
How does it work?
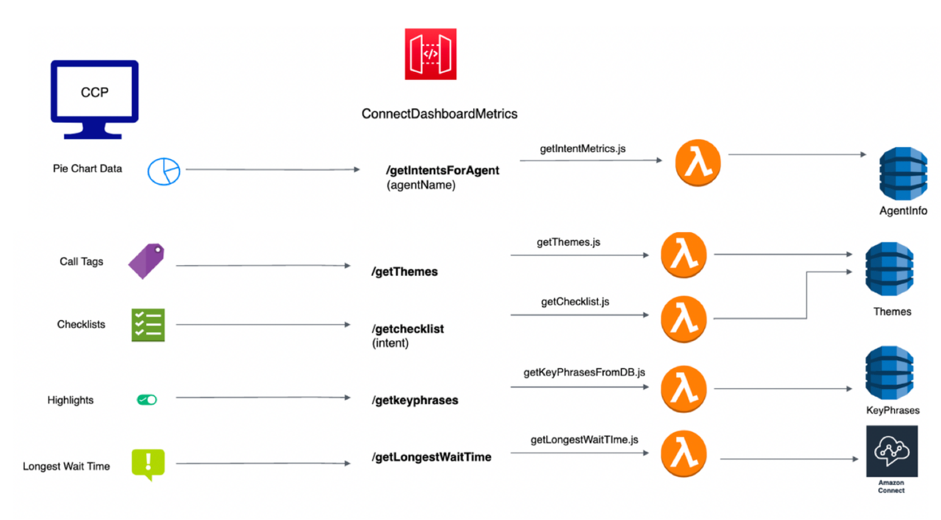
The backend is based on a serverless architecture, where all computations are handed by AWS Lambda. Amazon API Gateway is used to manage the routing and Amazon DynamoDB is used for storage.
GET request architecture
GET request architecture
PUT request architecture

PUT request architecture
Walkthrough
The CCP code can be cloned from here. This repository contains:
- The React app for the UI, located in: /ccp-ui
- Infrastructure and AWS Lambda code for the backend, located in: /ccp-cdk-infra
- An Amazon Connect sample flow, this is located in the top-level directory, with file name: topHotelsFlow.json
- Two ZIP files of Amazon Lex bots, located in the top-level directory, with file names: newBookingBotLEX.zip, TopHotelsThemeLEX.zip
The deployment of this solution is automated where possible, however, some steps of the deployment are manual.
Please note: This is a sample project designed to be efficiently deployable for experimentation. The IAM policy permissions use least privilege, however the Amazon CloudFront and API Gateway deployed will be publicly accessible. Please take the appropriate measures to secure your Amazon CloudFront distribution and API Gateway following the public documentation https://docs.aws.amazon.com/AmazonCloudFront/latest/DeveloperGuide/SecurityAndPrivateContent.html and https://docs.aws.amazon.com/apigateway/latest/developerguide/security.html
Prerequisites
For this walkthrough, you should have the following prerequisites:
- An AWS account with access to the following services
- Amazon Connect
- Amazon Lex
- Amazon CloudFront
- AWS Lambda
- Amazon API Gateway
- Amazon S3
- Amazon DynamoDB
Deployment instructions
Set up an Amazon Connect Instance
- Import the Amazon Lex bots (newBookingBotLEX.zip and TopHotelsThemeLEX.zip) into your account. Repeat the following steps for each bot ZIP file.
- Go to the Amazon Lex console.
- If this is your first-time using Amazon Lex, you’ll be shown the Welcome page, choose Get Started.
- When presented with the Create your bot page, scroll down to the bottom of the page and select Cancel. If this is not your first-time using Amazon Lex, skip this step.
- Select Actions, then Import.
- Choose the .zip archive to import.
- Select Import.
- Open the bot by clicking on the bot name.
- In the top right-hand corner of the page, click Build.
- [Optional] Once the build has completed, test the bot using the window that appears on the right (click on the microphone icon to speak to your bot).
- Choose Publish. You must create an alias, type an alias name, and choose Publish.
- Set up an Amazon Connect instance using the console.
- Go to the Amazon Connect console.
- If this is the first time you’ve been to the Amazon Connect console, you’ll see the Welcome page, choose Get Started.
- If this isn’t the first time you’re using Amazon Connect, click Add an instance.
- Type a unique name for your instance, for example, the image shows the name customCCPTest4724.
- Choose Next step.

Amazon Connect Instance Set Up
- On the Create an Administrator page, add a new administrator account for Amazon Connect. Use this account to log in to your instance later using the unique access URL.
- Choose Next step.

Adding an administrator
- On next two pages – Telephony Options and Data storage – accept the default settings, and choose Next step.
- On the Review and Create page, choose Create instance.
- After the instance is created, choose Get started.
- Now, claim a phone number. Choose Let’s go.

Amazon Connect Instance Start Page
- Choose a Country and leave the default type of DID (Direct Inward Dialing).
- Choose Next.

Claim a phone number
- On the Make a call page, you can optionally make a call to your phone number. Otherwise, choose Skip for now.
- You’re now on the Amazon Connect dashboard. The navigation menu is on the left.
- Add the Amazon Lex bots to your newly created Amazon Connect instance.
- Go to the Amazon Connect console.
- Select the Instance Alias of the instance to which to add the bot.
- Choose Contact flows.
- Under Amazon Lex, use the drop-down to choose the name for your bot.
- Choose + Add Lex Bot. Select the newBookingBot and TopHotelsTheme bots. If the name of your bot doesn’t appear in the list, reload the page.
- Choose Save Lex Bots.
- Import the topHotelsFlow contact flow
- Go to the Amazon Connect console.
- Select the Instance Alias of the instance and log in.
- From the navigation menu on the left, choose Contact Flows from the Routing menu.

Amazon Connect Routing Menu
- Choose Create contact flow.
- On the right-hand side of the page, click on the down arrow and click Import flow (beta).

Import Amazon Connect Flow
- Find the topHotelsFlow.json file and choose Import.
- Click Publish.
- Then, associate this flow with your phone number.
- From the navigation menu on the left, choose Phone Numbers from the Routing menu.
- Choose the phone number we created earlier.
- Under the Contact flow/IVR section, search for topHotelsFlow and select it.

Associate flow with phone number
- Click Save.
Your Amazon Connect instance and Amazon Lex bots are ready to use. Next, we will set up the CCP page.
Run the CDK script
- Add localhost to approved origins.
- Go to the Amazon Connect console.
- Under Approved Origins select Add origin.
- Add http://localhost:3000.

Add origin
- Install node dependencies and bootstrap CDK.
- Open a terminal in the ccp-cdk-infra directory.
- To install node dependencies, run:
npm i - With your AWS credentials, set up bootstrap CDK by running this command:
npm run bootstrap(This command can take quite some time).
- When deploying the infrastructure, enter parameters for the Connect ID and Queue ID. To find the Connect ID and Queue ID:
- Go to the Amazon Connect console and log in.
- Under Routing, go to Queues.
- Select the queue.
- Select Show additional queue information.
- You’ll see the ARN like so: arn:aws:connect:<REGION>:<ACCOUNT>:instance/<CONNECT_ID>/queue/<QUEUE_ID> (In the following screenshot, the Connect ID is outlined in orange and the Queue ID in red.)

Amazon Connect Queue Information
- After bootstrapping, deploy the infrastructure by running the following command:
npm run deploy -- --parameters connectID="<ADD_CONNECT_ID>" --parameters queueID="<ADD_QUEUE_ID>" - Once the infrastructure has deployed, copy the ID from the outputs. It appears as random letters and numbers like so: “xyzjej23”.
- Update the CCP code with your Amazon Connect instance name and CDK ID. To do this:
-
- Open your terminal or use your existing terminal to open the ccp-ui directory.
- Edit src/lib.js with your text editor of choice and change:
- CONNECT_NAME to your Amazon Connect instance name.
- LAMBDA_PREFIX to the ID we copied from CDK.
-
- Now, open the Connect Control Panel by either:
- Clicking the phone icon while logged in to the Amazon Connect dashboard.
- Or, paste the following into a new tab: https://<YOUR_AMAZONCONNECT_NAME>.my.connect.aws/connect/ccp-v2/softphone
- If you opened localhost:3000 early, you might need to close localhost:3000, accept your first call with the standalone CCP window, and then re-open localhost:3000.
- Test the CCP locally:
- Install the Node dependencies by running:
npm i - Start the dashboard by running:
npm start
- Install the Node dependencies by running:
- If you have any issues with the CCP, close the localhost:3000 tab, answer a call in the standalone Amazon Connect Control Panel (for instructions on how to open this, see step 7), then re-open.
Once the solution is ready, test it by placing calls and answering them locally in the CCP page.
Optional: Host the CCP on Amazon CloudFront
- Host the CCP Page on Amazon CloudFront:
- Run
npm i - Run
npm run build - Copy the build folder into the Amazon S3 bucket that is fronted by your CloudFront distribution.
- Ensure the Status field on the Amazon CloudFront distribution is “Deployed”.
- Note the domain name of the Amazon CloudFront distribution.
- Run
- In the Amazon Connect instance, under Application integration, add the chosen domain to the Approved origins.

Add Amazon CloudFront domain to approved origins
Cleaning up
Once finished with the solution deployed in this blog, clean up your AWS environment as not to incur any unwanted charges.
- To tear down the AWS CDK stack, run
cdk destroy - Go to the Amazon S3 console, empty and delete all buckets created.
- Go to Amazon Connect in the console and delete your instance.
- If using CloudFront, go to the Amazon CloudFront console and delete the distribution.
Conclusion
With the solution from this blog, your agents can now be supported in many ways using one interface. Agents will know the contact attributes collected in the IVR and what questions were asked, reducing repetitiveness and improving customer experience. Agents no longer need to look around for information to give customers. And, with automatic intent detection and checklists, your agents will know what to say.
The CCP page you’ve deployed stores data in Amazon S3. This includes data on call tags and session attributes. To take this one step further, you can visualise this data using Amazon QuickSight and get insight on the performance of your contact centre. Start finding out answers to questions like “Do our customers really engage with our IVR system?”, “What are the most popular inquiries” and more. Using this data, you can improve your journeys, your Amazon Lex bots and ultimately, your customer experience.