AWS Contact Center
Build an Amazon Connect Customer Data Lake with a Reusable CDK Construct
Introduction
The Amazon Connect Customer data lake gives contact centers a central, zero-extract, transform, and load (zero-ETL) location to query contact records, agent performance, conversational analytics, and other data types. However, enabling access requires navigating multiple AWS consoles to associate datasets, accept AWS Resource Access Manager resource shares, configure Lake Formation permissions, and create resource link tables using AWS Glue—a process that becomes repetitive and inefficient when scaled across 30+ datasets.
This post introduces cdk-construct-connect-datalake, an open-source AWS CDK construct that automates the entire Amazon Connect Customer data lake access setup. This post walks through deploying the construct, verifying the configuration, and querying the data through Amazon Athena.
Overview of solution
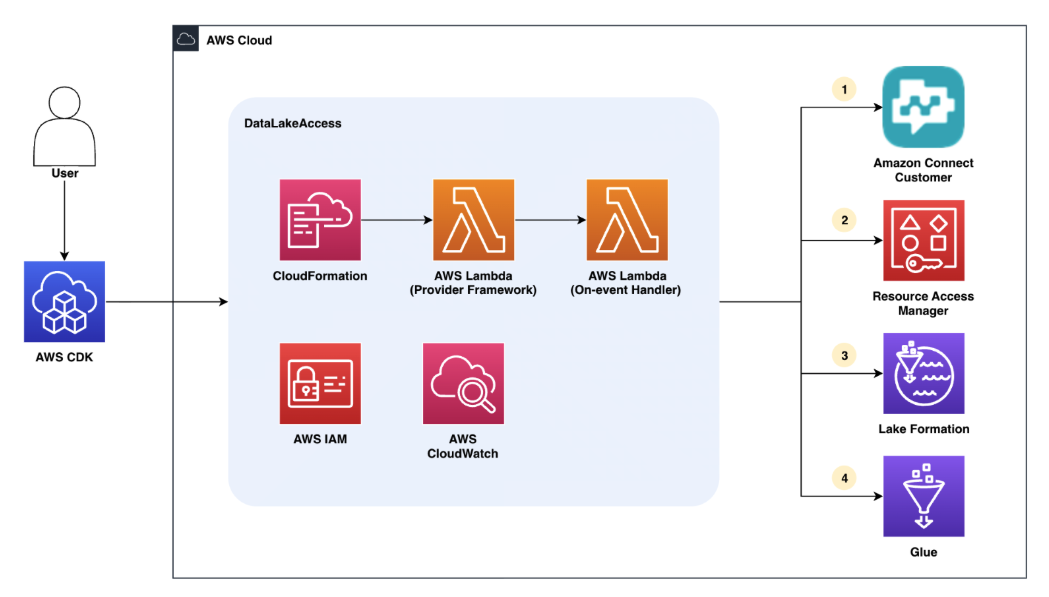
The DataLakeAccess construct automates the complete data lake access setup. When you deploy it, the construct:
- Associates the specified datasets for an Amazon Connect Customer instance with the target account.
- Accepts the resource share invitation(s).
- Configures the execution role as a data lake administrator.
- Creates the
connect_datalake_database, then creates resource link tables for each dataset once the resource shares are accepted
The construct manages this workflow through a AWS Lambda-backed custom resource and an IAM role scoped to the required permissions. CloudFormation invokes the provider to orchestrate the steps above during stack create, update, and delete events.
Walkthrough
In this section, you install the construct, deploy the solution to set up data lake access for an Amazon Connect Customer instance, and run sample queries. The examples use TypeScript, but the construct is also available for Python, Java, .NET, and Go.
Prerequisites
Before getting started, you need:
- An AWS account
- An Amazon Connect Customer instance
- AWS CDK v2 installed
- Node.js 18.x or later
- AWS credentials with permissions to deploy CloudFormation stacks
- (Optional) AWS CLI installed
Warning: If you have already associated any of the datasets specified in this exercise with your Connect instance, you can still proceed. However, deploying this construct will transfer ownership of those dataset associations to the construct. Destroying the construct stack will disassociate those datasets, even if they were originally configured manually.
Step 1: Create a CDK project and install the construct
From a terminal, create and initialize a new TypeScript CDK project:
mkdir connect-data-lake && cd connect-data-lake && cdk init app --language typescript Next, install the construct library:
npm install @cdklabs/cdk-construct-connect-datalakeStep 2: Add the construct to your CDK stack
After running cdk init, your project will contain a file at lib/connect-datalake-stack.ts. Open this file and replace its contents with the following, substituting your Connect instance ID:
import * as cdk from 'aws-cdk-lib'; import { DataLakeAccess, DataType } from '@cdklabs/cdk-construct-connect-datalake'; export class ConnectDataLakeStack extends cdk.Stack { constructor(scope: cdk.App, id: string, props?: cdk.StackProps) { super(scope, id, props); new DataLakeAccess(this, 'DataLakeAccess', { instanceId: 'xxxxxxxx-xxxx-xxxx-xxxx-xxxxxxxxxxxx', // Your Connect instance ID datasetIds: [ DataType.CONTACT_RECORD, ], }); } }The DataType enum provides type-safe access to the available dataset types. These values are updated periodically as new analytics capabilities are added to Amazon Connect Customer. For dataset types not yet included in the enum, you can pass string literals directly.
Step 3: Bootstrap your environment (optional)
If this is your first time deploying CloudFormation stacks, you need to bootstrap your environment first. Run the following command in the terminal, replacing the required values:
cdk bootstrap aws://<account-id>/<region>
This step is only required once per desired region.
Step 4: Deploy
Deploy with the CDK CLI in your terminal:
cdk deploy When prompted, enter y to continue. The CDK deployment first creates a set of IAM roles, then deploys the Lambda function and invokes a custom resource to configure data lake access. First-time deployment typically takes 2–3 minutes.
Step 5: Verify the deployment
After deployment, you can confirm access is configured in a few places:
- CloudFormation stack outputs – In your terminal window, check the
{constructId}Errorsoutput. A successful deployment shows None. If any workflow steps fail, the stack deployment still shows as successful, with partial failures reported here. The construct can be redeployed until the desired configuration is reached, though some failures may require manual intervention before re-deployment.

- AWS CLI – From your terminal or AWS CloudShell, verify the dataset associations, resource share, and resource link tables are present.
Verify the dataset association:
aws connect list-analytics-data-associations --instance-id 'xxxxxxxx-xxxx-xxxx-xxxx-xxxxxxxxxxxx'This will show an association between your Connect instance and the contact_record dataset.
Verify the resource share:
aws ram get-resource-shares --resource-owner OTHER-ACCOUNTS This confirms that the resource share has been accepted and that the correct table is being shared with your account.
Verify the resource link tables:
aws glue get-tables --database-name connect_datalake_database This shows that in the newly created connect_datalake_database, there is a resource link table with a name that follows the pattern {datasetId}_{dataCatalogId} (e.g., contact_record_123456789012) along with the expected schema.
- AWS Management Console – Verify the setup was successful through the console:
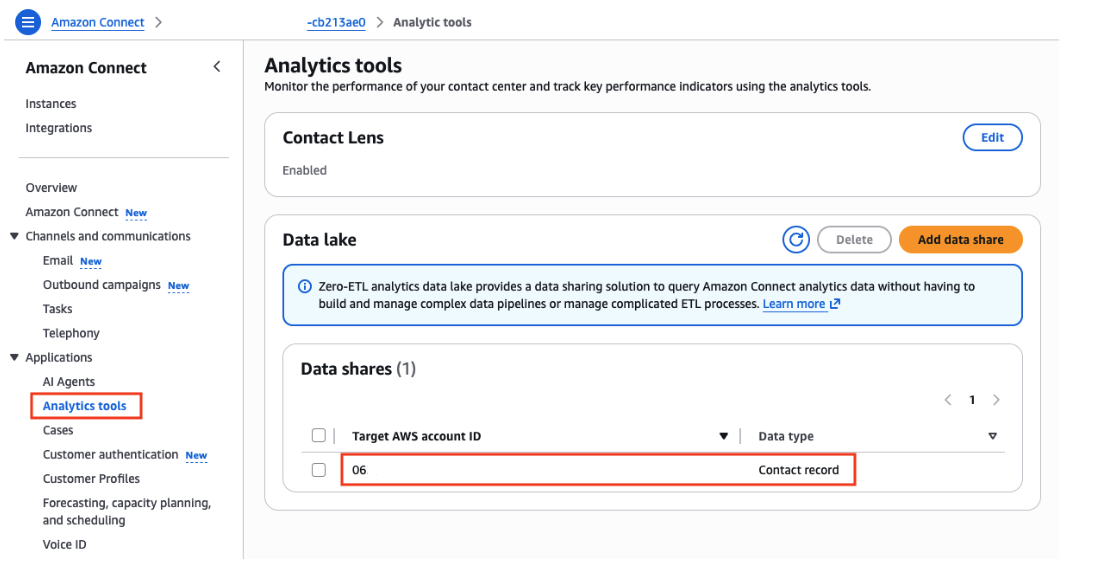
In the Amazon Connect Customer console, navigate to your instance, then select Analytics tools. The data lake section will show the datasets that have been successfully associated.
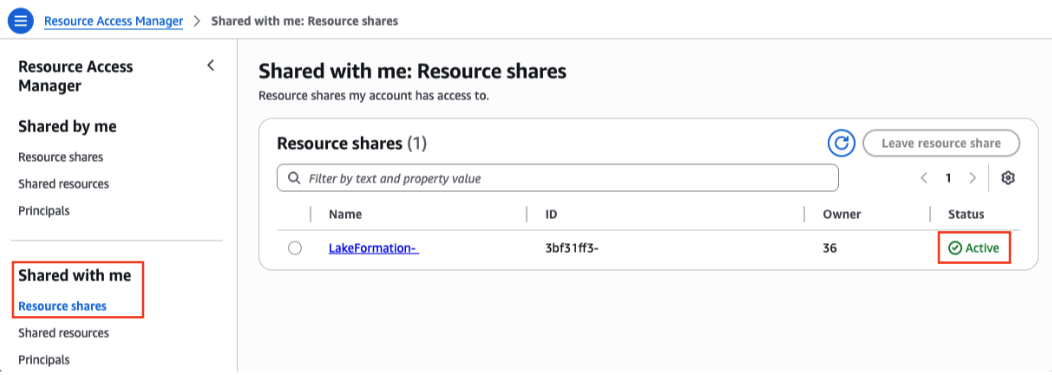
In the AWS RAM console, go into the resource shares under ‘Shared with me’ and verify the resource share has been accepted.
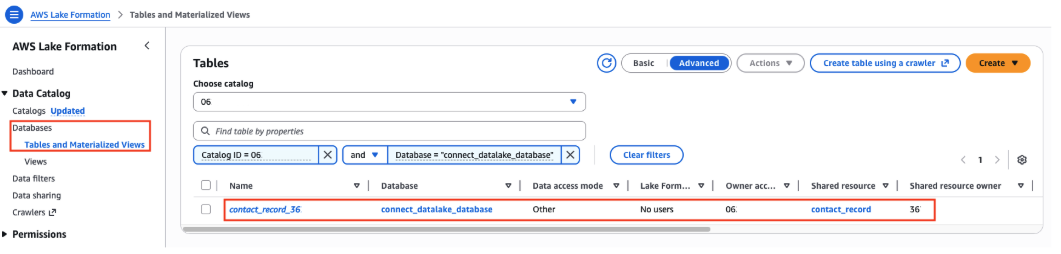
Finally, in the AWS Lake Formation console, navigate to Data Catalog in the left navigation pane, then select Tables and materialized views. Filter by the database name connect_datalake_database to verify the resource link table(s) have been successfully created.
Tables created by this construct follow the naming pattern {datasetId}_{dataCatalogId}, where datasetId represents your associated dataset type (e.g., contact_record) and dataCatalogId identifies the source data catalog.
Step 6: Query your data with Amazon Athena
With the deployment verified, you’re ready to start querying. Open the Amazon Athena console, select the database named connect_datalake_database, and run SQL queries against your contact center data. In the queries below, replace the table name with the one from your deployment (using the {datasetId}_{dataCatalogId}pattern noted in the previous step).
Validate the data for your instance exists:
SELECT * FROM connect_datalake_database.{datasetId}_{dataCatalogId} LIMIT 10; Query contact_record for call volume and handle time using your resource link table:
SELECT date_trunc('day', initiation_timestamp) AS day, COUNT(*) AS call_volume, AVG(agent_interaction_duration_ms) AS avg_handle_time FROM connect_datalake_database.{datasetId}_{dataCatalogId} GROUP BY 1 ORDER BY 1; Cleaning up
To avoid future charges, delete the resources:
cdk destroy This removes the Lambda function, IAM role, and custom resource provider, then triggers the cleanup workflow that disassociates datasets, deletes the resource link tables, and removes the execution role from the Lake Formation configuration. The connect_datalake_database is shared across all deployments of this construct in an account and is only removed when no tables remain.
Important: Constructs must be deleted before deleting the associated Connect instance. Cleanup after instance deletion is not currently supported.
Conclusion
This blog post demonstrated how the DataLakeAccess construct replaces a multi-console setup process with a single cdk deploy. Whether you’re managing one Connect instance or several across multiple accounts, the construct gives you a consistent, repeatable, and version-controlled way to configure data lake access.
To get started, visit the GitHub repository to find the full source code, additional examples for cross-account and multi-instance configurations, and the complete API reference. For the Amazon Connect Customer data lake documentation, see the Amazon Connect Customer admin guide.
Author bio
 |
Nichole White is a Software Development Engineer on the Amazon Connect Customer Data Lake team based in Vancouver, Canada. Over the past year, she has led the development of multiple features that reduce the complexity and manual effort when integrating with the data lake. |
 |
Abhishek Pandey is a WW Tech Leader with Amazon Web Services based in Houston, TX. He is passionate about architecting creative solutions that drive business innovation across industries, specializing in helping customers design and implement agentic customer experience solutions |
 |
Ankur Taunk is a Manager, Applied AI at Amazon Web Services (AWS), based in Austin, TX. He focuses on agentic customer experiences and operational efficiency. |
 |
Rob Sammons is the Engineering Manager on the Amazon Connect data lake team at Amazon Web Services (AWS). He leads the engineering team behind the data lake platform. |