AWS Database Blog
Connecting .NET Lambda to Amazon Aurora PostgreSQL via RDS Proxy
Are you modernizing legacy .NET applications while reducing database costs and improving scalability? Many organizations face this dual challenge when migrating to AWS Lambda and transitioning from SQL Server to Amazon Aurora PostgreSQL-Compatible Edition. In this post, I show you how to connect Lambda functions to Aurora PostgreSQL using Amazon RDS Proxy. We cover how to configure AWS Secrets Manager, set up RDS Proxy, and create a C# Lambda function with secure credential caching. I provide a GitHub repository which contains a YAML-format AWS CloudFormation template to provision the key components demonstrated, a C# sample function. I also walk through the Lambda function deployment step by step.
Solution overview
The following diagram shows a .NET Lambda function connecting to Aurora PostgreSQL via RDS Proxy, with Secrets Manager handling secure credential management.
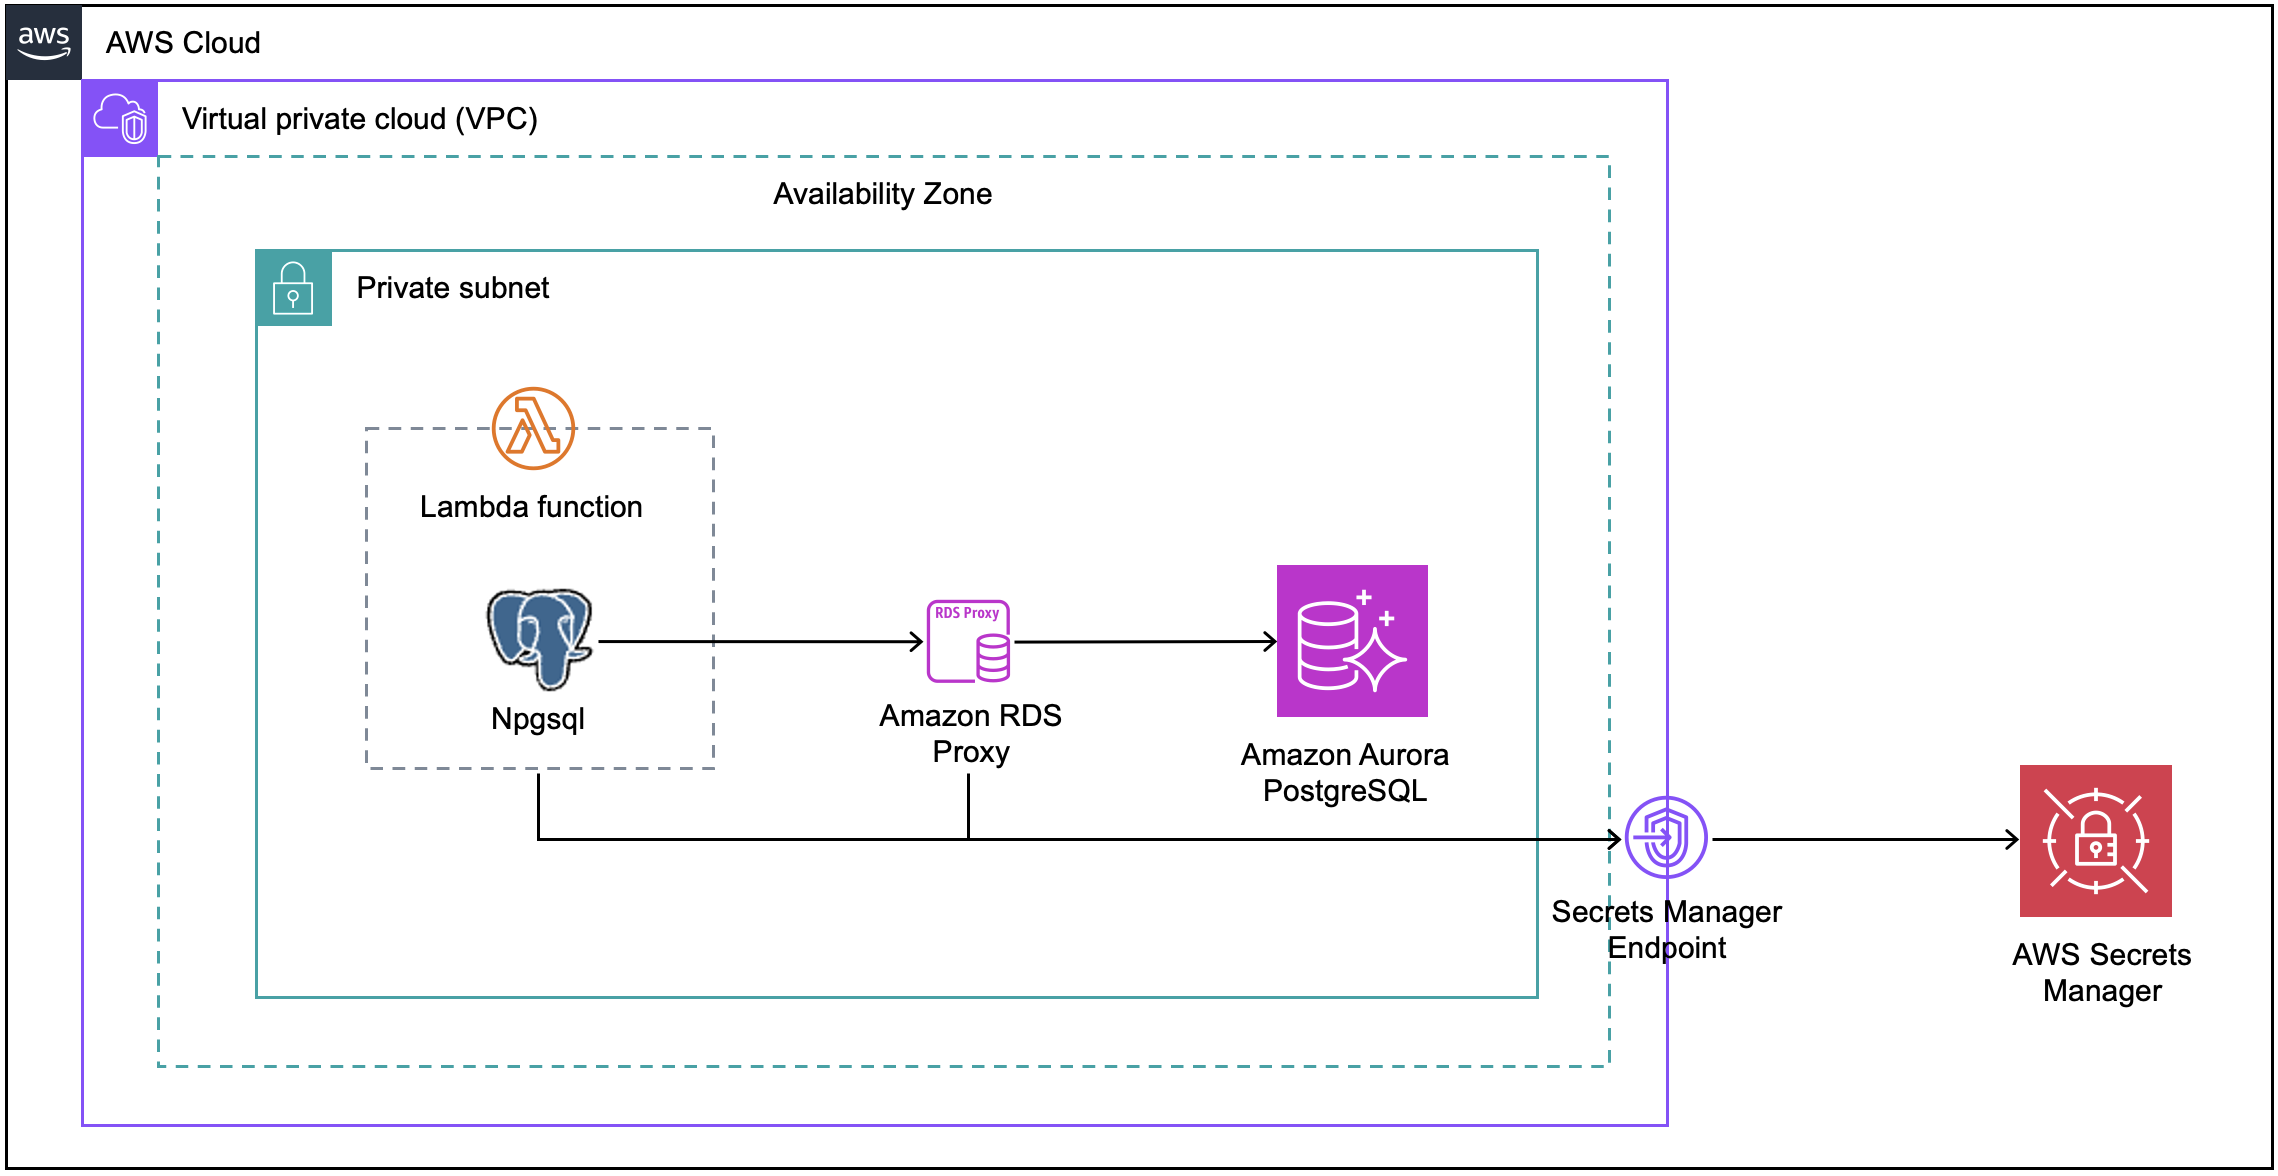
AWS Lambda with RDS Proxy and Aurora PostgreSQL Architecture
When connecting Lambda functions to Aurora PostgreSQL, RDS Proxy provides connection pooling to handle the serverless scaling patterns and help reduce database connection overhead. Database credentials are stored in AWS Secrets Manager. For production environments, consider enabling automatic credential rotation to maintain security without manual intervention.
For this post, I’ve simplified the architecture by placing Lambda, RDS Proxy, and Aurora PostgreSQL within the same VPC private subnet. In production, you might separate these across multiple subnets for better isolation.
The solution uses Npgsql, an open-source .NET data provider, to enable our Lambda-based C# application to interact with PostgreSQL databases. The flow begins with the Lambda function connecting through RDS Proxy, which manages connections to Aurora PostgreSQL and retrieves credentials from Secrets Manager through a configured VPC endpoint.
Prerequisites
This walkthrough uses a CloudFormation template to create all required resources. The template creates:
- VPC with private subnets
- Aurora PostgreSQL cluster
- RDS Proxy:
blog-rds-proxy - Secrets Manager VPC endpoint
- Two secrets in AWS Secrets Manager:
blog-apg-secretblog-rds-proxy-secret
- Windows EC2 instance (t3.medium with Microsoft Windows Server 2022 English Full Base AMI)
- IAM roles and supporting resources
The template creates these resources within a single stack to avoid conflicts with existing resources and simplify maintenance.
The RDS Proxy is configured with the following parameters:
- Engine family: PostgreSQL
- Idle client connection timeout: 1800 seconds
- IAM authentication: Disabled
- Secrets Manager secret: blog-apg-secret
- Require Transport Layer Security: Enabled
- Enhanced logging: Disabled
Note: In this walkthrough, IAM authentication is disabled on the RDS Proxy for simplicity. The proxy authenticates to Aurora PostgreSQL using credentials stored in AWS Secrets Manager. In production environments, enable IAM authentication to centrally manage database access through IAM policies rather than relying solely on database credentials.
For detailed configuration options, refer to the AWS RDS Proxy documentation.
You need to specify one parameter for the Windows EC2 instance:
- Password for the Windows Administrator account (8-32 characters with letters, numbers, and symbols)
Note: When prompted for the Windows Administrator password during stack creation, choose a strong password and store it securely. This password is defined as a NoEcho parameter. It will be masked in the AWS CloudFormation console and API responses, so that it is only visible to administrators with direct access to the EC2 instance. - Latest AMI ID. (No need to input it. You can leave it as default)
The template provisions a Windows EC2 instance with the following pre-installed components:
- AWS Command Line Interface (AWS CLI)
- .NET Core SDK 8
- AWS Lambda templates for .NET
- AWS Lambda tools
- pgAdmin (PostgreSQL management tool)
I’ll use Fleet Manager Remote Desktop to connect to the underlying Windows EC2 instance. The CloudFormation template configures AWS Systems Manager (SSM) Agent. You can access the instance directly through AWS Systems Manager Fleet Manager, even though the instance resides in a private subnet.
- Choose the EC2 instance and choose Connect.

- Choose the RDP client tab, then choose Connecting using Fleet Manager, and choose Fleet Manager Remote Desktop.
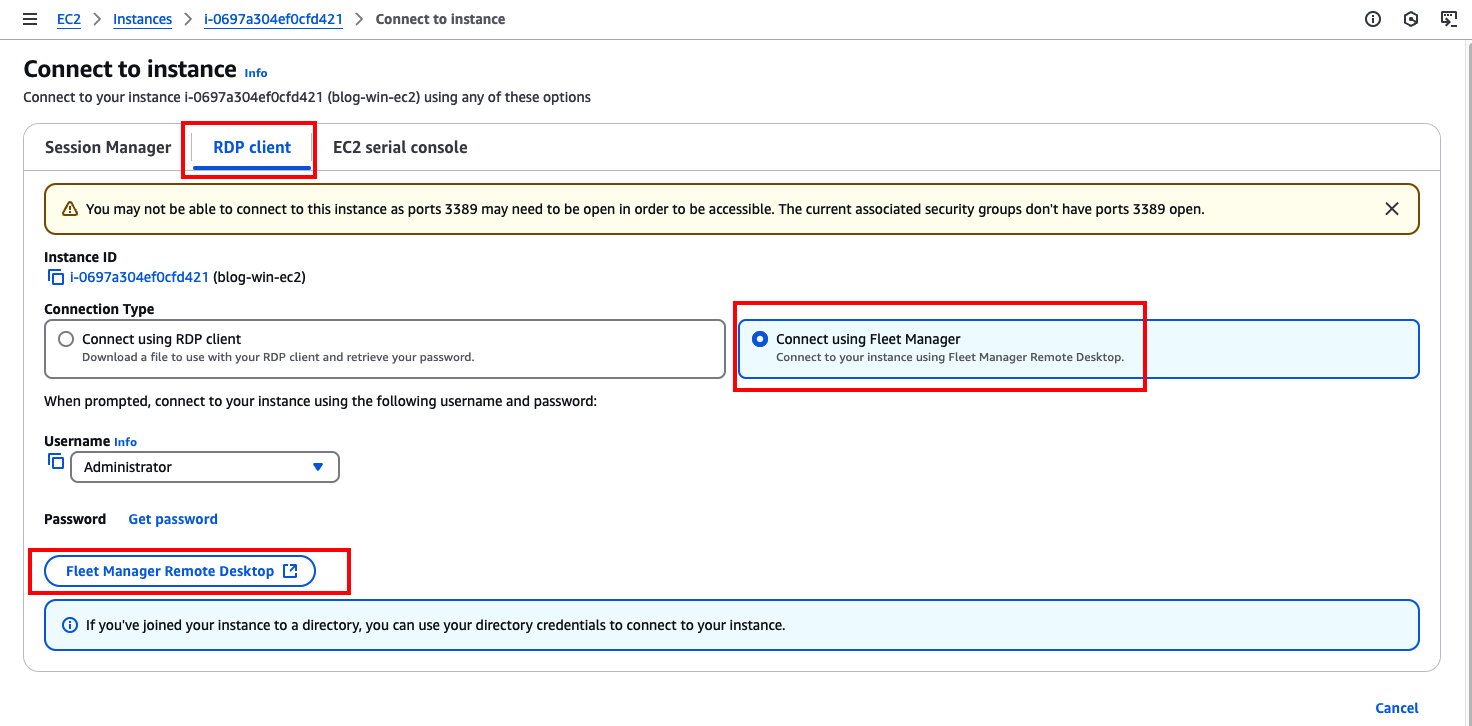
Note: To help optimize cost, the CloudFormation template uses a t3.medium instance type. Since Fleet Manager Remote Desktop requires the SSM Agent to be fully operational and registered with AWS Systems Manager. You might need to wait 10–20 minutes after instance launch before the “Connect using Fleet Manager” option becomes available.
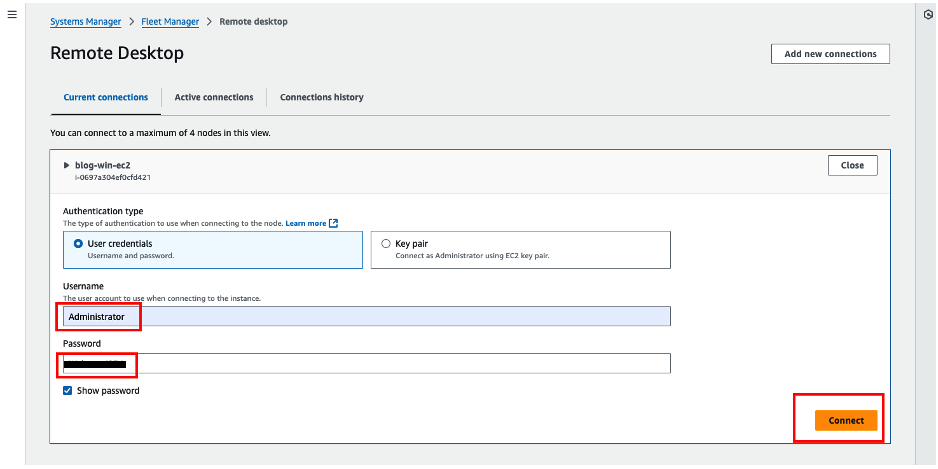
- Enter these credentials:
- Username:
Administrator - Password:
*******(You can find the password in the Outputs section of the CloudFormation template)
- Username:
- Choose Connect to log in to the Windows EC2 instance.
To test the solution, you need to create a sample table named employee and populate it with test data. Follow these steps:
- Connect to Windows EC2 using Fleet Manager
- Launch a Command Prompt window and run the following command to retrieve the database connection information from the blog-rds-proxy-secret in AWS Secrets Manager:
- Use pgAdmin on the Windows EC2 instance to connect to the Aurora PostgreSQL database.
- Execute the following SQL statements in the public schema:
Create a new Lambda project
You can create a new .NET project using the .NET Lambda Global CLI on the provisioned Windows EC2 instance. The .NET Lambda Global Tools extension (Amazon.Lambda.Tools), which is included with the .NET CLI, provides a cross-system solution for creating, packaging, and deploying .NET-based Lambda functions.
- Open Command Prompt on the Windows EC2 instance, and run the following commands to create a new Lambda project:
- Source code review
After creating a new Lambda function project, add the following packages:
Npgsql: Enables connections to PostgreSQL database.
Newtonsoft.Json: A widely used JSON framework for .NET. It supports serialization and deserialization, allowing you to convert .NET objects to JSON format and vice versa.
Use the AWS Secrets Manager client-side caching library to help improve application availability, reduce latency, and lower the cost of retrieving secrets. The following is the C# source code:
Note: The code snippets are for demonstration purposes and highlight only key concepts. For deployment, you can find the complete source code in the Function.cs file on GitHub.
- Deploy the project to Lambda.
Since the IAM user blog-user, provisioned by the CloudFormation template, has already been granted the necessary permissions in previous steps. Running the command dotnet lambda deploy-function will display a list of available IAM roles. Choose an IAM role to use for deploying the Lambda C# code to AWS. In this case, I use the IAM role: xxxx-BlogLambdaRole-YYYY
Configure the new Lambda function
The Lambda function is created and deployed via the AWS Lambda project with the .NET Core CLI, with final configuration done through the AWS CLI:
You can find the Physical IDs mapped to the following Logical IDs on the Resources tab of the CloudFormation stack.
BlogPrivateSubnet1BlogPrivateSubnet2BlogPrivateSubnet3BlogLambdaSG
Test the Lambda function
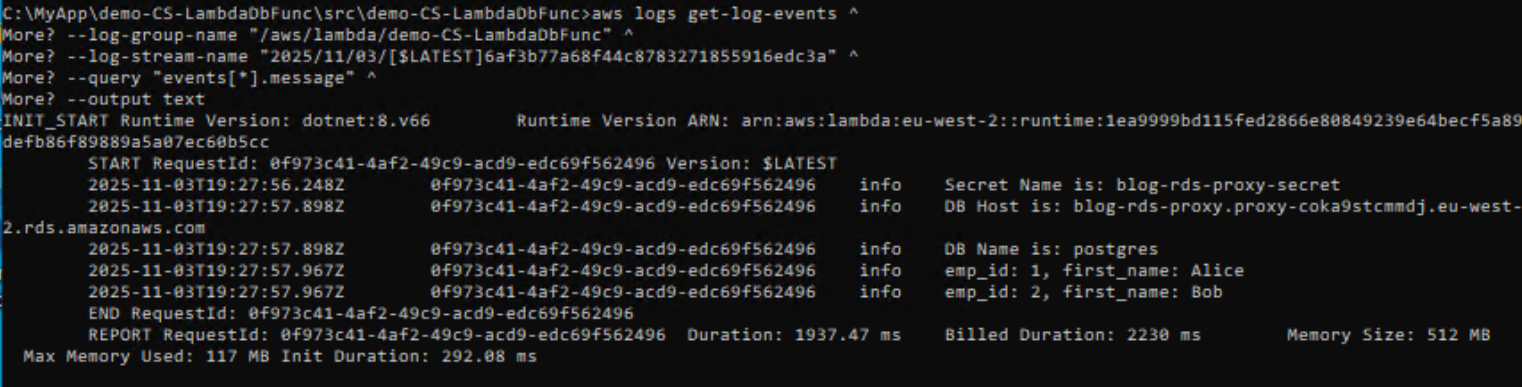
- Invoke the Lambda function
- Get the log stream name
- Use the log stream name to show the Amazon CloudWatch log for the test result
Clean up
To avoid ongoing charges, delete the resources you created:
- Delete the Lambda function:
Note: Wait a few minutes before proceeding, as Lambda ENIs can take some time to fully detach after function deletion.
- Delete the CloudFormation stack:
- Navigate to the CloudFormation console.
- Choose and delete the associated stack.
- Note: Wait for complete stack deletion before proceeding with other tasks.
- (Optional) Remove Elastic Network Interfaces (ENIs):
If the CloudFormation stack was not fully deleted, check for and manually remove any remaining Lambda-associated ENIs:- Navigate to the EC2 console and choose Network Interfaces.
- Filter by Interface Type: lambda
- Delete any remaining ENIs associated with your Lambda function.
Important: Always verify that all resources are properly deleted to avoid unexpected charges.
Conclusion
In this post, you learned how to connect .NET Lambda functions to Aurora PostgreSQL using RDS Proxy, with Npgsql as the data provider and AWS Secrets Manager for secure credential management. You deployed the solution using CloudFormation and tested the integration to verify connection pooling and credential retrieval.
This architecture is especially beneficial during SQL Server to PostgreSQL migrations, as RDS Proxy abstracts connection complexity while your team focuses on application logic changes. By using RDS Proxy’s connection pooling and automatic failover capabilities, your .NET Lambda functions gain improved performance and reliability compared to direct database connections. This serverless approach modernizes your application stack while providing the scalability and cost-efficiency of cloud-native architectures.
Want to explore more? Try these next steps:
- Implement connection pooling optimization for high-traffic scenarios
- Add monitoring and alerting with CloudWatch
- Explore multi-region deployment patterns