AWS Database Blog
How Letta builds production-ready AI agents with Amazon Aurora PostgreSQL
AI agents require persistent memory to maintain context, learn from past interactions, and provide consistent responses over time. Consider a customer service AI agent deployed at a large ecommerce company. Without long-term memory, the agent would need to ask customers to repeat their order numbers, shipping preferences, and past issues in every conversation. This creates a frustrating experience where customers feel unrecognized and need to constantly provide context. With long-term memory, the agent can recall previous interactions, understand customer preferences, and maintain context across multiple support sessions, even when conversations span several days or weeks.
With the Letta Developer Platform, you can create stateful agents with built-in context management (compaction, context rewriting, and context offloading) and persistence. Using the Letta API, you can create agents that are long-lived or achieve complex tasks without worrying about context overflow or model lock-in. You can self-host the Letta API in your own virtual private cloud (VPC) and persist agent state in Amazon Aurora PostgreSQL-Compatible Edition. Letta persists all state, including memories, tools, and messages, in normalized tables, so you can query data across agents and port state across different model providers.
In this post, we guide you through setting up Amazon Aurora Serverless as a scalable, highly available PostgreSQL database repository for storing Letta long-term memory. We show how to create an Aurora cluster in the cloud, configure Letta to connect to it, and deploy agents that persist their memory to Aurora. We also explore how to query the database directly to view agent state.
Solution overview
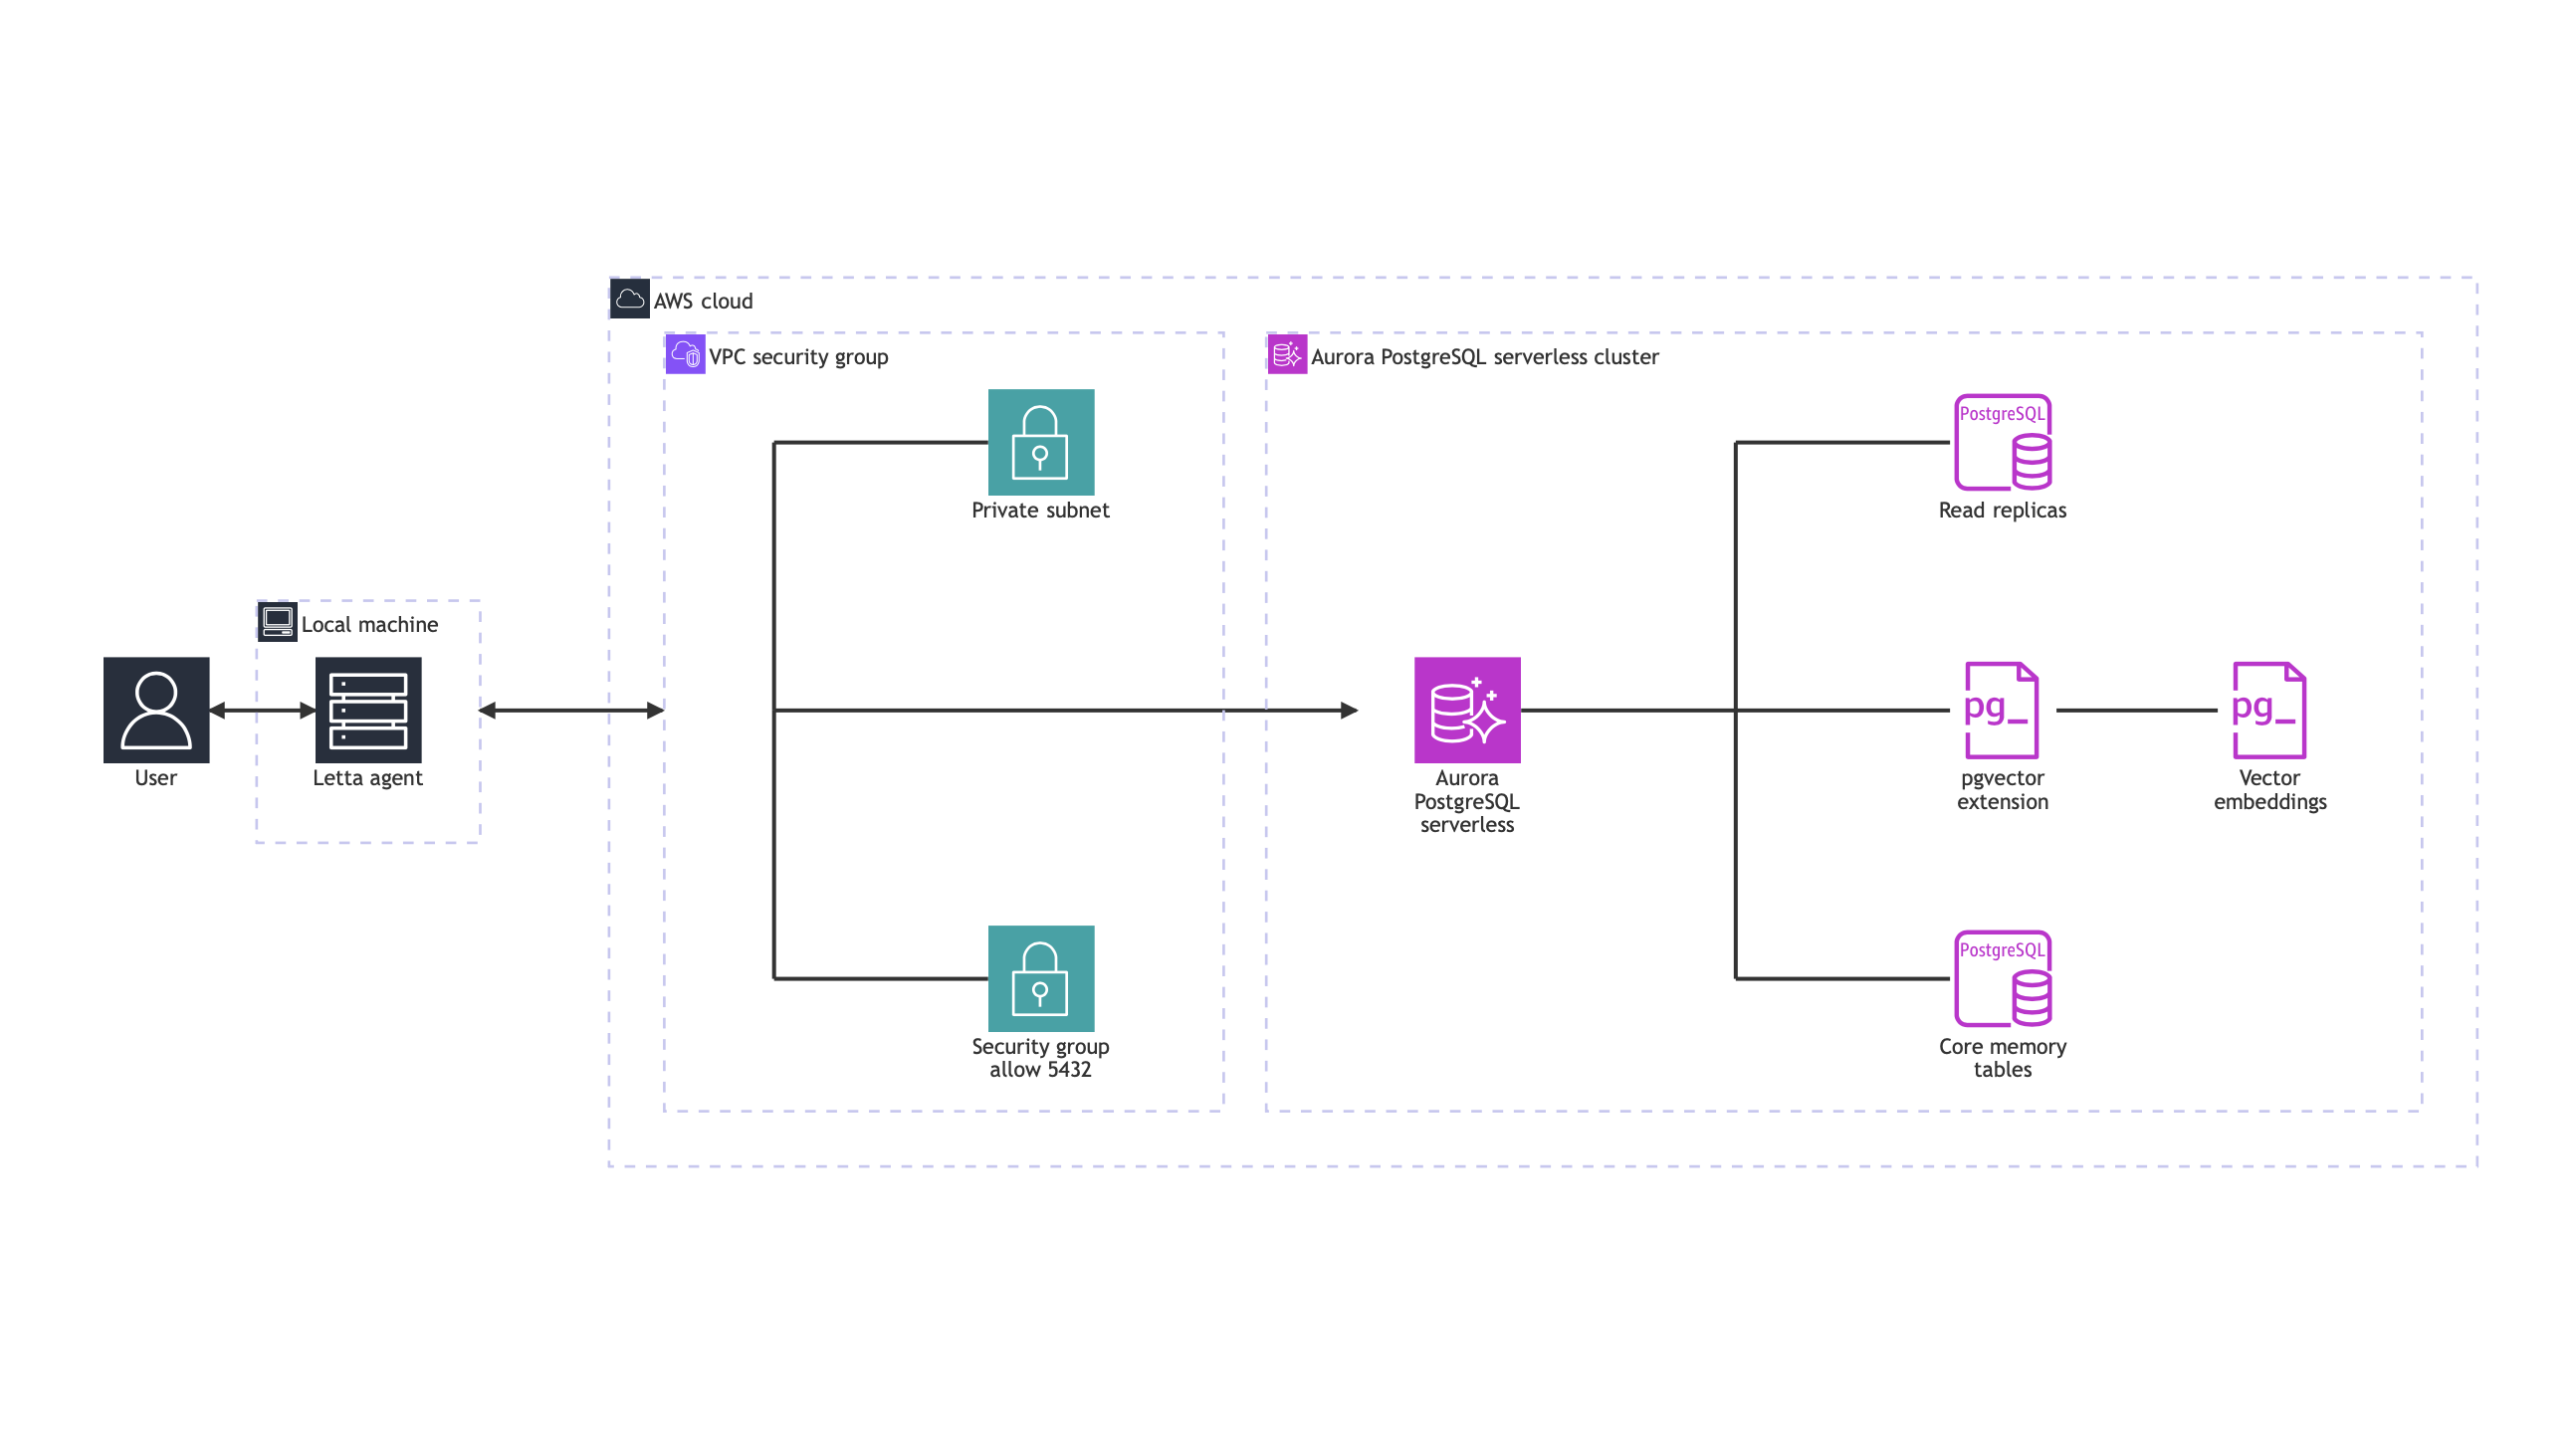
Letta runs in a Docker™ container on your local machine and connects to Aurora PostgreSQL over the internet. Aurora stores agent configuration, memory, and conversation history in PostgreSQL tables. The connection uses standard PostgreSQL wire protocol on port 5432.
The following diagram illustrates this architecture.
Aurora PostgreSQL
The integration of Aurora PostgreSQL brings several capabilities needed for production-ready AI agent memory systems. Aurora PostgreSQL supports the pgvector extension, enabling efficient similarity searches across millions of vector embeddings, which are the numerical representation of past conversations. This allows AI agents to quickly retrieve contextually relevant information.
Aurora PostgreSQL delivers sub-second query latency for memory lookups and supports up to 15 read replicas to scale memory retrieval operations efficiently. This means your AI agents can access their memory rapidly, even under heavy loads. The database’s storage capacity extends up to 256 TB, providing ample space for extensive memory archives and long-term conversation history.
Aurora provides reliability through its comprehensive durability features. The database maintains six-way replication across three Availability Zones, reducing the risk of data loss. Your agents’ memories are further protected by point-in-time recovery capabilities with up to 35 days of backup retention. The self-healing storage system continuously performs data integrity checks, maintaining the consistency of your agents’ memory states.
For cost optimization, Aurora Serverless automatically scales based on workload, handling thousands of concurrent agent connections. Storage scaling is also dynamic, growing from 10 GiB to 256 TB with no downtime, so your agents don’t run out of memory space as they learn and interact.
Letta
Letta treats agents as persistent services, maintaining state server-side and enabling agents to run independently, communicate with each other, and continue processing when clients are offline. For production workloads, Letta supports horizontal scaling using Kubernetes, with configurable worker processes and database connection pooling. The background execution mode enables resumable streams that survive disconnects and allow load balancing by picking up streams started by other instances.
Production deployments support multi-tenancy with unlimited agents on Pro and Enterprise plans, making Letta suitable for large-scale customer service and multi-user applications. The platform includes enterprise features like SAML/OIDC SSO, role-based access control, and tool sandboxing, with telemetry and performance monitoring for tracking system metrics. Although this post demonstrates a local setup, production deployments typically use cloud platforms with HTTPS access and security controls.
Walkthrough overview
In the following sections, we walk through the steps to build the following resources:
- An Aurora serverless cluster with the pgvector extension for embedding storage
- A security group configuration that allows your IP address to connect on port 5432
- A Letta Docker container configured with
LETTA_PG_URIpointing to Aurora - Working AI agents that persist all state to Aurora instead
Our solution uses Aurora Serverless with minimal capacity settings suitable for development and testing environments.
Although we’re using an internet-exposed database for this post for simplicity, the best practice in production is to place it in a private subnet with a security group that only allows connections from your application.
Prerequisites
Before we begin, make sure you have the following:
- An AWS account with permissions to create Aurora clusters and modify security groups
- Docker installed on your local machine
- An OpenAI API key for Letta’s language model integration
- PostgreSQL client tools installed locally (psql version 12 or higher recommended)
- Python 3.8+ with pip, or Node.js 16+ with npm
Set up Aurora Serverless
In this section, we demonstrate how to create an Aurora PostgreSQL cluster configured for external access from your local machine.
Create the Aurora cluster
To create the Aurora cluster, complete the following steps:
- On the Amazon RDS console, in the navigation pane, choose Databases.
- Choose Create database.
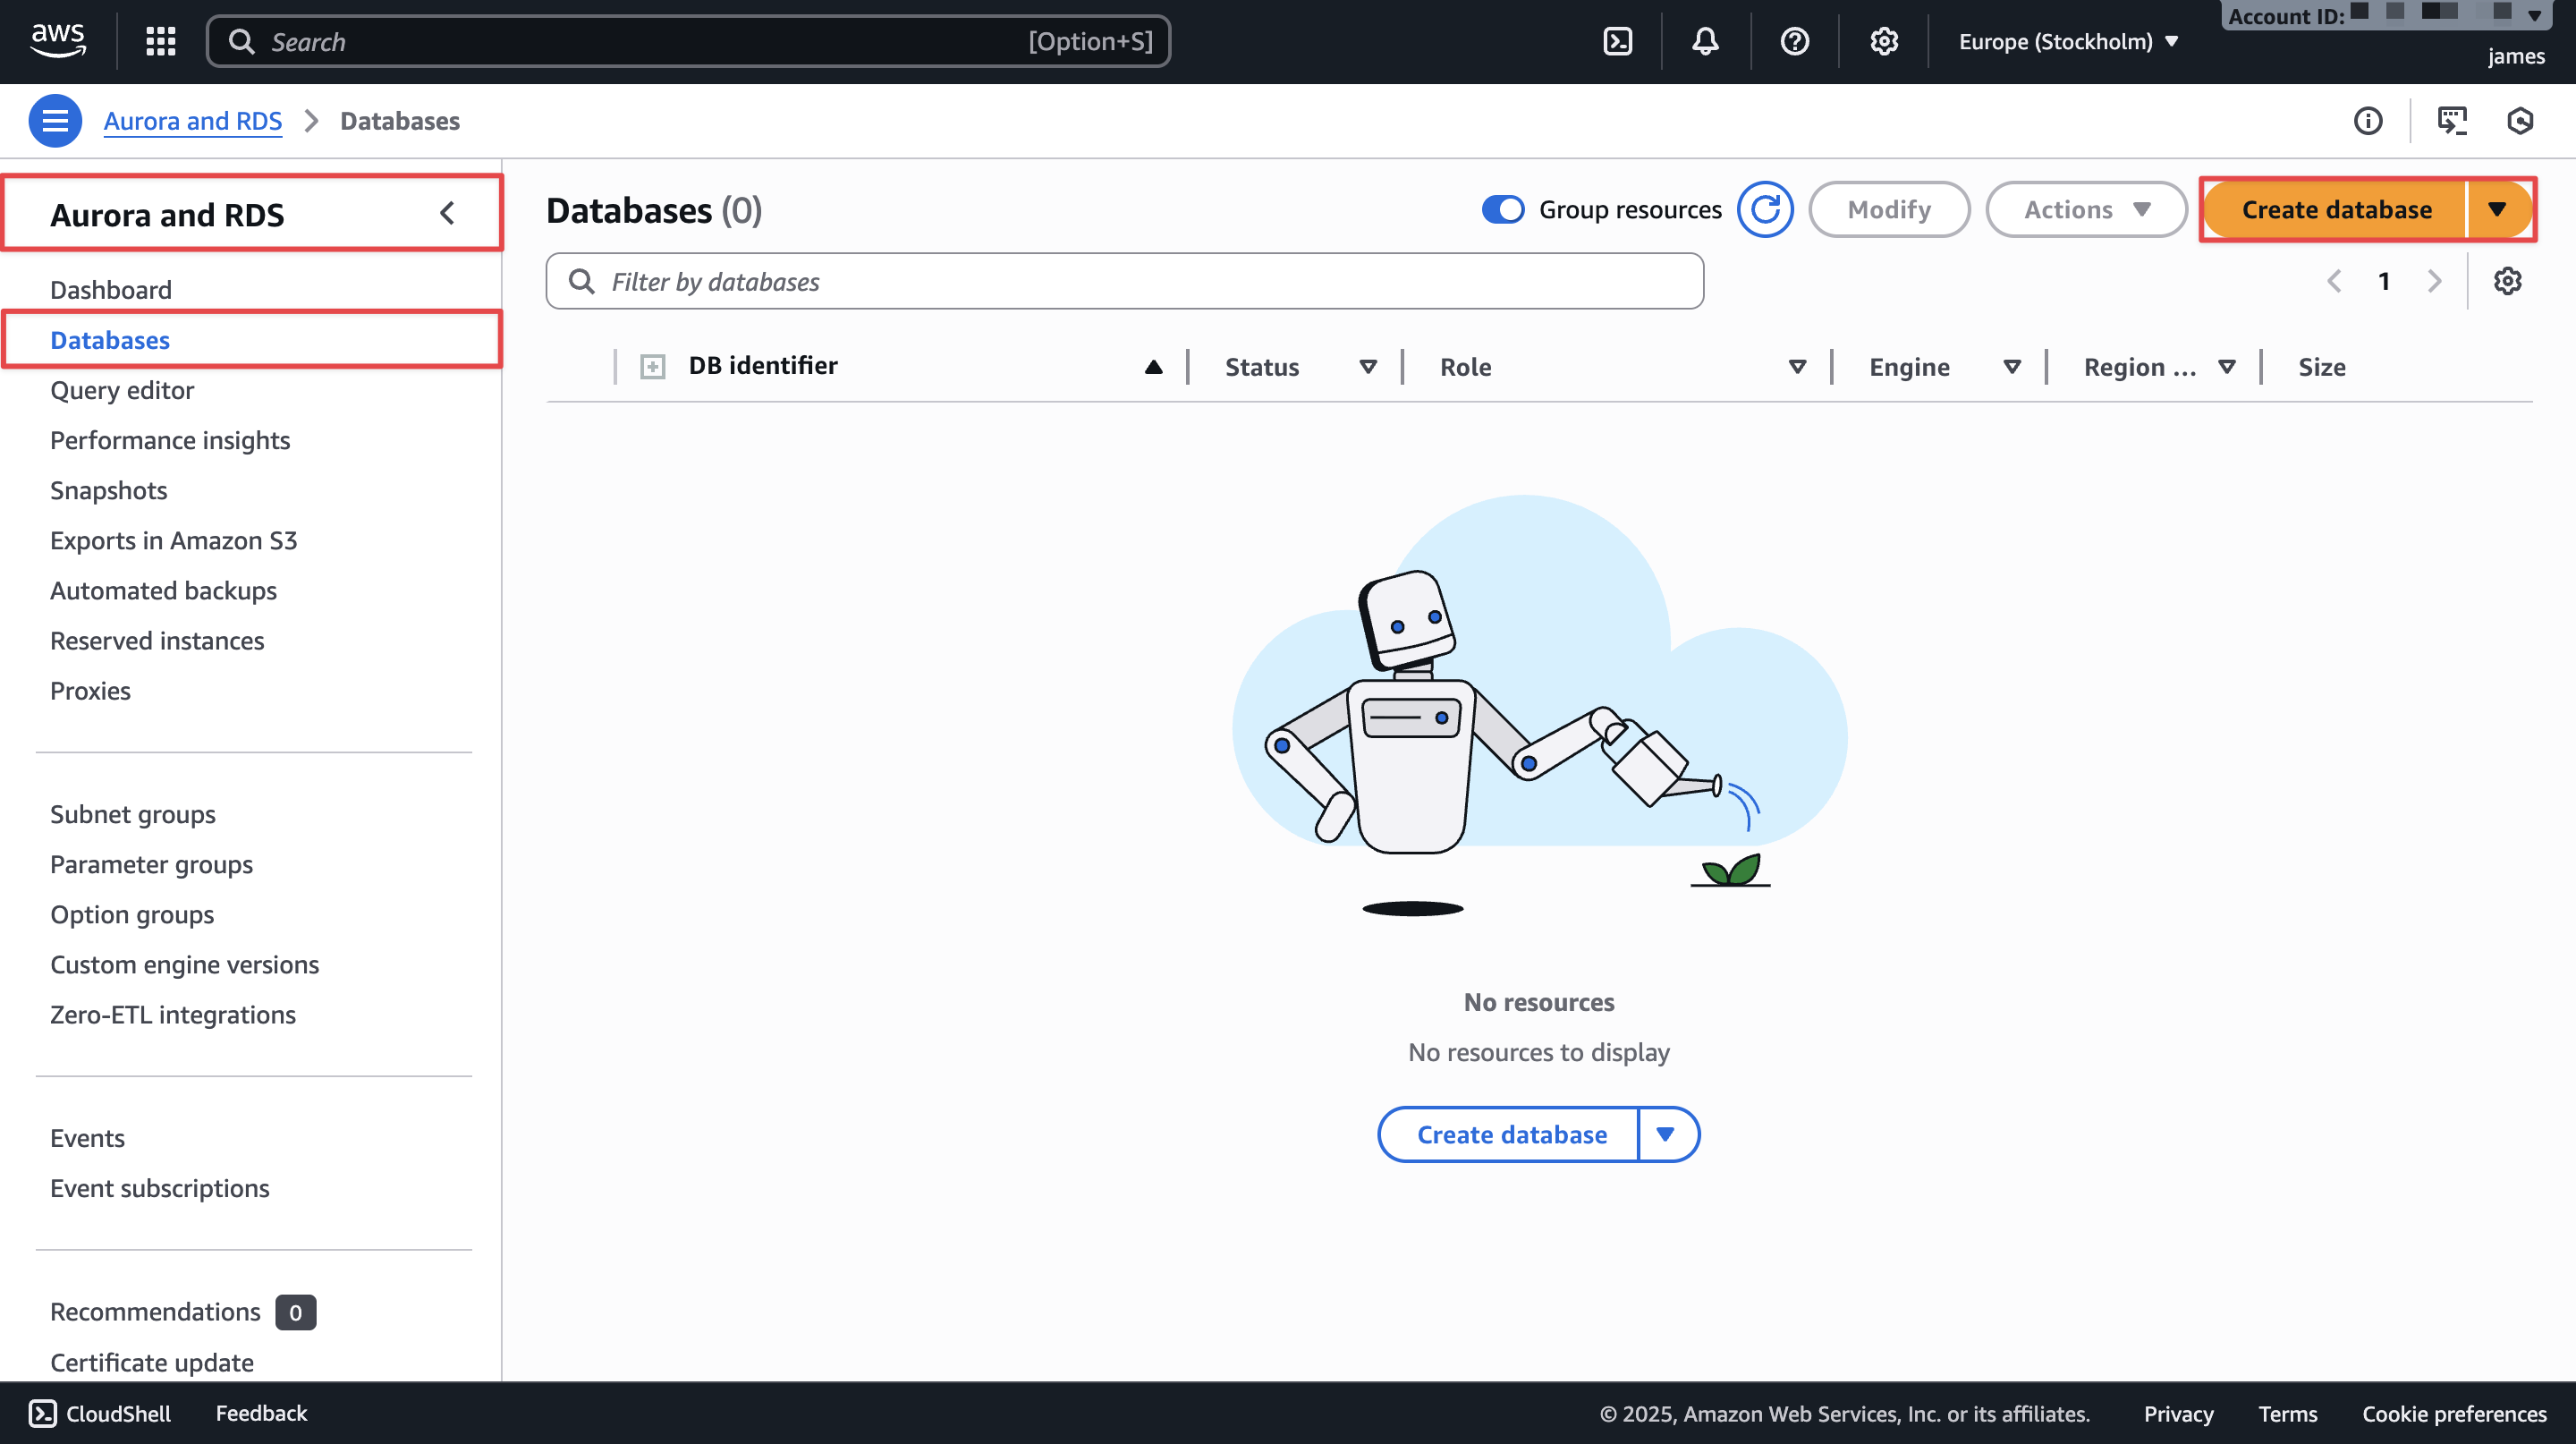
- For Engine options, select Aurora (PostgreSQL Compatible).
- For Engine version, select Aurora PostgreSQL (Compatible with PostgreSQL 17.4).
This is the default for major version 17, or you can choose your preferred version. - Under Templates, select Dev/Test to optimize for lower costs.
- Under Settings, configure the following:
- For DB cluster identifier, enter a name, such as
letta-aurora-cluster. - For Master username, keep the default (
postgres). - For Credentials management, choose Self managed.
- For Master password, enter an alphanumeric password.
- For DB cluster identifier, enter a name, such as
- Under Instance configuration, select Serverless v2.
- For Capacity range, set the following:
- Minimum capacity (ACUs): 0.5
- Maximum capacity (ACUs): 1
Aurora Capacity Units (ACUs) are the measurement unit for database compute capacity in Aurora Serverless. Each ACU is a combination of approximately 2 GiB of memory, corresponding CPU, and networking capabilities. For example, 0.5 ACUs provides 1 GiB of memory, whereas 32 ACUs provides 64 GiB of memory with proportional compute resources. Your Aurora database charges are based on the ACU usage per second. For development and testing, starting with 0.5–1 ACU is sufficient. Production workloads typically require higher ACU ranges based on your application’s memory and processing needs. Aurora Serverless automatically adjusts capacity within your specified ACU range based on actual database load. Aurora can scale to a minimum capacity of zero ACUs, which avoids compute charges in periods where your cluster is not being used.
- Under Connectivity, configure the following:
- For Public access, choose Yes.
- For VPC security group (firewall), select Create new.
- For New VPC security group name, enter a name, such as
letta-aurora-sg.
- Choose Create database.
While Aurora creates the cluster, you can proceed to configure the security group.
Configure security group access
Aurora clusters require security group configuration to allow external connections. By default, the security group blocks all incoming traffic. This solution creates an Amazon Elastic Compute Cloud (Amazon EC2) security group.
To configure the security group, complete the following steps:
- On the Amazon EC2 console, in the navigation pane, under Network & Security, choose Security Groups.
- On the Inbound rules tab, select the security group attached to your Aurora cluster (
letta-aurora-sg). - Choose Edit inbound rules.
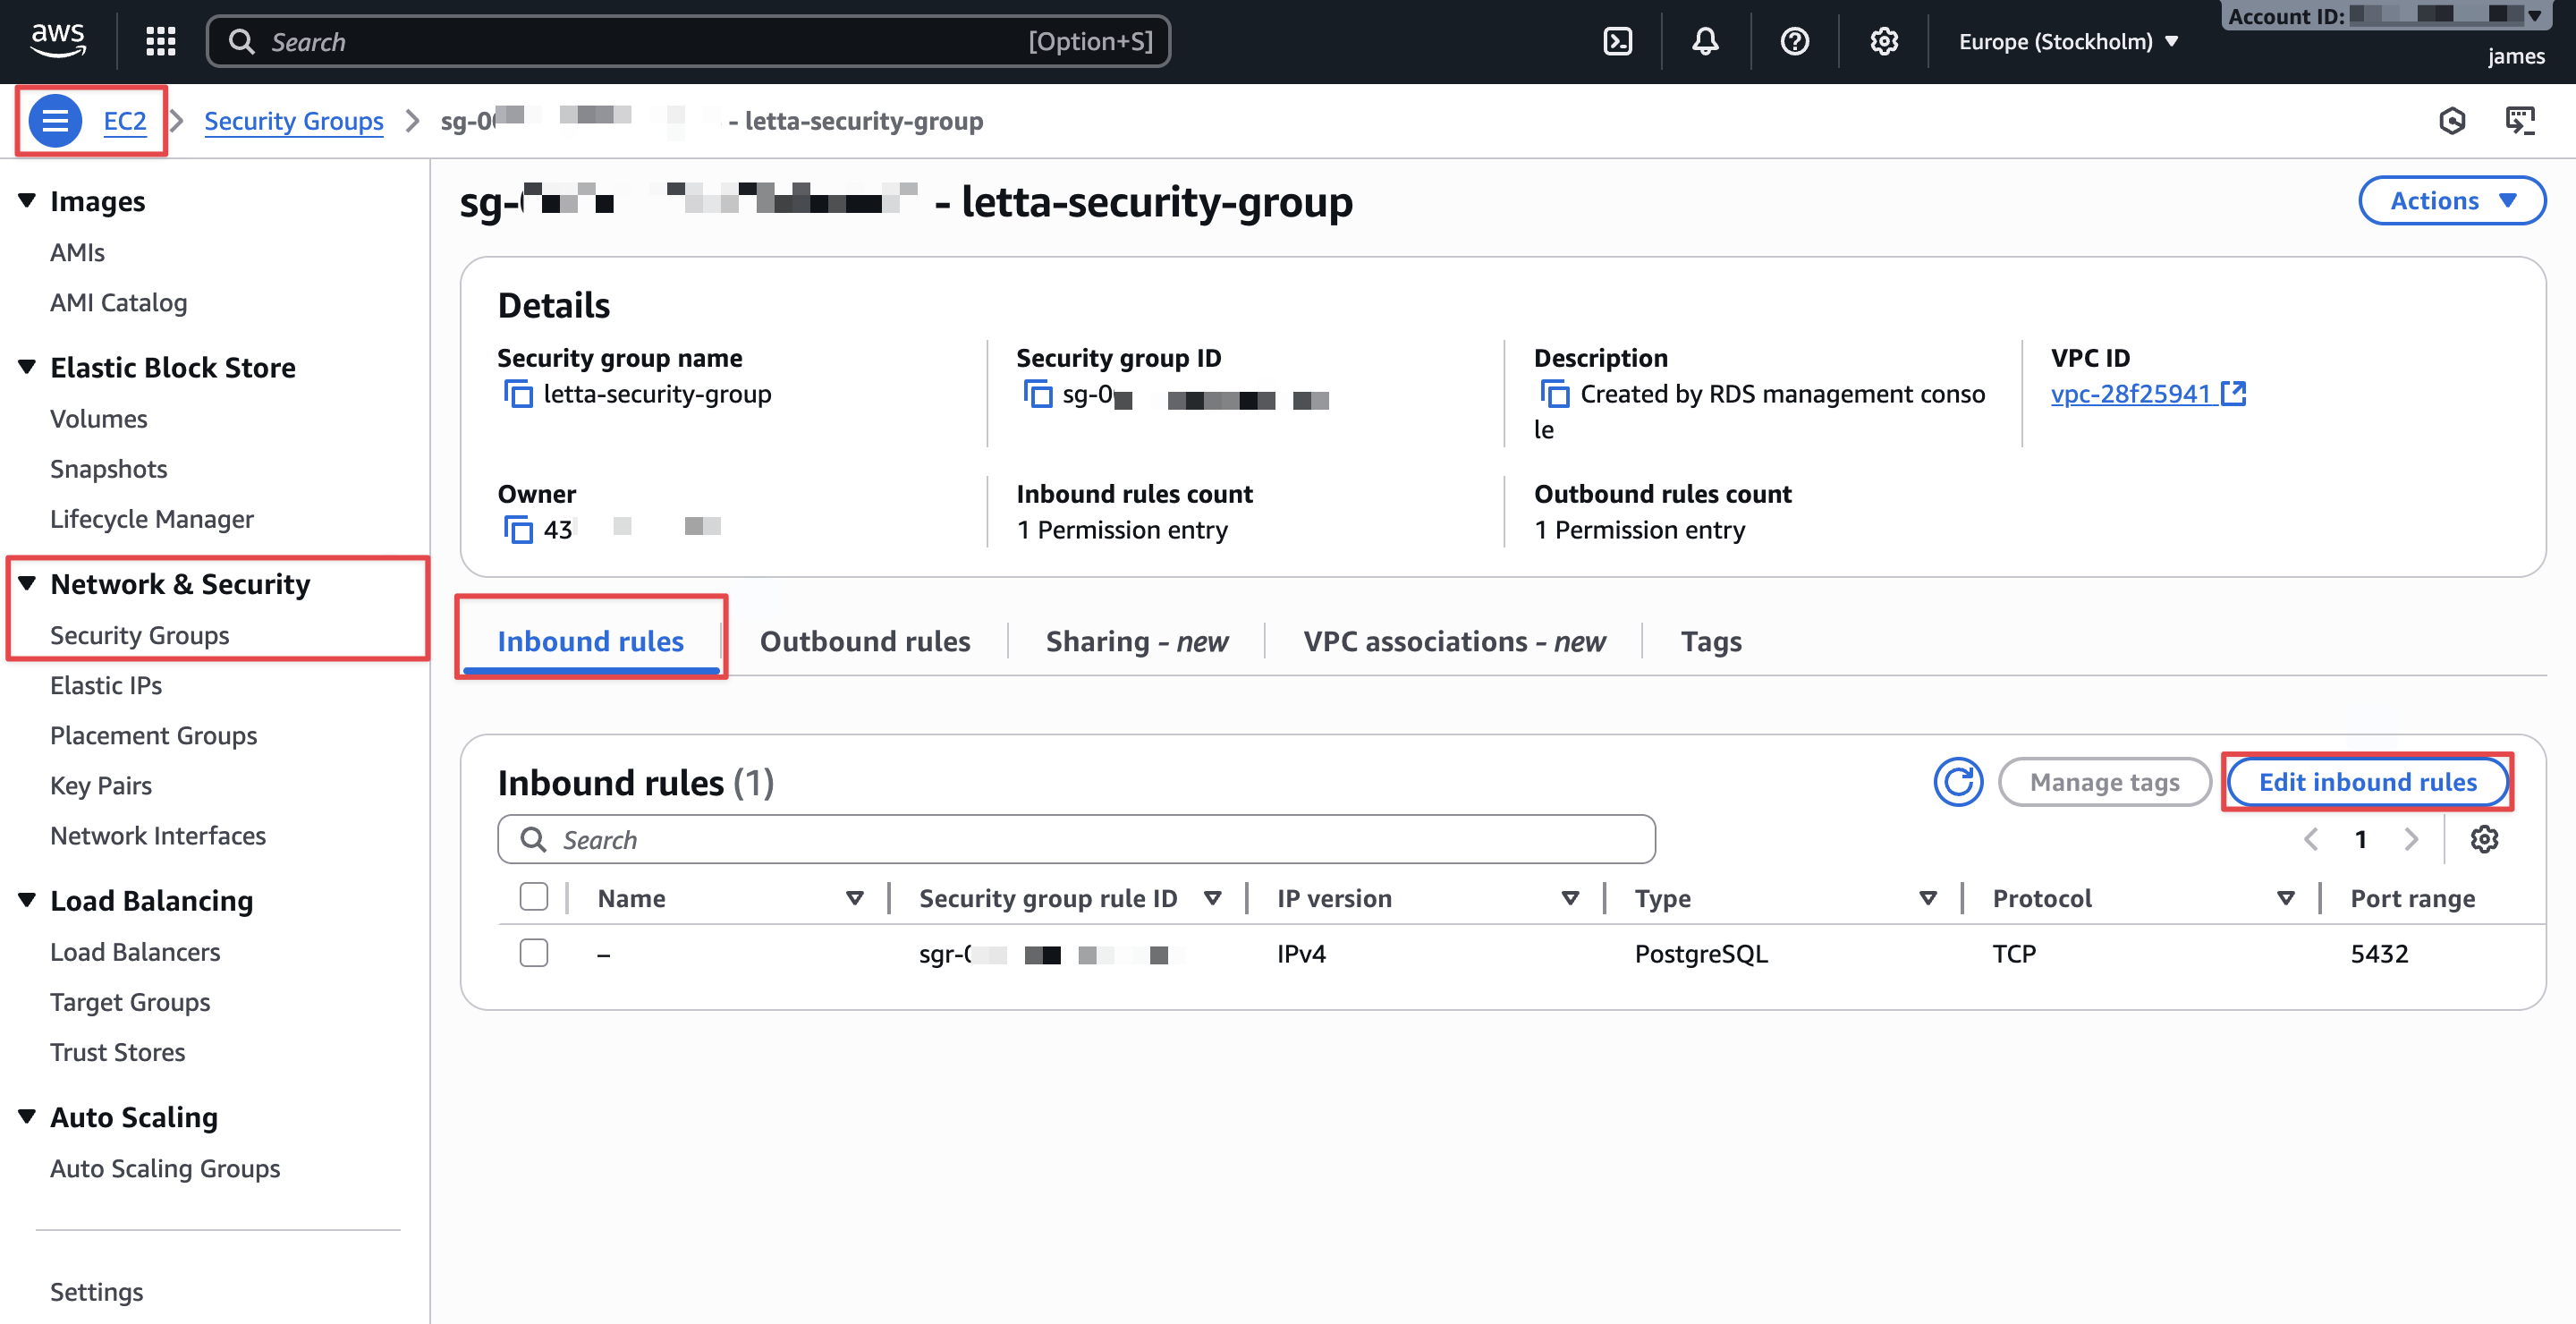
- Choose Add rule and configure the following:
- For Type, choose PostgreSQL.
- For Protocol, keep at default (TCP).
- For Port range, keep at default (5432).
- For Source, choose one of the following options:
- My IP: Automatically detects and allows your current IP address (recommended for testing).
- Custom: Enter a specific IP address with
/32suffix for single IP access.
- Choose Save rules.

Your security configuration now allows PostgreSQL connections from your IP address to the Aurora cluster.
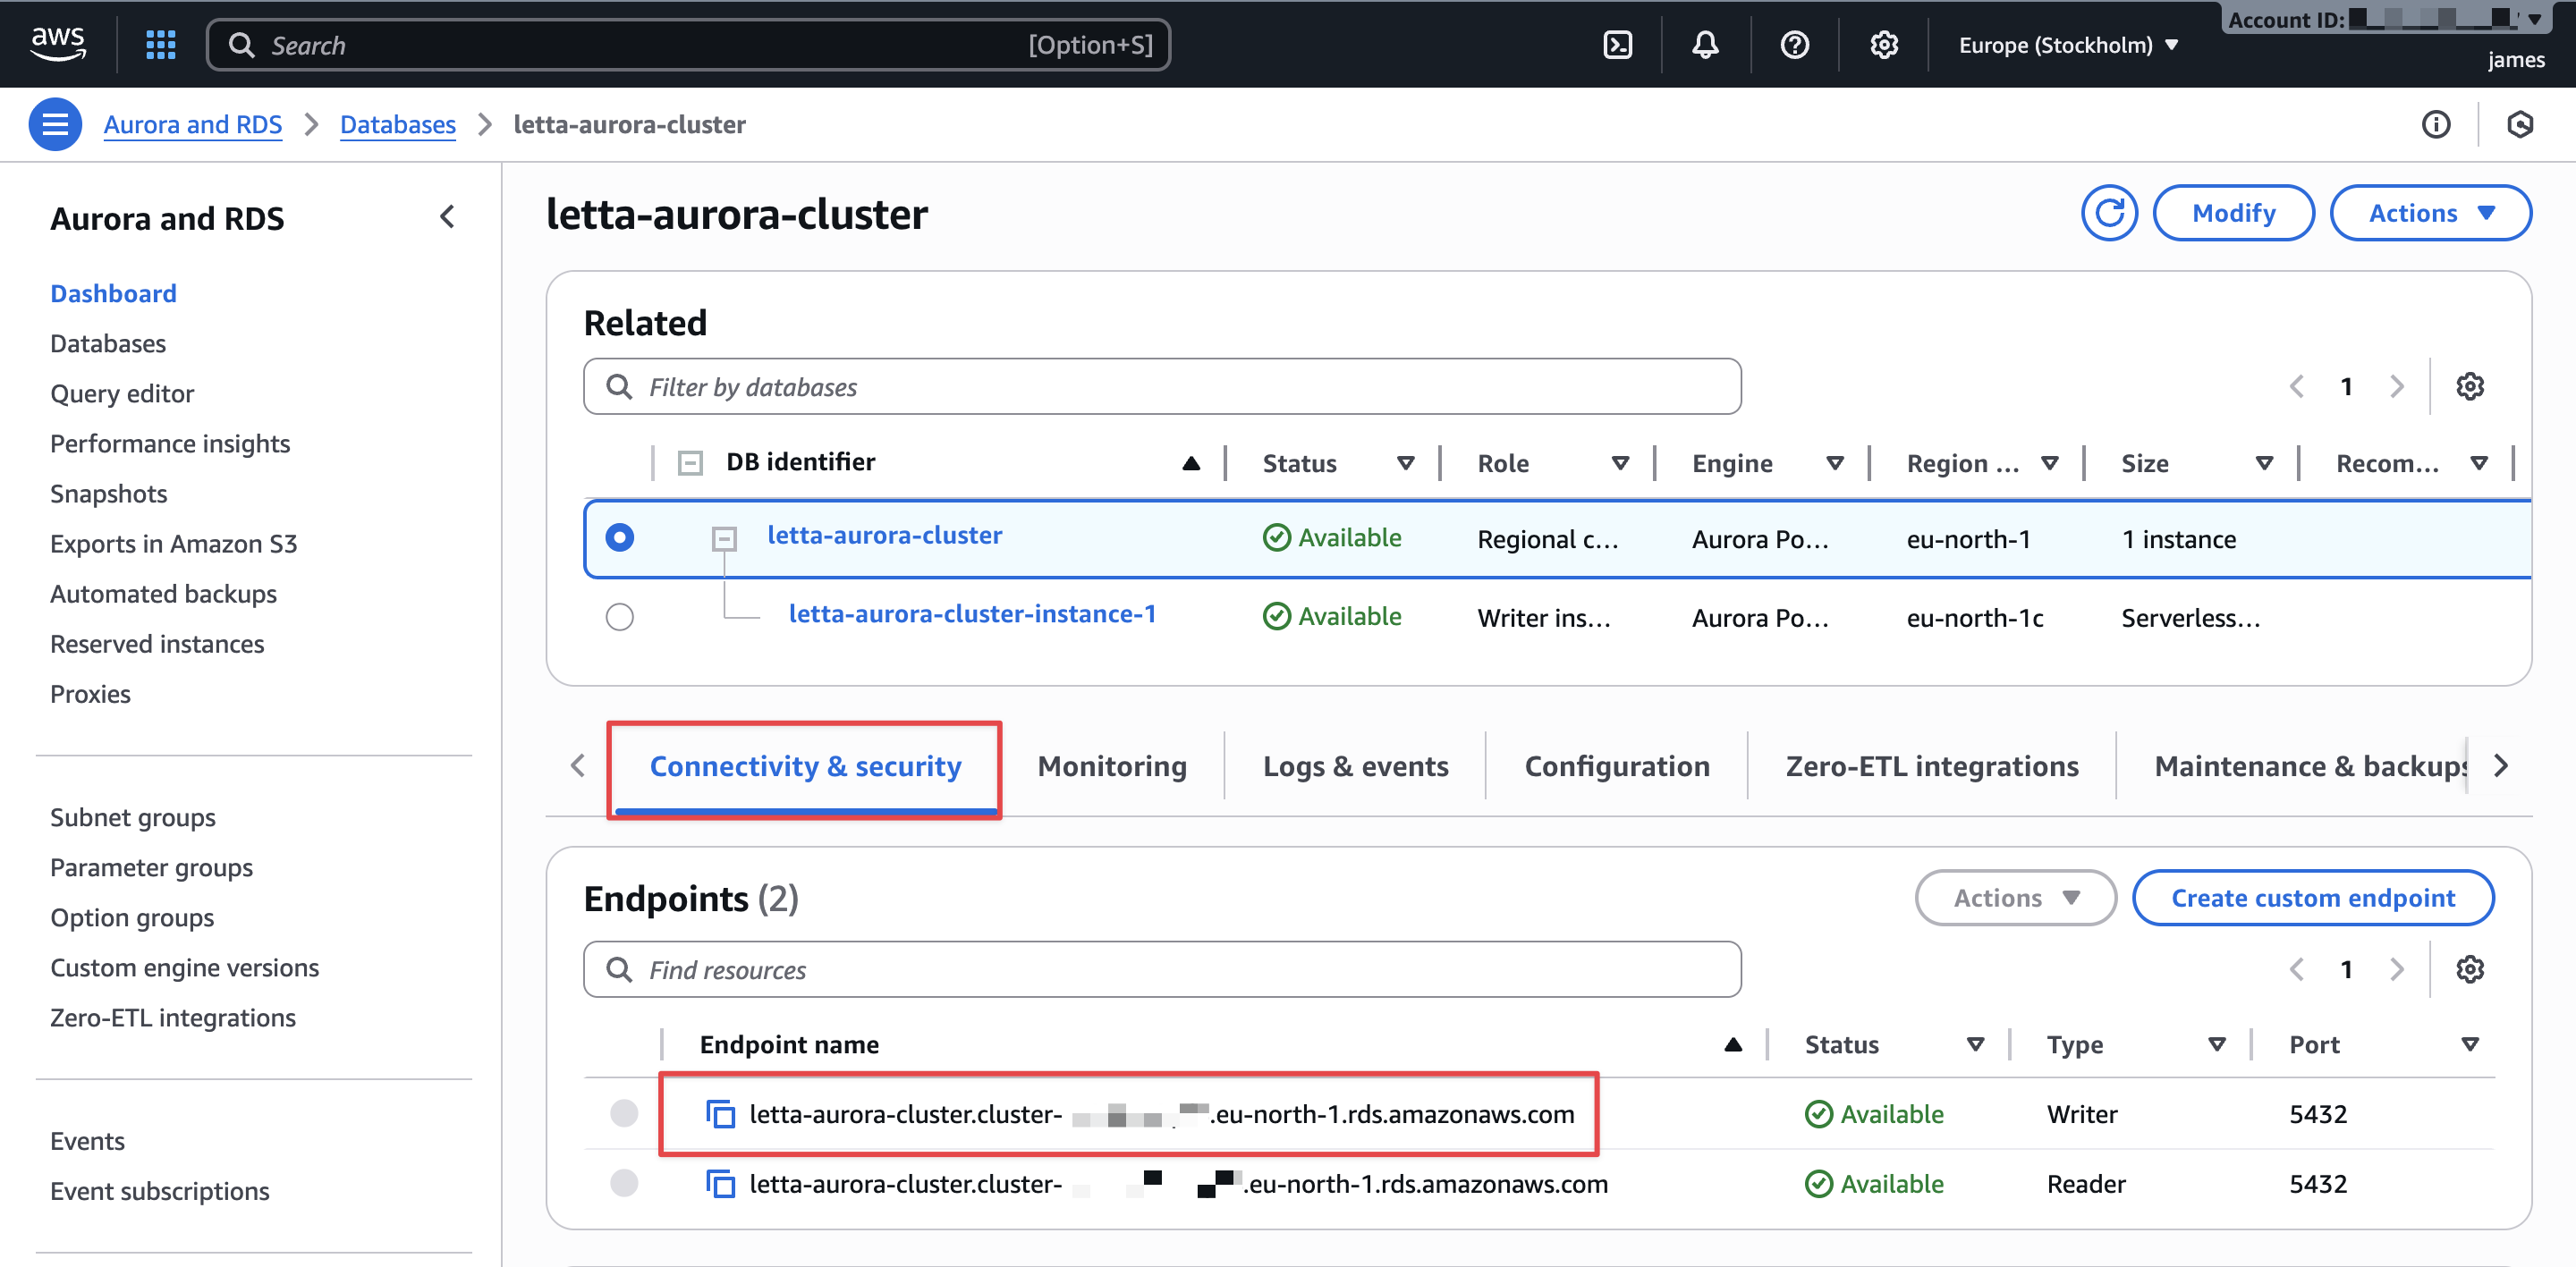
Retrieve cluster endpoint
After the cluster status shows as Available, retrieve the connection endpoint:
- On the Amazon RDS console, choose Databases in the navigation pane.
- Choose your cluster.
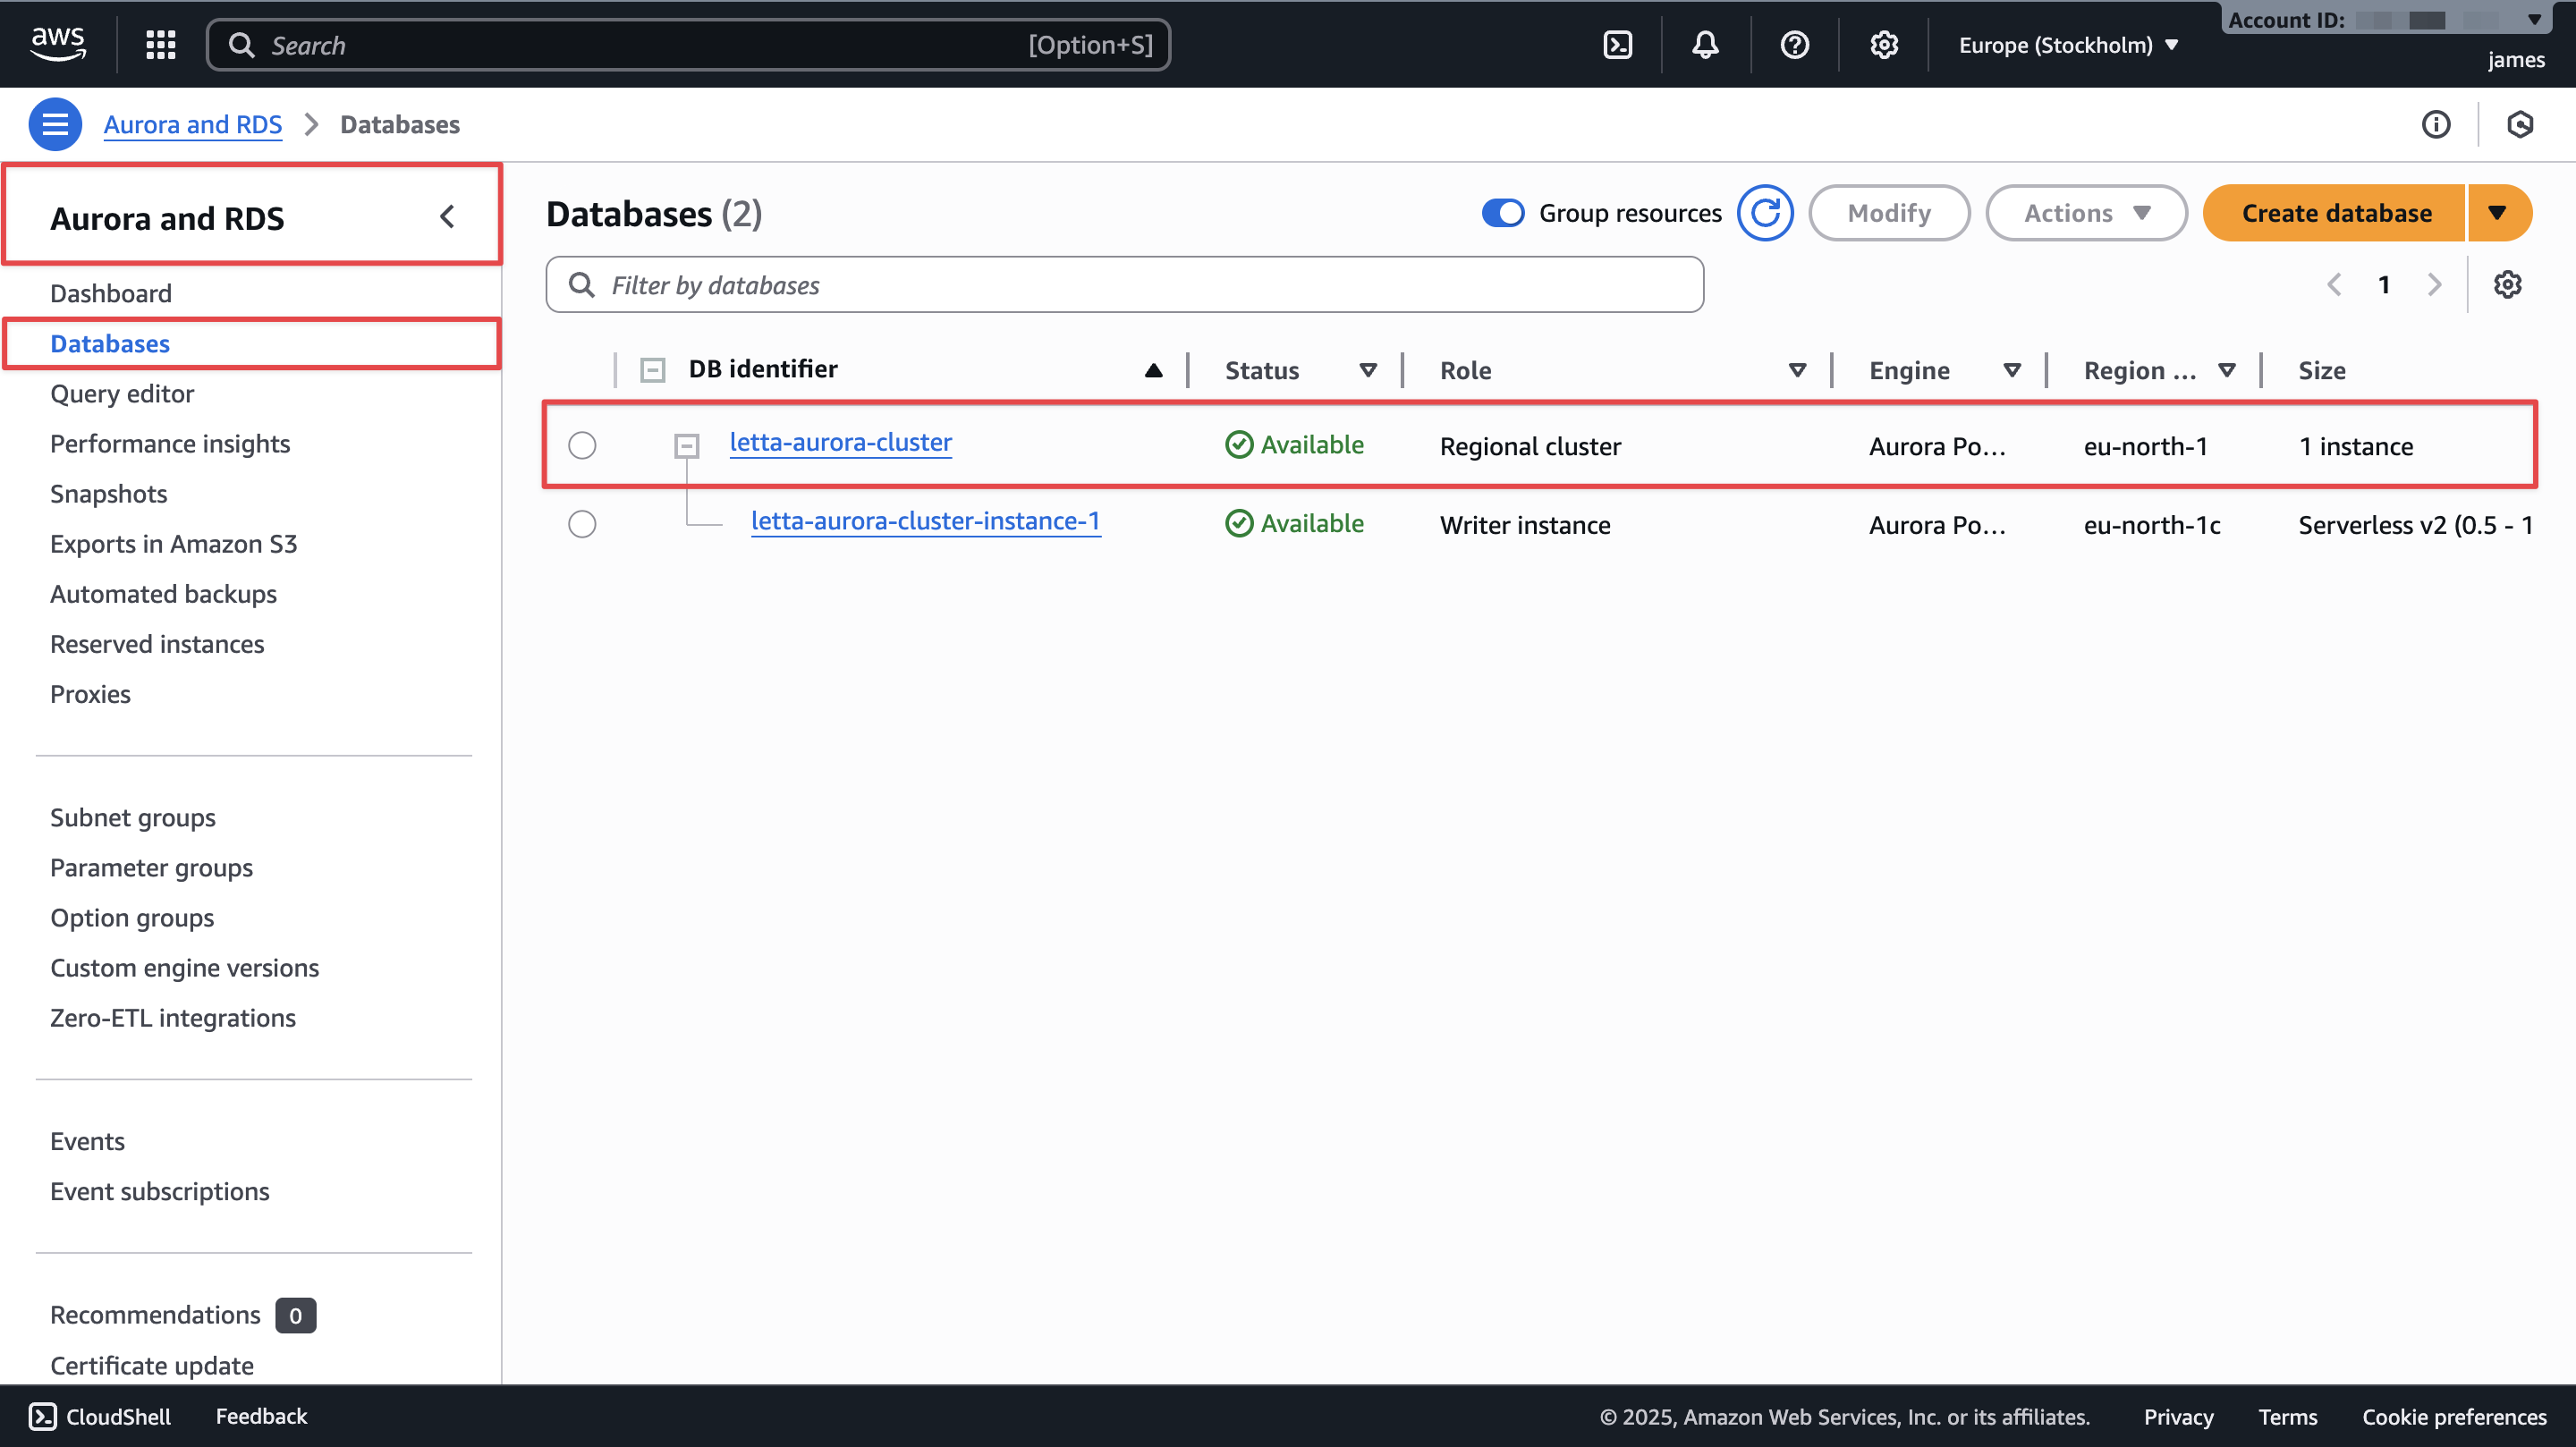
- On the Connectivity & security tab, go to the Endpoints section.
- Copy the writer instance endpoint. It looks similar to
letta-aurora-cluster.cluster-abc123def456.us-east-1.rds.amazonaws.com. You will use this endpoint to construct the PostgreSQL connection string.
Install pgvector extension
Letta uses the pgvector extension to store vector embeddings for agent memory. You must manually enable this extension before connecting Letta.
To install pgvector, complete the following steps:
- Connect to Aurora using the psql command line tool:
- When prompted, enter the primary password you configured during cluster creation.
After successful connection, you will see the PostgreSQL prompt: - Create the pgvector extension:
- Verify the installation:
- Exit psql:
Your Aurora cluster is now ready for Letta connections.
Connect Letta to Aurora
With Aurora configured, you can now run Letta and connect it to your cluster using the LETTA_PG_URI environment variable. Letta’s Docker image automatically detects the external PostgreSQL connection and runs database migrations on startup.
Construct connection string
The LETTA_PG_URI follows the standard PostgreSQL connection string format:
Using the values from your Aurora cluster, construct the string as follows:
Replace the endpoint and password with your actual cluster endpoint and password.
Run Letta with Docker
To start Letta connected to Aurora, run the Docker container with your Aurora connection string and OpenAI API key:
Provide your Aurora primary password, your cluster endpoint, and your OpenAI key.
Watch for the migration output. You should see the following:
This confirms Letta detected the PostgreSQL connection and created the necessary database schema.
When you see the following output, the server is ready:
Letta is now running and connected to Aurora. Agent data will persist to your Aurora cluster instead of local storage.
Create and test an agent
To verify the connection works, create an agent and send it a message. Choose either Python or TypeScript based on your preferred language.
Using Python
With Python, complete the following steps:
- In a new terminal, create a Python virtual environment and install the Letta Python client:
- Create a Python script called
test_aurora_agent.py: - Run the script:
You should see output similar to the following code:
Using TypeScript
With TypeScript, complete the following steps:
- Initialize a Node.js project and install dependencies:
- Update your package.json to use ES modules by adding the following:
- Create a TypeScript script called
test_aurora_agent.ts:You might see validation warnings about
tool_return_messagewhen running this script. These are internal SDK type validation messages. The warnings don’t affect functionality. To suppress these warnings,redirect stderr: npx tsx test_aurora_agent.ts 2>/dev/null. - Run the script:
You should see output similar to the following code:
The agent response confirms that Letta successfully created an agent and processed your message. This data is now stored in Aurora.
View agent state in Aurora
Now that you have agents running and storing data in Aurora, you can connect directly to the database to inspect how Letta organizes agent state, memory, and conversations.
Connect to Aurora
Using the same psql connection from earlier, connect to Aurora:
Explore the database schema
Letta creates 42 tables to manage agents, memory, messages, and associated metadata. To view all tables, use the following command:
You should see output showing tables including agents, messages, organizations, users, block, sources, and other details:
The key tables for understanding agent state are:
- agents – Stores agent configuration and metadata
- messages – Contains all conversation messages with full content as JSON
- organizations and users – Manages multi-tenant access control
- block and block_history – Stores memory blocks and their revision history
- sources and source_passages – Contains data sources and their embeddings for retrieval
View agent information
To see all agents in your database, use the following code:
View agent messages
To see the conversation history for a specific agent, use the content column, which stores messages as JSON (the text column is empty in current Letta versions):
The following is an example of the output:
The messages table stores the complete conversation flow as JSON, so you can trace exactly how agents process and respond to user input.
Examine message content structure
Letta stores message content as JSON. To view the detailed structure of an assistant message, use the following code:
The following is an example of the output:
This shows the JSON structure of assistant messages. Each message is stored as an array of content objects with type, text, and optional signature fields. System messages contain the full agent instructions including memory blocks, and assistant and user messages contain the conversation content.
Understanding the schema for embeddings and data sources
Letta uses the pgvector extension to store embedding vectors for semantic memory search and Retrieval Augmented Generation (RAG). The database includes tables specifically designed for vector storage:
For a newly created agent with basic conversation history, both tables will show 0 records. These tables are populated when you take the following actions:
- Attach documents or files to an agent as data sources
- Use archival memory features for long-term storage
- Implement RAG workflows
The source_passages table stores embeddings for external data sources, and archival_passages stores embeddings for the agent’s archival memory system. Both use pgvector’s vector data type for efficient similarity search.
Clean up
When you’ve finished exploring the integration, delete the Aurora cluster and associated resources to avoid ongoing charges.
Delete the Aurora cluster
To delete your Aurora cluster, complete the following steps:
- On the Amazon RDS console, in the navigation pane, choose Databases.
- Select your database within the cluster (such as
letta-aurora-cluster-instance-1). - Choose Actions, then choose Delete.
- Enter
delete mein the confirmation field. - After the instance is deleted, you can delete the cluster.
- For Create final snapshot, choose No (this is a test environment).
- Enter
delete mein the confirmation field. - Choose Delete.
The deletion process takes several minutes.
Delete the security group
After the cluster is deleted, complete the following steps to delete the security group:
- On the Amazon EC2 console, in the navigation pane, choose Security Groups.
- Select the security group you created (such as
letta-aurora-sg). - Choose Actions, then choose Delete security groups.
- Choose Delete.
Conclusion
In this post, you configured Letta to use Aurora PostgreSQL as a managed database backend. You created an Aurora Serverless cluster, configured security group access, installed the pgvector extension, and connected Letta using the LETTA_PG_URI environment variable. You then created AI agents that persist their state to Aurora and queried the database to view agent conversations and memory.
This integration enables production deployments of Letta with the scalability, durability, and high availability that Aurora provides. For production use, consider implementing additional security measures such as AWS Identity and Access Management (IAM) database authentication, encryption at rest, and restricting security group access to specific IP ranges or VPC configurations.
To learn more about Letta, refer to the Letta documentation guides. For more information about Aurora PostgreSQL, see Working with Amazon Aurora PostgreSQL.