AWS Database Blog
How to manage AWS Auto Scaling policies easily with tag-based scaling plans
AWS Auto Scaling can scale your AWS resources up and down dynamically based on their traffic patterns. However, a typical application stack has many resources, and managing the individual AWS Auto Scaling policies for all these resources can be an organizational challenge. With scaling plans, you can automate the creation of AWS Auto Scaling policies and modify these policies easily by using tags. In this blog post, I demonstrate how to aggregate, configure, and manage AWS Auto Scaling policies by grouping resources based on one or more tags and using scaling plans.
To use tag-based scaling plans, you need to tag your AWS resources before setting up a plan. Before I started this example, I went through my AWS resources that I wanted my scaling plans to manage (Amazon EC2 Auto Scaling groups and Amazon DynamoDB tables, in my case). I then tagged my resources using an Environment tag with the correct corresponding value of either DEV, BETA, or PROD. I can use the Environment tag to group and manage the scaling policies of the resources by infrastructure location and adjust target utilization percentages. See AWS Tagging Strategies for useful tips and strategies for tagging your resources.
Note: AWS Auto Scaling is currently available in the regions shown in the AWS Region Table.
Setting up scaling plans based on infrastructure environment
In this section, I set up one scaling plan for all of my development resources and a second plan for my production resources. These scaling plans allow me to set the target utilization parameter easily on a group of related resources that are associated with the tags I select.
Creating a plan for development resources
- To get started, I navigate to the AWS Auto Scaling console. I choose Get started because I have no existing scaling plans. (If I had existing plans, I would choose Create scaling plan on the AWS Auto Scaling console.) I then choose Search by tag to search for resources by tags that are applied to them.
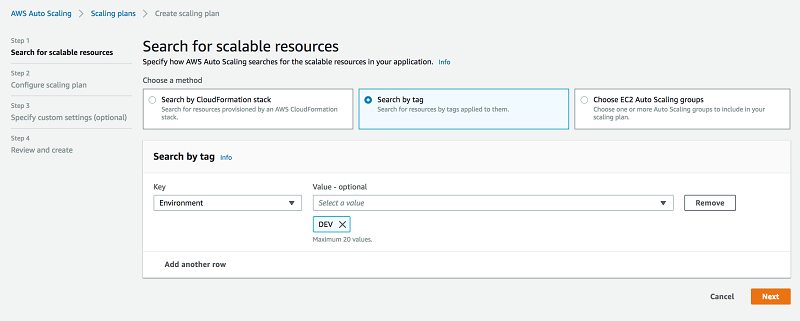
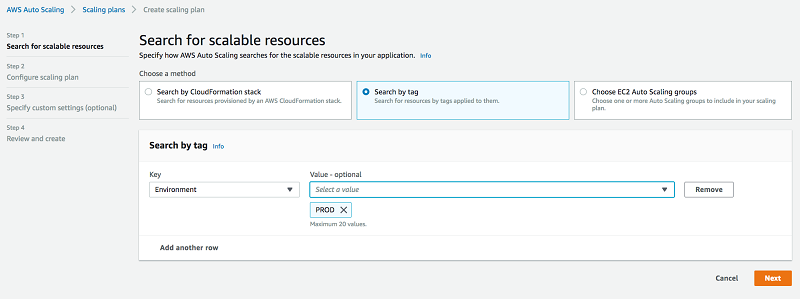
As shown in the preceding screenshot, to search by tag, I choose Environment as the Key and DEV as the Value. (If you don’t see any options under Key, make sure that you have already gone through the resources you want to manage and tagged them appropriately, as I mentioned in the introduction.) Searching with these parameters finds all resources that are tagged with DEV.
Optionally, I could add other values such as BETA, which would act as an OR operation (thus finding all environments tagged as DEV OR BETA). Additionally, I could add another row to filter on a different Key such as Owner, which would act as an AND operation (for example, Owner is Alice AND Environment is DEV or BETA). Again, for the best tagging results, see AWS Tagging Strategies.
- Now that I have chosen the DEV tag for Environment, I choose Next to configure policies for the resources found when searching by tag.
- On the next page, I enter Developer Scaling Plan as the Name of the scaling plan. Be sure to supply a scaling plan name based on the tags that you are using.
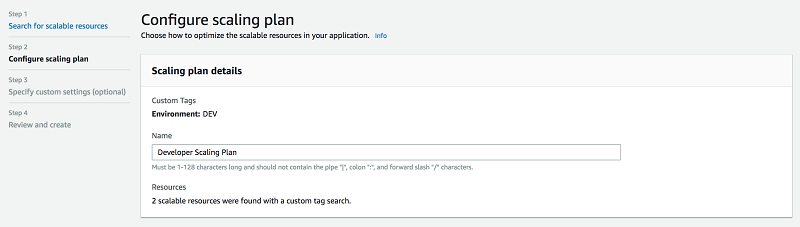
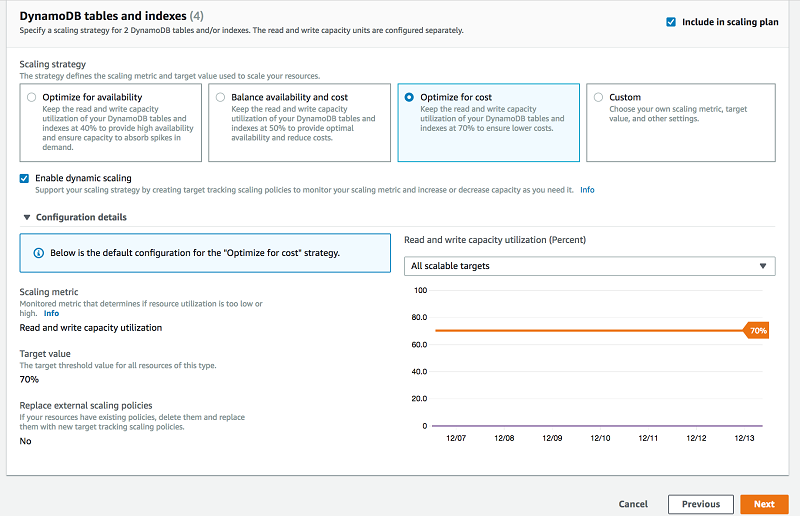
- Scrolling down, I see that the scaling plan has found two DynamoDB tables for my development environment. I now have to choose a Strategy, which tells AWS Auto Scaling how to scale these resources dynamically. Because this is a development environment, I choose to Optimize for cost (to account for a higher resource utilization target). I then choose Next to go to the Review and create Note: If the resources have existing scaling policies you can select Custom and check Replace external scaling policies to have them managed by the plan.
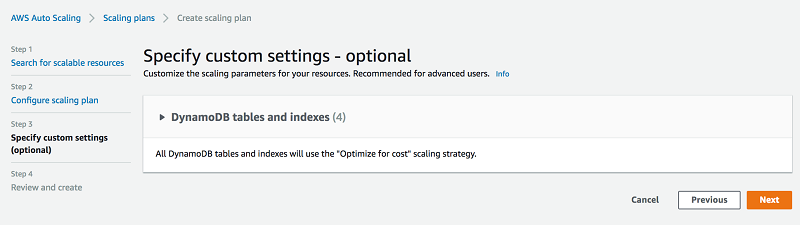
- The next page allows you to fine tune any setting managed by the plan if desired. I will be skipping this step, so I click Next. This might be useful if some resources are more/less important and you can specify lower/higher target utilizations as necessary.
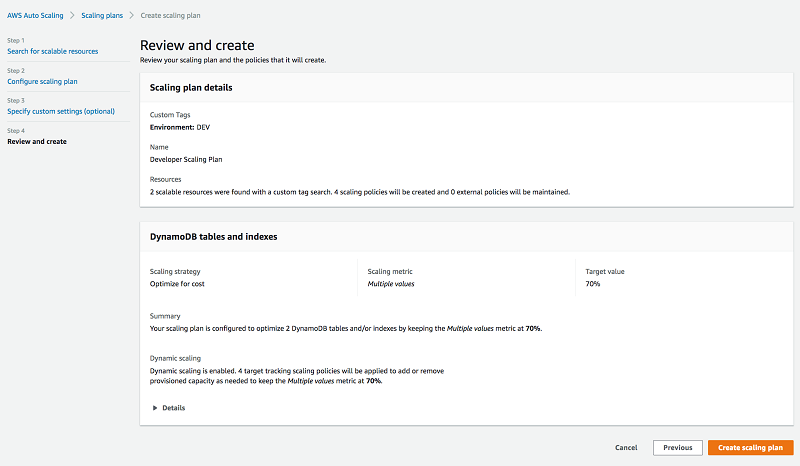
- I confirm the number of resources found by the custom tag search, the name of the scaling plan, and the summary of changes. As you can see in the following image, this scaling plan automatically creates four new scaling policies, two for each table (one for read capacity and another for write capacity). Everything looks good, so I choose Create scaling plan.
Creating a plan for production resources
Now, I want to repeat the preceding steps for the production environment:
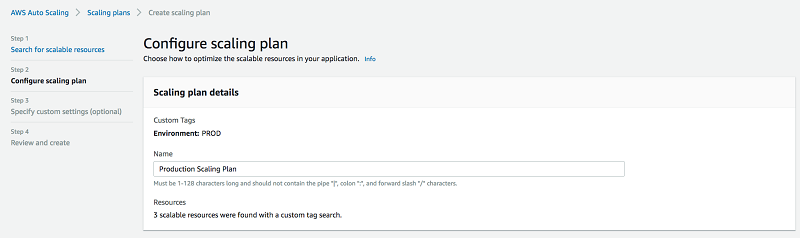
- I start by creating a new scaling plan and choosing the PROD tag for Environment, as shown in the following screenshot.
- On the Configure scaling planpage, for Scaling plan details, I enter Production Scaling Plan for the name of my plan.
- Because this is a production environment, I want to overprovision my resources to handle large traffic spikes better. As a result, I choose Optimize for availability to use a lower resource utilization target.
This time, DynamoDB tables and an Amazon EC2 Auto Scaling group are found, so I will configure both here. As I mentioned earlier in this post, scaling plans can manage different types of resources with different strategies for each.

- I’m then prompted to specify custom settings if I desire, but I skip this step and click Next.

- I then choose Next, review everything, and then finally choose Create scaling plan.
Now, I have set up scaling plans for both my development and production environments. This has reduced the time I need to spend going to each resource individually to manage AWS Auto Scaling policies.
Changing the scaling strategy of a plan
Sometimes traffic patterns change, and you might need to adjust the utilization values to handle the scaling of your application better. If your traffic pattern becomes more consistent, you can try a higher utilization target to save on cost. If your application experiences unpredictable bursts, a lower utilization target would be better so that you can easily absorb the traffic and have the time to scale out if needed.
If I want to edit the strategy for a scaling plan, I choose that policy on the dashboard, and then choose Edit. I adjust the values of the resources I want to change, choose Next, review the changes, and choose Save changes to commit them.
Potential issues
By default, AWS Auto Scaling does not delete the existing scaling configuration for your resources. If you create a scaling plan for a resource that already has policies configured, the plan is created in the ActiveWithProblems status. To address this, either delete the existing scaling policies and update the scaling plan, or during the creation of the plan, have AWS Auto Scaling replace the existing policies. You can do this in the Configure scaling plan step by selecting Custom for the scaling strategy, and then choosing Replace external scaling policies. You can modify this setting when editing a scaling plan under the Dynamic scaling settings.
Summary
In this post, I showed how to use AWS Auto Scaling plans to efficiently manage and create AWS Auto Scaling policies on a large number of AWS resources for different environments. These scaling plans create policies automatically and allow you to modify these policies easily by using tags. You can extend this approach to other AWS resources such as Amazon EC2 Spot Fleets and Amazon Aurora Replicas, whose plans you can scope easily based on any number of tags.
About the author
 Dario Marasco is a software development engineer at Amazon Web Services. He focuses on the DynamoDB control plane and also works on DynamoDB auto scaling.