AWS Database Blog
How to Migrate Your Oracle Data Warehouse to Amazon Redshift Using AWS SCT and AWS DMS
Shree Kenghe is a solutions architect at Amazon Web Services.
This blog post gives you a quick overview of how you can use the AWS Schema Conversion Tool (AWS SCT) and AWS Database Migration Service (AWS DMS) to help you migrate your existing Oracle data warehouse to Amazon Redshift. Amazon Redshift is a fast, fully managed, petabyte-scale data warehouse service that makes it simple and cost-effective to analyze all your data using your existing business intelligence tools. Migrating your Oracle data warehouse to Amazon Redshift can substantially improve query and data load performance, increase scalability, and save costs.
When migrating your database from one engine to another, you have two major things to consider: the conversion of the schema and code objects, and the migration and conversion of the data itself. AWS has tools to help do both. You can convert schema and code with AWS SCT and migrate data with AWS DMS. AWS DMS helps you migrate your data easily and securely with minimal downtime.
Let’s take a look at the architecture if you are migrating your data warehouse from Amazon RDS for Oracle to Amazon Redshift.
AWS SCT is a client application that can be installed on a workstation, laptop, or Amazon EC2 instance. AWS DMS creates a replication instance that runs on an Amazon EC2 instance in a VPC. You use this replication instance to perform the database migration. The replication instance to be used by DMS, the RDS Oracle database, and Amazon Redshift should all be in the same region. Ideally, they should all be in the same account within the same Availability Zone.
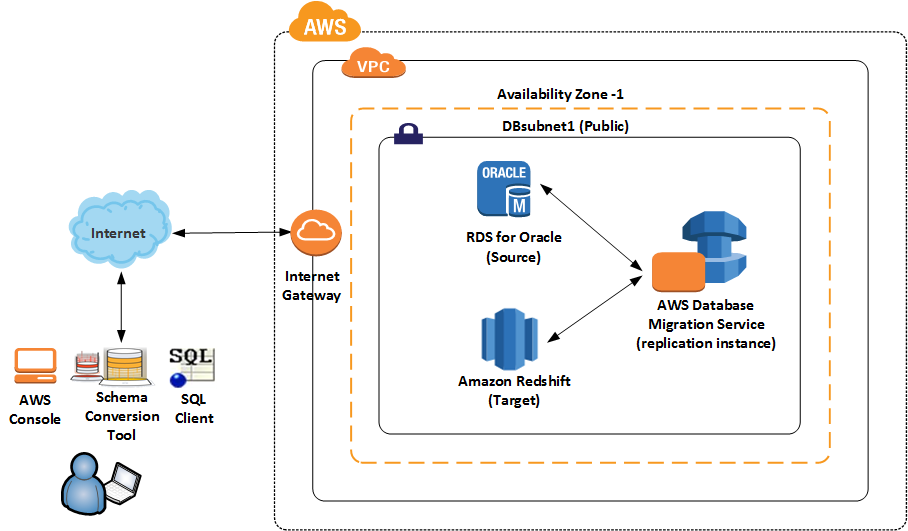
Now that we know how the architecture looks, let’s take a look at the steps to take.
Working with AWS SCT
First step when doing a migration is to know how much time and effort the migration will take. AWS SCT automates much of the process of converting your data warehouse schema to an Amazon Redshift database schema. SCT generates a database migration assessment report for Oracle to Amazon Redshift. This report not only helps you identify the effort required to convert but also identifies issues, limitations, and actions to take for schema conversion.
SCT supports a wide variety of operating systems. For the purposes of this blog, we will run it on Microsoft Windows. To find an overall reference for SCT, start with What Is the AWS Schema Conversion Tool? in the SCT documentation. To download a copy of SCT, see Installing and Updating the AWS Schema Conversion Tool in the SCT documentation.
I will not cover installation and configuration of SCT in this post, but it’s important to know that you need to install drivers for Oracle and Amazon Redshift to connect SCT to your source and target databases.
When converting from Oracle to Amazon Redshift, you need to ensure that you use the right distribution style and sort keys. To do this, take the following steps in SCT before converting the schema:
- Choose your optimization strategy – To optimize how AWS SCT converts your data warehouse schema, you can choose the strategies and rules you want the tool to use. Strategies involve using either metadata, statistical information, or both for optimization. After you choose your optimization strategy, you can choose the rules you want to use. You can choose from the following:
- Choose Distribution Key and Sort Keys using metadata
- Choose fact table and appropriate dimension for collation
- Analyze cardinality of indexes’ columns
- Find the most used tables and columns from QueryLog table
For each rule, you can enter a weight for the sort key and a weight for the distribution key. AWS SCT uses the weights you choose when it converts your schema. When you review the suggested keys later, if you are not satisfied with the results you can change your settings. You do this by choosing Project settings and then Optimization Strategies for Settings. For more information, see Choosing Optimization Strategies and Rules for Use with the AWS Schema Conversion Tool.
- Collect statistics – To optimize how AWS SCT converts your data warehouse schema, you can provide statistics from your source database that the tool can use. You can either collect statistics directly from the database, or upload an existing statistics file. You can right-click on the source schema and select collect statistics. For more information, see Collecting or Uploading Statistics for the AWS Schema Conversion Tool.
- Create mapping rules – Before you convert your schema with AWS SCT, you can set up rules that change the data type of columns, move objects from one schema to another, and change the names of objects. For example, if you have a set of tables in your source schema named OracleDW_TABLE_NAME, you can set up a rule that changes the prefix OracleDW_ to the prefix RedshiftDW_ in the target schema. For Settings, choose Mappings Rules to create new mappings. For more information, see Creating Mapping Rules in the AWS Schema Conversion Tool.
Now connect to your Oracle Data Warehouse source database, right-click on the schema, and generate an assessment report. The assessment report tells you at a very high level how much of the schema can be converted automatically from Oracle to Amazon Redshift and the work that is left after conversion. You can find an example report following.
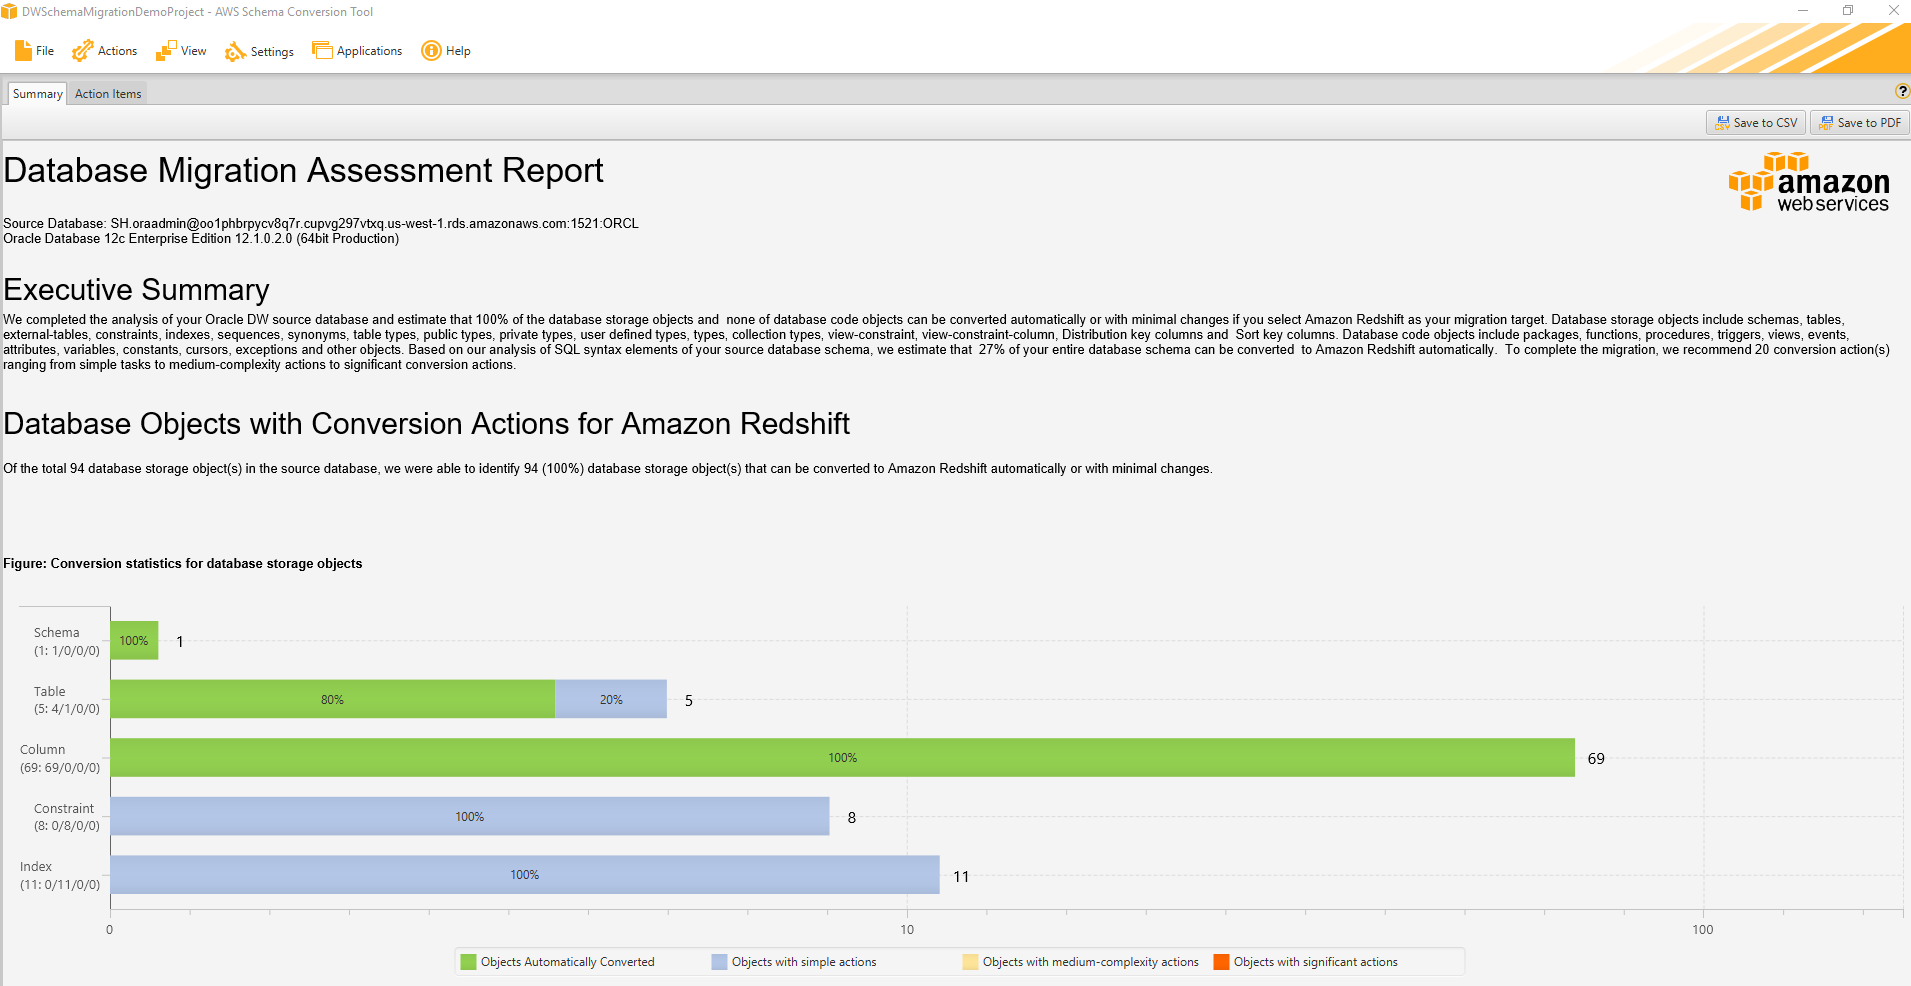
In addition to the assessment report, the SCT also tells you how exactly each object was converted. If an object can’t be converted, the SCT tells you why and give you hints on how you can remedy the situation.

Not all the database features of Oracle Data Warehouse are available to us in Amazon Redshift. Features that aren’t available include indexes, sequences, constraints—check, primary, unique, foreign key (which the optimizer can use but aren’t enforced). Others are PL/SQL language triggers, stored procedures, and SQL functions like SUBSTR, TRANSLATE, ROW_NUMBER, and so on. So it’s unlikely that 100 percent of your schema will convert from Oracle to Amazon Redshift. You’ll need to remedy the situation in one of the following ways:
- Modify objects on your source Oracle database so the SCT can better convert them to Amazon Redshift.
- Convert the schema as-is and modify the scripts generated by the SCT before applying them to your Amazon Redshift database.
- Ignore the inconvertible objects and replace or ignore them on the target. For example, Amazon Redshift doesn’t have the concept of sequence. Instead, you can use IDENTITY columns. An IDENTITY column contains unique auto generated values. These values start with the value specified as seed and increment by the number specified as step. The data type for an IDENTITY column must be either INT or BIGINT.
When all the necessary changes have been made, convert the schema and apply the changes to the target database.
Once the schema has been converted to Amazon Redshift, the other important thing to consider is to review the suggested keys—that is, distribution and sort keys. You might have to adjust your optimization strategies and rules, or collect and upload statistics and then convert your schema again.
You can also manage and edit the keys yourself. Key management is an important aspect of a data warehouse. To help with selecting the best distribution style, see Choose the Best Distribution Style in the SCT documentation. To help with selecting the best sort key, see Choose the Best Sort Key.
In SCT, select each of your tables in Amazon Redshift in the right pane. Then take a look at the Key Management tab in the middle pane as shown following. If needed, customize the keys.

In general, a good approach to using the SCT as part of your migration should include the following:
- Set your optimization strategies, rules, and collect/upload statistics, and create mapping rules. Generate the SCT assessment report and use it to develop a plan to close any gaps in the conversion.
- Review the action items and determine an appropriate remedy for each item that fails in the conversion. Change the code as needed. Also review the suggested keys and make changes as needed. To determine the correct keys, you can either change the optimization strategies, collect or upload statistics, or both. You can also change the keys manually. Then, make changes as needed. Perform the schema conversion. Connect to your Amazon Redshift cluster using SQL Workbench. Verify the sort and distributions keys that are created in the Amazon Redshift cluster by using the following query.
The results of the query reflect the distribution key (distkey) and sort key (sortkey) choices made by using AWS SCT key management.
- You will likely want to iterate on this process. When you’re satisfied with the schema conversion, go to the next step of using the AWS Database Migration Service (AWS DMS) to load data into your target.
Which brings us to AWS DMS!
Working with AWS DMS
During a database migration to Amazon Redshift, AWS DMS first moves data to an Amazon S3 bucket. Once the files reside in an S3 bucket, AWS DMS then transfers them to the proper tables in the Amazon Redshift data warehouse. AWS DMS creates the S3 bucket in the same AWS Region as the Amazon Redshift database. The AWS DMS replication instance must be located in that same region.
One great thing about DMS is that in addition to loading your bulk data, it captures and applies ongoing transactions. It brings and keeps your Oracle source and Amazon Redshift target databases in sync until you’re ready to cut over. When you are ready to cut over to Amazon Redshift, you simply stop the application, let DMS apply the few remaining transactions, and start using your new Amazon Redshift database for querying and reporting purposes. This approach can significantly reduce the outage time required to complete your migration. Any DMS migration includes the following elements: a source endpoint, Oracle; a target endpoint, Amazon Redshift; a replication server; and a task.
There are a few things to consider when using DMS to migrate from Oracle to Amazon Redshift:
Supplemental logging – For DMS to capture changes from your Oracle source, you need to enable supplemental logging. Detailed instructions can be found in the DMS documentation.
Enhanced VPC routing – If you’re using the enhanced VPC routing feature with your Amazon Redshift target, the feature forces all COPY traffic between your Amazon Redshift cluster and your data repositories through your Amazon VPC. Because enhanced VPC routing affects the way that Amazon Redshift accesses other resources, COPY commands might fail if you haven’t configured your VPC correctly. AWS DMS can be affected by this behavior because it uses the COPY command to move data in S3 to an Amazon Redshift cluster.
If enhanced VPC routing is not enabled, Amazon Redshift routes traffic through the Internet, including traffic to other services within the AWS network. If the feature is not enabled, you also don’t have to configure the network path. If the feature is enabled, you must specifically create a network path between your cluster’s VPC and your data resources.
Data types – When migrating to a new database engine, it’s critical to understand which data types are supported and how the source data types are transformed into the new target data types. For this example, you should check Oracle source data types and Amazon Redshift target data types in the DMS documentation.
Performance – The overall performance of your migration can vary depending on the amount, type, and distribution of data in your Oracle source. The Database Migration Services Best Practices whitepaper has some good recommendations for optimizing the performance of your migration. You can specify additional connection attributes when creating an endpoint for AWS Database Migration Service.
For example, for Amazon Redshift you definitely want to make sure you increase the maxFileSize parameter to be greater than the default value. The maxFileSize parameter specifies the maximum size (in KB) of any CSV file used to transfer data to Amazon Redshift. The default is 1024, but you probably want to increase it to a bigger number depending on the number of threads you have specified. The fileTransferUploadStreams parameter specifies the number of threads used to upload a single file. You can definitely increase fileTransferUploadStreams to improve performance in certain situations. However, keep an eye on I/O when increasing it. You can find additional information on connection attributes in Using Extra Connection Attributes in the DMS documentation.
Post-migration activities – You’ll want to do a few things after migration, such as making sure you have primary keys and foreign keys defined in your target database. Even though they are informational only in Amazon Redshift, the query optimizer uses those constraints to generate more efficient query plans. Also, make the necessary changes in the application to point to the new database. Test a few queries to make sure all your data from the Oracle database migrated to Amazon Redshift. Point your application to the new Amazon Redshift database and test again.
To summarize the steps:
- Use the SCT assessment report to get an overview of the task at hand. Practice generating your target schema while optimizing the keys and making needed changes to your code and objects.
- Load the target Amazon Redshift database using DMS and perform any post-migration tasks as needed.
- Test your application on your target system to ensure it works as expected in your new environment. Try to test your application in a configuration that resembles your production configuration, including load, network configuration, and so on.
- Practice the actual migration including generating your schema, loading your data, applying post processing steps, bringing the target system in sync with the source, querying target to make sure data has migrated, and any cut-over steps you might require.
Before you begin your actual migration, we recommend you thoroughly read the documentation for both the SCT and DMS. We also recommend you read the step-by-step walkthrough and the Database Migration Services Best Practices whitepaper.
If you’d like to use our sample database to get a feel for using the tools, you can find it in the AWS GitHub repository.
Although this blog post is not intended to outline all possible steps or considerations that might be required for your particular situation, it should give you a good idea how you can use the SCT and DMS to move your Oracle data warehouse to Amazon Redshift which is a simple, fast, powerful, fully managed data warehouse service. Good luck and happy migrating!