AWS Database Blog
How to Use SSL with the AWS Schema Conversion Tool Data Extractors
In another blog post, we described how to use the AWS Schema Conversion Tool data extractors (AWS SCT data extractors) to migrate your legacy data warehouse to Amazon Redshift. Amazon Redshift is a fast, fully managed, petabyte-scale data warehouse service that makes it simple and cost-effective to analyze all your data using your existing business intelligence tools. Migrating your data warehouse to Amazon Redshift can substantially improve query and data load performance, increase scalability, and save costs. The Schema Conversion Tool is provided free of charge by AWS to help you migrate your legacy data warehouse to the cloud.
This blog post gives you a quick overview of how you can use Secure Socket Layer (SSL) encryption with the SCT data extractors. SSL is the standard security technology for establishing an encrypted link between applications. With this link, all data passed between the applications remain private and integral.
If you’re not familiar with the overall process of how to install and configure the SCT extractors, read the blog post How to Migrate Your Data Warehouse to Amazon Redshift Using the AWS Schema Conversion Tool Data Extractors before digging into the SSL setup.
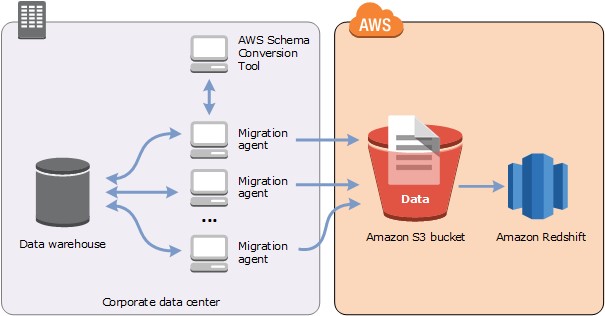
Architecture
You can install the SCT extractors on any servers with connectivity to your source data warehouse. The SCT client application issues commands to the extractors to pull data from the source system, upload the data to Amazon S3, and copy the data into Amazon Redshift. You can install multiple extractors on the same machine. Alternatively, you can separate them as needed across many machines. Which approach you might prefer depends on your available server resources and network capacities. In general, a best practice is to locate the data extractors close to your data warehouse to reduce network traffic and latency.
The extract files produced by the extractors are compressed, using lossless LZO compression, then copied to an S3 bucket. The files are compressed to reduce network transfer time and to reduce storage costs on S3. After the files are uploaded to S3, the extractor triggers Amazon Redshift to copy the data into the target tables using the standard Amazon Redshift COPY command.
Now that we know what the architecture looks like, let’s take a look at the steps involved in setting up SSL for SCT and the data extractors.
In the following example, we use Amazon EC2 running Red Hat Linux to host the extractors. However, you can install the extractors on-premises, and on many platforms, including Microsoft Windows, Ubuntu, macOS, and Red Hat.
The SCT client in this example runs on a Mac laptop. Because the client offloads data processing chores to the extractors, a small desktop or laptop is perfectly suited to run the client.
Setup
In the SCT client, you need to generate trust and key stores to enable SSL between the client and the extractors. In this example, we create new trust and key stores for this application, rather than reusing existing keys.
In the SCT client, navigate to the Global Settings, Security page and choose Generate Trust and Key Store.

You are asked for the name of a folder in which to store the keys, the names of the keys, and the passwords for the keys. Be sure to write down the key names and passwords, because you’ll need to supply them later when you configure the extractors. For this example, we use the following values:
- Folder: aws_folder
- Key store
- Name: aws_key
- Password: <key_password>
- Trust store
- Name: aws_trust
- Password: <trust_password>
Of course, choose names that are meaningful to you and passwords that are secure.

Finally, copy the trust and key stores to your extractor servers.
Configuring the Extractors
The next step is to configure the extractors to use SSL.
We’ll use the following information to set up the data extractors:
- Source data warehouse engine: Oracle
- Source data warehouse port: 8192
- Oracle JDBC driver location: /usr/local/jdbc-drivers/ojdbc7.jar
- Amazon Redshift JDBC driver location: /usr/local/jdbc-drivers/RedshiftJDBC42-1.2.1.1001.jar
- Shared output folder: /efs
- Private working folder: /home/ec2-user/private
Now, run the sct-extract-setup.sh program to configure the extractor. The extractor runs as a listener on the port designated in the configuration. You specify this same port number in the SCT client to register the listener. You use the same source database (Oracle), port number (8192), and trust and key store names and passwords that you specified earlier for the SCT client.
After completing the configuration, inspect the settings.properties file. It should look like the following.
Finally, you’re ready to start the extractor process. Start the process using the systemctl command and verify that it is running.
At this point, extractor configuration is complete. The next step is to establish communication with the SCT client by registering the extractor.
Configuring the SCT Client
Return to the SCT client and navigate to the View, Data Migration View page. Choose the Agents tab and choose + Register to register a new agent. Here you fill in a name for the extractor, the server name, and the port it is listening on. You also select the Use SSL box to enable secured communication with the extractor. You can verify the correct key store and trust store files are selected by choosing the SSL tab.

Verify the connection to the agent by choosing Test Connection. Then choose + Register to establish the connection to the extractor.
If the test is successful, then the setup is complete and you are ready to start a migration.
Troubleshooting
If the connection test is not successful, then you need to dig in and check a few things.
There are two separate log files to check for information related to the setup. On the extractor server, the private folder configured in the extractor setup is an important source of information. For this example, the extractor log is contained in the following file:
For the SCT client, the log location can be found from the Settings, Global Settings menu, as follows.

The following steps can help you identify and correct the issue:
- Verify that the extractor is running, for example:
ps –eaf | grep java - Verify that the extractor is listening on the configured port, for example:
netstat -tulpn - Verify that the SCT client and the extractor are using the same communication port for communication.
- Verify that your extractor server accepts incoming TCP traffic on the configured port.
If these checks are successful, try reconfiguring SCT and the extractors without SSL to isolate any network or OS configuration issues.
If you need to make any changes, be sure to stop and restart the extractor to force it to pick up configuration changes.
I hope you find this information useful in your next (or current) data warehouse migration.
Thanks for reading and happy migrating!
About the Author
 Michael Soo is a database engineer at Amazon Web Services.