AWS Database Blog
Storage layout and best practices for Amazon RDS Custom for SQL Server
Amazon Relational Database Service (Amazon RDS) Custom for SQL Server provides OS-level access to the underlying operating systems. However, this access also exposes internal storage volumes that can appear as uninitialized disks to an unfamiliar administrator. Formatting or modifying the volume results in data loss that requires a full restore from an earlier backup.
On Amazon RDS Custom for SQL Server, the W: drive appears as a raw, uninitialized disk. In reality, it is the block-level replication layer underlying your D: data volume. An administrator unfamiliar with this architecture could inadvertently format it within moments, resulting in total data loss.
In this post, we provide guidance on storage volumes by focusing on the internal partitions that RDS Custom manages. We walk through the storage architecture: the C:, D:, and W: drive relationships and why the W: drive exists. We also cover safe disk operations to avoid data loss, lessons from real customer engagements, and a checklist for administrators working at the OS level.
Prerequisites
You must have an active RDS Custom for SQL Server instance, Remote Desktop Protocol (RDP) access to the Amazon Elastic Compute Cloud (Amazon EC2) host, and familiarity with Windows Disk Management.
Storage architecture
The following diagram shows how the C:\, D:\, and W:\ drives relate to the Amazon Elastic Block Store (Amazon EBS) volumes beneath them. The W:\ drive sits beneath the D:\ data volume as the replication layer.
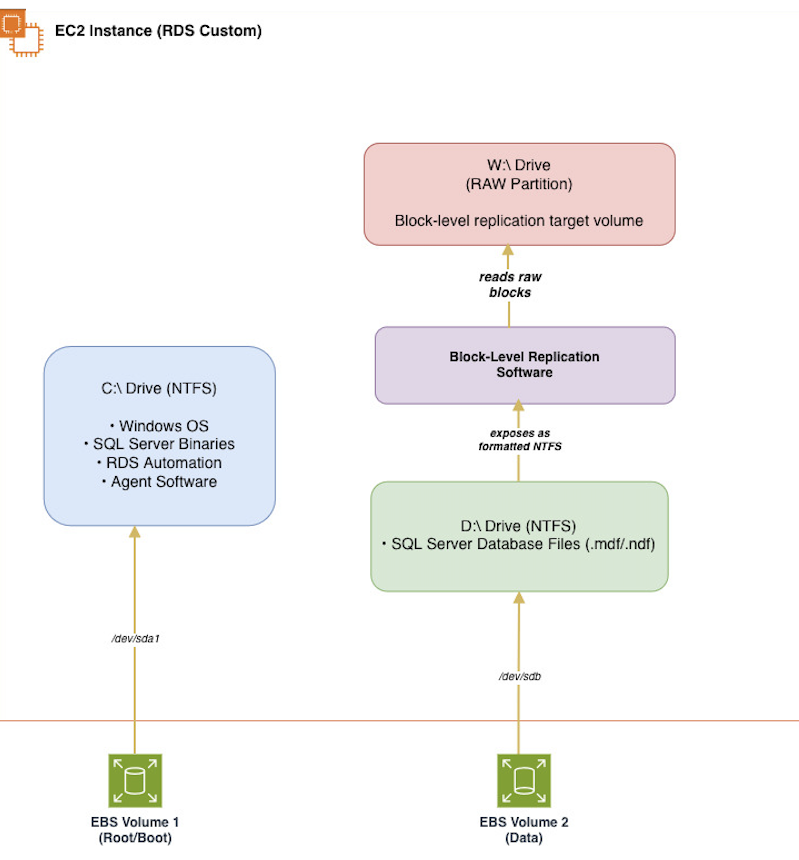
Figure 1: Storage architecture showing how the C, D, and W drives map to Amazon EBS volumes, with the W drive as the replication layer beneath the D data volume
Every RDS Custom for SQL Server instance presents three drive letters inside Windows:
Multi-AZ deployment: primary instance (three drives)
| Drive | Purpose | Modifiable? |
| C:\ | OS, RDS Custom automation, SQL Server binaries | No |
| D:\ | SQL Server data files (.mdf/.ndf), logs (.ldf), tempdb | Never – Formatting causes data loss and service unavailability |
| W:\ | Multi-AZ block-level replication partition — underlies D:\ | Never – Formatting causes data loss and service unavailability |
CRITICAL: W:\ appearing as “RAW” in Disk Management is its normal, expected state. Do not format, partition, or modify it. It will result in complete data loss.
Multi-AZ deployment: secondary instance (two drives)
| Drive | Purpose | Modifiable? |
| C:\ | OS, RDS Custom automation, SQL Server binaries | No |
| W:\ | block-level replication target that receives block writes from the primary instance | Never – Formatting causes data loss and service unavailability |
Note: The secondary (standby) instance does not have a D:\ drive. Data is received at the raw block level through W:\ and is not mounted as an NTFS volume until a failover occurs. During failover, the W:\ replication layer is promoted and D:\ becomes accessible on the new primary.
Single-AZ deployment (3 drives)
| Drive | Purpose | Modifiable? |
| C:\ | OS, RDS Custom automation, SQL Server binaries | No |
| D:\ | SQL Server data files (.mdf/.ndf), logs (.ldf), tempdb | No |
| W:\ | Multi-AZ block-level replication partition — underlies D:\ | Never – Formatting causes data loss and service unavailability |
Note: Even Single-AZ instances are provisioned with the W:\ drive and block replication layer. The reason is conversion readiness: When you convert a Single-AZ instance to Multi-AZ, RDS Custom needs to attach a standby instance and begin synchronous replication immediately. If the replication layer weren’t already in place on the primary, the conversion would require restructuring the storage stack. That would mean downtime and potential data movement on the primary instance.
How the drives relate to EBS
Amazon EBS volumes attach to the underlying Amazon EC2 instance and map to Windows drives. In a Multi-AZ deployment, the synchronous replication flow is:
- SQL Server writes to D: (NTFS file system).
- The write passes through the block-level replication layer.
- The replication layer synchronizes the block to the standby instance.
- After the standby acknowledges, the write is committed locally.
D: and W: are inseparable. Any manual operation on W: severs the replication and leaves D: in an inaccessible state, which can result in complete data loss.
Operating safely
Follow these steps before any disk operation to protect your data.
Pre-operation checklist
- Take an RDS manual snapshot (full database-level recovery point).
- Create an EBS snapshot of the data volume.
- Run the drive identity script in the following section and confirm W:\ is RAW.
- Document all drive letters in Disk Management (
diskmgmt.msc).
Drive identification
You can identify each drive visually in Disk Management or with the PowerShell script that follows.
Using Windows Disk Management
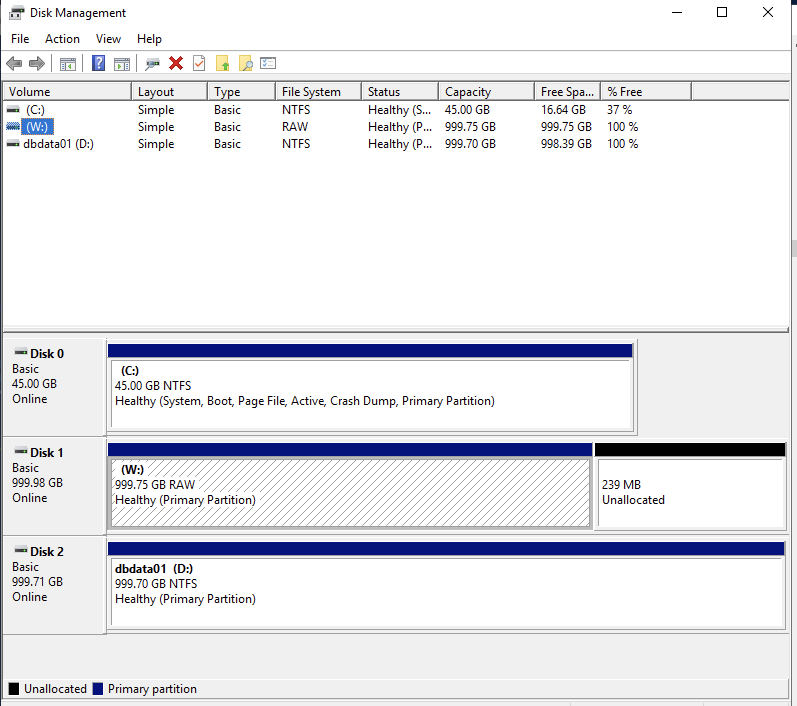
Figure 2: Windows Disk Management showing the W drive (the Multi-AZ block-level replication partition) as RAW beneath the D drive, which is its normal, expected state
Using PowerShell script
Example output on a 1 TB instance:
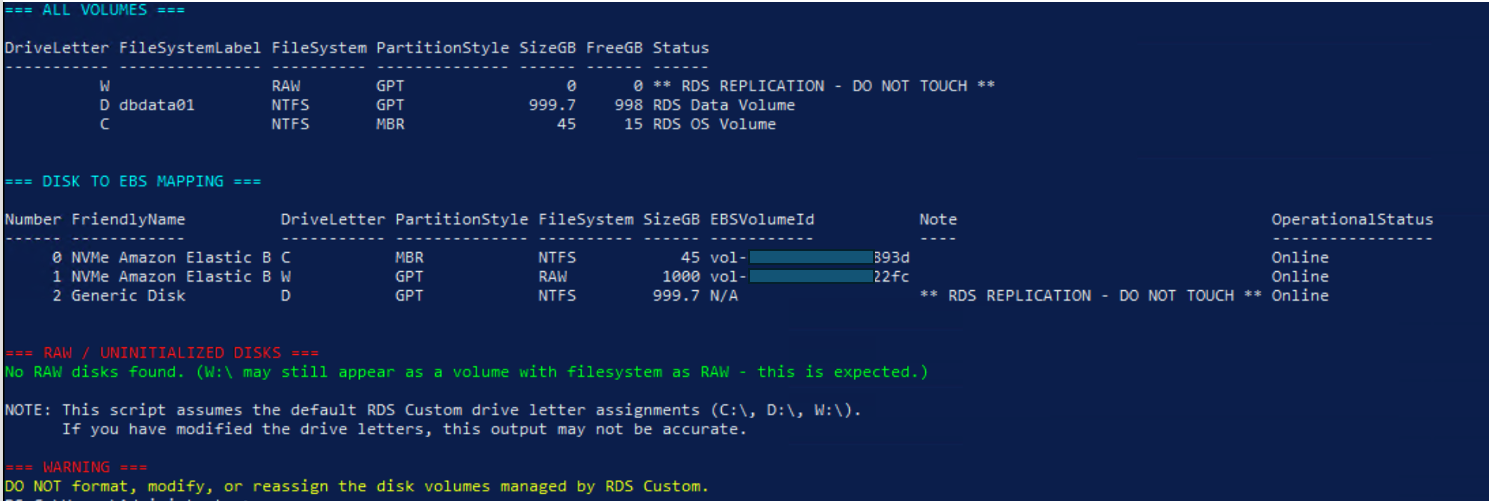
Figure 3: Drive identity report produced by the PowerShell script on a 1 TB instance
Understanding PartitionStyle compared to FileSystem
Windows reports two separate properties for storage devices: PartitionStyle and FileSystem, which describe different layers of the storage stack and can be confusing when both use the term “RAW.”
PartitionStyle (disk level): Indicates whether the physical disk has been initialized with a partition table. Values are GPT, MBR, or RAW. A disk with PartitionStyle = RAW has never been initialized, it has no partition table and appears as “Unknown / Not Initialized” in Disk Management.
FileSystem (volume level): Indicates the filesystem format on a partition. Values are NTFS, ReFS, FAT32, or RAW. A volume with FileSystem = RAW has a partition allocated but no recognizable filesystem and it appears as “RAW” in the File System column of Disk Management.
Key takeaway: The W:\ drive shows FileSystem = RAW because it intentionally has no filesystem and the replication layer writes raw blocks directly. A newly attached user volume shows PartitionStyle = RAW because it has never been partitioned at all. Despite both using the word “RAW,” they represent completely different states at different layers. Only PartitionStyle = RAW with a matching EBS volume ID indicates a disk you can safely initialize.
| Drive | PartitionStyle | FileSystem | What it means |
| W:\ | GPT | RAW | Disk is initialized (has partition table), but the partition has no filesystem and the replication layer uses raw blocks directly. This is the normal, expected state. |
| D:\ | GPT | NTFS | Disk is initialized, partition is formatted with NTFS and SQL Server data files live here. |
| C:\ | MBR | NTFS | Disk is initialized (legacy MBR style), partition is formatted with NTFS. This is the OS volume. |
| User-attached (new) | RAW | Unallocated | Disk has never been initialized and no partition table exists. This is the only disk safe to format (after verifying its EBS volume ID). |
How to correlate PowerShell disks with AWS Command Line Interface (AWS CLI) volumes:
The EBSVolumeId column in the DISK TO EBS MAPPING section extracts the EBS volume ID from each disk’s serial number. Cross-reference this with the aws ec2 describe-volumes output to build a complete picture of your storage layout.
Example output on a 1 TB Multi-AZ instance:
Only two EBS volumes are attached, yet Windows shows three disks. The W: drive isn’t a separate EBS volume. The EBS volume presents as the W:\ raw block device. The D:\ drive (NTFS) is created as a partition on top of W:. The replication layer operates at the block level beneath the NTFS filesystem.
Key insight: RDS Custom tags its managed volumes with names starting with do-not-delete-rds-custom-. This naming convention is an additional safety signal. Never delete or modify volumes with this prefix.
Rules for identifying RDS-managed storage:
- If you attach a new volume, it appears as an additional entry in
aws ec2 describe-volumes. Match its size andvol-xxxxID to the new RAW disk in Windows to confirm identity. - RDS-managed volumes are named
do-not-delete-rds-custom-*.
Attaching additional storage
To safely add storage (for example, for DBCC or backup staging):
- Create EBS volume with tag:
Note: The gp3 EBS volume provisioned here and any associated snapshots incur ongoing charges for as long as they exist. See Amazon EBS pricing for details.
- Attach the EBS volume to the instance.
- Verify and format (only after confirming both the disk’s EBS volume ID and size from the PowerShell drive identity script match the volume ID and size returned by
aws ec2 describe-volumes):
Output from PowerShell script
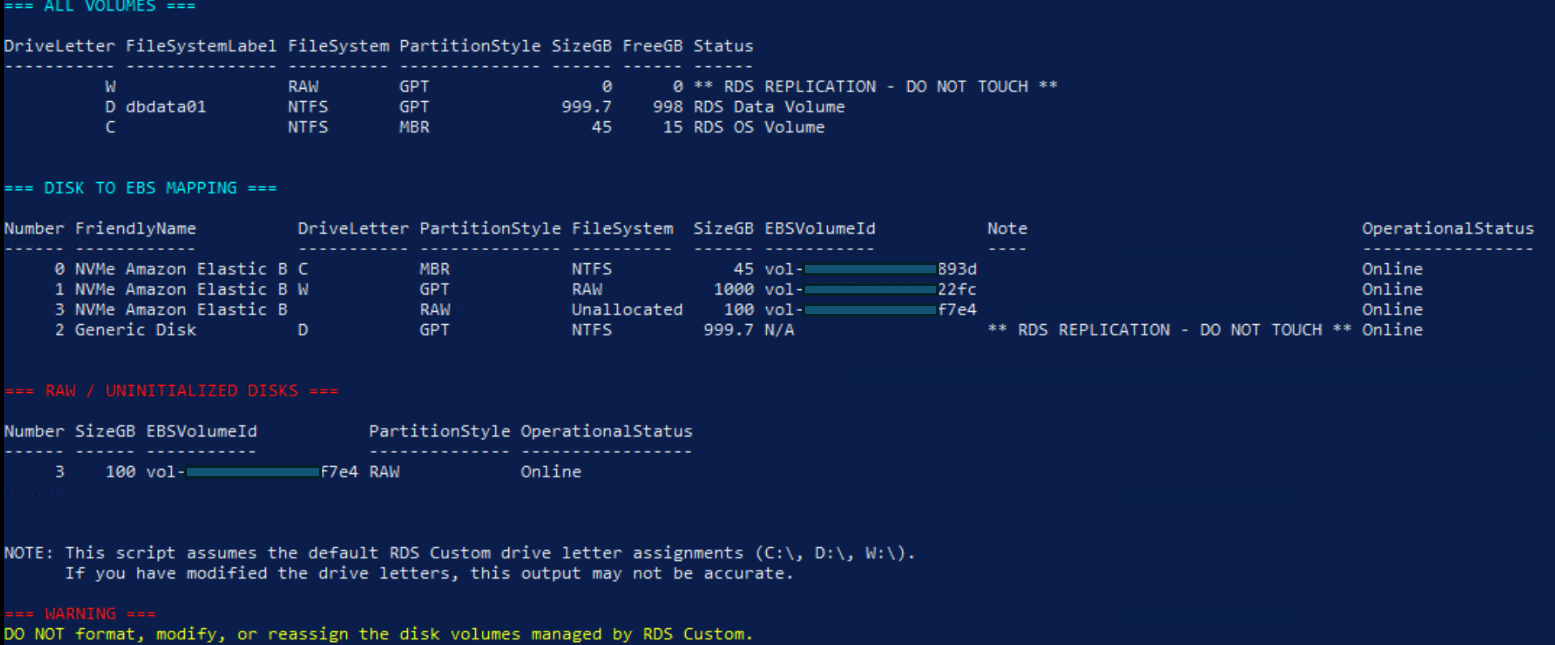
Figure 4: PowerShell output confirming the newly attached 100 GB user-managed volume and its EBS volume ID
Output from the AWS CLI describe-volumes command
Best practices to follow and identifying user-managed storage:
- The volume appears in
aws ec2 describe-volumeswith theManagedBy=usertag specified during volume creation. - The volume name doesn’t start with
do-not-delete-rds-custom-. - In PowerShell, the disk shows as “NVMe Amazon Elastic B” with a valid
vol-xxxxserial number that matches the volume you attached. - The disk size matches exactly what you specified when creating the volume (for example, 100 GB).
You can proceed to format, partition, and assign a drive letter to this disk only after confirming all of the preceding criteria.
Warning: If the RAW disk is the same size as D:, it is the W: replication device. Stop immediately.
Lessons from customer engagements
The following scenarios are drawn from real customer engagements. Each one was avoidable by using the preceding guidance and checklist.
Mistaking the W: drive for a new EBS volume
A database administrator attached a new Amazon EBS volume to their RDS Custom for SQL Server instance. When they opened Disk Management, they saw the newly attached volume (showing as “unallocated”) and the W:\ drive (showing as “RAW”). The administrator confused the unallocated volume with the RAW partition and formatted the RAW partition. The W: drive was the block-level replication partition beneath the D: volume. The moment it was formatted, it resulted in complete data loss. Recovery required restoring from the most recent automated backup snapshot, which lost any data committed since that snapshot.
Note: Point-in-time recovery (PITR) to a new instance might still succeed if transaction logs were uploaded before the incident.
Why it happens: User unaware that the W: drive is an RDS Custom managed disk and unable to distinguish it from a user-attached volume.
Prevention: Always run the drive identity script and match the EBS volume ID from PowerShell against aws ec2 describe-volumes before formatting any disk. Make sure you are dealing with user-attached volumes.
Running disk cleanup or defragmentation on internal partitions
Administrators familiar with Windows Server maintenance sometimes run disk cleanup utilities or third-party defragmentation tools against all visible drives. On RDS Custom, running these tools against the W: drive can corrupt the replication state, potentially resulting in data loss.
Why it happens: Standard Windows Server hardening playbooks often include “defragment all drives” as a routine task. Those playbooks were not written for RDS Custom.
Prevention: Exclude W:\ and D:\ from all maintenance scripts, scheduled tasks, and defragmentation tools (assuming you did not change the default disk volume letters assigned by RDS Automation).
Extending the D: partition without checking
An administrator attempted to extend D: by merging adjacent unallocated space visible in the Disk Management console. The space they targeted belonged to the W: replication partition. The operation impacted the replication state and database availability.
Why it happens: Windows allows partition merging from Disk Management without confirming which service depends on the target space.
Prevention: For storage-scaling operations, use the RDS modify-db-instance API. Never modify partitions through Disk Management or Amazon EBS.
Automating volume operations without drive identity verification
Infrastructure-as-code scripts that automate disk initialization (Initialize-Disk, New-Partition in PowerShell) might target volumes by index rather than by a stable ID. If the volume index order shifts after a reboot or instance replacement, an automation script can inadvertently format the W: drive.
Why it happens: Volume index is not deterministic across reboots on Amazon EC2. Scripts that assume a fixed index order are fragile on RDS Custom, where internal volumes occupy indices that might shift.
Prevention: All automation must identify disks by EBS volume ID (extracted from the disk serial number), never by disk index or assumed position.
Operational guardrails
The following table lists common mistakes, what happens if you make them, and how to prevent each one.
| Mistake | What Happens | Prevention |
| Format W:\ (looks “empty”) | Complete data loss | Run identity script. Verify size ≠ D:\ and verify EBS volume ID |
| Extend D:\ through Disk Management | Impacts replication | Use the RDS modify-db-instance API to increase instance storage size |
| diskpart clean on unknown disk | Wipes RDS partition tables | Only target user attached/tagged volumes |
| Reassign C:\, D:\, W:\ letters | Breaks RDS automation | Never change RDS-assigned letters |
| Defragment D:\ or W:\ | Massive resync + timeouts | Exclude RDS drives from maintenance |
| Automate format without checks | Script may target W:\ | Automation must check tags + size first |
Recovery: If W:\ is lost because of an accidental operation
- Pause RDS Custom automation. For more information, see Pausing and resuming RDS Custom automation.
- Assess: check if the D: drive and SQL Server are accessible by Test-Path D:\ and
Get-Service MSSQLSERVER. - If not, restore from the most recent backup (point-in-time restore preferred)
- Validate: D:\ has files, W:\ is RAW,
DBCC CHECKDBpasses, replication healthy. - Redirect the application to the restored instance.
Important: There’s no way to un-format W:\ in place. Restoration from backup is the only recovery path.
Conclusion
In this post, we walked through the storage architecture of Amazon RDS Custom for SQL Server, and explained why the W:\ drive exists and appears as a raw partition. We also shared safe disk operations, field lessons, and a verification checklist for working at the OS level. Understanding how the C:\, D:\, and W:\ drives relate, and treating the W:\ replication layer as off-limits, helps you use the OS-level access of RDS Custom for SQL Server without putting your data at risk.
The W: drive looks like unused space, but it is the replication layer that keeps your D: data volume intact across Availability Zones. Formatting it, defragmenting it, or merging it into another partition destroys your production data.
Before any disk operation, verify every drive’s identity using the commands shown earlier, take a snapshot first, and leave any drive you do not recognize untouched. These habits keep the flexibility of RDS Custom working for you rather than against you.
For related guidance, see Restore an Amazon RDS Custom for SQL Server instance using a backup from AWS Backup. To learn more about RDS Custom storage management, see the Amazon RDS Custom documentation.
Try the drive identity script in your own environment to see your storage layout before performing any disk operation.