.NET on AWS Blog
Optimizing AWS development costs for .NET applications with LocalStack
Development and testing of AWS integrated applications incur AWS costs and need reliable internet connectivity. LocalStack helps reduce AWS costs by running emulated AWS services locally, while also eliminating connectivity issues. In this blog post, we will demonstrate how to reduce AWS costs for a sample .NET application in Development and Test cycles by setting up a local AWS environment using LocalStack.
Prerequisites
To get a clear understanding of this blog, and to implement the solution presented here, you should have:
- Basic understanding of containers and containerization concepts
- Docker Desktop installed on your development machine
- .NET 8 SDK or later
Cloud development challenges
Development vs. Production Parity
One of the challenges in cloud development is maintaining parity between different development environments, that is, Dev, QA, UAT and Prod. More external integrations make it even harder to test and to prevent environment differences. For cloud development projects, developers adopt different strategies, including but not limited to:
- Sharing AWS accounts for Dev, QA and UAT
- Using different storage mechanisms for local testing versus QA / UAT / Prod. Eg., local file system vs Amazon Simple Storage Service (Amazon S3)
- Postponing integration testing to QA or downstream environments
These approaches can lead to integration issues or resource conflicts that surface only in a production environment.
AWS Costs and Connectivity
With reduced time-to-market demands from product teams and iterative development cycles, extensive testing is required at each stage of the development cycle will increase the AWS costs. Addionally, cross-functional teams need a reliable and secure connection to AWS services to test and deliver on time.
What is LocalStack?
LocalStack is a cloud service emulator that runs in a single container on your laptop or in your CI environment. Developers run AWS service emulations on their machines without connecting to remote AWS services during development and testing.
Since it runs in a container, you can have multiple, independent cloud stacks (representing an AWS account or environment) running locally on your machine.
LocalStack supports a wide range of AWS services, including, but not limited to:
- Amazon Simple Storage Service
- Amazon Simple Queue Service
- Amazon Simple Notification Service
- Amazon DynamoDB
- AWS Lambda
- Amazon API Gateway
A full list of AWS services supported by LocalStack is available at https://docs.localstack.cloud/aws/services/
Benefits of Local AWS Service Emulation
Local AWS service emulation provides following benefits:
- Cost Optimization – eliminates AWS resource charges during development phases
- Development Velocity – reduces network delays, quickens testing
- Offline Development – Enables development and testing without internet connectivity
- Environment Consistency – Maintains uniform configurations across development teams
- Resource Management – Creates and removes test resources instantly
Getting Started with LocalStack: Choose Your Container Runtime
LocalStack helps you develop and test AWS applications offline, and you can run it using different container runtimes.
In this post, we’ll explore setting up LocalStack using Docker Compose, but first, let’s understand your runtime options.
Two popular choices for running LocalStack are:
- Docker – The widely-adopted container platform
- Podman – An open-source, daemonless container engine
While Docker requires a paid license for enterprise use, Podman (including Podman Desktop) provides a open-source alternative under the Apache License 2.0.
We’ll focus on Docker Compose because it streamlines the process of managing multiple containers – a common requirement when developing cloud applications locally. Docker Compose’s declarative approach helps you define and spin up your entire development environment with minimal effort.
.NET application development with LocalStack for AWS
Let us explore how to use LocalStack in .NET application development using a practical example: a .NET-based Order Management System (OMS) Web API that integrates with AWS services and PostgreSQL. We’ll walk through building this sample application using LocalStack, with all code available in our AWS Samples repository for your reference.
The following architecture diagram illustrates how the components work together in both local development and AWS environments.
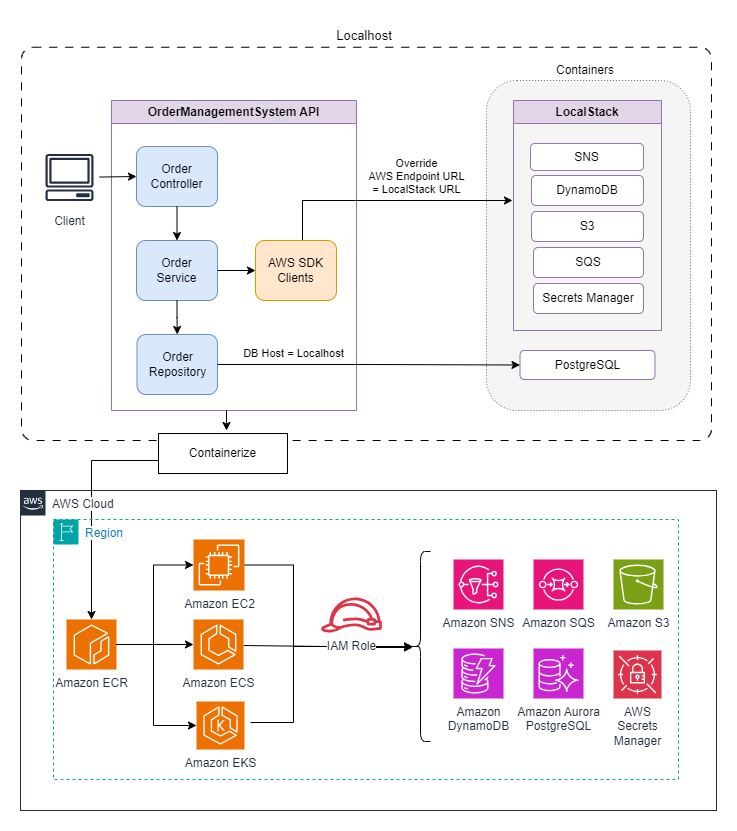
Figure 1: architecture
The architecture diagram demonstrates a comprehensive system that combines local development infrastructure with AWS cloud services. At a high-level, the following steps should be performed to build the solution presented in the architecture diagram:
- Build the .NET application using AWS SDK for .NET (for AWS integration) and Postgres DB Client (for DB integration).
- Update AWS SDK configuration to connect to the LocalStack instance.
- Containerize the application.
- Create docker-compose file
- Add containers for the .NET application, LocalStack and Postgres DB
- Add container to create AWS resources in LocalStack instance
- Run docker-compose to start all the containers.
- Perform Integration testing.
Step 1. Building the application
You will use the localstack-aws-devkit-dotnet sample application from the AWS Samples GitHub repository. This .NET 8 Web API demonstrates AWS service integration using the AWS SDK for .NET and connects to a PostgreSQL database using Npgsql.
The sample Web API implements a simple Order Management System (OMS), when an order is placed, the system:
- Saves the order to PostgreSQL
- Publishes a notification to Amazon SNS
- Stores order details in Amazon S3
- Logs metadata to DynamoDB
- Uses AWS Secrets Manager for secure credential storage
To build the sample application
- Clone the GitHub repository containing the solution
git clone https://github.com/aws-samples/sample-localstack-aws-devkit-dotnet
- Navigate to the solution directory
/appand build the solutionOrderManagementSystem.slnto ensure there are no build errors
Step 2. Updating configuration to connect to LocalStack
AWS SDK for .NET uses client configurations for the AWS region, credentials, service URL and various other connection settings. ServiceUrl is a key config entry that we use to switch between connecting to LocalStack instance and remote AWS endpoints.
The sample implements following factory pattern to switches between LocalStack and AWS based on configuration:
public class S3ClientFactory: IS3ClientFactory
{
    public IAmazonS3 CreateClient(IOptions<AWSSettings> awsSettings)
    {
        var s3Config = new AmazonS3Config();

        // LocalStack configuration
        if (!string.IsNullOrWhiteSpace(awsSettings.Value.ServiceUrl))
        {
            s3Config.ServiceURL = awsSettings.Value.ServiceUrl;
            s3Config.ForcePathStyle = true; // Required for LocalStack
        }
        // Production AWS configuration
        else
        {
            s3Config.RegionEndpoint = RegionEndpoint.GetBySystemName(awsSettings.Value.Region);
        }

        return new AmazonS3Client(s3Config);
    }
}
To connect to LocalStack instance (running locally)
1. Specify the LocalStack instance Url(http://localhost:4566) as the ServiceUrl in appsetting.dev.json.
// appsettings.Dev.json - ServiceUrl points to LocalStack URL
{
  "AWS": {
    "ServiceUrl": "http://localhost:4566",
    "S3BucketName": "order-bucket",
    "SNSTopicArn": "arn:aws:sns:us-east-1:000000000000:order-topic"
  }
}
To connect to AWS services
-
- Remove the ServiceUrl from the appsetting.json; the SDK will use the default AWS endpoint for the specified region.
- Ensure to provide valid AWS credentials (as environment variables, AWS IAM role, AWS profile or shared credentials file) and AWS region.
// appsettings.Prod.json - No ServiceUrl
{
  "AWS": {
    "Region": "us-east-1",
    "S3BucketName": "order-bucket",
    "SNSTopicArn": "arn:aws:sns:us-east-1:XXXXXXXXXXXX:order-topic"
  }
}
Step 3: Containerizing the application
The following steps will containerize the sample application:
- Create Dockerfile for the .NET application with instructions to build, test and publish the application into a container image. You can find a reference implementation of Dockerfile in the AWS Samples repository.
- Run docker build command from the solution root folder to build the container image.
docker build -t localstack-demo. - Once build is complete, run following command to verify the docker image.
docker images ls localstack-demo
The docker image for the .NET application is now ready for execution, i.e., to run as a standalone docker container.
Step 4: Creating Docker Compose
Since the application is dependent on other containers such as LocalStack and PostgresDB, you need to start and manage all dependent containers. While multiple docker containers can be run individually with docker run command, it is cumbersome and error-prone. With Docker Compose you can remove the complexity in managing interconnected containers.
In this section, you will create a docker compose file with two containers; 1) LocalStack and 2) Provisoin AWS resources in the LocalStack container.
To create Docker Compose and configure LocalStack container
- Create
docker-compose.yml - Add the following LocalStack container configuration to emulate AWS services.
services:
  localstack:
    container_name: localstack
    image: localstack/localstack
    ports:
      - "4566:4566"
    environment:
      - SERVICES=s3,sns,sqs,dynamodb,secretsmanager
      - DEFAULT_REGION=us-east-1
      - AWS_ACCESS_KEY_ID=test
      - AWS_SECRET_ACCESS_KEY=test
    volumes:
      - "./tmp/localstack:/var/lib/localstack"
      - "/var/run/docker.sock:/var/run/docker.sock"
To provision AWS Resources in LocalStack
You can provision AWS resources in 2 ways
- Directly add AWS CLI commands in the command section of aws-setup container
- Create a separate script and specify its path as the entrypoint of aws-setup container
Here, we created a script: aws-setup.sh – to provision required AWS resources in LocalStack. This script is placed in the ./infra/local directory, which is mounted to the aws-setup container as a volume mount and executes when the aws-setup container starts.
- Add the following to setup up aws-setup container
services:
  aws-setup:
    image: amazon/aws-cli
    depends_on:
      - localstack
    environment:
      - AWS_ACCESS_KEY_ID=test
      - AWS_SECRET_ACCESS_KEY=test
      - AWS_DEFAULT_REGION=us-east-1
      - AWS_ENDPOINT_URL=http://localstack:4566
    volumes:
      - ./infra/local:/aws
entrypoint: /aws/aws-setup.sh- The sample script given below uses environment variables for AWS Endpoint URL and for the AWS resource names. These environment variables are defined in a separate file named .env in the same folder as the script file. Alternatively, these environment variables can be added under the environment section of aws-setup container configuration in docker-compose file. The DB credentials are also saved in this env file and referenced in the database container configuration.
Add the following commands in aws-setup.sh to provision AWS resources in LocalStack container
echo "Creating S3 bucket..."
aws --endpoint-url=${AWS_ENDPOINT_URL} s3 mb s3://${BUCKET_NAME}

echo "Creating SQS queue..."
aws --endpoint-url=${AWS_ENDPOINT_URL} sqs create-queue --queue-name ${SQS_QUEUE_NAME}

echo "Creating SNS topic..."
aws --endpoint-url=${AWS_ENDPOINT_URL} sns create-topic --name ${SNS_TOPIC_NAME}

echo "Setting up SNS-SQS subscription..."
aws --endpoint-url=${AWS_ENDPOINT_URL} sns subscribe \
    --topic-arn ${SNS_TOPIC_ARN} \
    --protocol sqs \
    --notification-endpoint ${SQS_QUEUE_ARN}

echo "Creating DynamoDB table..."
aws --endpoint-url=${AWS_ENDPOINT_URL} dynamodb create-table \
    --table-name order-metadata \
    --attribute-definitions AttributeName=OrderId,AttributeType=S \
    --key-schema AttributeName=OrderId,KeyType=HASH \
    --provisioned-throughput ReadCapacityUnits=5,WriteCapacityUnits=5

echo "Creating secrets..."
aws --endpoint-url=${AWS_ENDPOINT_URL} secretsmanager create-secret \
    --name ${DATABASE_CREDENTIALS_SECRET_ID} \
--secret-string "${DATABASE_CREDENTIALS_SECRET_STRING}"- Grant execute permissions for the setup script in the aws-setup container configuration:
chmod +x ./infra/local/aws-setup.sh
Step 5: Running docker-compose
With the docker-compose file ready for execution, follow these steps to start the containers for the .NET application, LocalStack and Postgres DB.
- Execute the login command to authenticate with Docker
docker login - Start all the containers using Docker Compose:
docker-compose -f ./infra/local/docker-compose.yml --profile all up -d --wait
Step 6: Performing Integration testing locally
The .NET application, along with the LocalStack and DB instance is ready for integration testing. Use any REST API client for testing the .NET application.
You can also use AWS CLI commands, with endpoint-url override, to view or manage AWS resources in the LocalStack instance:
aws s3 ls --endpoint-url=http://localhost:4566
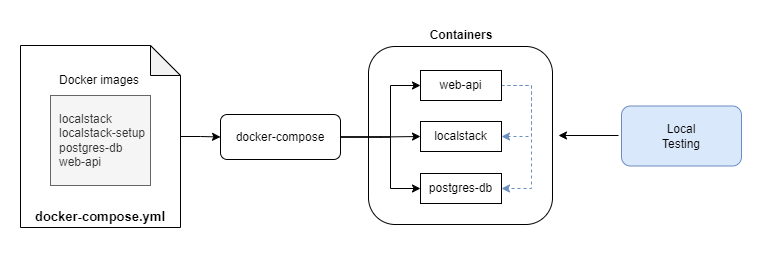
Figure 2: local integration testing
Extend Integration testing, using LocalStack, to the CI/CD pipeline
The Docker Compose file used in the previous section can be used in a CI/CD pipeline to spin up the application along with its dependent containers (DB and LocalStack) and execute integration tests.
Add automated tests (integration tests) to the solution and update the appsettings.json in the tests; the ServiceUrl should point to LocalStack URL.
In the CI/CD pipeline, add a pipeline step that will:
- Run docker-compose using the same Docker Compose file that is used for local testing. This will spin up the .NET application, LocalStack, and Postgres DB containers on the build server.
- Start the automated tests. The tests will connect to the LocalStack instance running in the build server.
This setup takes care of application integrity and environment consistency while also reducing AWS costs.
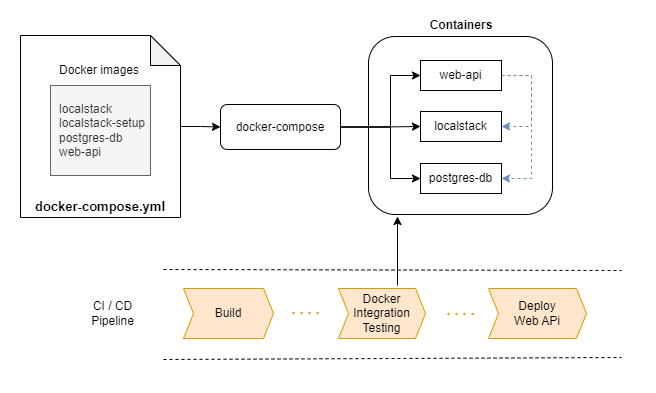
Figure 3: Integration testing in CI/CD pipeline
Running multiple LocalStack instances for integration testing
Running separate LocalStack instances lets you test multiple microservices independently, each with its own simulated AWS environment. It also allows integration testing or simulation of multi-account or multi-environment scenarios locally.
Figure 4 illustrates how two independent microservices (App1 and App2) each with its own LocalStack & DB containers can run on the same machine. Both stacks operate in isolation, using non-conflicting ports for LocalStack and DB. This setup enables end-to-end integration testing of workflows with multiple independent services. It also allows mimicking multi-account or multi-environment setups without incurring AWS costs.

Figure 4: Architecture showing two independent microservices
Security and Deployment Best Practices
When moving from local development (with LocalStack) to testing and production environments that use AWS services:
- Remove ServiceUrl Configuration: Let the AWS SDK use default endpoints; specify valid RegionEndpoint and credentials
- Configure IAM Roles: Implement least-privilege IAM policies; enable MFA and test thoroughly
- Secure Database and Secrets: Use Secrets Manager or Parameter Store for credentials; enable SSL connections and secrets rotation
- Implement API Authentication: Add mechanisms like API keys or Amazon Cognito for Web API endpoints
- Enable Encryption: Use AWS KMS for data at rest/in transit; enforce HTTPS and S3 bucket encryption
- Implement Monitoring and Logging: Add CloudWatch metrics/alarms, CloudTrail for auditing, and secure logging
- Deploy Infrastructure as Code: Use Terraform or CloudFormation for reproducible setups
- Security Hardening: Enable VPC endpoints, security groups, and NACLs
Conclusion
LocalStack provides multiple benefits for developers who want to build AWS integrated applications. It reduces the complexity and cost of managing cloud resources during development, while also reducing disparity in multiple development environments.
Local AWS service emulation provides the following benefits:
- Reduces development costs
- Accelerates testing cycles
- Increases team productivity
- Enhances integration testing reliability
- Ensures environment consistency
For more information about LocalStack for AWS, visit the official documentation.
Next Steps
The full source code for the sample .NET application with LocalStack setup and Docker files is available in AWS Samples GitHub repository. It provides step-by-step guidance on how to integrate LocalStack into your .NET projects.
Try implementing this solution in your own development workflow. Start with the basic setup, then add CI/CD integration. As your requirements emerge to integrate with other services, refer to the section “Running multiple LocalStack instances for integration testing” to enable multi-service integration locally.
Experiment with other AWS services in LocalStack: AWS Lambda, Amazon API Gateway, Amazon EventBridge, etc.
You can also experiment running LocalStack with MiniKube or launching LocalStack on a shared machine.