.NET on AWS Blog
Safely Roll Out Changes in .NET with AWS AppConfig Feature Flags
Introduction
With AWS AppConfig, a capability of AWS Systems Manager, you can use feature flags to roll out changes in your .NET application incrementally, giving you fine-grained control over releasing new features. You deploy new code while keeping them inactive until you explicitly enable them at runtime. If problems occur, you turn off the feature flag without redeployment.
AWS AppConfig feature flags also provide built-in deployment strategies that support gradual rollouts, real-time monitoring through Amazon CloudWatch, and automatic rollback capabilities.
This post walks you through implementing feature flags using AWS AppConfig for safe, progressive rollouts and setting up automatic rollback by associating Amazon CloudWatch alarms with your AppConfig environment.
What are feature flags?
A feature flag is a conditional statement controlled by external configuration rather than hard-coded logic. For example, instead of deploying a new version of your checkout page directly, you deploy it hidden behind a flag such as “newCheckoutFlow“. In production, your code checks the feature flag’s value at runtime: if it is true, users see the new experience; otherwise, they get the existing one. The key insight is that changing a configuration value is far less risky than redeploying an application.
Benefits of AWS AppConfig for feature flags
You could implement feature flags with a JSON file or an environment variable, but that approach breaks down quickly. You need a way to roll out a change to 10% of your fleet first, automatically revert if error rates spike, and audit for changes.
AWS AppConfig helps meet these requirements through its managed service features. It provides deployment strategies that control how fast a configuration change propagates. You can deploy all-at-once for low-risk changes. Alternatively, use a gradual rollout that increases exposure in steps. During any active deployment, AWS AppConfig monitors associated Amazon CloudWatch alarms. If an alarm fires, AppConfig automatically rolls back to the last known-good configuration. This gives you progressive-delivery capabilities integrated natively with your AWS infrastructure.
Prerequisites
To follow along with this tutorial, you’ll need:
- An AWS account with appropriate permissions mentioned in setup and configuration for AWS AppConfig.
- .NET 8.0 or later installed
- AWS CLI configured with your credentials
- Basic familiarity with C# and ASP.NET Core
Architecture
The system described in this blog has two flows: the Admin Deployment Flow, which pushes configuration changes into AWS AppConfig, and the Client Request Flow, which evaluates feature flags at runtime from the .NET application.
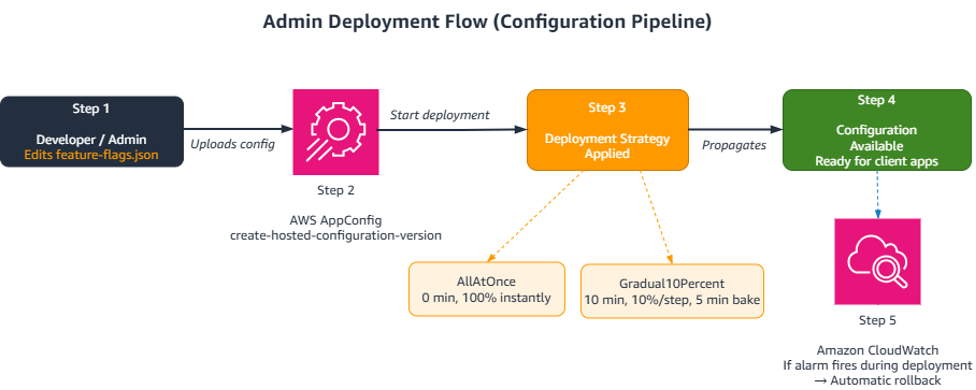
Figure 1: AWS AppConfig deployment flow
Admin/Deployment Flow
- The developer/admin defines or updates feature flag values.
- Upload the updated configuration to AWS AppConfig using create-hosted-configuration-version.
- Start a deployment by calling the StartDeployment API. They need to specify the application ID, environment ID, configuration profile ID, configuration version, and the deployment strategy ID. AWS AppConfig then deploys the configuration changes using the chosen deployment strategy.
- Client applications can retrieve the new flag values through the AWS AppConfig API after deployment.
Monitoring & Automatic Rollback (Background)
- The .NET application emits metrics (for example, error counts) to Amazon CloudWatch.
- Amazon CloudWatch monitors these metrics against defined thresholds (for example, error rate > 10 in 2 periods.
- If an Amazon CloudWatch alarm fires during an active AWS AppConfig deployment, AWS AppConfig automatically rolls back the configuration to the previous known-good version. AWS AppConfig handles this rollback automatically without manual intervention.
Client Request Flow (Runtime Evaluation)
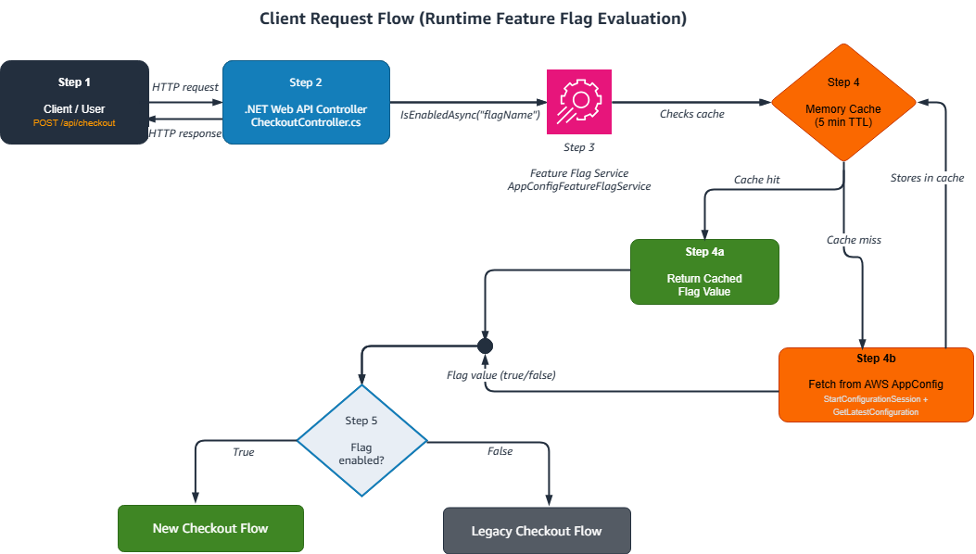
Figure 2: Client request flow with AWS AppConfig Feature Flags
- A user or client makes an HTTP request (for example, POST /api/checkout) to the .NET Web API.
- Your
CheckoutControllerhandles the request and calls the Feature Flag Service (IFeatureFlagService.IsEnabledAsync("newCheckoutFlow")). - Feature Flag Service checks memory cache: The
AppConfigFeatureFlagServicefirst checks the IMemoryCache (5-minute Time to Live (TTL)). - If the flag is cached,
- Cache hit: the cached value is returned immediately. Skip to Step 5.
- Cache Miss: The cache is empty or expired. The service calls
StartConfigurationSessionandGetLatestConfigurationthrough theAWSSDK.AppConfigDataclient to retrieve current flag values from AWS AppConfig. The result is then stored in cache.
- Based on the flag value (true/false), the controller routes the request to either the new checkout flow or the legacy checkout flow and returns the response to the client.
Setting up AWS AppConfig
AWS AppConfig organizes configurations into a hierarchy. An Application is the top-level container, think of it as your microservice or project. Within an application, Environments represent deployment targets like development, staging, and production. A Configuration Profile defines what kind of configuration you’re managing (in our case, feature flags). Finally, Deployment Strategies control the rollout mechanics when you push a change. The following steps walk you through creating the required AWS AppConfig resources.
Create an application
Every AWS AppConfig setup begins with creating an application resource. Application is an organizational construct that groups all feature flag and free-form configuration data for a particular service or workload. Provide a descriptive name that helps team members identify and manage the configuration. This command creates the application and returns an application ID that you will reference in every subsequent step:
aws appconfig create-application \ --name "DotNetFeatureFlagApp" \ --description "Feature flags for .NET application"
Create an environment
Next, you create an environment within that application. Environments let you maintain separate configurations for each stage of your delivery pipeline. For example, you might enable experimental flags aggressively in a development environment while restricting production to fully tested flags only. Associating an Amazon CloudWatch alarm with AWS AppConfig, can automatically rollback a deployment if your error metrics spike. Create the production environment with the following command:
aws appconfig create-environment \ --application-id <application-id>\ --name "Production" \ --description "Production environment" \
--monitors "AlarmArn=arn:aws:cloudwatch:<region>:<account-id>:alarm:<alarm-name>,AlarmRoleArn=arn:aws:iam::<account-id>:role/<appconfig-cloudwatch-role>"
The --monitors parameter references an IAM role (AlarmRoleArn) that grants AWS AppConfig permission to read your Amazon CloudWatch alarm state. Before running this command, create the role with a trust policy that allows appconfig.amazonaws.com to assume it, and attach the CloudWatchReadOnlyAccess managed policy. Replace <appconfig-cloudwatch-role> with the name of this role and <alarm-name> with the CloudWatch alarm you create in the “Implementing automatic rollback” section later in this post.
Create the IAM role with the following commands:
aws iam create-role \ --role-name AppConfigCloudWatchRole \ --assume-role-policy-document '{"Version":"2012-10-17","Statement":[{"Effect":"Allow","Principal":{"Service":"appconfig.amazonaws.com"},"Action":"sts:AssumeRole"}]}'
aws iam attach-role-policy \ --role-name AppConfigCloudWatchRole \
--policy-arn arn:aws:iam::aws:policy/CloudWatchReadOnlyAccess
Create a configuration profile
A configuration profile tells AWS AppConfig what kind of data you intend to store and where it lives. By specifying the type as AWS.AppConfig.FeatureFlags, you unlock built-in validation that validates every configuration version you upload conforms to the feature flag schema. It catches errors such as missing flag definitions or malformed attributes and blocks them before reaching your application. The hosted location URI indicates that the configuration content is stored directly within AWS AppConfig rather than in an external source like Amazon Simple Storage Service (Amazon S3).
aws appconfig create-configuration-profile \ --application-id <application-id>\ --name "FeatureFlags" \ --location-uri "hosted" \ --type "AWS.AppConfig.FeatureFlags"
Create deployment strategies
Deployment strategies govern how quickly and safely a configuration change propagates to your fleet. Rather than choosing a single approach, it is common to define multiple strategies. Pick the appropriate strategy at deployment time based on the risk profile of the change.
A gradual strategy limits the impact of changes by increasing exposure to the new flag value incrementally. This gives you time to act on regressions before they affect everyone. An immediate strategy, on the other hand, delivers the change to all instances at once, which is ideal for low-risk toggles or urgent hotfixes that need to take effect without delay. These commands create both strategies, so they are ready when you need them:
Gradual rollout (grows by 10% per step over 10 minutes):
aws appconfig create-deployment-strategy \ --name "Gradual10Percent" \ --deployment-duration-in-minutes 10 \ --growth-factor 10 \ --replicate-to "NONE" \ --final-bake-time-in-minutes 5
Immediate Deployment:
aws appconfig create-deployment-strategy \ --name "AllAtOnce" \ --deployment-duration-in-minutes 0 \ --growth-factor 100 \ --replicate-to "NONE" \ --final-bake-time-in-minutes 0
Implementing feature flags in .NET
The next steps cover project setup, service implementation, and controller integration.
Project Setup
Create a new Web API project and install the required packages:
dotnet new webapi -n FeatureFlagDemo
cd FeatureFlagDemo
dotnet add package AWSSDK.AppConfig
dotnet add package AWSSDK.AppConfigData
dotnet add package AWSSDK.Extensions.NETCore.Setup
Feature flag configuration
Create feature-flags.json with initial flag definitions. All flags default to disabled; you activate them through deployment later.
Note: This example defines two flags: newCheckoutFlow (demonstrated in this post) and premiumFeatures (a placeholder to illustrate managing multiple flags in a single configuration profile).
{
  "flags": {
    "newCheckoutFlow": {
      "name": "New Checkout Flow"
    },
    "premiumFeatures": {
      "name": "Premium Features"
    }
  },
  "values": {
    "newCheckoutFlow": {
      "enabled": false
    },
    "premiumFeatures": {
      "enabled": false
    }
  },
  "version": "1"
}
The feature flag service
The service implements an IFeatureFlagService interface with two methods: IsEnabledAsync(string flagName) to check a flag’s state, and RefreshAsync() to force cache invalidation when immediate updates are needed.
The AppConfig data plane uses a session-based polling model. You start a configuration session once, receiving an initial token. Each subsequent call to GetLatestConfiguration uses the previous token and returns a new one. If the configuration hasn’t changed since your last poll, the response body is empty, this is by design, not an error.
The core retrieval logic that handles this pattern:
private async Task<Dictionary<string, FeatureFlag>?> GetFeatureFlagsAsync()
{
    return await _cache.GetOrCreateAsync("feature-flags", async entry =>
    {
        entry.AbsoluteExpirationRelativeToNow = TimeSpan.FromMinutes(5);

        if (string.IsNullOrEmpty(_nextPollToken))
        {
            var session = await _appConfigClient.StartConfigurationSessionAsync(
                new StartConfigurationSessionRequest
                {
                    ApplicationIdentifier = _applicationId,
                    EnvironmentIdentifier = _environmentId,
                    ConfigurationProfileIdentifier = _configurationProfileId
                });
            _nextPollToken = session.InitialConfigurationToken;
        }

        var response = await _appConfigClient.GetLatestConfigurationAsync(
            new GetLatestConfigurationRequest { ConfigurationToken = _nextPollToken });
        _nextPollToken = response.NextPollConfigurationToken;

        // Empty body means no change since last poll
        if (response.Configuration == null || response.Configuration.Length == 0)
            return _lastKnownFlags;

        using var reader = new StreamReader(response.Configuration);
        var json = await reader.ReadToEndAsync();
        var parsed = JsonSerializer.Deserialize<AppConfigFeatureFlagResponse>(json);
        _lastKnownFlags = parsed?.Values;
        return _lastKnownFlags;
    });
}
The 5-minute cache TTL indicates that your application makes at most one AppConfig API call every 5 minutes per instance, keeping costs low while supporting flags refresh within a reasonable window
Key Implementation Notes
- AWS AppConfig returns feature flags as a flat dictionary:
"flagName": {"enabled": true}} - The service caches flags for 5 minutes to reduce API calls and cost.
- The
AppConfigFeatureFlagServiceusesStartConfigurationSessionandGetLatestConfigurationAPIs from theAWSSDK.AppConfigDataNuGet package for polling configuration data. - Call
RefreshAsync()to force cache invalidation when immediate flag updates are required. - AWS AppConfig integrates with AWS CloudTrail. CloudTrail logs all API activity. That gives you a complete audit trail of configuration changes and access.
Consuming flags in a controller
With the service in place, consuming a feature flag is a single method call. The branching logic is in the checkout endpoint:
[HttpPost] public async Task<IActionResult> ProcessCheckout([FromBody] CheckoutRequest request) { var useNewFlow = await _featureFlags.IsEnabledAsync("newCheckoutFlow"); if (useNewFlow) return await ProcessNewCheckoutFlow(request); else return await ProcessLegacyCheckoutFlow(request); }
Each branch calls a separate private method containing the respective implementation. The key point is that you deploy both code paths simultaneously and the flag determines which one to execute at runtime.
Dependency injection setup
Register the feature flag service in your DI container by providing the AppConfig resource IDs from the setup steps:
builder.Services.AddSingleton<IFeatureFlagService>(sp => new AppConfigFeatureFlagService( sp.GetRequiredService<IAmazonAppConfigData>(), sp.GetRequiredService<IMemoryCache>(), sp.GetRequiredService<ILogger<AppConfigFeatureFlagService>>(), applicationId: "<your_application_id>", environmentId: "<your_environment_id _>", configurationProfileId: "4lia7kl" ));
The feature flag service walkthrough uses AWSSDK.AppConfigData directly so you can see the session, polling, and token-rotation mechanics. When running on Amazon Elastic Container Service (Amazon ECS), Amazon Elastic Kubernetes Service (Amazon EKS), or AWS Lambda, the AWS AppConfig Agent offers a language-agnostic way to retrieve feature flags without embedding the AWS AppConfig SDK in your code.
The agent runs as a sidecar container on Amazon ECS or Amazon EKS, or as an AWS Lambda extension for serverless workloads. It manages the configuration session, polling intervals, local caching, and token rotation on your behalf, and exposes the current configuration over a local HTTP endpoint.
Deploying feature flag changes
Deploying a feature flag change in AWS AppConfig is a two-step process: upload the new configuration version, then start a deployment that rolls it out according to your chosen strategy.
Step 1: Upload configuration to AppConfig
Before AWS AppConfig can deploy a new set of flag values, you must upload them as a hosted configuration version. AWS AppConfig numbers each immutable version sequentially, which gives you a clear audit trail of every change. If a deployment causes issues, you can always redeploy a previous version number to restore the last known good state. The content-type header tells AppConfig to validate the payload against the feature flag schema, so any structural errors are rejected at upload time rather than discovered at runtime:
aws appconfig create-hosted-configuration-version \ --application-id cmbt3zu \ --configuration-profile-id 4lia7kl \ --content fileb://feature-flags.json \ --content-type "application/json" \ output.json
Step 2: Deploy the configuration
You must start the deployment to make the uploaded configuration version live specifying which environment and strategy to use. This way, you can upload and review a change before committing to a rollout. In the following command, the gradual strategy delivers the new flag values to instances incrementally over 10 minutes, with automatic rollback enabled if your Amazon CloudWatch alarm fires during the process:
aws appconfig start-deployment \ --application-id cmbt3zu \ --environment-id k55x8l4 \ --deployment-strategy-id ikbmudo \ --configuration-profile-id 4lia7kl \ --configuration-version 1
When you use a gradual strategy, AWS AppConfig increases the percentage of instances receiving the new configuration in steps such as 10%, 20%, up to 100%. Between each step, during the bake period AppConfig watches for Amazon CloudWatch alarm triggers. If an alarm fires during this process, the entire deployment rolls back automatically. This is what makes gradual deployments powerful, you can catch problems early when only a fraction of your fleet is affected.
Testing the implementation
Run the application with dotnet run, then test the checkout endpoint:
With the feature flag disabled, you’ll see:
{"message":"Processed with legacy flow","orderId":"..."}
Now, Update feature-flags.json to set “enabled”: true for the newCheckoutFlow flag, upload it as version 2, and deploy. After deployment completes and the cache refreshes, the same request returns:
{"message":"Processed with new flow","orderId":"..."}
Caching and deployment strategies
The 5-minute cache TTL in our implementation represents a deliberate tradeoff. A shorter TTL indicates faster flag propagation but more API calls and cost. A longer TTL reduces costs but delays the effect of flag changes. For most feature rollouts, a 5-minute window is acceptable, as flags are not changed every few seconds. However, if you’re using flags as a circuit breaker for an active incident, you may want to call RefreshAsync() explicitly or reduce the TTL temporarily.
Your deployment strategy should match the risk level of the change:
| Strategy | Duration | Growth Factor | Bake Time | Best For |
| AllAtOnce | 0 min | 100% | 0 min | Low-risk changes, hotfixes |
| Gradual10Percent | 10 min | 10%/step | 5 min | High-risk feature rollouts |
For routine flag toggles or hotfixes, AllAtOnce delivers the change immediately to 100% of polling clients. For a first-time rollout, where you’re unsure of the impact, the gradual strategy increases exposure step by step, with a bake period at the end to watch for delayed errors before declaring success.
Implementing automatic rollback
You can protect your applications from faulty configuration changes by associating an Amazon CloudWatch alarm with your AWS AppConfig environment. In the “Create an environment” section, you specified the alarm using the --monitors parameter. Here, you create the actual alarm and link it to AppConfig through an extension association, which provides the same rollback behavior with more flexibility for adding or updating alarms independent of the environment configuration. Create an alarm that monitors your application’s health:
aws cloudwatch put-metric-alarm \
    --alarm-name "HighErrorRate" \
    --alarm-description "Triggers when error rate exceeds threshold" \
    --metric-name "ErrorCount" \
    --namespace "YourApp/Checkout" \
    --statistic "Sum" \
    --period 60 \
    --evaluation-periods 2 \
    --threshold 10 \
    --comparison-operator "GreaterThanThreshold"
Then link it to your AppConfig environment:
aws appconfig create-extension-association \ --extension-identifier "AWS-AppConfig-Rollback-On-CloudWatch-Alarm" \ --resource-identifier \ "arn:aws:appconfig:region:account:application/app-id/environment/env-id" \ --parameters \ "AlarmArn=arn:aws:cloudwatch:region:account:alarm:HighErrorRate"
Once you create this association, AWS AppConfig immediately rolls back to the previously known-good version if your Amazon CloudWatch alarm enters the ALARM state during any active deployment.
Testing automatic rollback
To verify that your safety net works as expected, you can simulate a faulty deployment and observe the rollback in action. The following walkthrough uses the gradual deployment strategy created earlier, which gives the Amazon CloudWatch alarm time to detect errors before the change reaches your entire fleet.
First, introduce a deliberate fault by modifying your feature-flags.json to enable a flag that causes errors in your application. For this test, enable the newCheckoutFlow flag and temporarily modify your new checkout handler to throw an exception, simulating a bug that would ship with a real faulty deployment:
private async Task<IActionResult> ProcessNewCheckoutFlow(CheckoutRequest request) { // Simulated bug: throws an exception to trigger error metrics throw new InvalidOperationException("Simulated checkout failure"); }
Upload and deploy this configuration using the gradual strategy. Because the strategy grows at 10% per step with a 5-minute bake time, only a fraction of your instances receives the faulty configuration initially:
aws appconfig start-deployment \ --application-id <application-id> \ --environment-id <environment-id> \ --deployment-strategy-id <gradual-strategy-id> \ --configuration-profile-id <profile-id> \ --configuration-version 3
As requests hit the affected instances, the exceptions increase your ErrorCount metric in Amazon CloudWatch. When the metric breaches the threshold of 10 errors within a 1-minute evaluation period(as defined in the alarm you created earlier), the alarm transitions to the ALARM state. You can monitor this transition in real time
aws cloudwatch describe-alarms \ --alarm-names "HighErrorRate" \ --query "MetricAlarms[0].StateValue"
Once the alarm fires, AWS AppConfig detects the state change and halts the in-progress deployment immediately. It then reverts all instances to the previous configuration version, restoring the last known-good flag values. The entire rollback happens automatically without any manual intervention. You can confirm the rollback by checking the deployment status.
aws appconfig list-deployments \ --application-id <application-id> \ --environment-id <environment-id>
The response shows the deployment with a state of ROLLED_BACK, along with the event that triggered it.
To verify that your application has returned to normal, send another request to the checkout endpoint. The response should reflect the legacy checkout flow, confirming that the previous flag values are once again in effect. The response confirms the rollback with following response.
`{"message":"Processed with legacy flow","orderId":"..."}`
Best practices
Use descriptive flag names
Choose clear, meaningful names that indicate what the flag controls
// Good: descriptive and self-documenting await _featureFlags.IsEnabledAsync("enhancedSearchAlgorithm"); // Avoid: opaque and meaningless await _featureFlags.IsEnabledAsync("flag1");
Caching and observability
Two operational practices go hand in hand: caching and logging. Cache feature flag values to reduce API calls. Refresh them periodically so your application picks up the latest configuration. A five-minute absolute expiration strikes a good balance for most workloads. Alongside caching, log every flag evaluation to trace which code path executed for a given request. This telemetry helps during incident investigation and gives product teams quantitative rollout data. These code snippets show both patterns.
// Cache flags for 5 minutes; adjust TTL to match your freshness requirements entry.AbsoluteExpirationRelativeToNow = TimeSpan.FromMinutes(5)
var isEnabled = await _featureFlags.IsEnabledAsync("newFeature"); _logger.LogInformation( "Feature flag {FlagName} evaluated to {Value}", "newFeature", isEnabled);
Flag lifecycle and testing
Treat every feature flag as temporary. Remove the flag from your configuration and delete the branching code once the feature is fully rolled out and stable. Document creation dates and expected removal dates when you first add a flag, assign clear ownership, and set deprecation timelines. Teams that skip this discipline accumulate stale flags that obscure the codebase and increase technical debt. Equally important is testing both code paths. Because a flag can be enabled or disabled at any time, your test suite must exercise both branches. Write unit tests that mock the feature flag service in each state and verify the controller routes to the correct implementation. This unit test demonstrates the pattern:
[Fact]
public async Task Checkout_WithNewFlow_ProcessesCorrectly()
{
    // Arrange
    _mockFeatureFlags.Setup(x => x.IsEnabledAsync("newCheckoutFlow"))
        .ReturnsAsync(true);

    // Act & Assert
    // Test new flow behavior...
}

[Fact]
public async Task Checkout_WithLegacyFlow_ProcessesCorrectly()
{
    // Arrange
    _mockFeatureFlags.Setup(x => x.IsEnabledAsync("newCheckoutFlow"))
        .ReturnsAsync(false);

    // Act & Assert
    // Test legacy flow behavior...
}
Cost optimization
AWS AppConfig charges based on configuration requests and data transfer. The caching strategy described earlier is your primary cost saver. With a 5-minute TTL, a fleet of 100 instances makes at most 100 calls every 5 minutes. Retrieve all flags in a single API call rather than making per-flag requests. Check the AWS System Manager pricing page for current Free Tier thresholds and limits.
Cleaning up
To avoid ongoing charges, delete the resources you created:
aws appconfig delete-application --application-id <application-id>
aws cloudwatch delete-alarms --alarm-names HighErrorRate
Also delete the extension association you created for automatic rollback.
Conclusion
In this post, you learned how to implement feature flags in .NET applications using AWS AppConfig. This approach provides a reliable, scalable way to release features safely and incrementally, with built-in deployment strategies, monitoring integration, and automatic rollback capabilities.
By implementing feature flags with AWS AppConfig, you can deploy code independently of feature releases, gradually roll out changes using time-based deployment strategies, instantly disable problematic features without redeploying, and set up automatic rollback by associating Amazon CloudWatch alarms with your AWS AppConfig environment, so that deployments revert automatically when error metrics breach your defined thresholds.
Start small by implementing a single feature flag in your application, then expand your usage as you become comfortable with the pattern. As a next step, try implementing user segmentation with AWS AppConfig or explore the AWS AppConfig Lambda extension for serverless applications.
For a complete working example, see the sample code on GitHub: https://github.com/aws-samples/sample-dotnet-feature-flags-with-aws-appconfig