AWS HPC Blog
Gang scheduling pods on Amazon EKS using AWS Batch multi-node processing jobs
Machine learning, weather forecasting, computational fluid dynamics, and other workloads all require distributing computation across many compute resources. These workloads are often too large for a single machine, and can benefit from scaling across multiple nodes. But with that scaling comes the need to continuously communicate with each other.
AWS Batch now offers a multi-node parallel (MNP) job type for gang scheduling of pods across nodes on your Amazon Elastic Kubernetes Service (Amazon EKS) clusters, to enable just these types of workloads. Previously MNP jobs were only available if you used Amazon Elastic Container Service (Amazon ECS), so today we’re excited to bring this feature for Batch users running on Amazon EKS, too.
In this post, we will show you how to use AWS Batch MNP jobs to set up a Dask distributed processing job on EKS.
Introduction to Dask and AWS Batch
Dask is a flexible library for parallel computing in Python, used in many data science applications including image processing and machine learning. It’s able to schedule computational tasks dynamically across data collections that can be larger than the available memory on a single Amazon Elastic Compute Cloud (Amazon EC2) instance, or distribute computation across many instances in a moderately-sized (~100s of instances) compute cluster.
Dask.distributed is a lightweight library within the project that creates a dynamic task scheduler coordinates the actions of workers spread across multiple machines. A script can connect to the scheduler and send work items to it for processing.
While you can use Dask in an interactive environment like a Jupyter Notebook to develop methods on example data, data scientists often want to scale their analysis on much larger datasets in an asynchronous fashion. When they do this, they’ll typically use an HPC cluster or cloud-native scheduler like AWS Batch to scale their workloads with dask.distributed.
If you’re new to AWS, then AWS Batch is a fully-managed service that adds batch-style semantics on top of our managed container orchestration services, Amazon ECS and Amazon EKS. This includes price-capacity optimized scaling of Spot or On-demand AWS Fargate or EC2 instances based on the jobs in a queue, and advanced capabilities like automated job retries and fair share job scheduling.
There are multiple ways of running Dask analysis clusters on AWS, but for this post I’ll focus on using AWS Batch multi-node parallel (MNP) jobs on top of a pre-existing Amazon EKS cluster across a set of interconnected Amazon EC2 instances.
When you define an MNP job, you choose what type and how many instances you want to launch. AWS Batch will launch the same instance size for all nodes, designating one of them to be the “main node”. Figure 1 illustrates the deployment strategy we used for our example distributed Dask workload, a simple print out of “Hello world!” across all workers.
The main node hosts the Dask scheduler, along with our analysis script. Dask workers are launched on each child node. The Dask workers connect to the Dask scheduler on the main node using details encoded in the Batch environment variable. Once the analysis is complete, the application container will send a shutdown signal to the scheduler and workers, causing them to cleanly shut down.
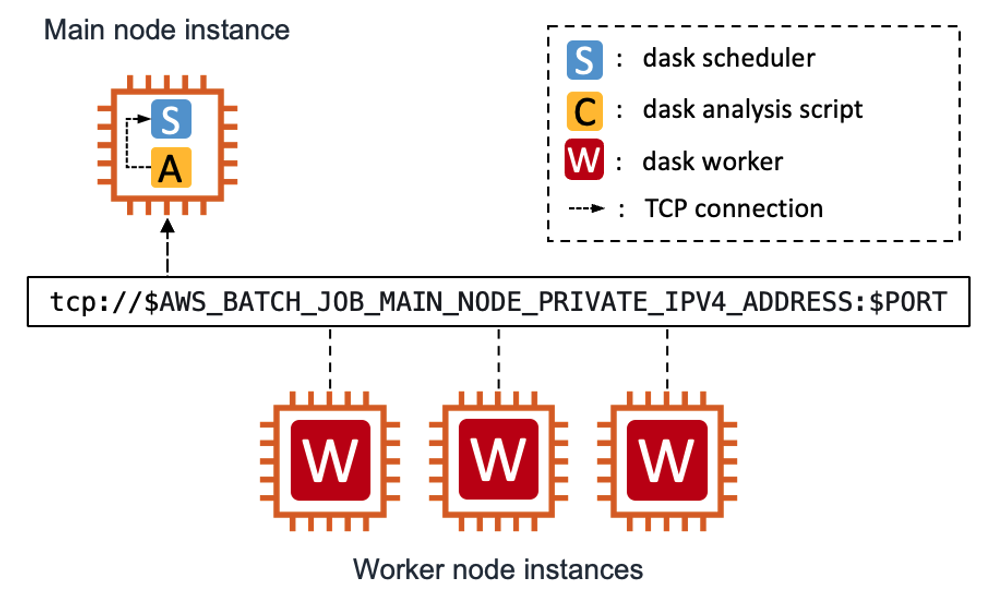
Figure 1 – Our deployment strategy for the distributed Dask workload. Dask workers are launched on each child node and connect to the Dask scheduler on the main node. When complete, the application container will send a shutdown signal to the scheduler and workers, causing them to cleanly shut down.
Overview of our example
All of the code and steps needed to stand up this example are available in our “Running batch workloads on Amazon EKS” workshop (the Dask-specific exercise is “Run a multi-node parallel job”). But let’s check out some specific parts of that exercise for additional context, so you can get an idea of how this all works.
$> dask_hello_world.py
First, we created a Python “hello world!” script with a method that returns a string with the Dask task index and hostname of the instance that the worker ran on:
# Hello world! method
def hello(task_index):
    return "%s: Hello from worker %s" % (str(task_index), os.uname()[1])
Next, the script connects the client to the Dask scheduler using details from a configuration file, then waits on the scheduler to report that it has all the expected workers connected before sending any work.
This is a choice you’re able to make: we could have started sending tasks to workers as soon as a single worker was ready. It depends on your whether workload requires all the workers to be up at the same time (tightly-coupled workloads) or not (pleasingly-parallel workloads). Both the scheduler configuration file and the expected number of workers are provided as positional arguments at runtime.
# Connect the client to the Dask scheduler service
dask_client = Client(scheduler_file=argv[1])

# Wait until the expected number of workers are ready
# before submitting tasks to workers.
expected_num_workers = int(argv[2])
while True:
    num_workers = len(dask_client.scheduler_info()["workers"].keys())
    logger.info("Workers %d of %d up" % (num_workers, num_worker_nodes))
    if num_workers == expected_num_workers:
        break
    sleep(10)
The script then uses the dask_client.map() function to run our workload across the available workers. As a reminder – the scheduler will assign a task to a Dask worker, which will run that task, and then return the result. It may get another task if there are any left on the Dask scheduler’s queue. In our example, we submitted the same method 50 times, so we expected each worker to complete multiple tasks during its runtime.
Results are gathered with as_completed() and the return messages are printed using Python’s standard logging capabilities:
# submit 50 tasks to the Dask scheduler
futures =  dask_client.map(hello, range(50))
# gather the results and print them out
for f in as_completed(futures):
    logger.info(f.result())
Once the tasks are complete, the Dask client sends a shutdown message to the scheduler and workers. Without that message, the script would exit but the containers (and nodes) for both the Dask scheduler and workers would remain running – waiting for work.
dask_client.shutdown()Process initialization
In order to give the script the expected number of workers, we need to use the context that Batch provides to nodes, namely the $AWS_BATCH_JOB_NUM_NODES environment variable. Kubernetes Pod specifications do not interpolate environment variables in either the command or args parameters, so we create an initialization shell script to interpolate any necessary environment variables and launch the script correctly. The example below showcases an initialization script that accepts the location of the dask scheduler configuration as a positional argument and leverages Batch environment variables to calculate the number of expected worker nodes. It then starts our analysis script with those values.
#!/bin/bash

SCHEDULER_FILE=${1:-"/tmp/dask-scheduler-info.json"}
NUM_WORKER_NODES=$((${AWS_BATCH_JOB_NUM_NODES} – 1))
SCRIPT="/usr/local/bin/dask-mnp-hello_world.py"

exec $SCRIPT $SCHEDULER_FILE $NUM_WORKER_NODES
Application container
Now that we have the Dask analysis and initialization scripts ready, it’s time to create the application container. We could build our own container from scratch, but the Dask project provides a Docker image with the full Dask Conda package (including the distributed scheduler), Numpy, and Pandas. It also has several other goodies – like having an entry point that activates the proper Conda environment and the potential to define an extra set of Python modules to install on launch. For more information on what the Dask container can do, refer to the dask-docker GitHub repository.
We’ll use the provided container as the base Docker image and add our dask_hello_world.py and initialization scripts to it. This example copies over the scripts as an executables but otherwise leaves the container be.
FROM ghcr.io/dask/dask:2024.6.2-py3.12

 # Copy the local analysis and initialization scripts

 COPY --chmod=755 src/dask-mnp-hello.py /usr/local/bin/dask-mnp-hello.py

 COPY --chmod=755 src/run-dask-mnp.py /usr/local/bin/run-dask-mnp.sh
We complete this part of the exercise by building the application container image and pushing it to a private Amazon Elastic Container Registry (Amazon ECR) that’s accessible from our EKS nodes.
Next, we create the AWS Batch job definition.
Creating a Batch on EKS multi-node parallel job definition
The AWS Batch MNP job determines the type and number of nodes that will be launched for our Dask analysis. The job definition also allows for defining other things, like the security context of the pods, but that’s outside the scope of this blog post. The documentation for EKS MNP job definitions provides all the possible configurations, so we’ll only cover the subset that are important for us.
Providing launch context
We need a way to give the Dask scheduler and workers – and our script – the context they need to launch correctly. Specifically, these processes need to know whether they’re running on the main node or a child node. In our design, the main node should host the Dask scheduler and the application script. The child nodes should only be running Dask workers.
Batch helps us in two ways. First, it provides environment variables that define the node index number, the main node’s index number, and the private IP of the main node. Second, MNP job definitions allow you to define multiple containers so you can encapsulate a process in its own container. Third, MNP has the concept of node ranges, so you can differentially define the type and number of containers on a node, the security context (via different service accounts), and/or host data volume mounts based on the node’s index range.
In our example, we will create two node ranges, one for the main node, and a second for the worker nodes.
For the main node, we define the following:
- Set the main node index to “0”.
- Create a single-node node range as
"targetNodes": "0:0".- Note that Batch uses closed interval, meaning that the latter index is included in the range. Most programming languages use
[closed, open)intervals, meaning that the last index value will not be in the range.
- Note that Batch uses closed interval, meaning that the latter index is included in the range. Most programming languages use
- Define two containers – one for Dask scheduler and the other for the analysis script.
- Define host volume mount that allows the containers to share configuration information.
- Set the number of expected workers to be one less than the number of Batch nodes, since the main node will not run a Dask worker.
You can review the complete JSON example for the job definition in the workshop.
For the worker nodes, we define a single container that leverages the Dask-provided container:
{
  "targetNodes": "1:",
  "instanceTypes": [
    "c5.xlarge"
  ],
  "eksProperties": {
    "podProperties": {
      "hostNetwork": true,
      "containers": [
        {
          "name": "dask-workers",
          "image": "ghcr.io/dask/dask:2024.6.2-py3.12",
          "command": [
            "/bin/sh",
            "-c"
          ],
          "args": [
            "dask worker --nworkers auto \"${AWS_BATCH_JOB_MAIN_NODE_PRIVATE_IPV4_ADDRESS}:8786\""
          ],
          "resources": {
            "requests": {
              "cpu": "3",
              "memory": "4000Mi"
            },
            "limits": {
              "cpu": "4"
            }
          }
        }
      ]
    }
  }
}
There’s a couple of things to call out here. First, AWS Batch MNP jobs only place a single pod per node. The pod containers can either use the host’s network, or the VPC CNI EKS add-on which can assign IP addresses to individual containers. Our example uses host networking since we know the individual containers will not have port clashes. Frankly, most batch processing jobs don’t need to assign individual IPs to containers, and doing so risks IP exhaustion and can slow down pod placement. We recommend using host networking whenever possible for these types of workloads.
Second, we created an ECR pull-through cache rule to cache the public Dask container image in a private repository, accessible to nodes. This allows us to scan the container image when caching, improve download performance, and mitigate against downstream rate limits from the remote registry.
Third, Batch provides the main node’s IP address to worker nodes via the $AWS_BATCH_JOB_MAIN_NODE_PRIVATE_IPV4_ADDRESS environment variable. Dask workers can leverage that variable to connect to the Dask scheduler, but, as we mentioned previously, Pod specifications do not interpolate environment variables to pass the correct value in the command or args parameters. For our application container we leveraged an initialization script. For the worker containers, we opt to use a complete command line string as the args to a shell command which will do the interpolation of the variable and start the Dask worker correctly.
Finally, we set the resource requirements for the container for CPU and memory. Batch uses the soft-limits in the requests parameter for scheduling and placement of pods on nodes. We also set the hard-limits limits parameter to a higher value for CPU. The reason for this is that Batch will copy over values from requests if limits is not set, and vice versa. By defining both, you can let Batch place a container using minimal CPU requirements, but allow the pod to scale to a higher limit if the resources are available. Note that Batch assumes memory is always a hard limit, and the values must be the same across both requests and limits.
Submitting the job and viewing results
Now that all the parts are in place, you can submit the job using the AWS CLI or AWS Batch console. Once you do, Batch will get busy launching instances into your EKS cluster.
When the Nodes show as Ready, Batch will start placing Pods on the Nodes. Batch provides Pod placement using nodeName and tolerations to the Kubernetes scheduler, bypassing much of the scheduler placement logic. You can view the status of the Nodes and Pods using either the EKS console or kubectl. Throughout the lifecycle of the job, Batch can provide information on its status, and any attempts that were made to run the analysis.
The workshop exercise sets up a new EKS cluster with the CloudWatch managed add-on configured to send the STDOUT and STDERR of all containers to an AWS CloudWatch log stream, as well as the necessary AWS Batch toleration. To see the output message from the workers, you can go to the CloudWatch management console and locate the right CloudWatch log stream using the pod container identifiers.
Here’s an example message from task 6 that ran on one of the Batch managed nodes (with the relevant log message highlighted in bold):
{
    "time": "2024-07-11T00:00:00.000000000Z",
    "stream": "stderr",
    "_p": "F",
    "log": "2024-07-11 0:00:00,000 - distributed - INFO - 6: Hello from Worker ip-10-1-123-123.us-east-1.compute.internal",
    "kubernetes": {
        "pod_name": "aws-batch.a1b2c3d4-1a2b-1234-a1b2d-a0123456789b1",
        "namespace_name": "my-aws-batch-namespace",
        "pod_id": "abcdef12-3456-7890-abcd-ef0123456789",
        "host": "ip-10-3-133-64.us-east-1.compute.internal",
   // . . . other JSON log attributes
    }
}
Once the workers complete all of the tasks, the script will send the shutdown signal to the scheduler and worker containers, and Batch will scale down the Nodes. Kubernetes will no longer be able to provide information on the Pods that ran, or even their exit status. This makes it difficult to find logs after the job is complete. Its a good thing, then, that Batch keeps a record of the job status.
Given the job’s ARN you can use the AWS CLI to find the Pod’s name, and then the logs since the CloudWatch EKS add-on leverages this in its log-stream naming convention. Here is an example querying for the names of the pod and node of the main node’s index from our example run.
# To query the main node pod name, use the main node index
$> aws batch-eks-mnp --endpoint $BATCH_ENDPOINT --region $BATCH_REGION --no-cli-pager  describe-jobs --jobs $JOB_ID#0 --query "jobs[].eksAttempts[].{podName: podName, nodeName: nodeName}"
[
    {
        "podName": "aws-batch.a1b2c3d4-1a2b-1234-a1b2d-a0123456789b1",
        "nodeName": "ip-10-1-123-123.us-east-1.compute.internal"
    }
]
We can use these values to search for any relevant logs in the CloudWatch log streams management console (Figure 2).
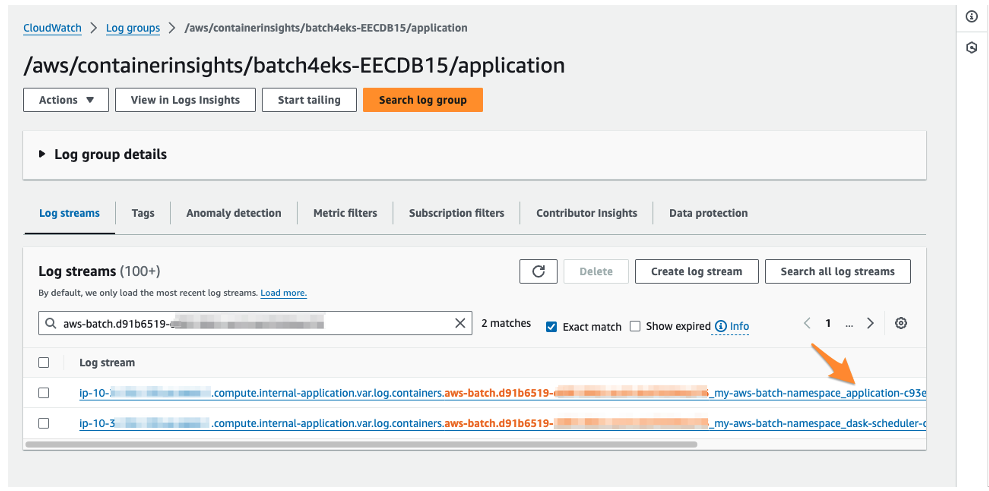
Figure 2 – The AWS CloudWatch management console showing the filtered log streams for applications running on the EKS cluster. The filter dialog shows using the Pod name to retrieve the individual container logs for our Batch job. The log stream name also contains the container’s name, allowing us to identify the correct log stream to view for our results.
Conclusion
In this post, we showed how you can leverage AWS Batch multi-node parallel (MNP) jobs to gang schedule pods across a set of instances on your Amazon EKS cluster. We used Dask, a popular data science framework, as an example workload to launch a distributed analysis.
You can try out this exercise by working through the exercises in the Running Batch workloads on Amazon EKS workshop. If you do, let us know what you think!