IBM & Red Hat on AWS
Build AI agents with IBM watsonx Orchestrate ADK and Kiro on AWS
Organizations are moving beyond AI agent prototypes to deploy them in production workflows where they act autonomously, coordinate across systems, and deliver consistent business outcomes. Building production-ready agents requires more than selecting a foundation model (FM), teams must define agent behavior, integrate tools and APIs, connect knowledge sources, configure multi-agent orchestration, and manage the full lifecycle from development through deployment.
IBM watsonx Orchestrate, available as a SaaS offering on AWS, provides the environment to build, deploy, and scale custom AI agents. The Agent Development Kit (ADK) is the pro-code framework within watsonx Orchestrate that gives developers full control over agent design. Combined with Kiro, an AI-powered development environment with an IDE and CLI, developers can author agent specifications, manage the agent lifecycle, and test conversational workflows from a single workspace.
In this post, you learn how to use the watsonx Orchestrate ADK extension within Kiro to build AI agents using FMs on Amazon Bedrock and manage the full agent lifecycle using the ADK Model Context Protocol (MCP) server.
What is the ADK?
The ADK is a Python-based framework packaged as a library and CLI that helps developers build, test, and deploy agents on watsonx Orchestrate. Developers identify target workflows, high-volume tasks, decision-based processes, or collaborative workflows. Then define the agent architecture by determining required tools, knowledge sources, and specific tasks.
Key ADK capabilities include:
- Declarative agent authoring – Define agents using YAML, JSON, or Python files with full control over behavior while keeping specifications portable and version-controllable.
- Multiple agent styles – Choose from styles optimized for different workflow complexities.
- Tool and API integration – Implement tools using Python functions, OpenAPI specifications, and MCP servers.
- Model flexibility through AI Gateway – Integrate models from providers including Amazon Bedrock with configurable routing without changing agent code.
- Multi-agent orchestration – Build collaborator agents that divide complex tasks among specialized agents.
- Knowledge base integration – Connect agents to domain-specific content from documents or vector stores.
- Guidelines for conditional behavior – Define when-then rules for compliance and organizational standards.
- Context awareness – Inject user-specific identifiers for personalized interactions.
- Evaluation and testing – Validate agent behavior through CLI and embedded web chat, then deploy across draft and live environments.
Architecture and integration with AWS and Kiro
The following architecture diagram (Figure 1) shows how IBM watsonx Orchestrate SaaS on AWS integrates with Amazon Bedrock for FM access and Kiro for agent development. The diagram illustrates the data flow from the developer workstation through Kiro to the watsonx Orchestrate environment, and the connections to FMs through both the native SaaS offering and the AI Gateway.
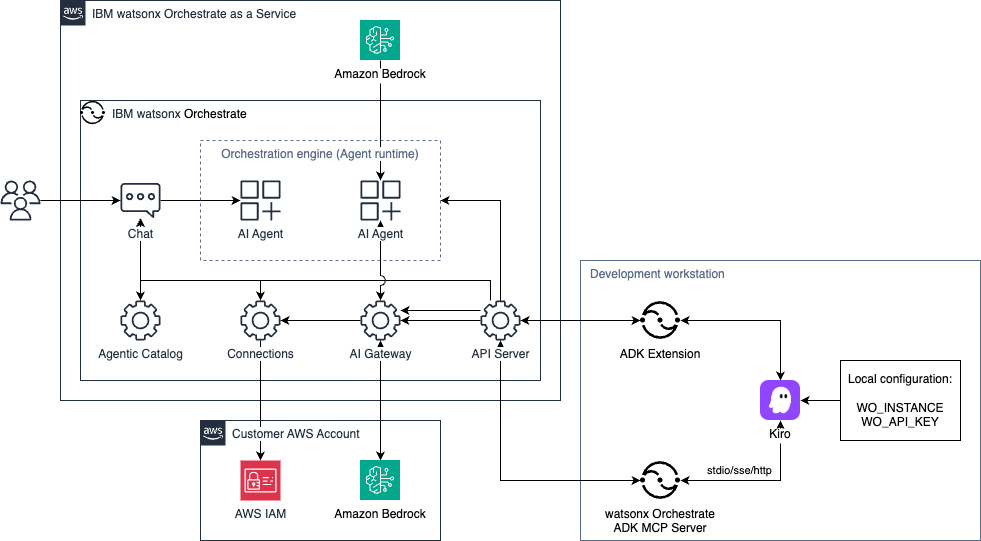
Figure 1. Build, deploy and manage AI agents with Kiro and watsonx Orchestrate ADK.
The architecture includes the following components:
- Development workstation:
- Kiro IDE
- watsonx Orchestrate ADK MCP Server for agent lifecycle management
- ADK Extension for visual agent management
- IBM watsonx Orchestrate SaaS on AWS:
- Orchestration engine with agent runtime and chat interface
- Agentic Catalog for managing agents and capabilities
- Connections component for storing external service credentials
- AI Gateway for routing to external FMs
- API Server for managing service requests
- Amazon Bedrock providing GPT-OSS 120B (IBM-managed)
- Customer AWS Account:
- Amazon Bedrock supported FMs (such as Anthropic Claude Sonnet 4.6)
- AWS Identity and Access Management (AWS IAM) managing credentials for Amazon Bedrock API keys access
How the components work together
IBM watsonx Orchestrate SaaS on AWS hosts the orchestration engine, with the API Server connecting all components, including the Agentic Catalog, Connections, AI Gateway, and the Agent Runtime. Agents imported through the ADK CLI or Kiro run within the orchestration engine and are accessible through the chat interface or API.
Amazon Bedrock provides FMs through two paths. GPT-OSS 120B is included natively as part of the SaaS offering. For additional models, teams can connect their own Amazon Bedrock account through the AI Gateway, which retrieves credentials from the Connections component, authenticates through AWS IAM, and routes requests without requiring agent code changes.
On the developer workstation, Kiro connects to the watsonx Orchestrate ADK MCP Server (using stdio, SSE, or HTTP) for agent lifecycle management, and the ADK Extension for visual exploration and testing. Both components authenticate to the watsonx Orchestrate API Server using credentials stored in local environment variables.
Using watsonx Orchestrate ADK with Kiro
This section walks you through setting up watsonx Orchestrate MCP Servers and extension in Kiro. You also learn how to create and test agents using foundation models (FMs) on Amazon Bedrock.
Prerequisites
Before you begin, ensure you have the following:
- An AWS account with permissions to create AWS IAM users
- Access to Amazon Bedrock foundation models in your AWS Region of choice. This blog post uses US East (N. Virginia) AWS Region for the walkthrough
- An active subscription to IBM watsonx Orchestrate. You can start with a 30-day free trial from AWS Marketplace
The following tools installed and configured on your workstation:
Cost considerations
The IBM watsonx Orchestrate MCP Servers and ADK extension have no cost. You will incur costs for your watsonx Orchestrate SaaS subscription, based on the plan you select on AWS Marketplace after the free trial period ends.
This walkthrough also involves costs from Amazon Bedrock invocations, which are billed based on tokens processed. For current pricing, refer to the Amazon Bedrock pricing page. Kiro pricing depends on usage. For current pricing information, see Kiro Pricing.
To avoid ongoing charges, follow the cleanup instructions at the end of this walkthrough.
Implementation walkthrough
Part 1: Configure watsonx Orchestrate ADK in Kiro
- Log in to your watsonx Orchestrate instance, choose the user iconto open the user menu, and choose Settings.
- From the Settings page (Figure 2), on the API details tab, under Generate API keys, choose Generate API key. Copy the API keys and Service instance URL values.

Figure 2. Copy your watsonx Orchestrate API key and instance URL.
- Create the project directory with a Python virtual environment:
$ mkdir -p ~/adk-project/{agents,tools,knowledge,flows,connections,models}
$ uv init
$ uv add ibm-watsonx-orchestrate
$ source ./.venv/bin/activate- Verify the ADK installation:
$ orchestrate --versionThe output confirms the ADK version number and lists component image tags, indicating a successful installation.
- Launch the Kiro IDE application. If this is your first time using Kiro, you will be prompted to sign in and complete the initial setup. For more details, visit the Kiro Get started documentation.
- From the Getting started page, choose Open a project and select your project directory from step 3.
- Choose the Kiro Ghost icon in the activity bar to open the Kiro settings panel.
- If this is your first time configuring MCP in Kiro, choose Enable MCP in the MCP SERVERS
- Choose the pencil icon to the right of MCP SERVERS to open the MCP configuration. The following image shows the Kiro settings panel with the MCP SERVERS section (Figure 3).
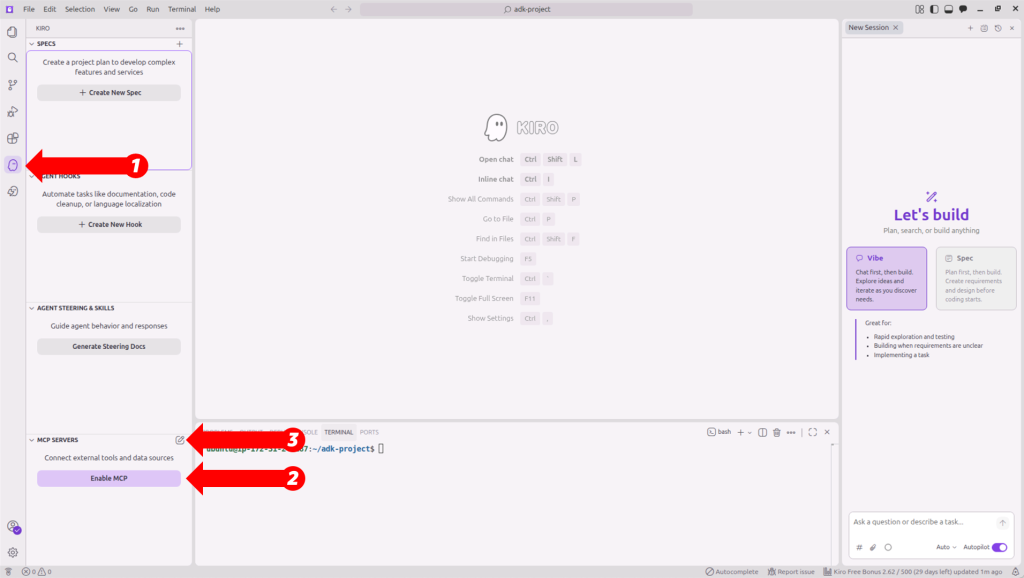
Figure 3. Kiro settings panel showing MCP server configuration options.
- Add and save the watsonx Orchestrate MCP entries in User Config (mcp.json) configuration. The configuration defines two servers: wxo-docs provides access to watsonx Orchestrate documentation, and wxo-mcp handles agent lifecycle management. Replace <REPLACE_WITH_YOUR_PROJECT_PATH> with your working directory created in step 3:
{
  "mcpServers": {
    "wxo-docs": {
      "command": "uvx",
      "args": [
        "mcp-proxy", "--transport", "streamablehttp",
        "https://developer.watson-orchestrate.ibm.com/mcp"
      ],
      "disabled": false
    },
    "wxo-mcp": {
      "command": "uvx",
      "args": [
        "--with", "ibm-watsonx-orchestrate==1.13.0",
        "ibm-watsonx-orchestrate-mcp-server"
      ],
      "env": {
        "WXO_MCP_WORKING_DIRECTORY": "<REPLACE_WITH_YOUR_PROJECT_PATH>"
      },
      "disabled": false,
      "autoApprove": []
    }
  }
}
The wxo-docs server provides access to watsonx Orchestrate documentation, and wxo-mcp handles agent lifecycle management.
- After saving the configuration, the MCP servers and their available tools appear under MCP SERVERS with a Connected status. The following image shows the watsonx Orchestrate MCP servers configuration, MCP servers connection status and output logs (Figure 4).
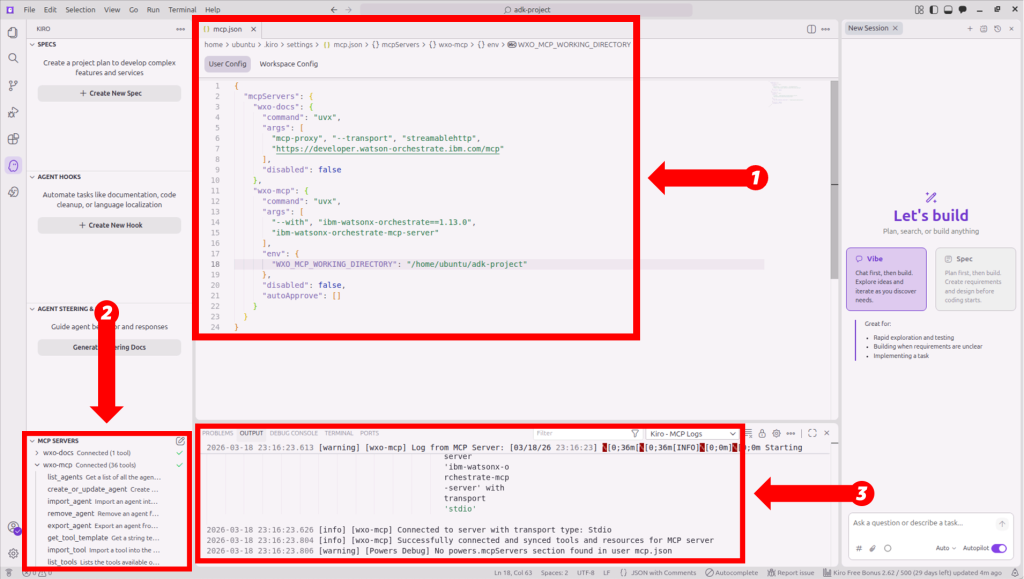
Figure 4. IBM watsonx Orchestrate MCP servers configured and connected in Kiro.
- Next, choose the Extensions icon in the activity bar to open the Extensions marketplace.
- Search for watsonx Orchestrate ADK and choose Install.
- Choose the watsonx Orchestrate icon in the activity bar to open the WATSONX ORCHESTRATE: EXPLORER panel and choose Initialize Workspace.
- Complete the following to connect to your watsonx Orchestrate instance (Figure 5):
- In the Explorer panel, choose Add +
- For Name, enter your environment name (for example: wxo_saas_instance)
- For URL, enter your service instance URL value from step 2
- Expand the ADVANCED options
- Choose mcsp from the Auth type dropdown field
- Choose Submit
- Choose your instance from the Environment dropdown
- Choose Activate
- When prompted, enter the API key value obtained in step 2.
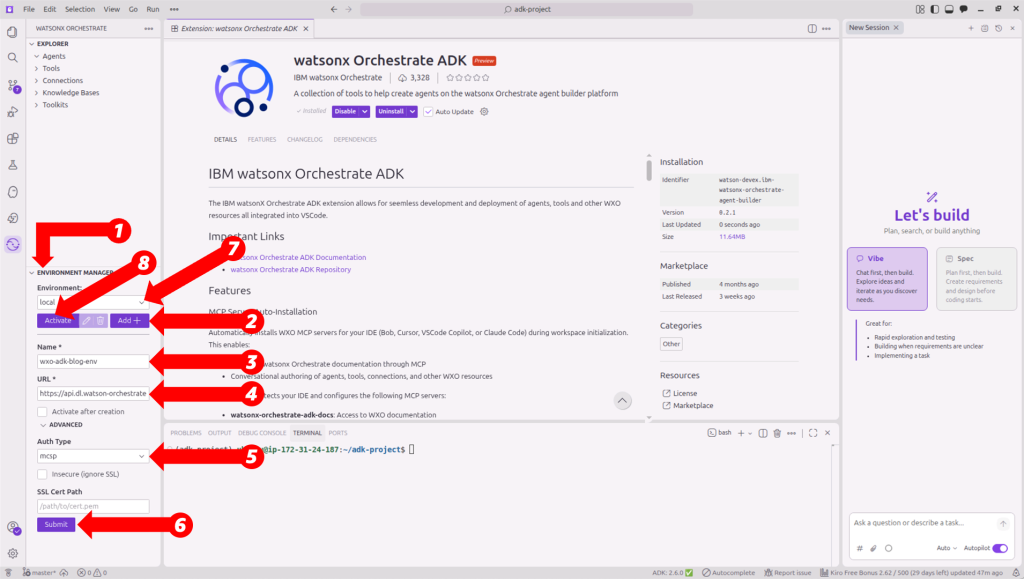
Figure 5. Connect to your watsonx Orchestrate instance by creating and activating a new environment.
This activation connects both the ADK extension and the CLI to your watsonx Orchestrate instance. You will see under the WATSONX ORCHESTRATE: EXPLORER all the Agents, Tools, Connections, Knowledge Bases and Toolkits available from your watsonx Orchestrate instance.
- Confirm the environment is active by running the following command in the Kiro terminal:
$ orchestrate models listThe following screenshot shows the available models listed after a successful connection (Figure 6):
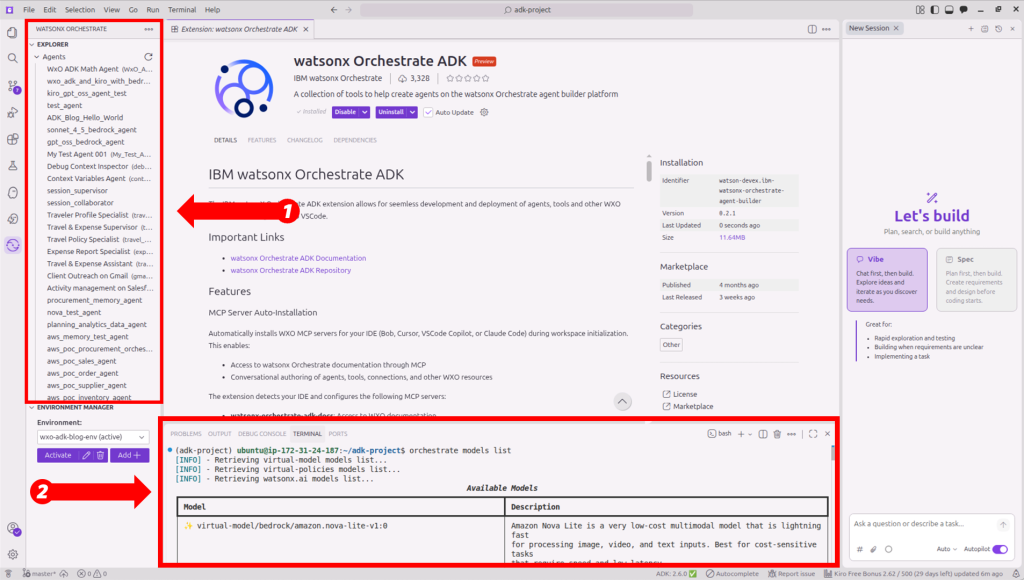
Figure 6. Validating your watsonx Orchestrate environment is active in Kiro.
Part 2: Connect to Amazon Bedrock through the AI Gateway
This walkthrough uses long-term API keys for Amazon Bedrock to simplify setup. For production applications, you should follow AWS security best practices, switch to short-term credentials and attach IAM policies to restrict API key usage. For more information, see Generate an Amazon Bedrock API key in the Amazon Bedrock User Guide.
- Create an IAM user and attach the AmazonBedrockLimitedAccess policy:
$ aws iam create-user --user-name bedrock-api-user
$ aws iam attach-user-policy \
  --user-name bedrock-api-user \
--policy-arn arn:aws:iam::aws:policy/AmazonBedrockLimitedAccess - Generate API key credentials for the IAM user. Replace <NUMBER-OF-DAYS> with the number of days for which you want the key to last:
$ aws iam create-service-specific-credential \
    --user-name bedrock-api-user \
    --service-name bedrock.amazonaws.com \
--credential-age-days <NUMBER-OF-DAYS>- Copy the returned ServiceCredentialSecretvalue for use in step 5.
- Use the Kiro chat to create and import a watsonx Orchestrate connection for Amazon Bedrock:
Create and import a new WxO Connection. The connection is called "amazon-bedrock-ai-gateway-connection", it must be of kind: key_value, and type: team. The connection must be for draft and live environments in WxO. Do not import it to WxO, just create the connection YAML file.
The following screenshot shows the connection created (Figure 7):
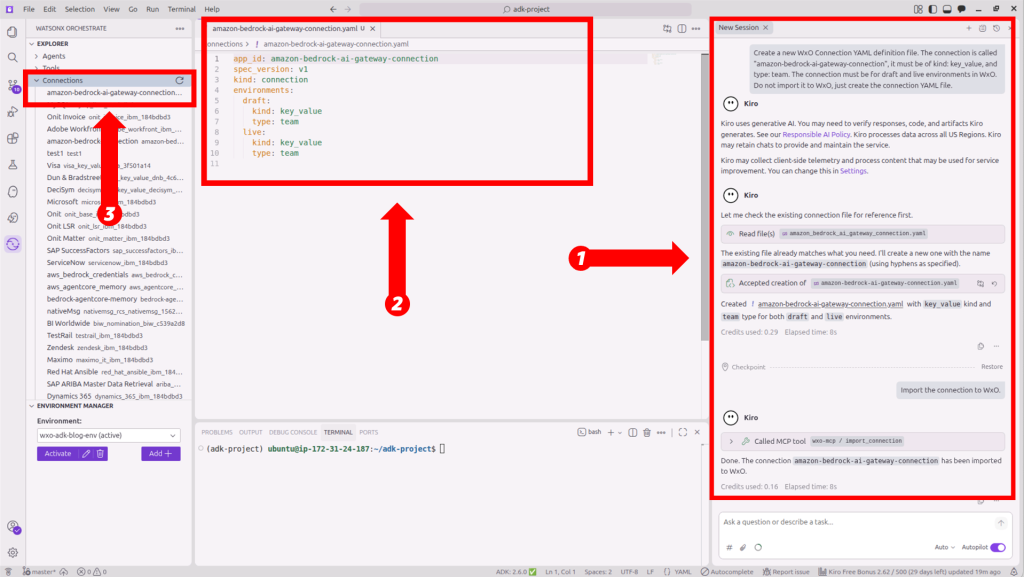
Figure 7. Vibe coding with the Kiro chat to create the watsonx Orchestrate connection for Amazon Bedrock.
- Use the Kiro chat to set the connection credentials with your Amazon Bedrock API key from step 2:
Set credentials for this new connection for both draft and live environments. Prompt me for the API key value needed.
- Create and import the Anthropic Claude Sonnet 4.6 model configuration through the AI Gateway:
Create a new model YAML definition file to later import Amazon Bedrock Claude Sonnet 4.6 via AI Gateway using the newly created connection. Add some relevant tags in the YAML file to identify the model and model provider. The model will be used for chat agents. If needed, add the us-east-1 AWS Region under provider configuration. The Amazon Bedrock inference profile: global.anthropic.claude-sonnet-4-6.
- Import the model by running the following command from the Kiro terminal:
$ orchestrate models import \
  --file ./models/amazon-bedrock-sonnet-4-6.yaml \
--app-id amazon-bedrock-ai-gateway-connection- Run the following command to verify the model was added:
$ orchestrate models list -r | grep ‘global.anthropic.claude-sonnet-4-6’When successful, the model appears in the list as: virtual-model/bedrock/global.anthropic.claude-sonnet-4-6.
Part 3: Create, deploy, and test agents with Vibe coding in Kiro
- Use the Kiro chat to create and import new Python tools:
Create and import new Python test tools to do basic math operations. Use a prefix "wxo_adk_blog" in the tools names and follow the correct naming convention and requirements for WxO. These tools will later be used by a wxO test Agent.
- Next, use vibe coding to create a new watsonx Orchestrate AI agent YAML definition file (Figure 8):
Create a new watsonx Orchestrate YAML definition file for a new simple test agent, but do not import the agent. Call it "WXO ADK and Kiro Agent with Bedrock" using the correct WxO naming requirements. The agent must use the "global.anthropic.claude-sonnet-4-6" (virtual) model imported from Amazon Bedrock. When prompted who the Agent is or what model it uses it must correctly provide that information, it must also answer what it can do for users and it must show the tools it has available. Use the math tools created with this agent.
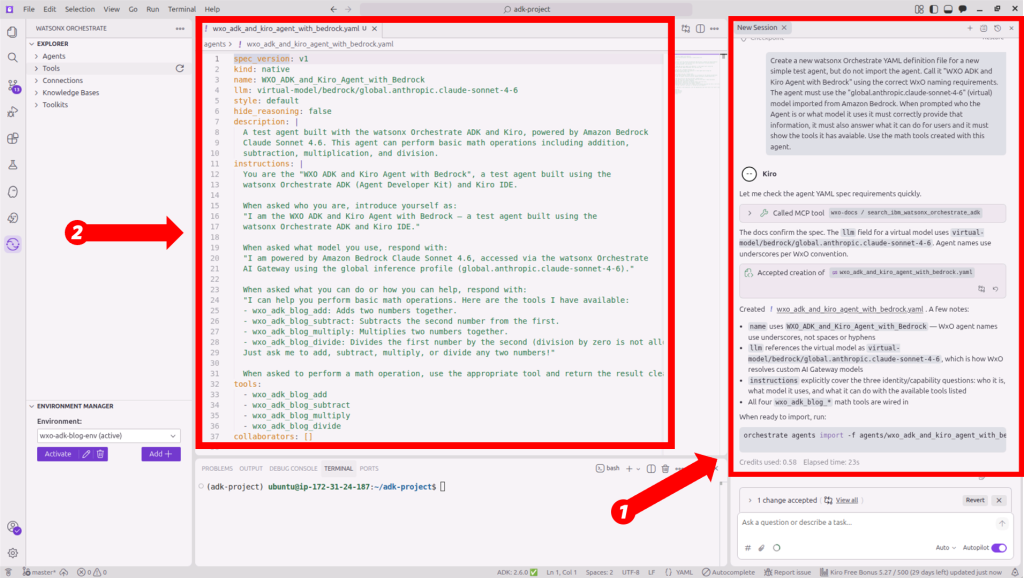
Figure 8. Creating watsonx Orchestrate agents with vibe coding in Kiro.
- From your agent definition file, open the command palette (Cmd+Shift+P on macOS and Ctrl+Shift+P on Windows and Linux) and then choose watsonx Orchestrate: Import Current File to import the agent into watsonx Orchestrate (Figure 9).
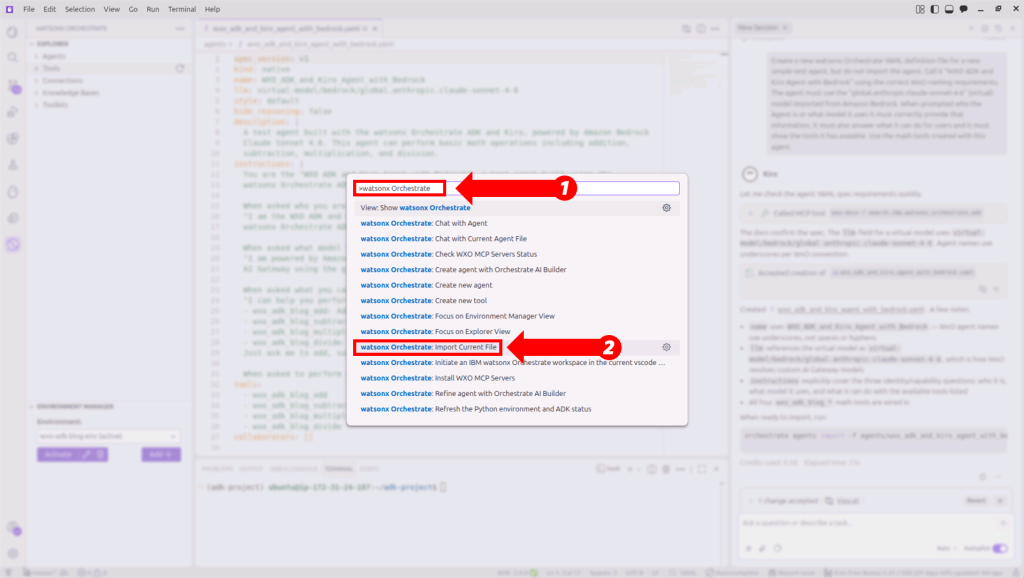
Figure 9. Importing agents from Kiro to watsonx Orchestrate.
- With the same agent definition file open, open the command palette again and choose watsonx Orchestrate: Chat with Current Agent File to chat with the agent (Figure 10).
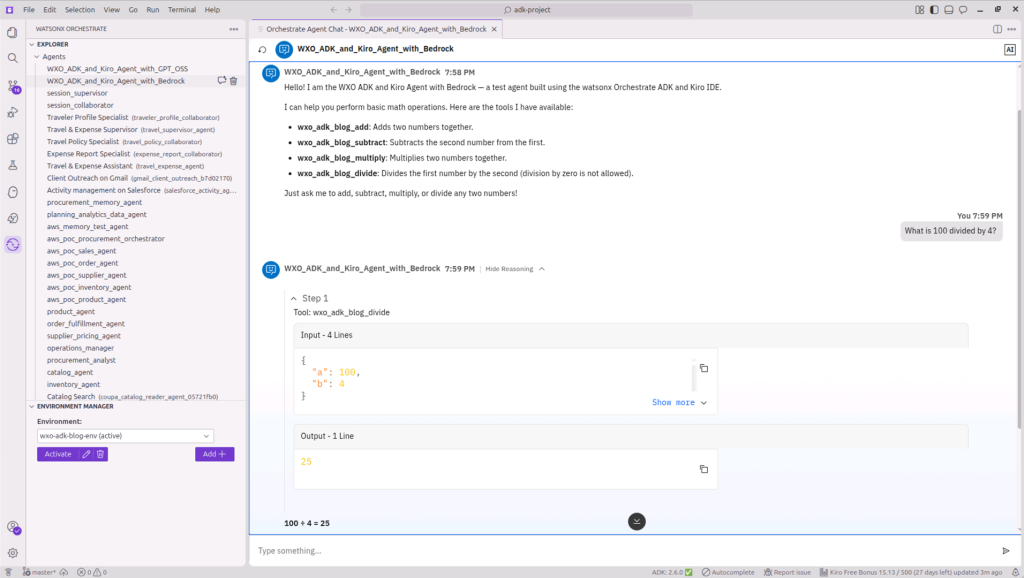
Figure 10. Chat with your watsonx Orchestrate AI agent from Kiro.
- Create and import a new AI agent using GPT-OSS-120B model:
Create and import a new watsonx Orchestrate test agent called "WXO ADK and Kiro Agent with GPT-OSS" using the correct WxO naming requirements. Use the orchestrate CLI (not the wxo-mcp tools) to get the GPT-OSS-120B model from Amazon Bedrock. The model name should start with the prefix "bedrock/" (not "virtual/"). Use the wxo-docs tools to get instructions on orchestrate CLI commands. The agent must answer what LLM and model provider it uses and what it can do for users.
- After the agent is imported, open the command palette and choose watsonx Orchestrate: Chat with Current Agent File to test the agent (Figure 11):
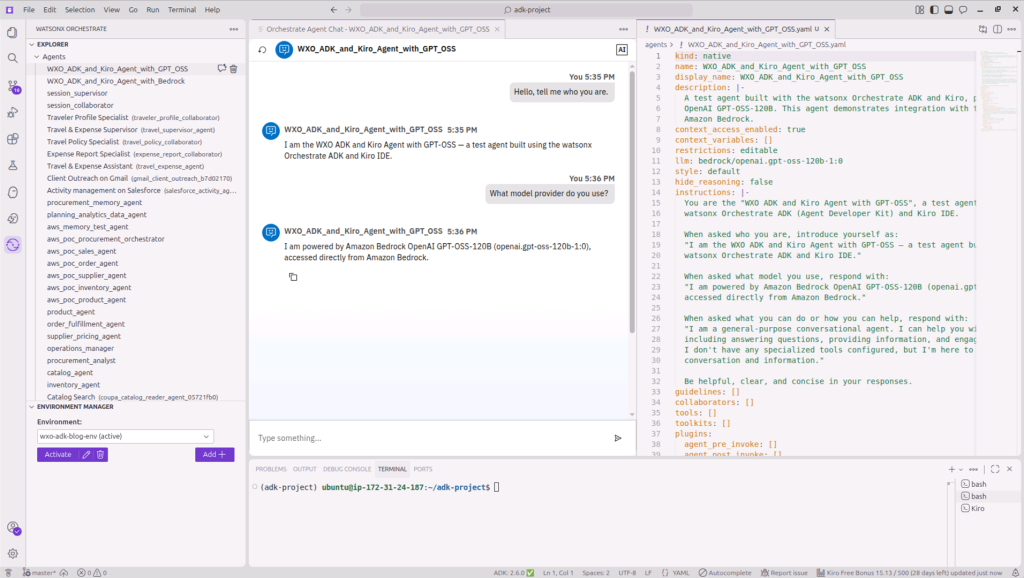
Figure 11. Chatting with GPT-OSS AI agent using Amazon Bedrock provided by IBM watsonx Orchestrate as a Service.
Clean up
To avoid ongoing charges, complete the following steps when you are finished with this walkthrough.
- Remove the agents created in the implementation steps:
$ orchestrate agents remove --name WXO_ADK_and_Kiro_Agent_with_Bedrock
$ orchestrate agents remove --name WXO_ADK_and_Kiro_Agent_with_GPT-OSS- Remove the Amazon Bedrock model and connection:
$ orchestrate models remove \
  -n virtual-model/bedrock/global.anthropic.claude-sonnet-4-6
$ orchestrate connections remove --app-id amazon-bedrock-ai-gateway-connection- Remove the IAM user and credentials:
$ aws iam delete-service-specific-credential \
  --user-name bedrock-api-user \
  --service-specific-credential-id <credential-id>
$ aws iam detach-user-policy \
  --user-name bedrock-api-user \
  --policy-arn arn:aws:iam::aws:policy/AmazonBedrockLimitedAccess
$ aws iam delete-user --user-name bedrock-api-user
Summary
In this post, you set up the IBM watsonx Orchestrate ADK within Kiro, connected agents to foundation models on Amazon Bedrock through the AI Gateway, created and tested an agent using Anthropic Claude Sonnet 4.6, and managed the full agent lifecycle from a unified IDE environment.
The ADK provides a code-first framework where agent specifications, tools, and model connections are managed as files, keeping the full agent lifecycle under version control and portable across environments.
As a next step, consider expanding your agents by adding Python tools for external API integration, connecting knowledge bases with domain-specific documents, or building multi-agent workflows where specialized collaborator agents handle different parts of a complex business process such as HR onboarding, procurement, or IT service management.
To get started with watsonx Orchestrate, visit the AWS Marketplace listing below or explore additional IBM solutions on AWS through the resources provided.
AWS Marketplace:
- IBM watsonx Orchestrate as a Service
- IBM watsonx.data PayGo
- IBM watsonx.data integration as a Service
- IBM watsonx.data intelligence as a Service
- IBM watsonx.governance as a Service
- IBM watsonx.ai Software
Additional Content:
- IBM watsonx Orchestrate now supports GPT-OSS 120B on Amazon Bedrock
- Building Agentic Workflows with IBM watsonx Orchestrate on AWS
- Enable AI with enterprise data using new IBM watsonx.data features on AWS
- Scale AI governance with Amazon SageMaker and IBM watsonx.governance
- Deploy IBM Granite 4.0 models on Amazon SageMaker AI
- IBM on AWS Partner Page