Migration & Modernization
Automating FSx for NetApp ONTAP Mounts with SSM and MGN Post-Migration
As organizations migrate to AWS at scale, connecting migrated instances to their new storage is a common bottleneck. When workloads move from on-premises NFS servers to Amazon FSx for NetApp ONTAP, teams often mount file systems by hand, minutes per instance that add up to weeks across hundreds or thousands of servers.
This solution combines AWS Transform MGN (hereafter MGN) with AWS Systems Manager (SSM) Automation to remove that step. Using SSM Automation documents integrated with MGN post-launch actions, migrated instances mount their FSx for NetApp ONTAP volumes automatically at launch, consistently and without manual effort.
In this post, we show you how to automate FSx for NetApp ONTAP volume mounting on migrated instances using SSM Automation documents integrated with MGN post-launch actions.
Prerequisites
1. AWS Account and Access: AWS account with AWS Identity and Access Management (IAM) permissions for MGN, SSM, and FSx for NetApp ONTAP
2. MGN Initialization: MGN service initialized with proper permissions
3. On-premises servers with MGN agent installed
4. Amazon FSx for NetApp ONTAP file system created with Storage Virtual Machines (SVMs) and volumes
5. Permission to access AWS Systems Manager (SSM) for configuration orchestration
6. Amazon EC2 instances with SSM agent installed and proper IAM instance profile
Solution overview
This solution combines AWS services for direct migration and storage integration:
– MGN for server migration
– Amazon FSx for NetApp ONTAP for enterprise storage with multi-protocol support
– AWS Systems Manager for automation and orchestration
– Post-launch actions for automated FSx for NetApp ONTAP mounting during migration
Architecture
The following diagram shows how SSM Automation documents integrate with MGN post-launch actions to mount FSx for NetApp ONTAP volumes on launched instances.
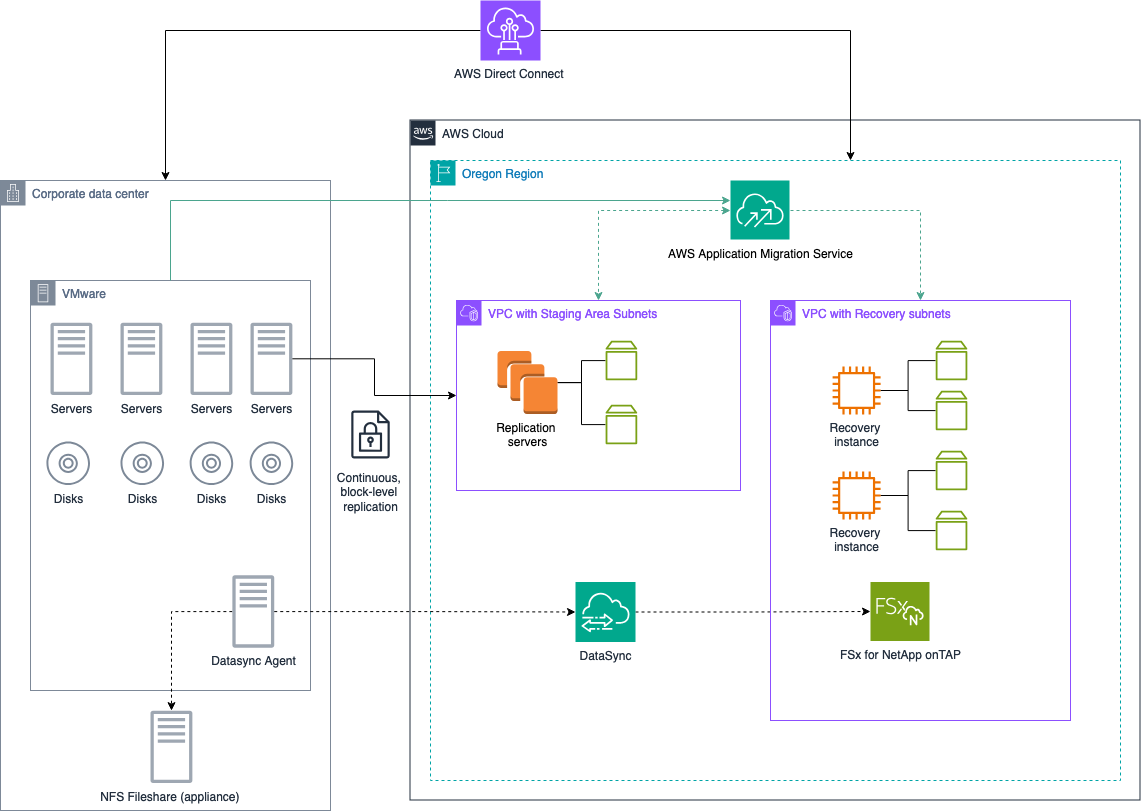
Figure.1 Architecture Diagram
Key features
- Multi-volume support: Mount multiple FSx for NetApp ONTAP volumes simultaneously with comma-separated parameters
- Automatic validation: pre-flight checks for filesystem, SVM, and volume associations
- Junction path discovery: Automatically retrieves volume junction paths from FSx for NetApp ONTAP API
- Cross-platform support: Separate implementations for Linux and Windows instances
- Security validation: Prevents mounting on critical system directories
- Persistent mounts: Configures fstab (Linux) or persistent drive mappings (Windows)
Implementation
Step 1: Create SSM Automation documents
We’ve created two sample SSM Automation documents in this AWS-samples GitHub repo: https://github.com/aws-samples/sample-FSxforONTAP-integration-post-migration-with-SSM-MGN
For Linux Instances: `Automation-document-FSxN-MGN-linux.yaml`
- Validates FSx for NetApp ONTAP filesystem, SVM, and volume associations
- Automatically discovers junction paths from FSx API
- Installs NFS utilities (supports both yum and apt)
- Mounts multiple volumes using NFS v4.1 (nfsvers=4.1) by default.
- Configures persistent mounts in /etc/fstab
- Includes retry logic for network delays
Note:FSx for NetApp ONTAP also supports NFS v3, v4.0, and v4.2; adjust the mount options in the automation document if your workloads require a different version.
For Windows Instances: `Automation-document-FSxN-MGN-Windows.yaml`
- Same validation logic as Linux version
- Installs NFS Client Windows feature
- Maps volumes to drive letters (Z:, Y:, etc.)
- Uses persistent network drive mappings
- PowerShell-based implementation
Note: NFS is intentionally used here (rather than the typically recommended SMB for Windows) to preserve the existing on-premises NFS mount protocol, providing a transparent migration with no application reconfiguration required on source servers that were already mounting NFS shares.
Key parameters:
- `FilesystemID`: FSx for NetApp ONTAP filesystem ID (format: fs-xxxxxxxxxxxxxxxxx)
- `SVMID`: Storage Virtual Machine ID (format: svm-xxxxxxxxxxxxxxxxx)
- `VolumeID`: Comma-separated volume IDs (format: fsvol-xxxxxxxxxxxxxxxxx,fsvol-xxxxxxxxxxxxxxxxx)
- `MountPointPath`: Comma-separated mount points (Linux: /mnt/vol1,/mnt/vol2 | Windows: Z:,Y:)
- `InstanceID`: Target EC2 instance IDs
- `AutomationAssumeRole`: IAM role ARN for automation execution
You can find the complete sample YAML documents in the repository. They include error handling, validation logic, and sample configurations suitable for customization.
Step 2: Configure IAM permissions (below are sample permissions, please apply your judgment before executing them in production environment, refer to managed policy “AmazonSSMManagedInstanceCore” for better understanding)
You would need IAM role for SSM Automation with following permission:
{
  "Version": "2012-10-17",
  "Statement": [
    {
      "Effect": "Allow",
      "Action": [
        "ssm:SendCommand",
        "ssm:GetCommandInvocation",
        "ssm:StartAutomationExecution",
        "ec2:DescribeInstances",
        "fsx:DescribeFileSystems",
        "fsx:DescribeStorageVirtualMachines",
        "fsx:DescribeVolumes"
      ],
      "Resource": "*"
    }
  ]
}
Step 3: Clone the repository from AWS samples. You will reference these files in the next step.
Step 4: Deploy SSM Automation documents: To create the SSM automation document, either use the respective AWS CLI commands as per your operating systems or do it via AWS console:
Deploy Linux version using AWS CLI:
aws ssm create-document \
  --name "FSx-Mount-Linux-Automation" \
  --document-type "Automation" \
  --content file://Automation-document-FSxN-MGN-linux.yaml \
  --document-format YAML
Deploy Windows version using AWS CLI:
Option 1 if you use Git Bash or WSL:
aws ssm create-document \
  --name "FSx-Mount-Windows-Automation" \
  --document-type "Automation" \
  --content file://Automation-document-FSxN-MGN-Windows.yaml \
  --document-format YAML
Option 2 using powershell:
aws ssm create-document `
  --name "FSx-Mount-Windows-Automation" `
  --document-type "Automation" `
  --content file://Automation-document-FSxN-MGN-Windows.yaml `
  --document-format YAML
Or Deploy using AWS console:
- Go to AWS Systems Manager and select documents from the left navigation pane:
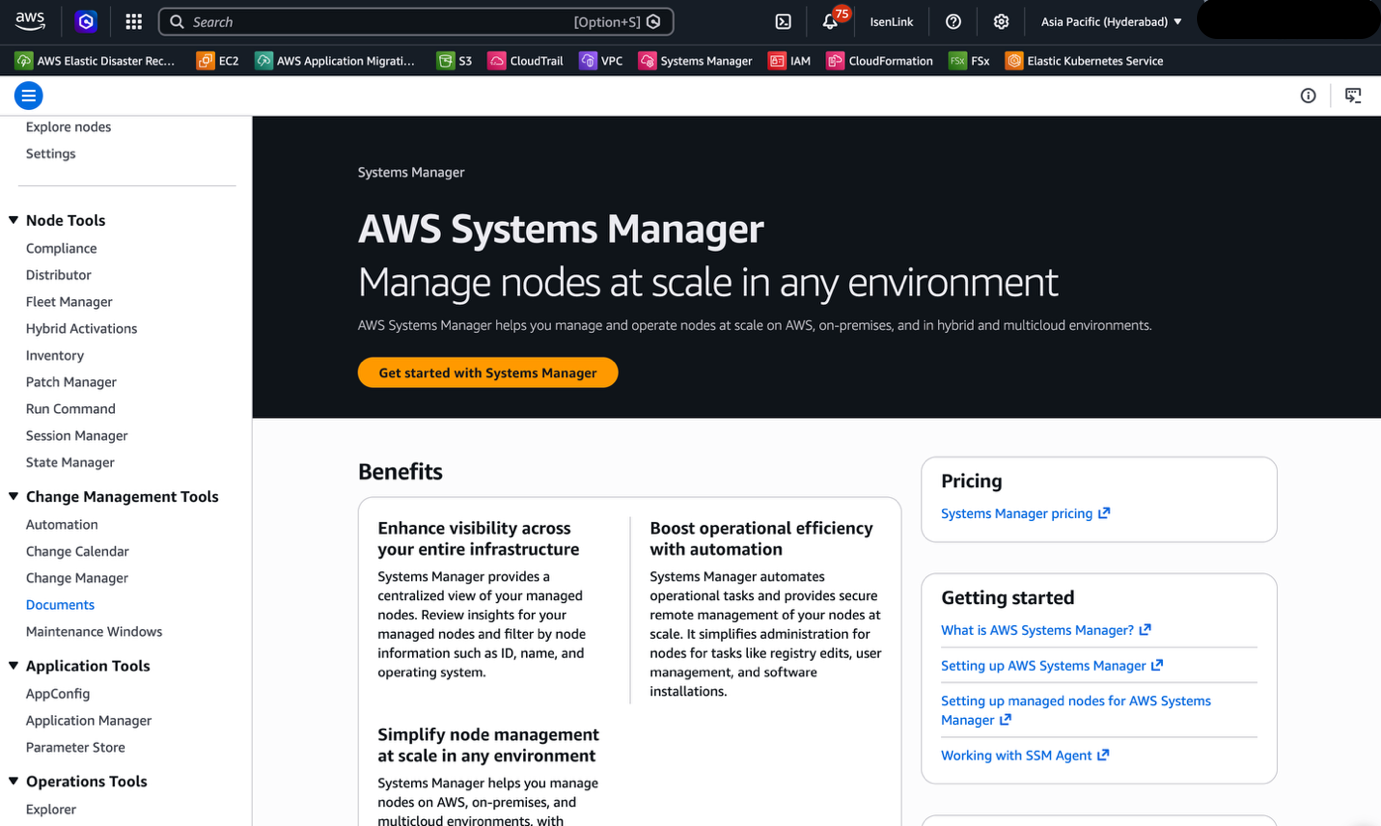
Figure.2 AWS Systems Manager
- Select Create Document > Automation:
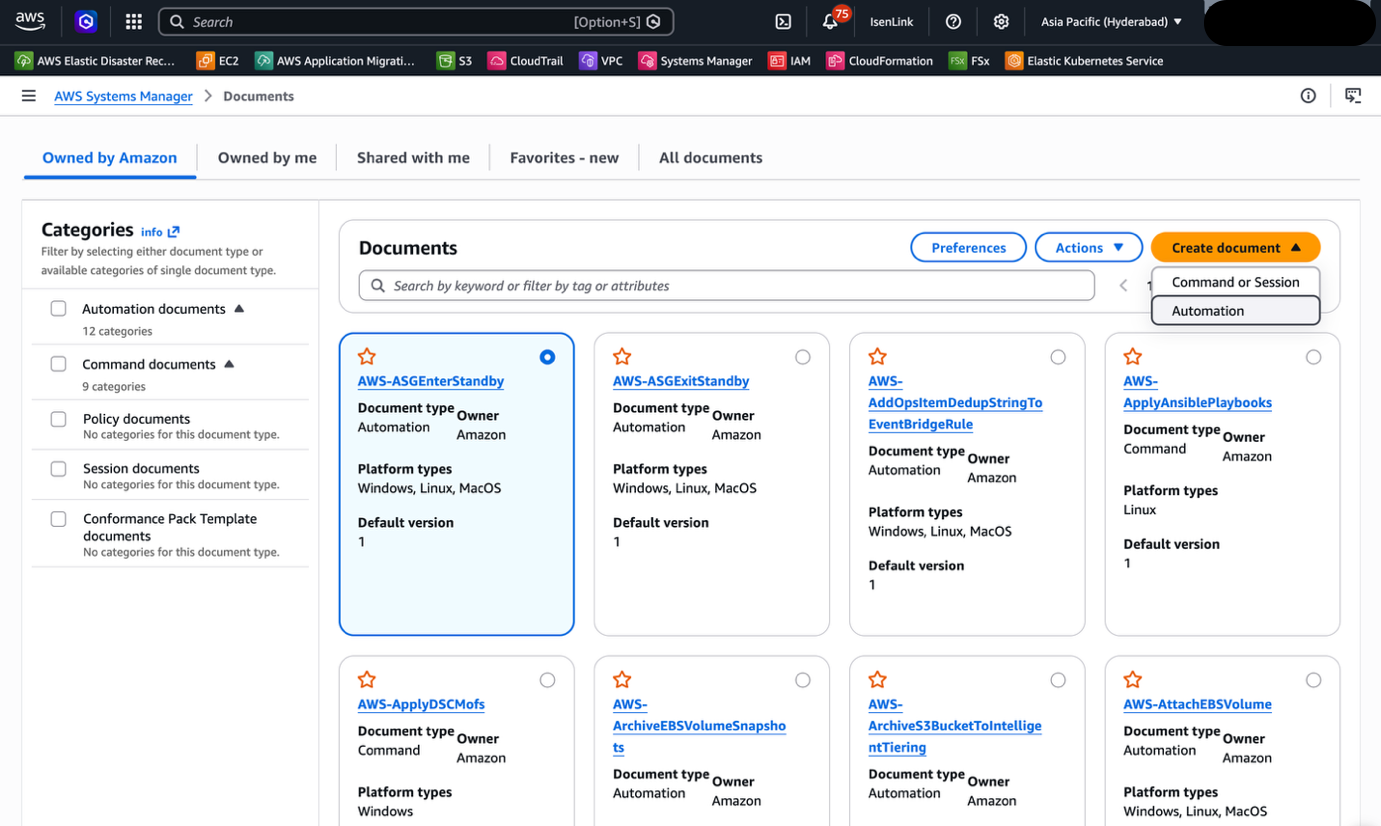
Figure.3 Create Document
- Under Actions select ‘Import runbook’ and select the runbook from the repo (step 3) and select import and then create runbook.
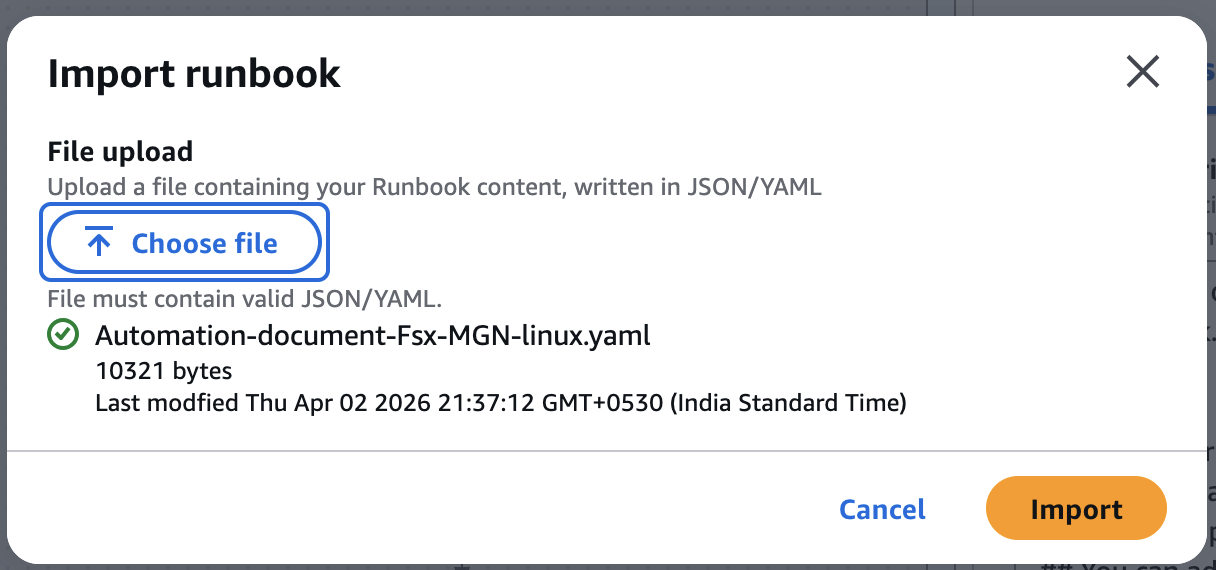
Figure.4 Import Runbook
- You can verify that runbook got created by selecting and opening it.
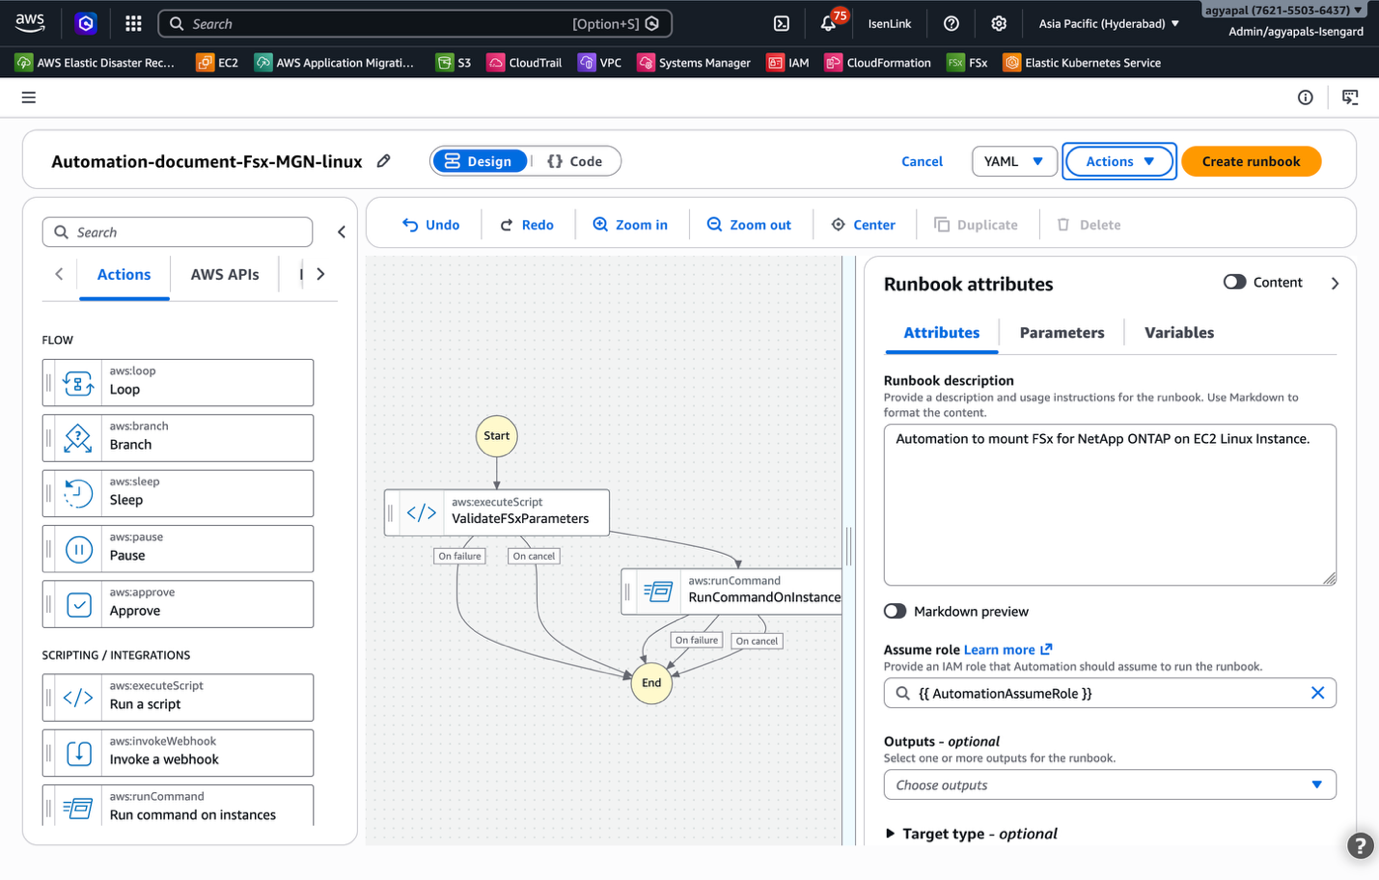
Figure.5 Runbook design verification
Now runbook is created, we need to attach runbook as post launch action after activating post-launch actions from MGN console.
Step 5: Configure MGN post-launch actions
Integrate with MGN for automatic execution during migration:
- Go to MGN service console and select ‘source servers’ where your source servers are visible.
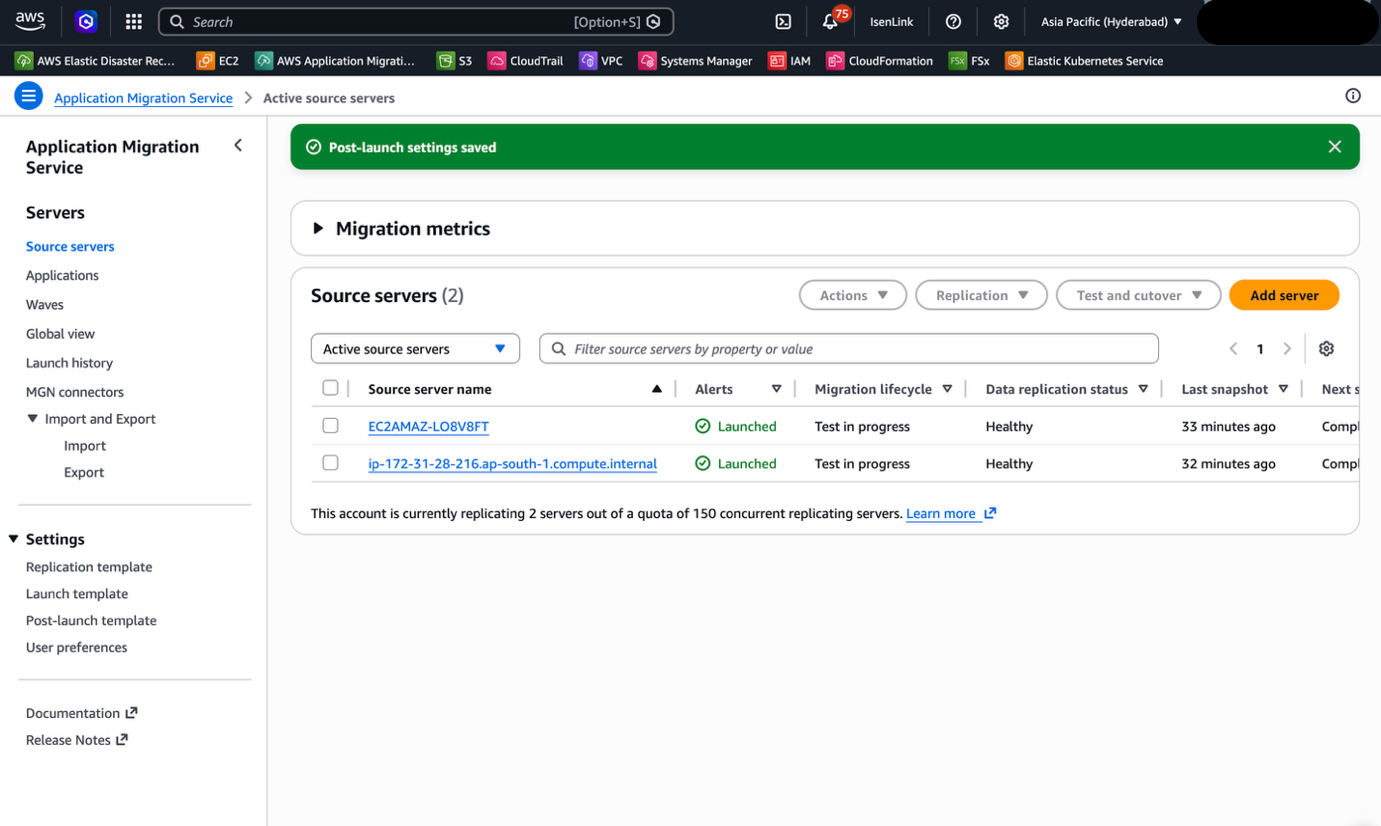
Figure.6 Select source servers
- Select the server that you want to act upon and go to post-launch settings and choose to edit, select the deployment type and choose save settings (you may have to initialize MGN if you are accessing it for the first time):
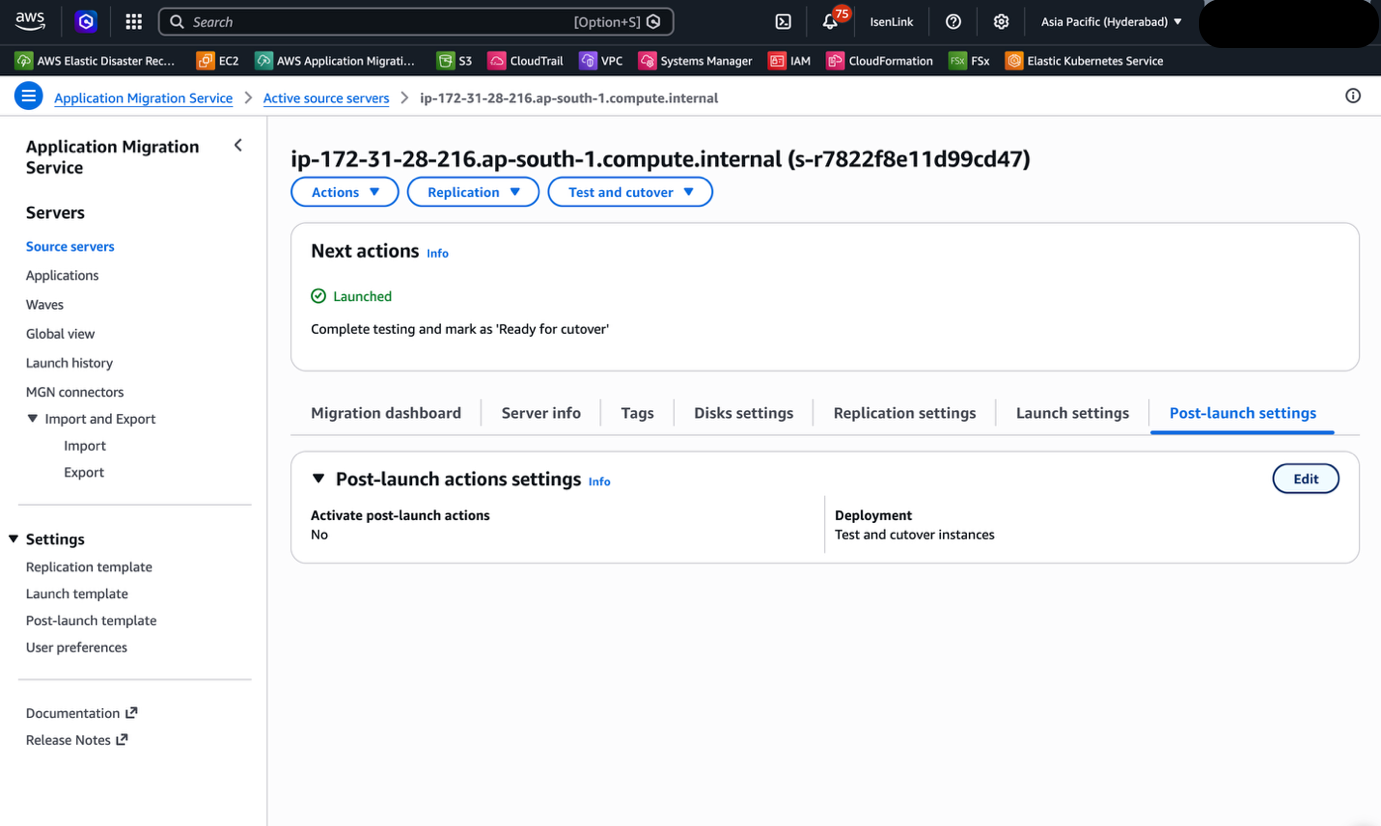
Figure.7 Edit post launch settings
- Upon arriving on the post-launch settings page, toggle the ‘install the Systems Manager agent and allow executing actions on launched servers’ to see the deployment options.
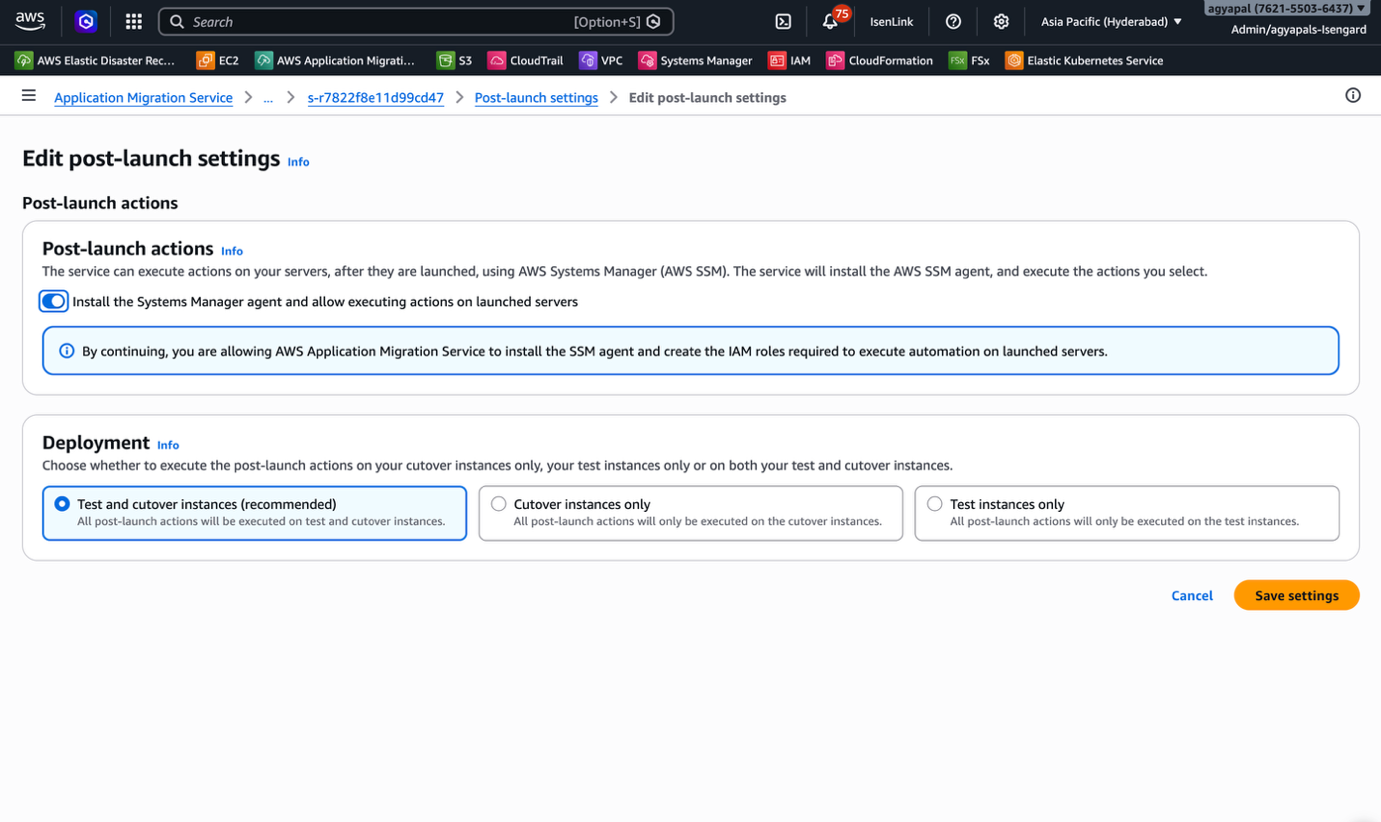
Figure.8 Choose Deployment type
- Select create action, fill action name and select the appropriate Systems Manager document from drop down and select the action parameters as per your choice.
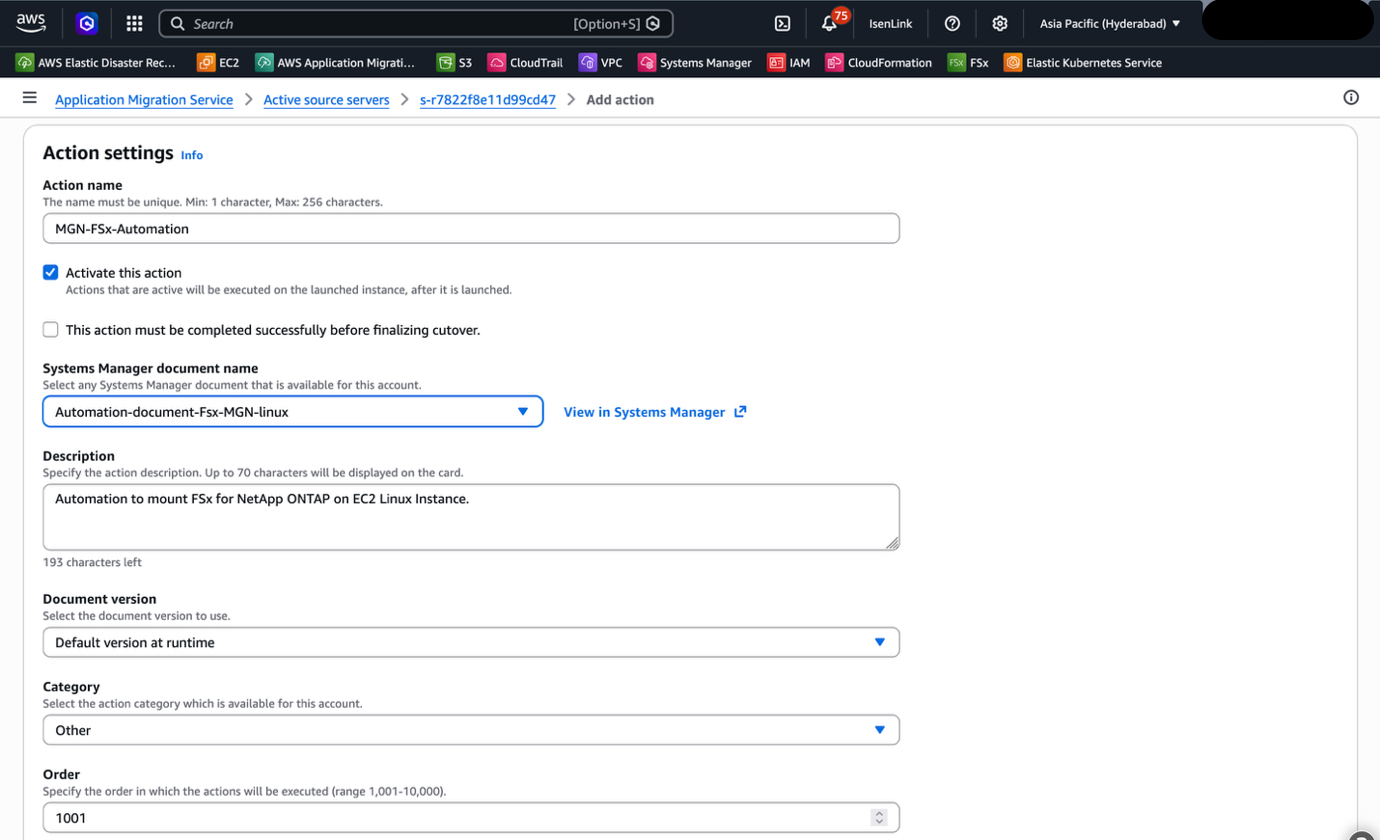
Figure.9 Configure post launch action
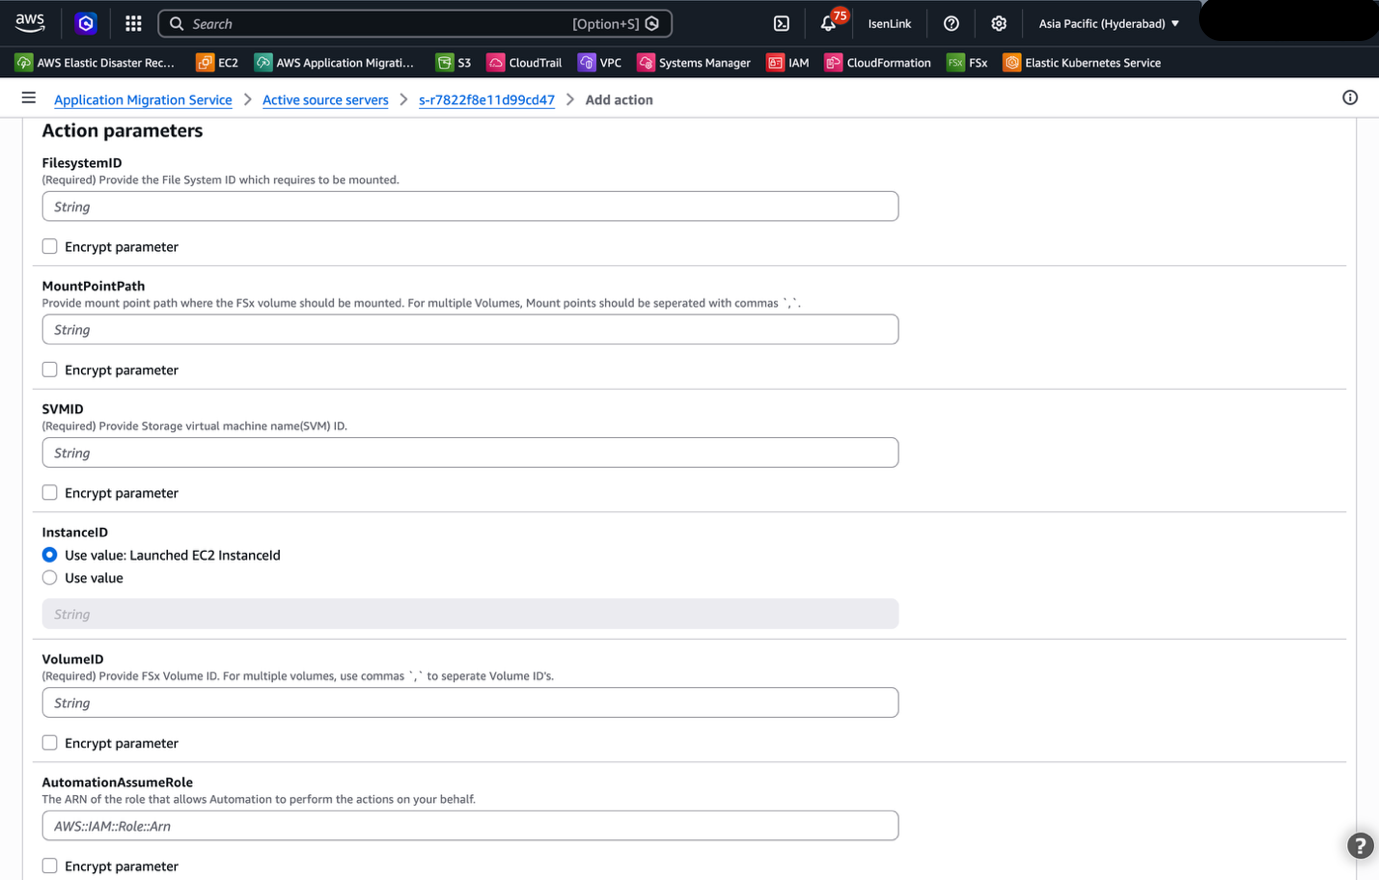
Figure.10 Provide action parameters
- Once you have saved the action settings, select add action at the bottom.
Validation and testing
- Once Runbook is added as post launch action, trigger a test cutover to verify that FSx for NetApp ONTAP volumes mount automatically on the launched instance.
- Select Test and Cutover for your source server and select launch test instance.
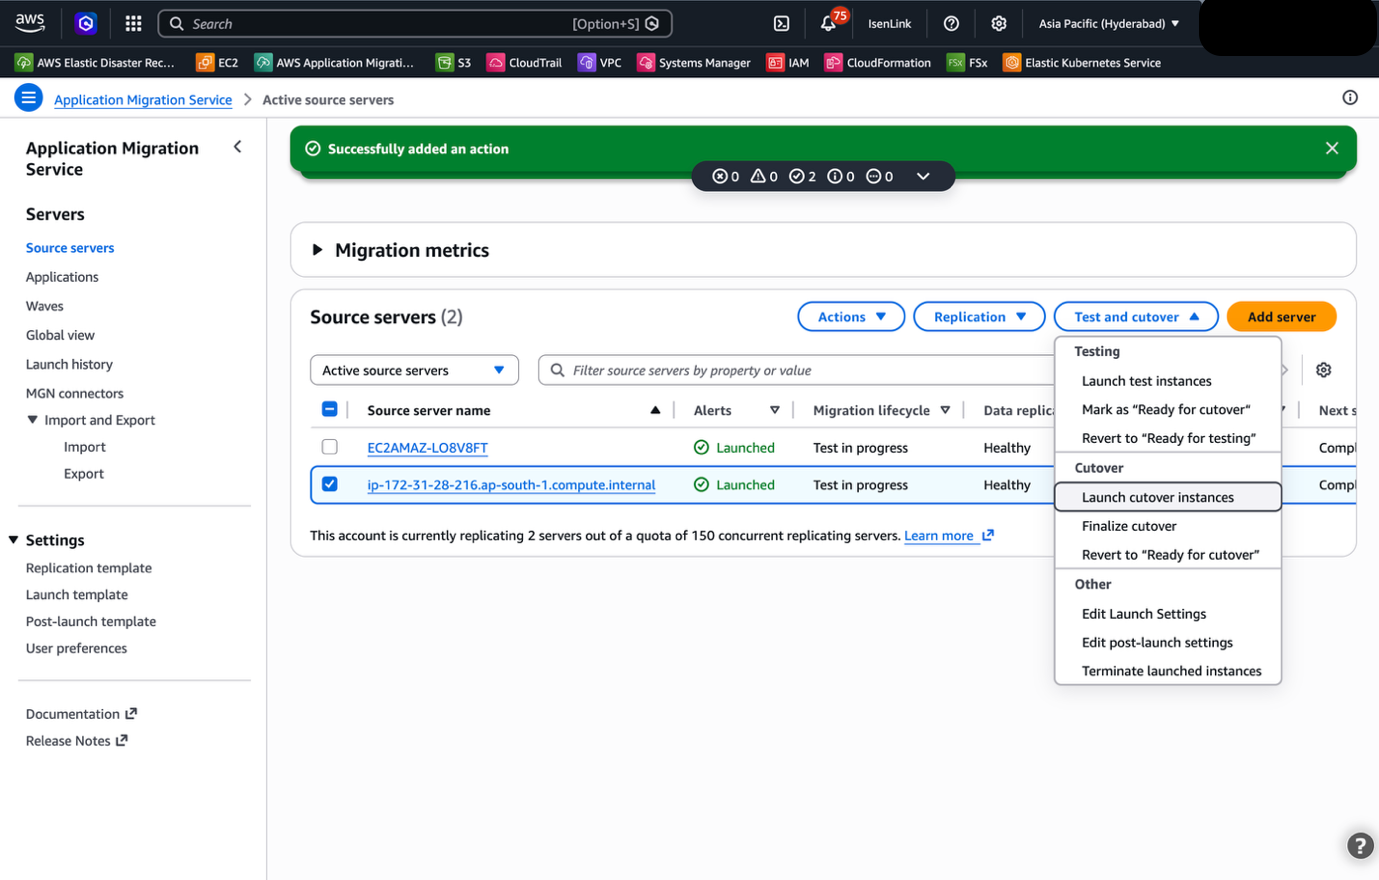
Figure.11 Launch cutover instance
- Wait for the launched instance to come online. If required, you can use SSM Session Manager or other access mechanisms to log in to the respective server and verify the volumes or rely on SSH/RDP if SSM Session manager is not being used in your Organization. Once you log in, you can see that FSx for NetApp ONTAP volume is attached and mounted.
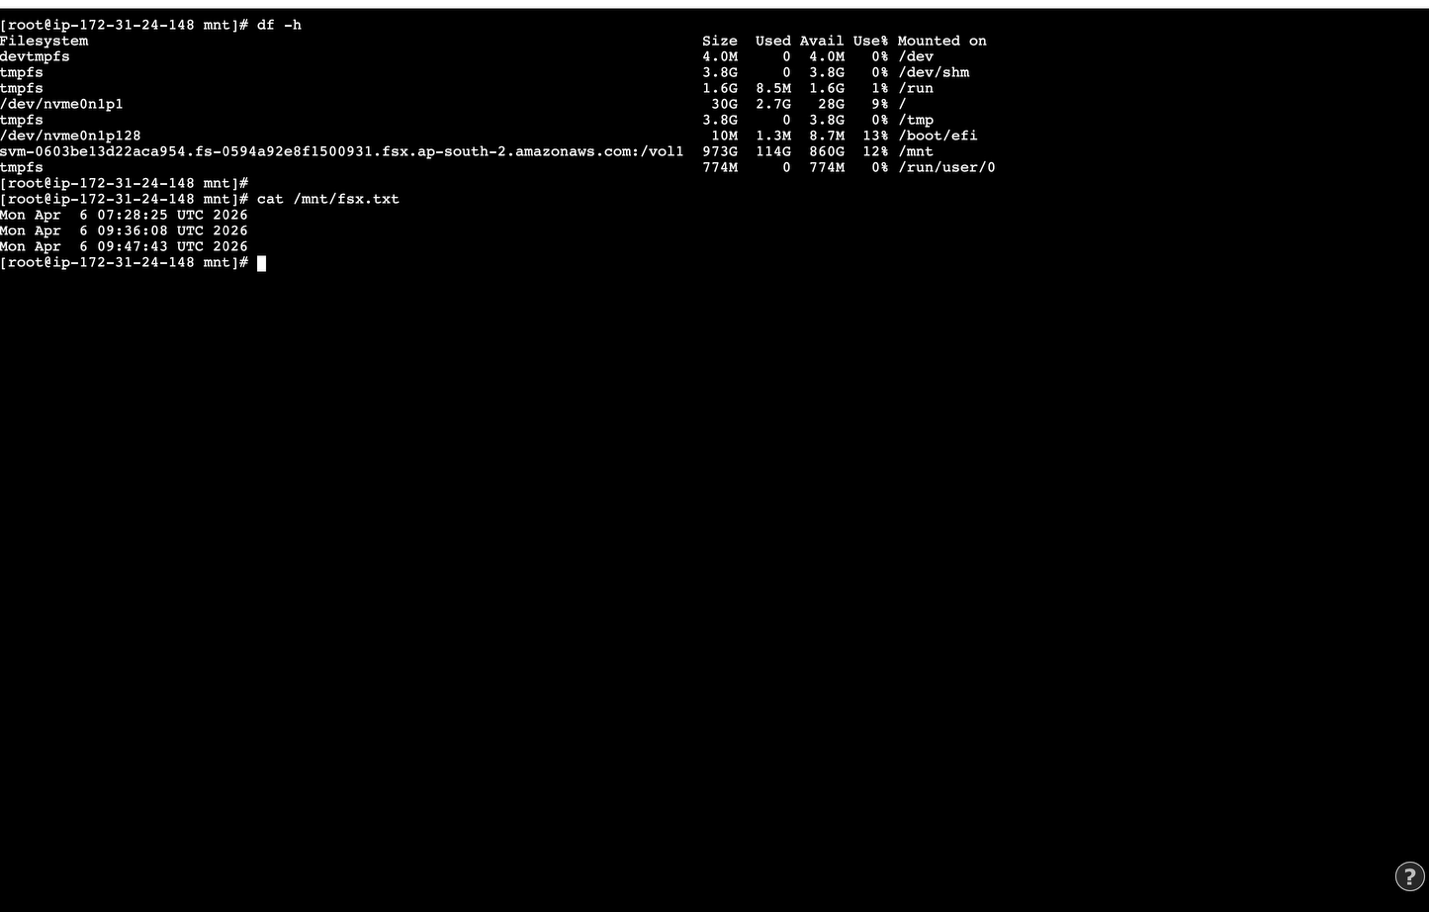
Figure.12 Verify the mount in server
While this blog validated the working of this automation in a non-production environment, it is recommended that you do your due diligence before testing and executing the automation in a production system.
Clean up
To avoid ongoing charges, remove the resources you created once you no longer need them. If you deployed into an existing environment, delete only the resources specific to this walkthrough.
- In the MGN console, delete the post-launch action referencing the FSx mount document, and terminate any test instances you launched during Test and Cutover.
- Delete the SSM Automation documents:
aws ssm delete-document --name "FSx-Mount-Linux-Automation"aws ssm delete-document --name "FSx-Mount-Windows-Automation"
- On any retained instances, unmount the volumes and remove their persistence entries (/etc/fstab on Linux, net use Z: /delete on Windows).
- If the FSx for NetApp ONTAP file system was created only for this walkthrough, back up any needed data, then delete its volumes, SVMs, and the file system.
- Delete the IAM automation role and EC2 instance profile if they aren’t used elsewhere.
Note: deleting the file system permanently destroys its data, so confirm backups first.
Conclusion
This automation solution transforms FSx for NetApp ONTAP integration from a manual bottleneck into an efficient, automated process. By combining AWS Transform MGN with SSM Automation, organizations can achieve the following:
| Manual approach (before) | Automated approach (after) |
| Minutes of manual mounting per instance, adding up to weeks across large fleets | Volumes mount automatically at launch, in parallel |
| Inconsistent configuration, prone to human error | Pre-flight validation provides consistent, reliable mounts |
| Linux and Windows handled ad hoc | Platform-specific documents cover both |
| Does not scale to hundreds or thousands of servers | Scales across the full migration portfolio |
The solution provides immediate value through time and cost savings while establishing a foundation for ongoing operational excellence in cloud migrations.
Additional resources
- FSx for NetApp ONTAP- https://docs.aws.amazon.com/fsx/latest/ONTAPGuide/
- Systems Manager Automation- https://docs.aws.amazon.com/systems-manager/latest/userguide/systems-manager-automation.html
- MGN Post-Launch Actions- https://docs.aws.amazon.com/mgn/latest/ug/post-launch-actions.html