Migration & Modernization
Proactive Rocket Software Licensing Daemon Management on AWS
AWS Transform for mainframe replatform is a migration service that helps organizations accelerate the modernization of their mainframe workloads to AWS. As organizations pursue their mainframe modernization journey, migrating mainframe systems to AWS has become a strategic imperative. The service provides an end-to-end automated migration pathway, including tooling, guidance, and self-managed runtime environments with Rocket Software (formerly Micro Focus) licensed products that enable enterprises to run their critical mainframe applications on Amazon EC2 instances.
The licensing daemon for Rocket Software serves as the cornerstone of your modernized mainframe environment on AWS. This critical background process acts as the gatekeeper for Rocket product licenses, ensuring that your applications, development tools, and runtime environments operate legally and efficiently. However, the licensing daemon can terminate unexpectedly, creating a cascade of failures that bring entire business operations to a halt. Unlike hardware failures or network outages that typically generate immediate alerts, licensing daemon failures often occur silently, making them particularly dangerous.
This article provides a comprehensive guide for transforming your approach from reactive troubleshooting to proactive licensing daemon management. We’ll cover two essential components: mastering troubleshooting procedures to restore the service quickly when issues occur and implementing robust Amazon CloudWatch-based monitoring that detects failures before they impact users.
The Critical Role of Licensing with AWS Transform for mainframe replatform
Unlike traditional mainframe environments, where licensing was often managed centrally by the mainframe operating system, cloud-based deployments require more granular and proactive license management. When functioning correctly, the licensing daemon operates silently in the background, seamlessly serving license requests from various Rocket components.
The Root Cause
The AWS version of the Rocket licensing daemon utilizes various software components to operate. When you upgrade these software components to versions that are incompatible with the licensing daemon, the licensing daemon enters an inoperable state and terminates.
Business Impact
When licensing daemon failures occur, organizations face significant challenges:
Immediate Impact:
- Applications fail to start or continue running.
- Development teams cannot access critical tools.
- Batch processing jobs terminate unexpectedly.
- User sessions disconnect abruptly.
Business Consequences:
- Revenue loss from system downtime.
- Missed SLA commitments to customers.
- Delayed project deliveries.
- Increased support costs and emergency response efforts.
- Potential compliance issues in regulated industries
Detection Challenges: Most organizations discover licensing daemon failures only when end users report application errors or when critical batch jobs fail to complete. Hours or even days may pass before discovering these failures. Without proper logging and monitoring, identifying the root cause becomes time-consuming, and without understanding failure patterns, the same problems repeat.
A New Paradigm: Proactive Licensing Management
This guide implements a two-part approach to ensure near-zero downtime for your Rocket Software licensing infrastructure:
First, Master Troubleshooting: Understanding the root causes of licensing daemon failures and implementing proven resolution procedures ensures you can quickly restore service when issues occur.
Then, Implement Monitoring: Build a robust CloudWatch-based monitoring solution that detects failures before they impact users, providing the visibility and alerting necessary for true operational excellence.
Step# 1 – Troubleshooting and Resolving Licensing Daemon Issues
The AWS Transform for Mainframe Replatform environment runs the Rocket licensing daemon through a service called MFCESD (Micro Focus Enterprise Server Cluster Daemon). To identify which software component versions the AWS version of the licensing daemon is using, you can review the hash check operations performed when starting the licensing daemon by viewing the script logic defined within the aws-license-daemon.jar file.
Resolving Incompatibility Issues
To resolve licensing issues originating from incompatibility between software component versions and the Rocket licensing daemon, follow these steps:
1. Retrieve the latest patch file for your Rocket Software version.
2. Execute the patch file script to ensure compatibility.
3. Restart the MFCESD service.
Example Resolution for Rocket Software Version 8
The patch script retrieves from an AWS-provided CloudFront distribution URL. The following commands download and apply the Rocket Software-provided patch for Version 8:
sudo curl
https://d148y999krizvm.cloudfront.net/patch/v8/linux/patch.sh -o
/var/microfocuslicensing/bin/patch.sh
sudo chmod +x /var/microfocuslicensing/bin/patch.sh
sudo /var/microfocuslicensing/bin/patch.sh
After applying any patch, restart the MFCESD service through executing the following commands as the recommended method:
sudo systemctl restart mfcesd.service
sudo systemctl status mfcesd.service
Alternatively, you can run the following commands:
sudo /usr/local/bin/mfcesd.sh stop
sudo /usr/local/bin/mfcesd.sh start
In addition, you may run the following commands to verify the service status and check for any potential issues:sudo journalctl -u mfcesd.service
After executing the latest patch file script, you may need to reboot your EC2 instance to ensure that all software components have been updated and are running with compatible versions for the Rocket licensing daemon.
For a comprehensive list of the different Rocket Software versions, read our article AWS Mainframe Modernization: Updating Rocket Software Runtime on Amazon EC2.
Step#2 – Implementing Proactive Monitoring with CloudWatch
Prerequisites
For this walkthrough, you need to have the following prerequisites:
- AWS Mainframe Modernization Rocket Software (formerly Micro Focus) EC2 instance.
- An IAM role with the AWS Managed Policy: CloudWatchAgentServerPolicy for the CloudWatch agent.
- Network connectivity to the CloudWatch service through the internet or VPC endpoints.
- Amazon SNS topic with a subscription that includes the necessary email addresses.
Install the CloudWatch Agent
There are two prerequisites that must be met before we can begin installing the CloudWatch agent:
- Following the principle of least privilege, the Identity and Access Management (IAM) role configured for the EC2 instance should be scoped to only allow the permissions required for CloudWatch Agent operation. This can be achieved by creating an IAM role with the AWS managed IAM policy CloudWatchAgentServerPolicy and attaching this role to the EC2 instance.
- Configure the EC2 instance in an Amazon Virtual Private Cloud (VPC) network that allows traffic to be sent to the CloudWatch service. This can be achieved by configuring the VPC for internet access or by using VPC endpoints.
For additional details, please refer to our CloudWatch documentation: CloudWatch agent prerequisites.
The CloudWatch agent is available as an installable package for the Amazon Linux 2023 and Amazon Linux 2 operating systems; therefore, we can simply run the following command:
sudo yum install amazon-cloudwatch-agent
However, if you require an alternative installation method, then there are a few options listed in our Amazon CloudWatch documentation article, Installing the CloudWatch agent.
Create the configuration file for the CloudWatch agent
To configure the CloudWatch agent to collect and send data to CloudWatch, create an agent configuration file. The primary requirement for our agent configuration file is that it must be in JSON format, but it can be in any directory and it can be created with any filename.
In this example, we will define our agent configuration file to create a custom metric named: “Licensing_Daemon” using the key: “namespace”. To identify which data points belong to a specific EC2 instance, we will define the key: “append_dimensions” and add “InstanceId”: “${aws:InstanceId}” to it. This will append the InstanceId as a dimension with the corresponding EC2 instance ID as the value.
The data points for our custom metric will be collected using the procstat plugin. It will use the duration reported within the “cpu_time” metric of the executable file at “/var/microfocuslicensing/bin/mfcesd”. The key that defines the custom metric collection interval is “metrics_collection_interval” with the value 300, so that the CloudWatch agent only pushes data points every 5-minutes.
The agent configuration file should contain:
{
"metrics": {
"namespace": "Licensing_Daemon",
"append_dimensions": {
"InstanceId": "${aws:InstanceId}"
},
"metrics_collected": {
"procstat": [{
"exe": "/var/microfocuslicensing/bin/mfcesd",
"measurement": [
"cpu_time"
],
"metrics_collection_interval": 300
}]
}
}
}
For additional details please refer to our CloudWatch documentation
Collect process metrics with the procstat plugin
Start the CloudWatch agent
Once our agent configuration file has been created then we are ready to start the CloudWatch agent. To start the CloudWatch agent with the configuration set within the agent configuration file, we can execute the following command while defining the “file:” parameter with the file path for our agent configuration file:
sudo /opt/aws/amazon-cloudwatch-agent/bin/amazon-cloudwatch-

 agent-ctl -a fetch-config -m ec2 -s -c file:<file-

 path/file.json>
To confirm the CloudWatch agent status, run the following command:
sudo /opt/aws/amazon-cloudwatch-agent/bin/amazon-cloudwatch-agent-ctl -a status
For additional details regarding process of manually configuring the CloudWatch agent please refer to our CloudWatch documentation: Manually create or edit the CloudWatch agent configuration file.
Preparing our custom metric before we create our CloudWatch alarm
Before we can create our CloudWatch alarm for our custom metric, we first have to add a math expression to our custom metric so that the CloudWatch service can identify when data points are missing from the metric and fill that timeslot with a negative value. This enables the CloudWatch alarm to detect missing data points in the custom metric by reporting negative values at expected time slots.
For our example, we will use the math expression: FILL(m1, -1) and our custom metric should look like the following after the math expression has been added (Figure 1):

Figure 1: Custom metric with FILL(m1, -1) math expression applied
For additional details please refer to our CloudWatch documentation: Using math expressions with CloudWatch metrics
Note: The FILL function replaces missing data points in CloudWatch metrics with a specified value, enabling alarms to detect gaps by treating them as negative values instead of empty slots.
Create a CloudWatch alarm
To create our CloudWatch alarm we will follow the process outlined in our CloudWatch documentation: Create a CloudWatch alarm based on a static threshold to alert when the data point reports a value less than or equal to zero. However, it is important to note that the data points being collected and pushed from your EC2 instance might experience some network latency, so it is possible that while the data points exist, they are delayed before being reported within your custom metric.
To avoid potential false positives, we can decrease the sensitivity of our alarm by specifying to alert only when two consecutive data points report values less than or equal to zero. Since the agent collects data every 5 minutes, requiring two consecutive missing data points means the alarm will trigger approximately 10 minutes after the licensing daemon stops responding (Figure 2).
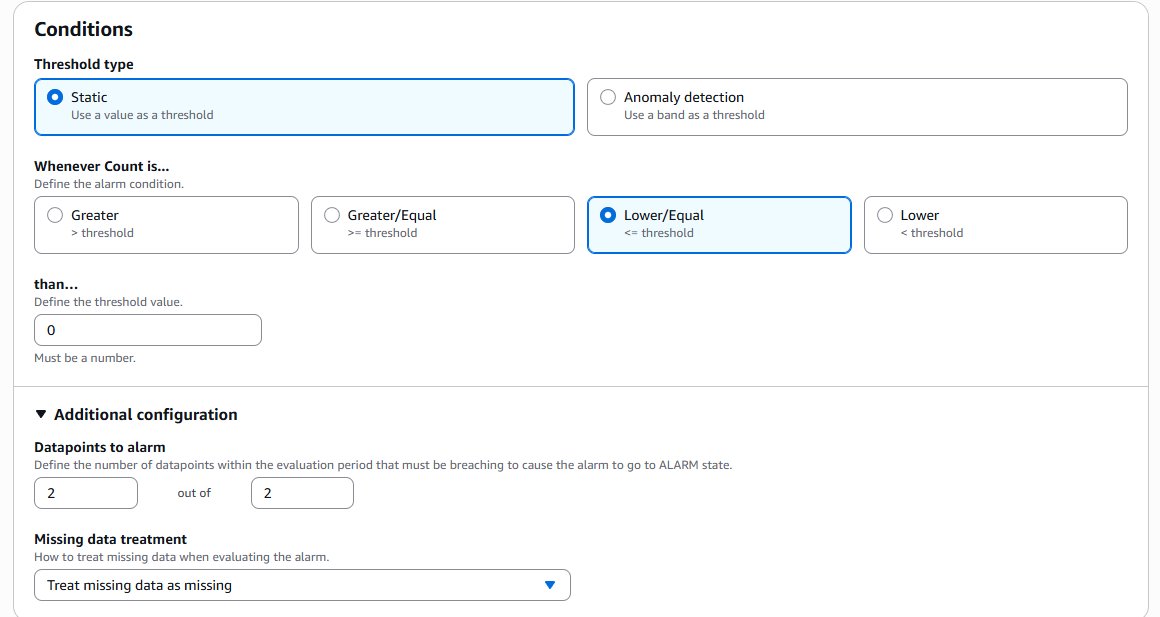
Figure 2: CloudWatch alarm configuration requiring two consecutive missing data points
Once this configuration is in place, you will have graphical representation for the status of your Rocket licensing daemon within your environments through the custom metric created using the CloudWatch agent.
Configuring the alarm to send an alert notification when the state changes
When the alarm enters the ALARM state, it indicates that the licensing daemon is no longer in an active state. In such an event, the alarm should be configured with an action that triggers an Amazon Simple Notification Service (SNS) topic to send a message notifying the respective administrators. To configure your alarm to trigger an SNS topic during an ALARM state, select the “In Alarm” option and select an existing or new SNS topic as shown in Figure 3.
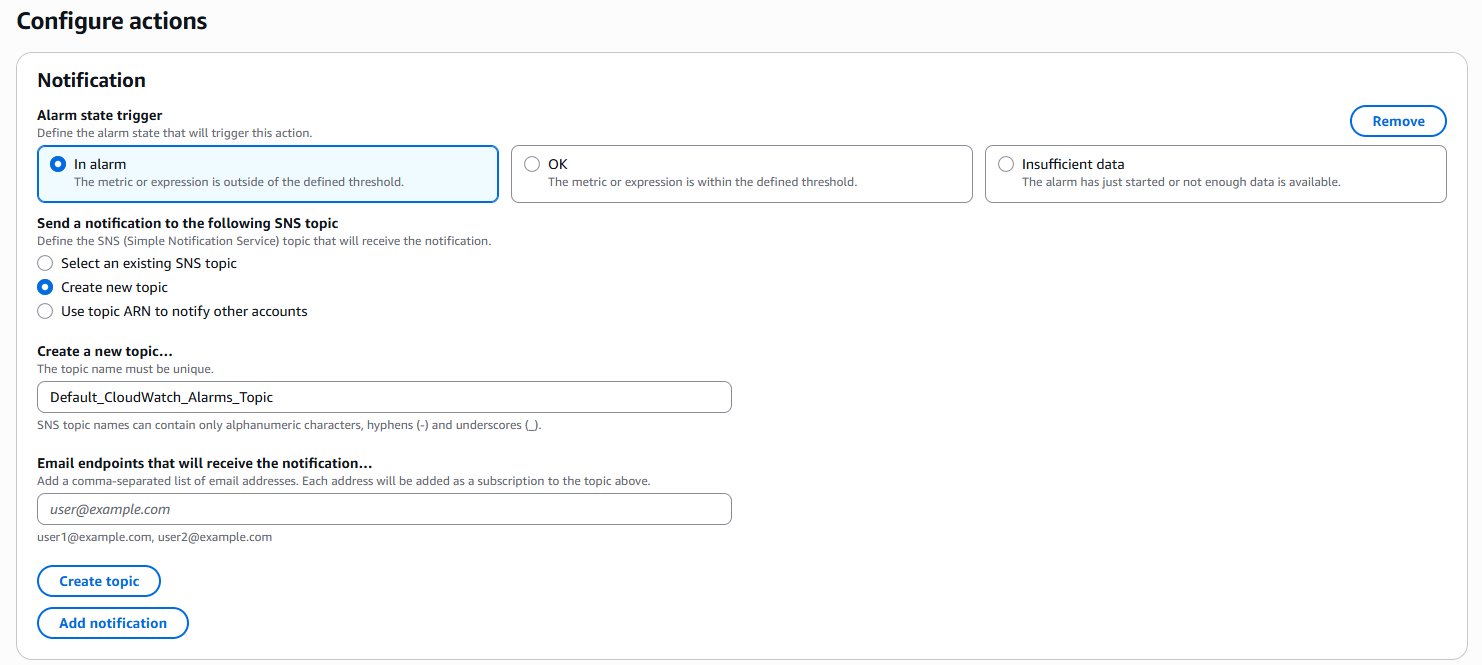
Figure 3: Configuring alarm actions to trigger SNS notifications
For additional details please refer to our CloudWatch documentation: Setting up Amazon SNS notifications
Testing the CloudWatch Alarm
To test the CloudWatch alarm after it has been created then the execute the following command to stop the Rocket licensing daemon:
sudo /usr/local/bin/mfcesd.sh stop
After 10 minutes has elapsed from when the Rocket licensing daemon stopped responding, the CloudWatch agent will have failed to push two consecutive data points to the custom metric. The alarm then must have entered the ALARM state, triggering the SNS topic to send a notification to the email addresses subscribed.
Once the notification has been received, use the following command to start the Rocket licensing daemon:
sudo /usr/local/bin/mfcesd.sh start
Troubleshooting
If your CloudWatch custom metric reports no data points and the alarm is in an INSUFFICIENT_DATA state, then use the following guide: How do I troubleshoot an alarm that monitors CloudWatch agent metrics and is in the INSUFFICIENT_DATA state?.
If your CloudWatch custom metric reports data points, but the alarm didn’t enter the ALARM state, then follow this guide: How do I troubleshoot a CloudWatch alarm that doesn’t invoke?.
Best Practices for Long-Term Success
We recommend that you regularly schedule maintenance windows for EC2 instances so they can be updated with the latest patch version for the Rocket Software version your environment uses. This will ensure the longevity of your environment and minimize unexpected downtime caused by incompatibility issues.
Operational Excellence Recommendations
1. Regular Maintenance: Schedule monthly maintenance windows for patch updates.
2. Testing: Test patches in non-production environments first.
3. Documentation: Maintain comprehensive documentation of all changes.
4. Monitoring: Continuously monitor system performance and adjust thresholds as needed.
5. Automation: Implement automated remediation where possible to reduce manual intervention.
Conclusion
By implementing this comprehensive approach—starting with proper troubleshooting procedures and followed by proactive monitoring—organizations can significantly reduce licensing daemon-related downtime. The combination of understanding root causes, applying proper fixes, and implementing continuous monitoring creates a robust foundation for maintaining Rocket Software environments on AWS. This solution transforms reactive troubleshooting into proactive system management, ensuring business continuity and an improved user experience while minimizing operational costs associated with unexpected licensing failures.
Next Steps
Now that you understand the importance of proactive licensing daemon management, here’s how to get started:
- Audit your current setup — Review your existing Rocket Software licensing daemon configuration and identify any unpatched components or version incompatibilities.
- Deploy CloudWatch monitoring — Follow the steps outlined in this post to set up the custom Licensing_Daemon metric and configure alarms with SNS notifications.
- Establish a maintenance cadence — Schedule regular patch review windows and test updates in non-production environments before rolling them out.
- Document your runbooks — Create or update your operational runbooks to include the troubleshooting and patch procedures covered here, so your team can respond quickly when issues arise.
Have questions or want to share your experience implementing this solution? Leave a comment below or reach out to us — we’d love to hear how proactive daemon monitoring is working in your environment.