Microsoft Workloads on AWS
Extending on-premises MS SQL Server Always On Availability groups to Amazon EC2 for Disaster Recovery
This post shows how to implement a hybrid disaster recovery solution by extending your on-premises Microsoft SQL Server Always On Availability Group (AOAG) to SQL Server on Amazon Elastic Compute Cloud (Amazon EC2).
Introduction
Many Organizations need cloud-based disaster recovery solutions that maintain critical on-premises operations while minimizing costs. This post demonstrates how to extend your on-premises AOAG to SQL Server on Amazon EC2. This hybrid architecture delivers both High Availability (HA) and Disaster Recovery (DR) without requiring additional physical infrastructure.
Solution overview
This hybrid disaster recovery architecture extends your on-premises Microsoft SQL Server AOAG to Amazon Web Services (AWS). A secure connection between the environments uses either AWS Direct Connect or AWS Site-to-Site VPN. The design adds SQL Server on Amazon EC2 as an asynchronous replica to your existing synchronous on-premise, AOAG SQL Server nodes. An Amazon Virtual Private Cloud (Amazon VPC) hosts both the SQL Server secondary replica and a domain controller to extend your on-premises Active Directory. Windows Server Failover Clustering (WSFC) manages disaster recovery capabilities between environments.
This step-by-step approach details the sequential implementation of network configuration, Active Directory extension, and AOAG configuration between your on-premises environment and SQL Server on Amazon EC2 instance, designed to achieve your Recovery Point Objective (RPO) and Recovery Time Objective (RTO) during disaster events.
The following architecture diagram shows how this hybrid disaster recovery solution integrates your on-premises SQL Server with AWS infrastructure.
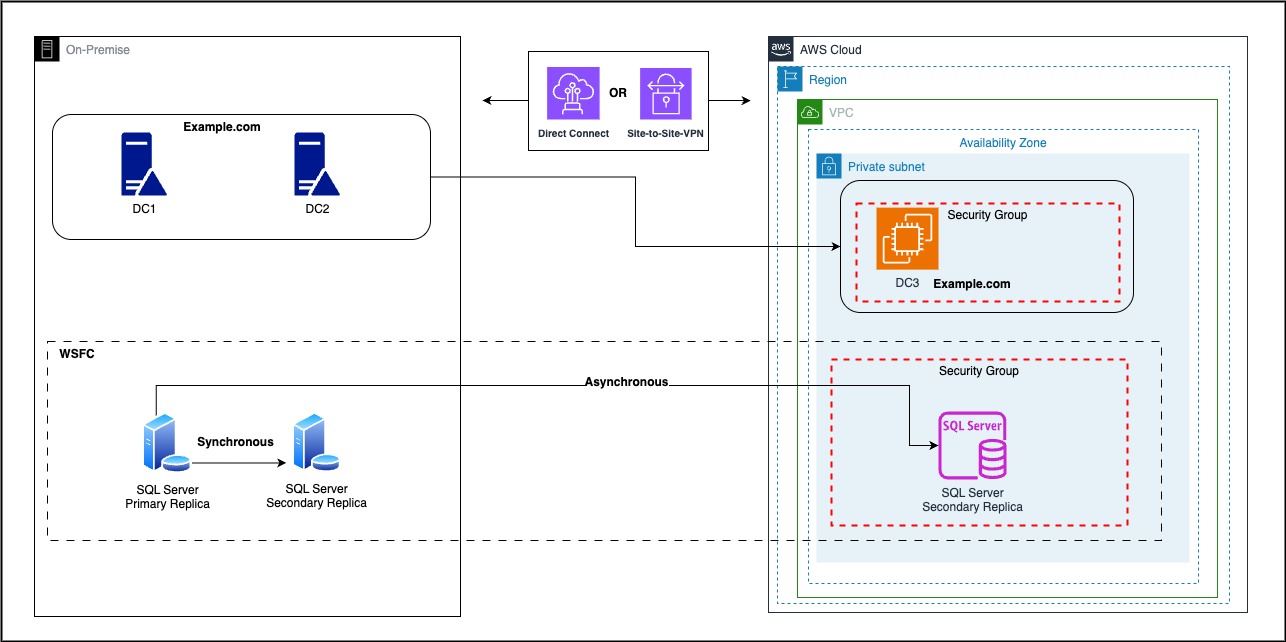
Figure 1- High level architecture flow
Benefits on having a DR for on-premises SQL Server in AWS cloud:
- Enhance business resilience with automatic/manual failover and rapid recovery using the AWS global infrastructure. This protects against both planned and unplanned service interruptions, while ensuring continuous application availability.
- Achieve cost-effective disaster recovery strategy by using Amazon EC2-based SQL Server replicas instead of secondary data centers. This approach uses pay-as-you-go pricing and flexible computing resources that adapt to your needs, providing an enterprise-grade protection solution.
Prerequisites
To implement a hybrid disaster recovery solution, make sure you have the following prerequisites:
AWS Requirements:
- An AWS account.
- Permissions to create and manage Amazon VPC resources, Amazon EC2 instance (“DRNode.mytest.com”), security groups, and AWS Identity and Access Management (AWS IAM roles).
- Extend your on-premises Active Directory to AWS to support Windows Server Failover Cluster and SQL Server deployment. For step-by-step instructions, see the AWS documentation.
An AD domain user with the necessary permissions to set up a failover cluster. - Create a service account in Active Directory for SQL Server and configure appropriate permissions across all SQL nodes.
Network Requirements:
- AWS Direct Connect or AWS Site-to-Site VPN connectivity between on-premises and AWS environment.
- Amazon Route 53 configured for Domain Name System (DNS) resolution.
On-premises SQL Server Source Requirements:
- Microsoft SQL Server Enterprise Edition (for production workloads) with an existing WSFC with two nodes and availability group and its listener setup. For a POC you can use developer edition.
- Configure firewall rules, security group rules for SQL Server AOAG and Microsoft Active Directory ports for secure hybrid connectivity.
Resource Names referenced in this post:
On-premises SQL Server:
- Self-managed Active Directory: mytest.com
- WSFC Name : TestClu.mytest.com
- WSFC Nodes / Resources : Pnode.mytest.com and Rnode.mytest.com
- AOAG Name: AOAGTest
- AOAG Listener Name: AOAGLstr
AWS:
- Amazon EC2: DRNode.mytest.com
- Additional Secondary IP for WSFC configuration : 10.x.x.69
- Additional Secondary IP for AOAG Listener configuration : 10.x.x.148
Note: The Object names, IP addresses and domain names used throughout this post are for reference and example purposes only – please substitute with your organization’s naming convention standards and available IPs from your environment.
Walk through
- Launch and integrate Microsoft SQL Server on Amazon EC2 instance with your self-managed Active Directory.
- Install and Configure Failover clustering feature on provisioned Amazon EC2 instance.
- Add the Amazon EC2 instance as an additional node to your existing on-premises WSFC.
- Enable AOAG feature for Microsoft SQL Server running on Amazon EC2 instance.
- Add Amazon EC2 SQL Server instance as an asynchronous secondary replica to your on-premises AOAG.
- Verify the failover and fail back tests.
1. Launch and integrate Microsoft SQL Server on Amazon EC2 instance with your self-managed Active Directory
This deployment uses SQL Server 2019 Enterprise Edition on Windows Server 2019 with AWS License Included AMIs. For supported versions and editions (SQL Server 2012-2022, Standard and Enterprise), see Microsoft SQL Server on Amazon EC2 instance, launch an Amazon EC2 instance that matches your on-premises SQL Server version, edition, and latest cumulative updates to maintain compatibility for AOAG configuration. To extend your on-premises Active Directory domain to AWS, follow the instructions in the AWS blog.
Assign two additional secondary private IP addresses to your Amazon EC2 instance – one for Windows Server Failover Cluster (WSFC) network communication and one for the SQL Server Always On Availability Group (AOAG) listener to enable proper failover and client connections. For instructions on adding secondary IP addresses, see Multiple secondary private IP Addresses. For information about adding an Amazon EC2 instance to an existing self-managed domain, see AWS documentation.
2. Install and Configure Failover Clustering feature on provisioned Amazon EC2 instance
- Connect your Amazon EC2 instance using Remote Desktop Protocol (RDP).
- Install Failover Clustering feature using the following PowerShell command.
Install-WindowsFeature -Name Failover-Clustering –IncludeManagementToolsAfter installation, check for any outstanding Windows updates and restart the Amazon EC2 instance to complete the Failover clustering feature installation, as shown in figure 2.

Figure 2 – Install Failover-Clustering feature
3. Add the Amazon EC2 instance as an additional node to your existing on-premises WSFC
On your on-premises SQL Server primary replica:
- Connect to your Amazon EC2 instance using Remote Desktop Protocol (RDP).
- Open the Failover Cluster Manager (CLU).
- Select the cluster object name (“TestClu.mytest.com”).
- Choose “Add Node” option, then click on “Next”.
- Add Amazon EC2 instance using its Fully qualified domain name (FQDN) as shown in the Figure 3.
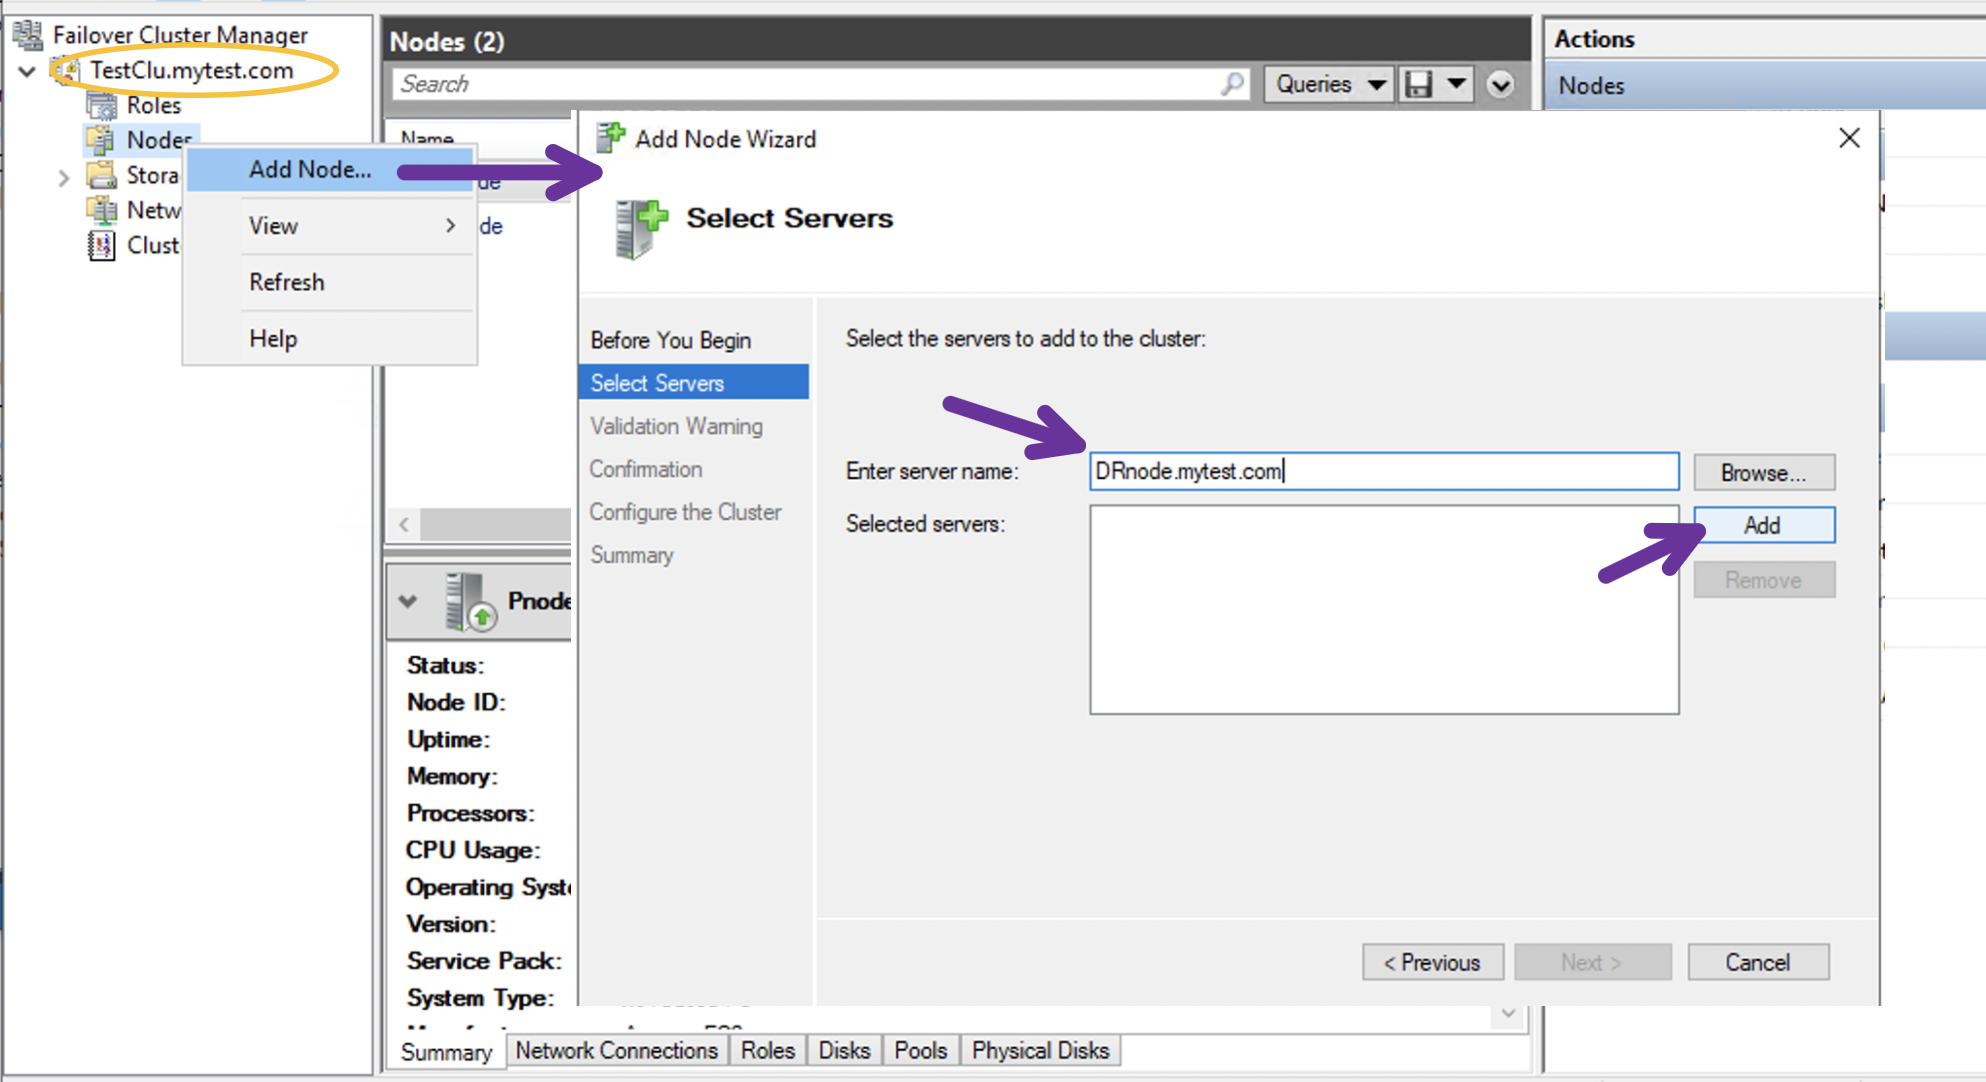
Figure 3 – Add Amazon EC2 as DR node to WSFC
Follow the CLU wizard to add Amazon EC2 instance (“DRNode.mytest.com”) as a DR node. When the process completes, verify the successful node addition by checking the status message as shown in Figure 3.1.
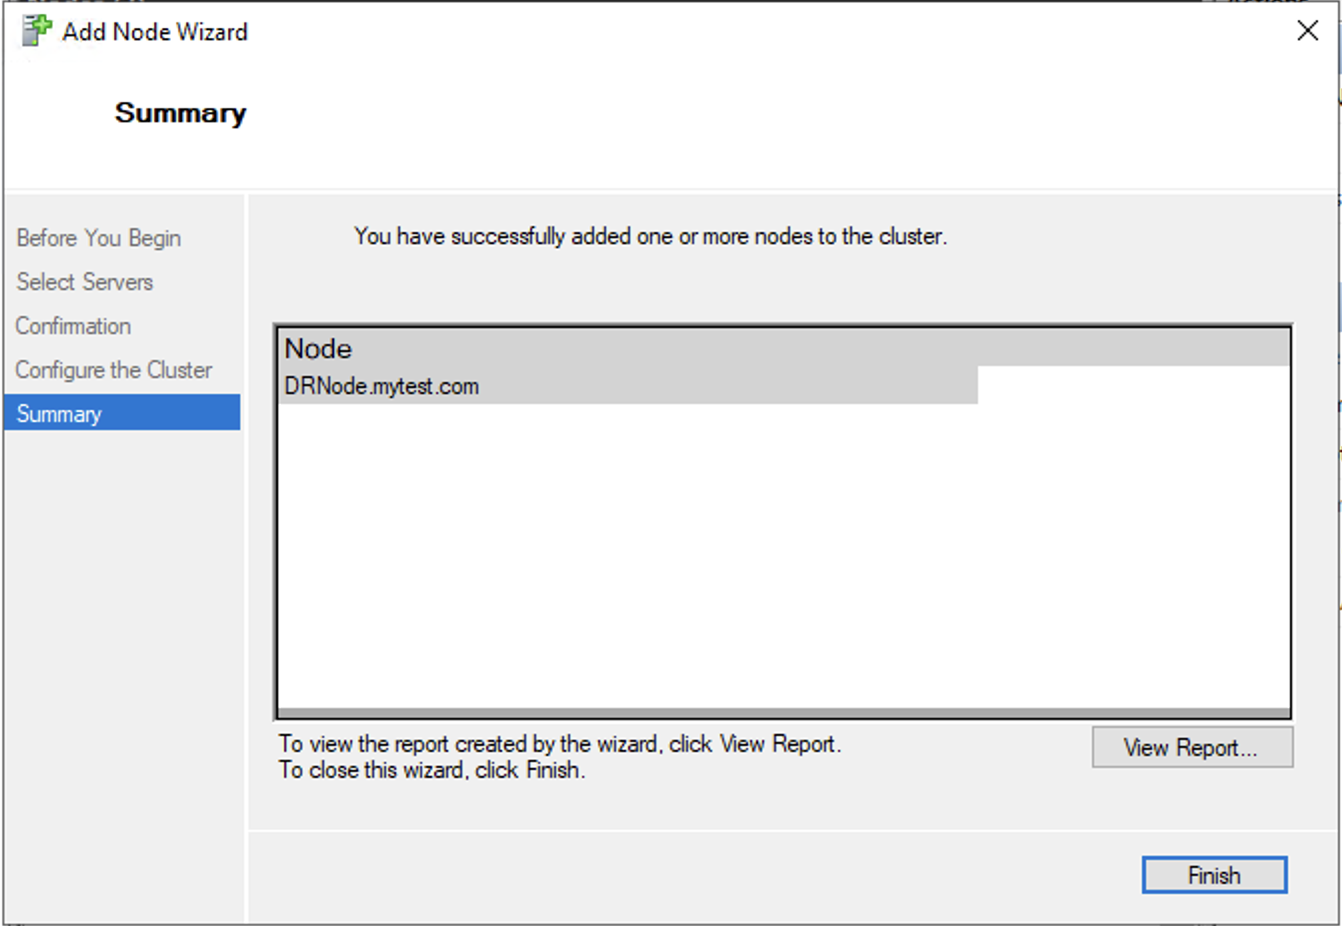
Figure 3.1 – Confirmation of successful addition of DR node
Figure 3.2 shows the successful addition of DR node to the cluster (“TestClu.mytest.com”).
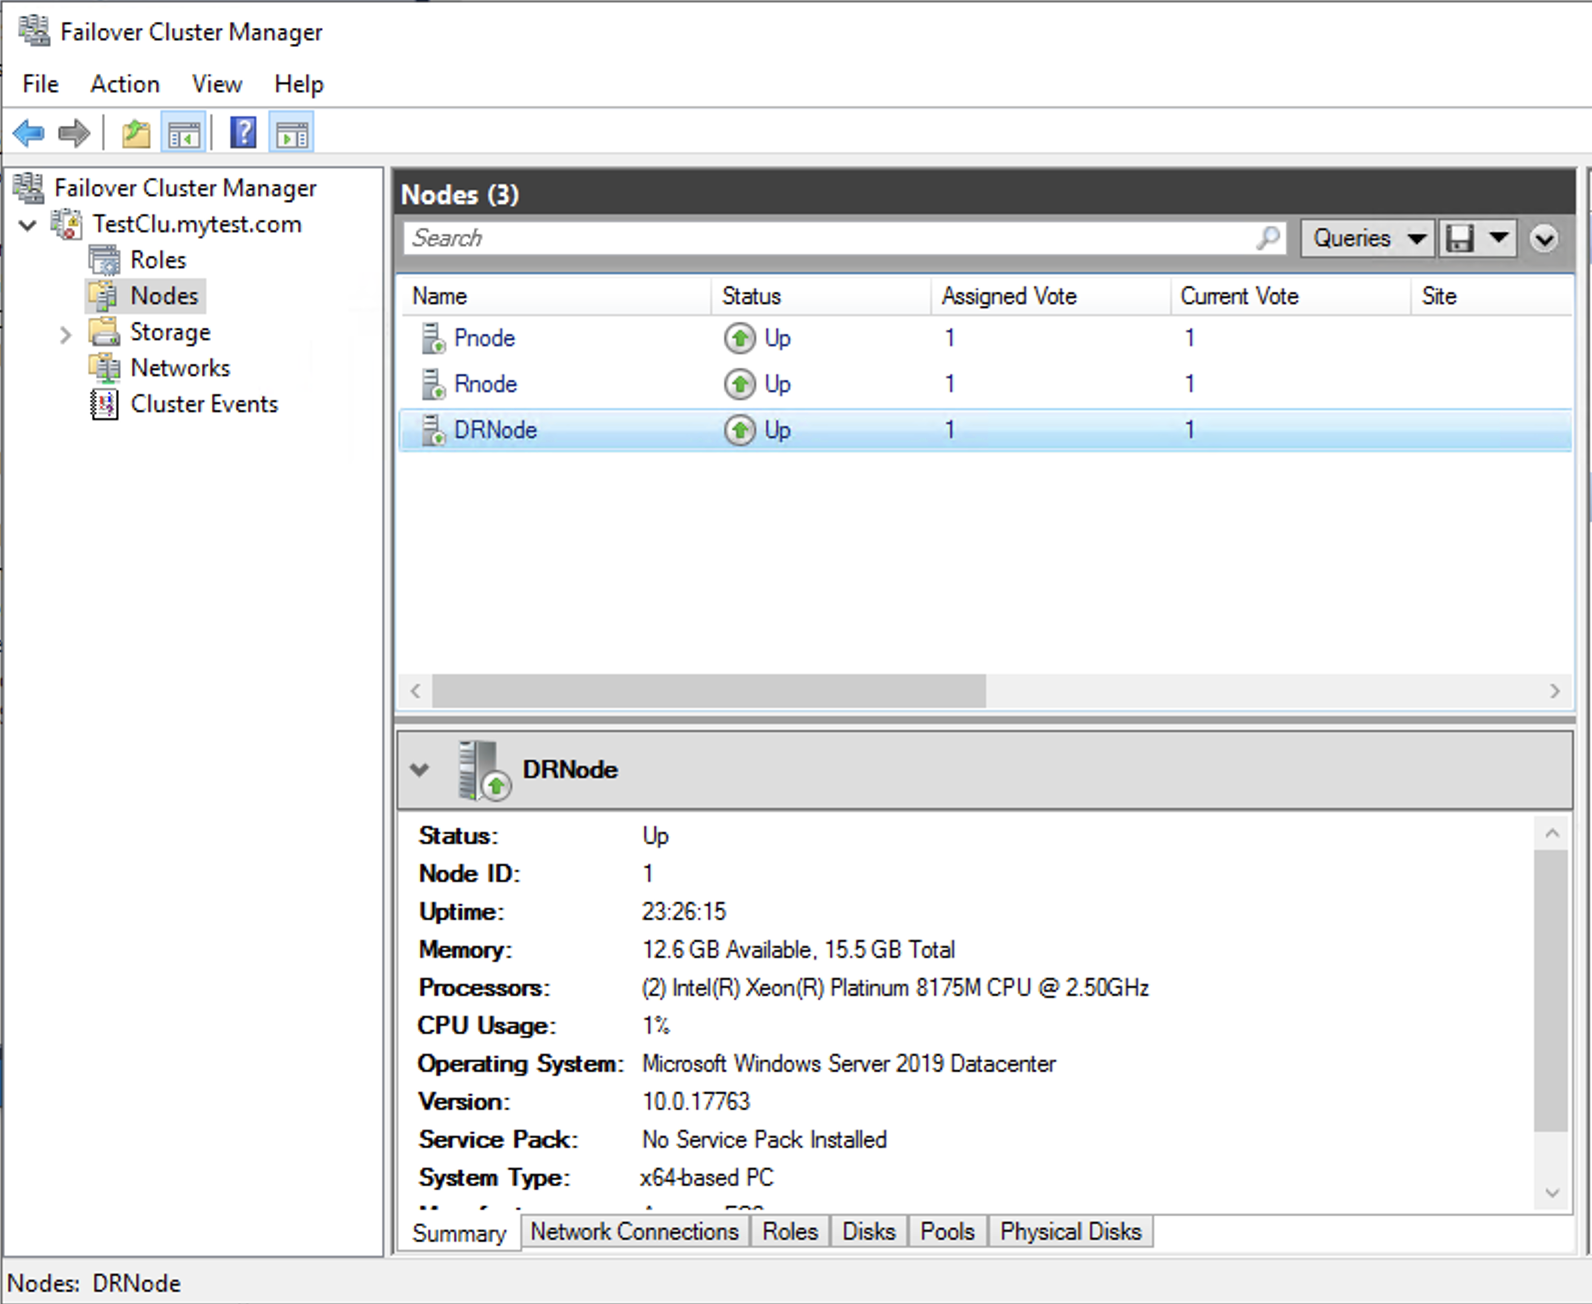
Figure 3.2 – Successful addition of DR node to the Cluster
3.a After successfully adding the Amazon EC2 instance to WSFC, update the cluster resource IP address:
- Connect to your Amazon EC2 instance using Remote Desktop Protocol (RDP).
- Open the Failover Cluster Manager.
- Select the cluster object name (“TestClu.mytest.com”).
- Right-click and choose Properties.
- Select appropriate subnet and an unused secondary IP address from your EC2 instance to update the resource IP address, as shown in Figure 3.3.
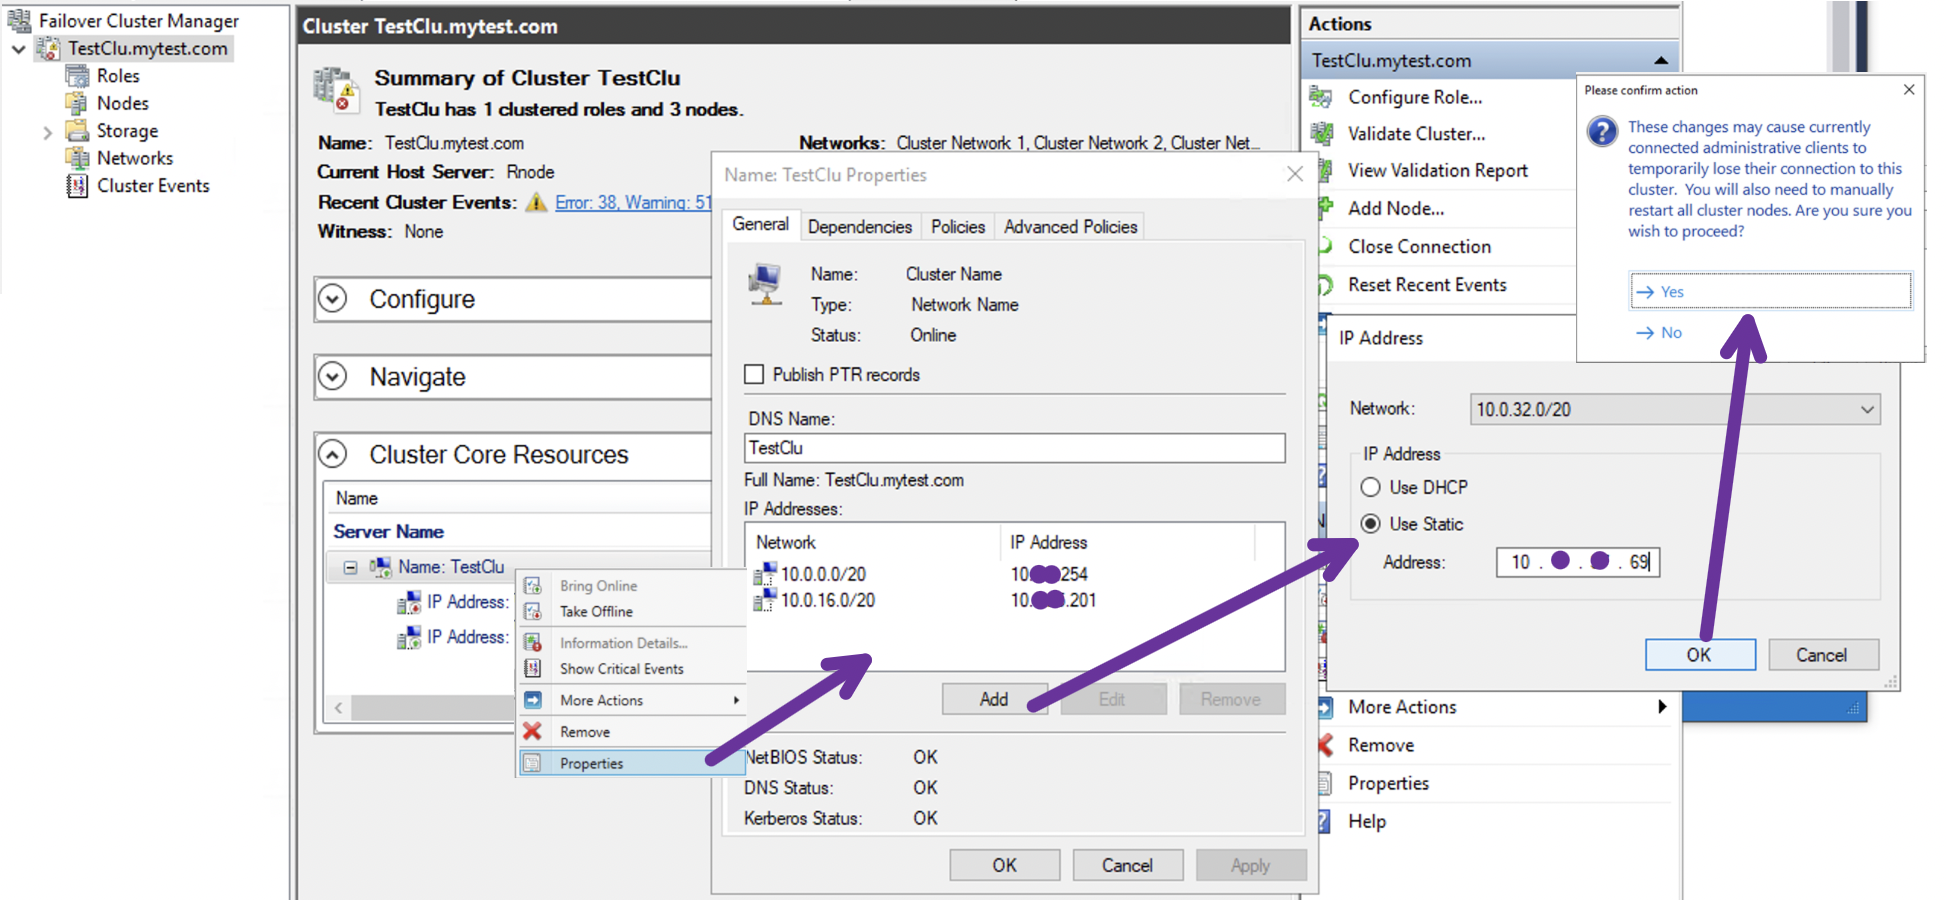
Figure 3.3 – Updating static IP’s to cluster resource
Following figure 3.4 shows the successful addition of your Amazon EC2 (10.x.x.69) to cluster (“TestClu.mytest.com”).
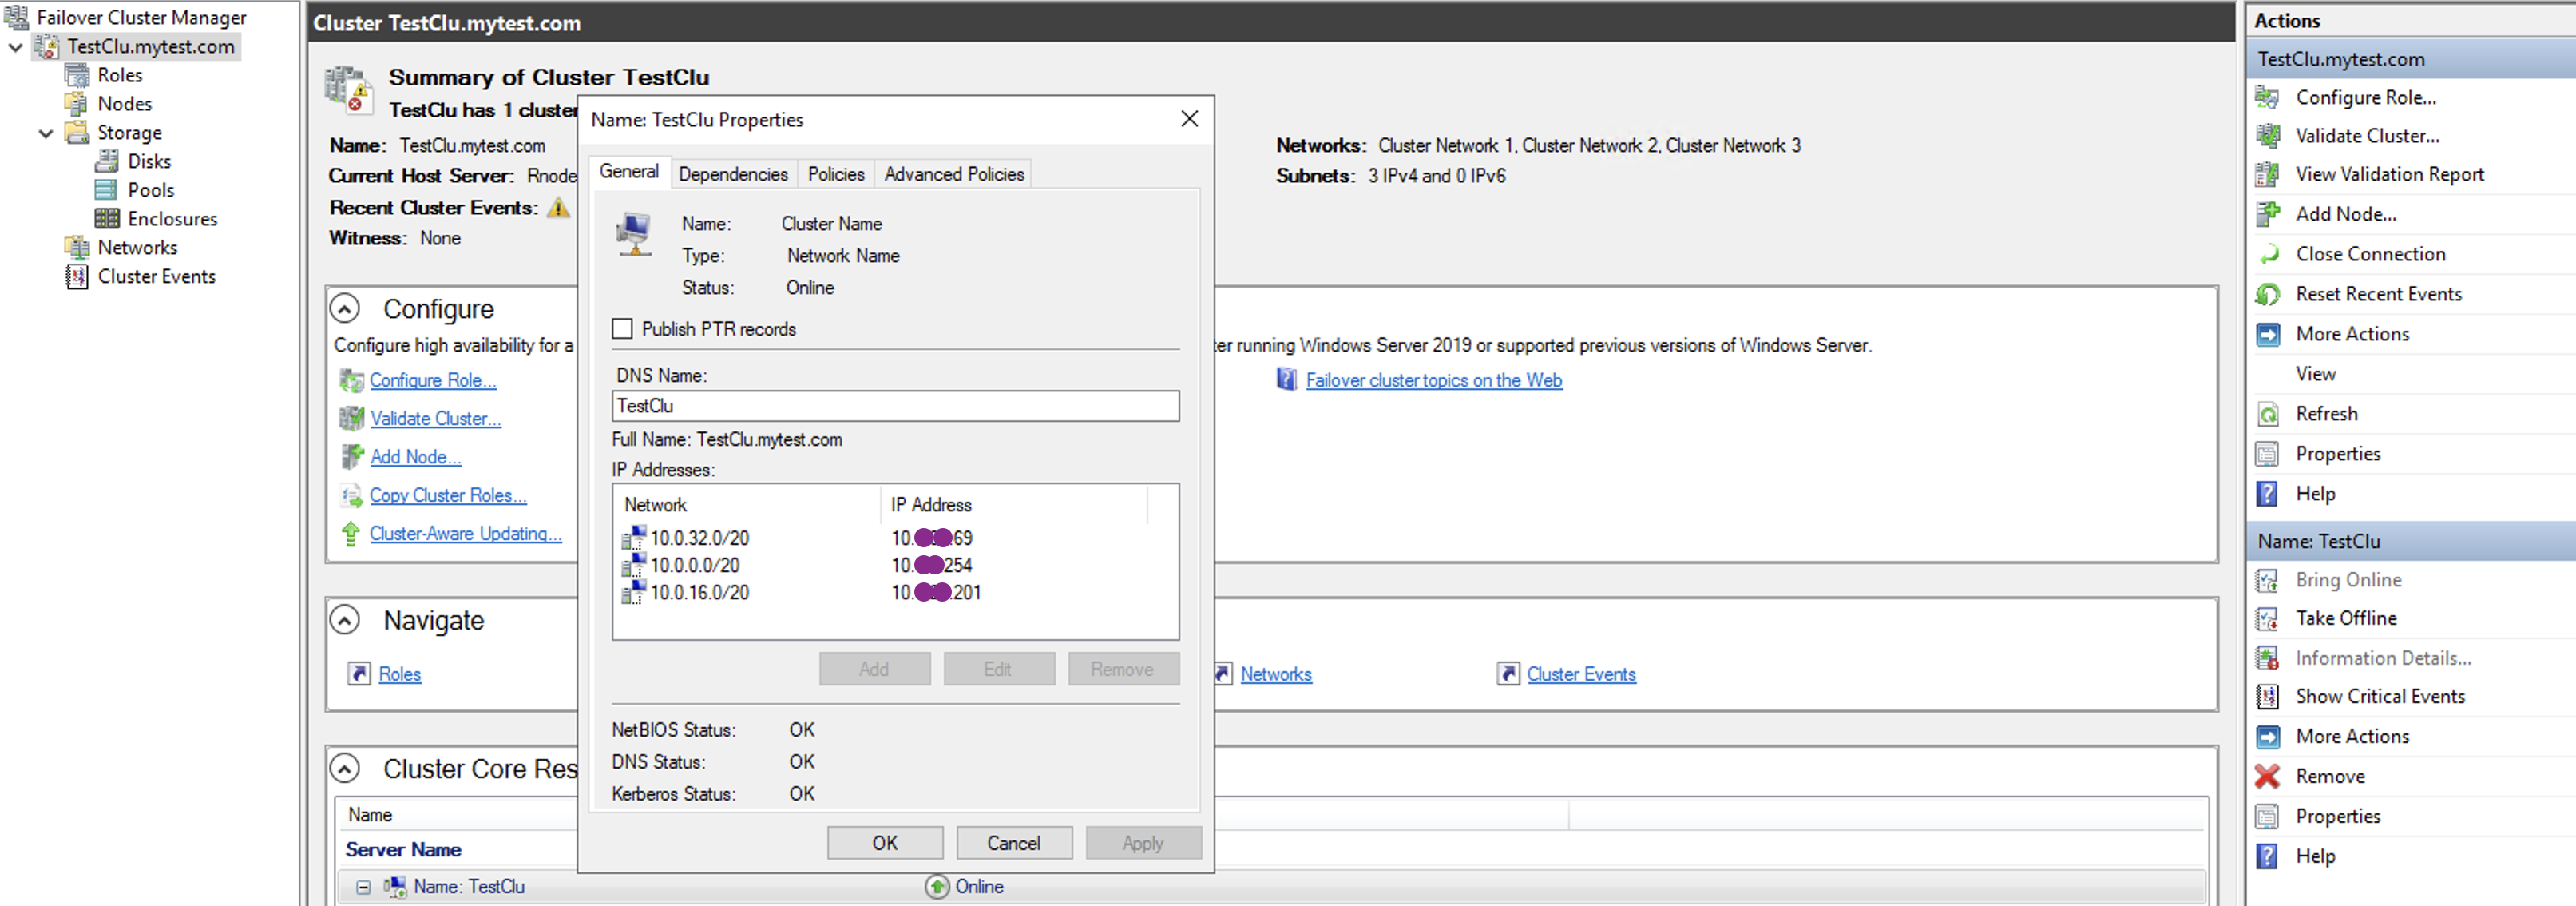
Figure 3.4 – Successful addition of Amazon EC2 (10.x.x.69) to cluster
Check that the node appears in the cluster core resources, as shown in Figure 3.5.
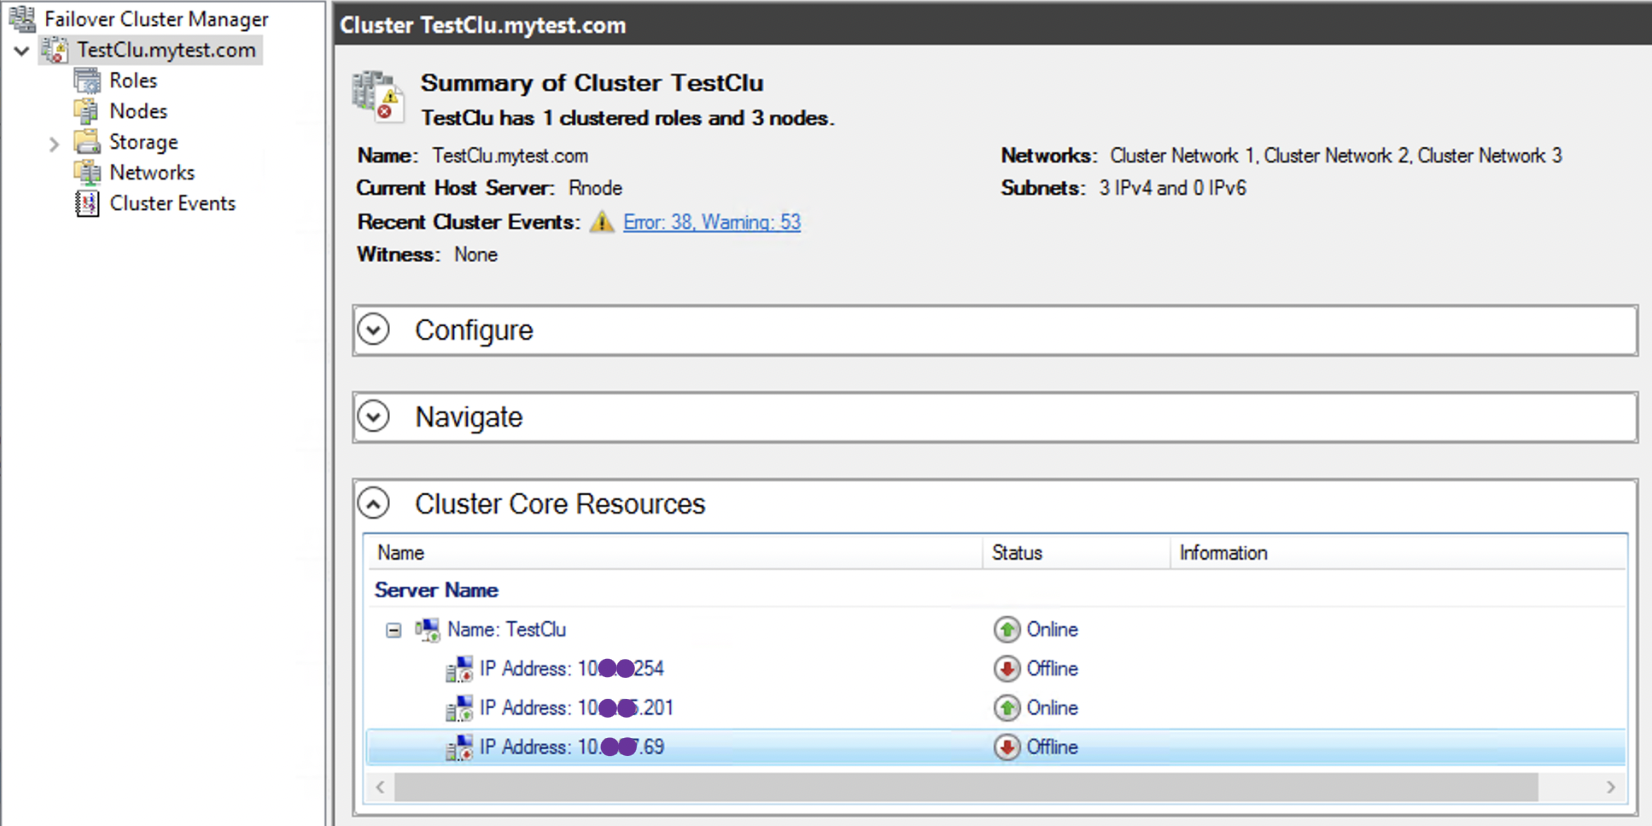
Figure 3.5 – List of cluster core resources
4. Enable AOAG feature for Microsoft SQL Server running on Amazon EC2 instance
To enable AOAG feature for SQL Server running on Amazon EC2 instance:
- Connect to your Amazon EC2 instance using Remote Desktop.
- Open SQL Server Configuration Manager.
- Navigate to SQL Server Services.
- Enable “Always On Availability Groups” in the SQL Server service properties.
- Select “Ok” and click on “Apply” to save the changes.
- Restart the SQL Server Engine service, as shown in Figure 4.
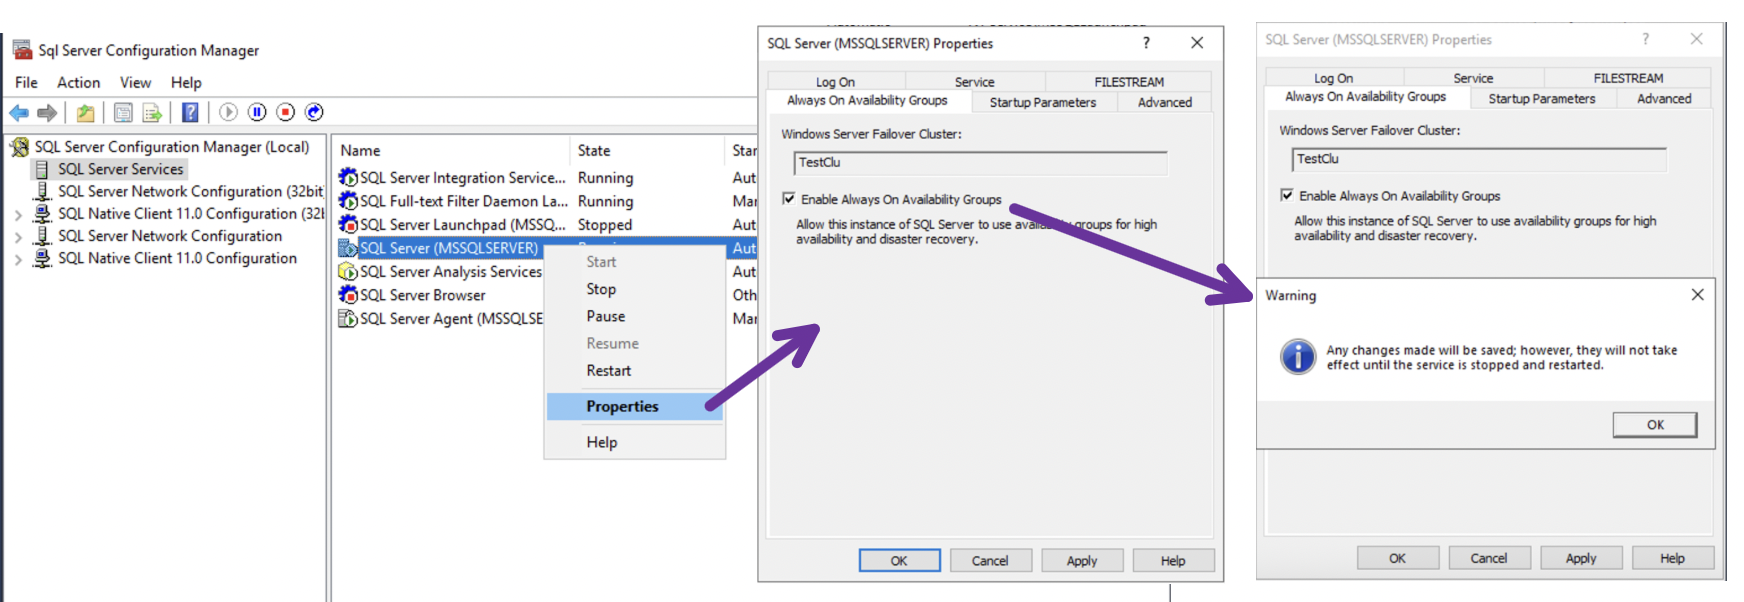
Figure 4 – Enabling Always On availability groups feature
5. Add Amazon EC2 SQL Server instance as an asynchronous secondary replica to your on-premises AOAG
Use the following steps to add Amazon EC2 instance to your existing AOAG as secondary replica and configure the AOAG listener.
5.a. Configure AOAG Listener:
- Connect to your on-premises SQL Server AOAG primary node using RDP.
- Open SQL Server Management Studio (SSMS).
- In Object Explorer, navigate to AOAG > Availability Groups > Availability Group Listeners.
- Select the AOAG listener name (“AOAGLstr”).
- In the listener properties, choose Add.
- Add the Amazon EC2 instance’s unused additional secondary static IP (10.x.x148) from relevant subnet, to the existing listener (For more information, see the documentation).
- See Figure 5 for adding the Amazon EC2 instance’s additional secondary IP to the AOAG Listener.
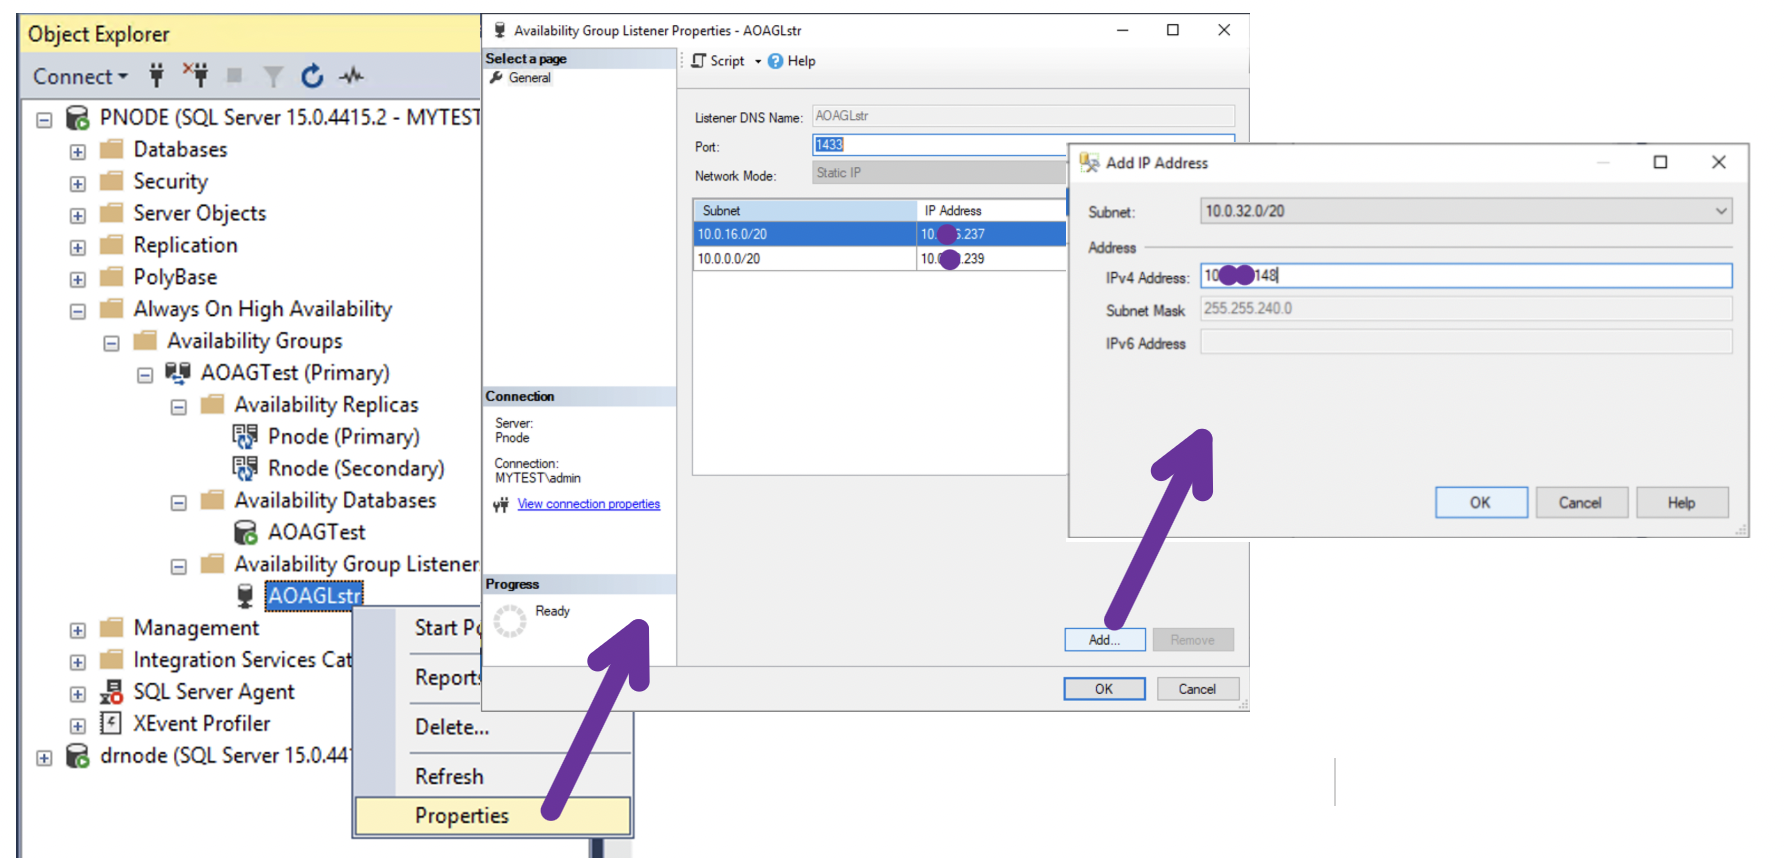
Figure 5 – Adding the Amazon EC2 Secondary IP to AOAG Listener
Refer the following figure 5.1 (Verify that the EC2 instance’s secondary IP address (10.x.x.148) has been successfully added to the AOAG listener (“AOAGLstr”).
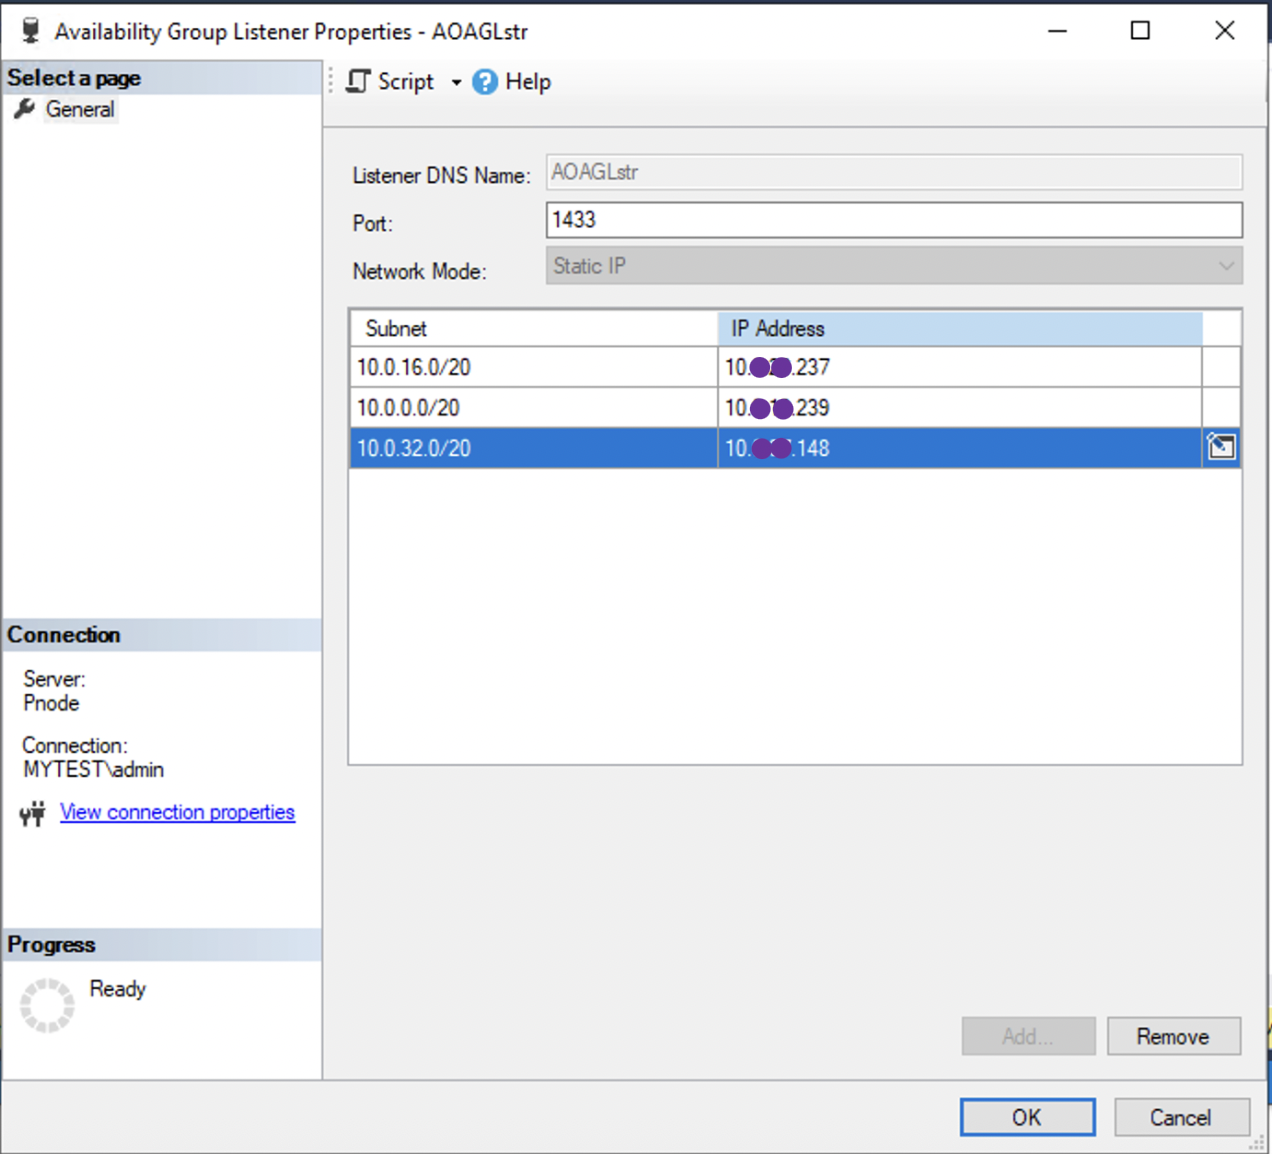
Figure 5.1 – Successful Addition of Amazon EC2 Secondary IP to AOAG Listener
5.b. Add Amazon EC2 SQL Server instance as an asynchronous secondary replica to your on-premises availability group
- Connect Amazon EC2 SQL Server instance (DRnode) using RDP.
- Open SSMS and connect to the primary node of your on-premises SQL Server AOAG.
- In the Object Explorer, navigate to “Always On High Availability” section.
- Locate your availability group (“AOAGTest”) and expand it.
- Right-click on “Availability Replicas”, and choose “Add Replica”. (Refer Figure 5.2)
- Follow the Availability Group wizard prompts.
- Select your Amazon EC2 SQL Server instance as the new secondary replica.
- Set the synchronization method to asynchronous. (Refer Figure 5.3)
- Select “Automatic seeding” (for our use case) option for “Select Data Synchronisation”.
- Complete the wizard to successfully join the replica to the Availability Group. (Refer Figure 5.4)
- Verify the synchronization status.
Note: For data synchronization preference, choose “Automatic seeding” (suitable for smaller databases). For larger databases, it is recommended to use the manual backup and restore method.
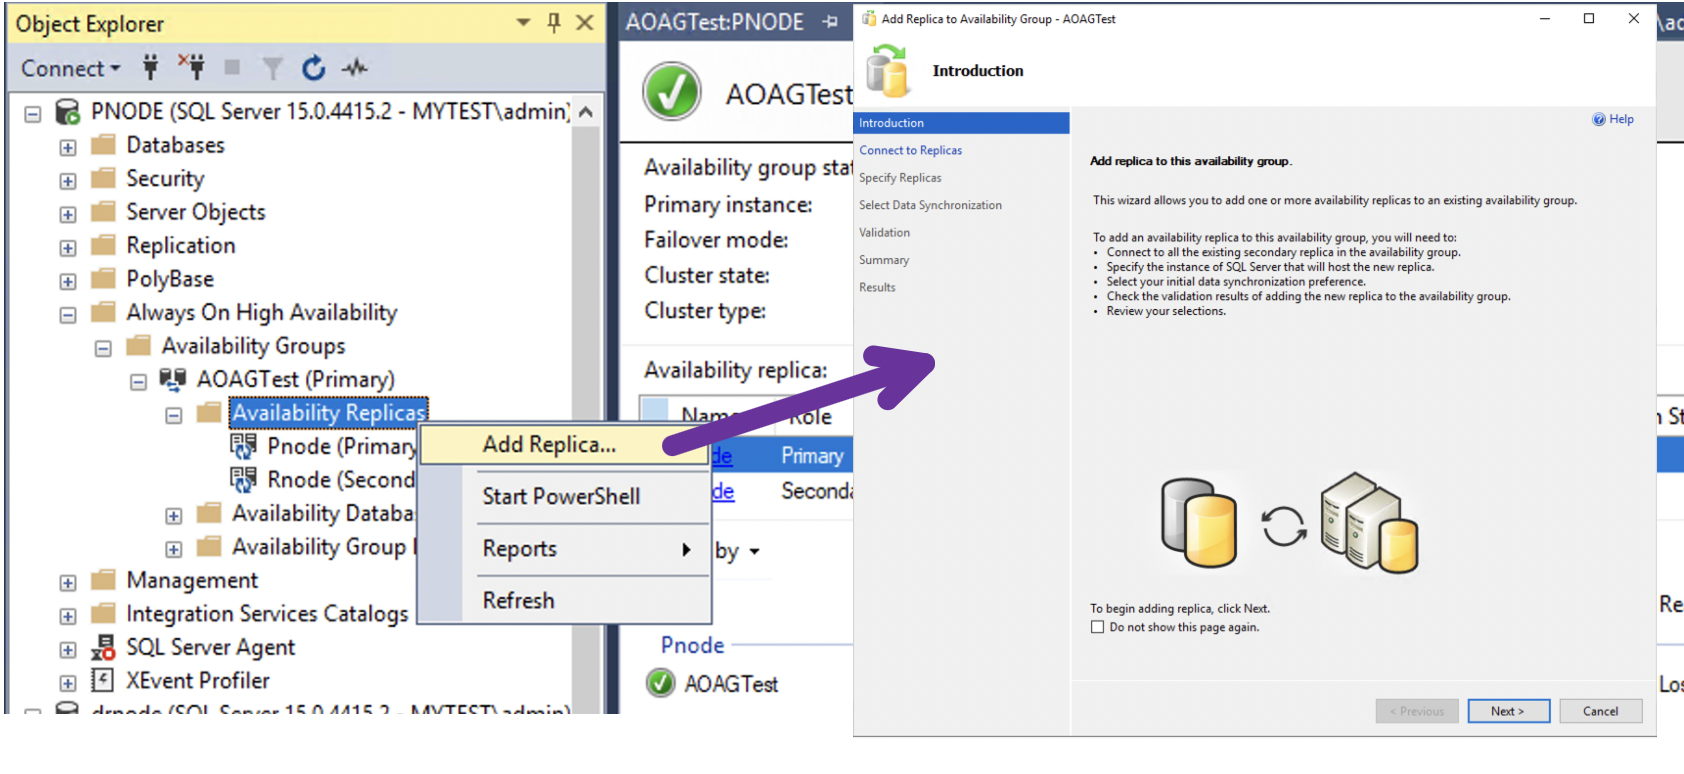
5.2 Adding Amazon EC2 as secondary replica to on-premises availability group
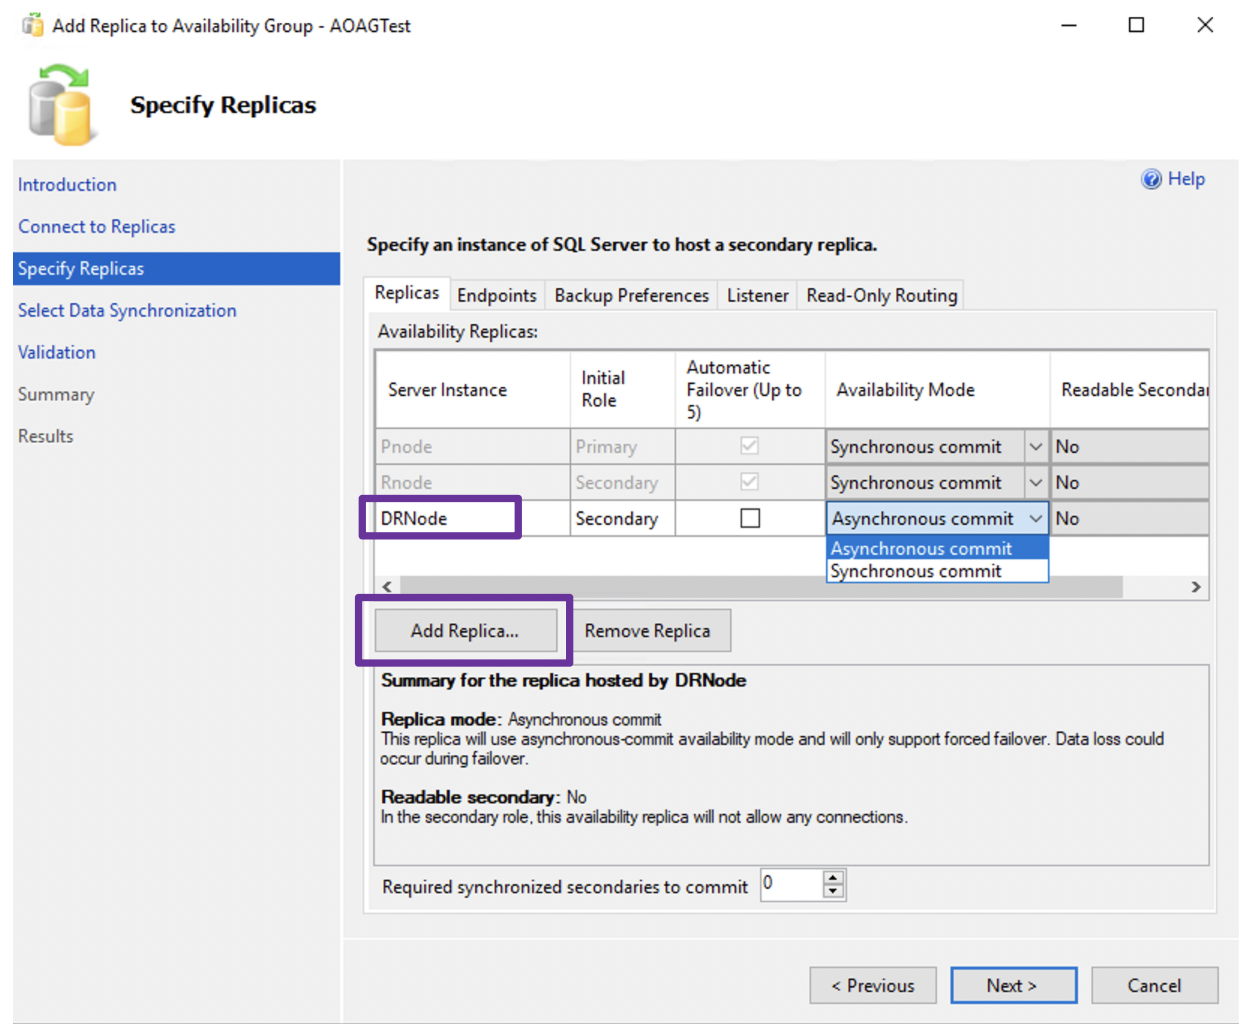
5.3 Selecting Asynchronous commit Availability mode for Amazon EC2
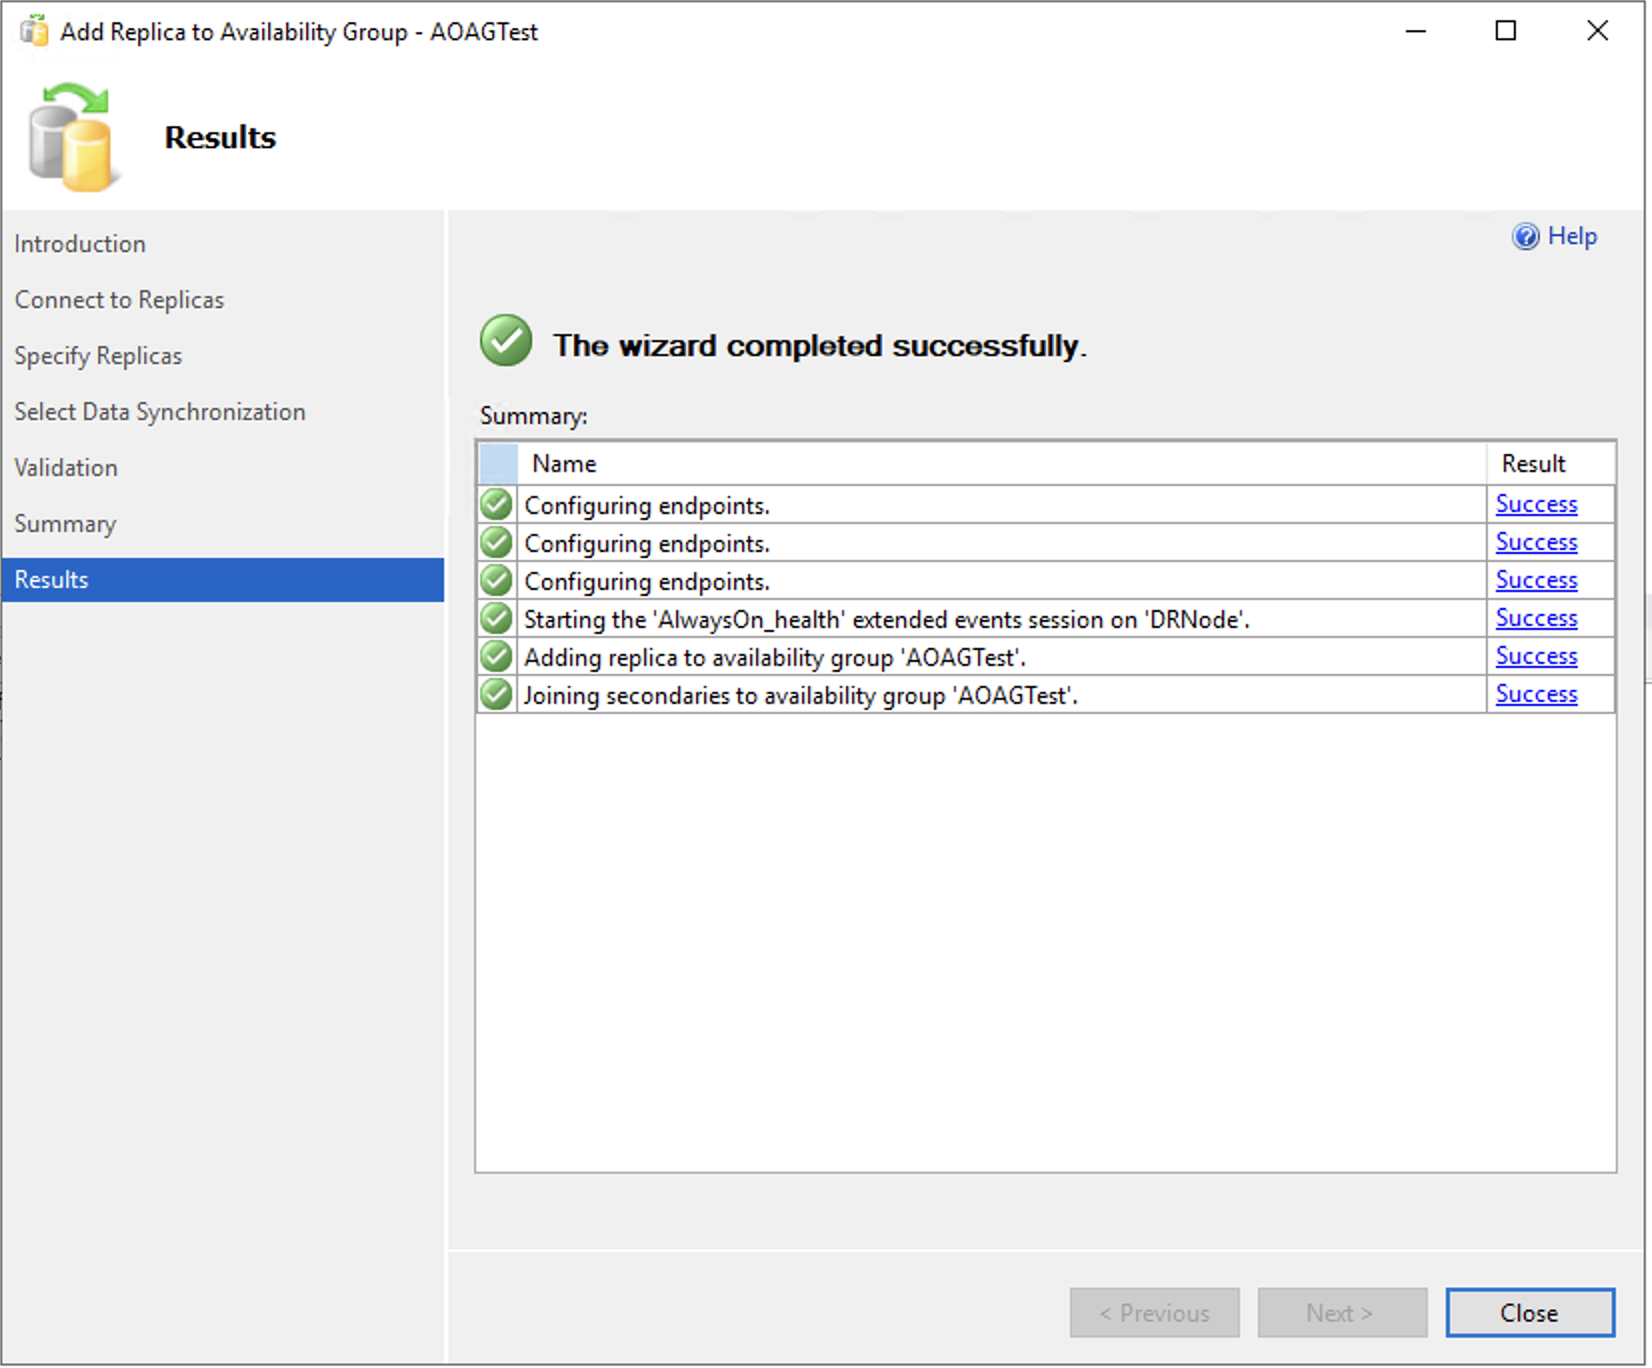
5.4 Successfully adding Amazon EC2 as a secondary replica to AOAG
For DR scenario, remove the Amazon EC2 instance from the WSFC preferred owners list to prevent automatic failover, as shown in Figure 5.5.
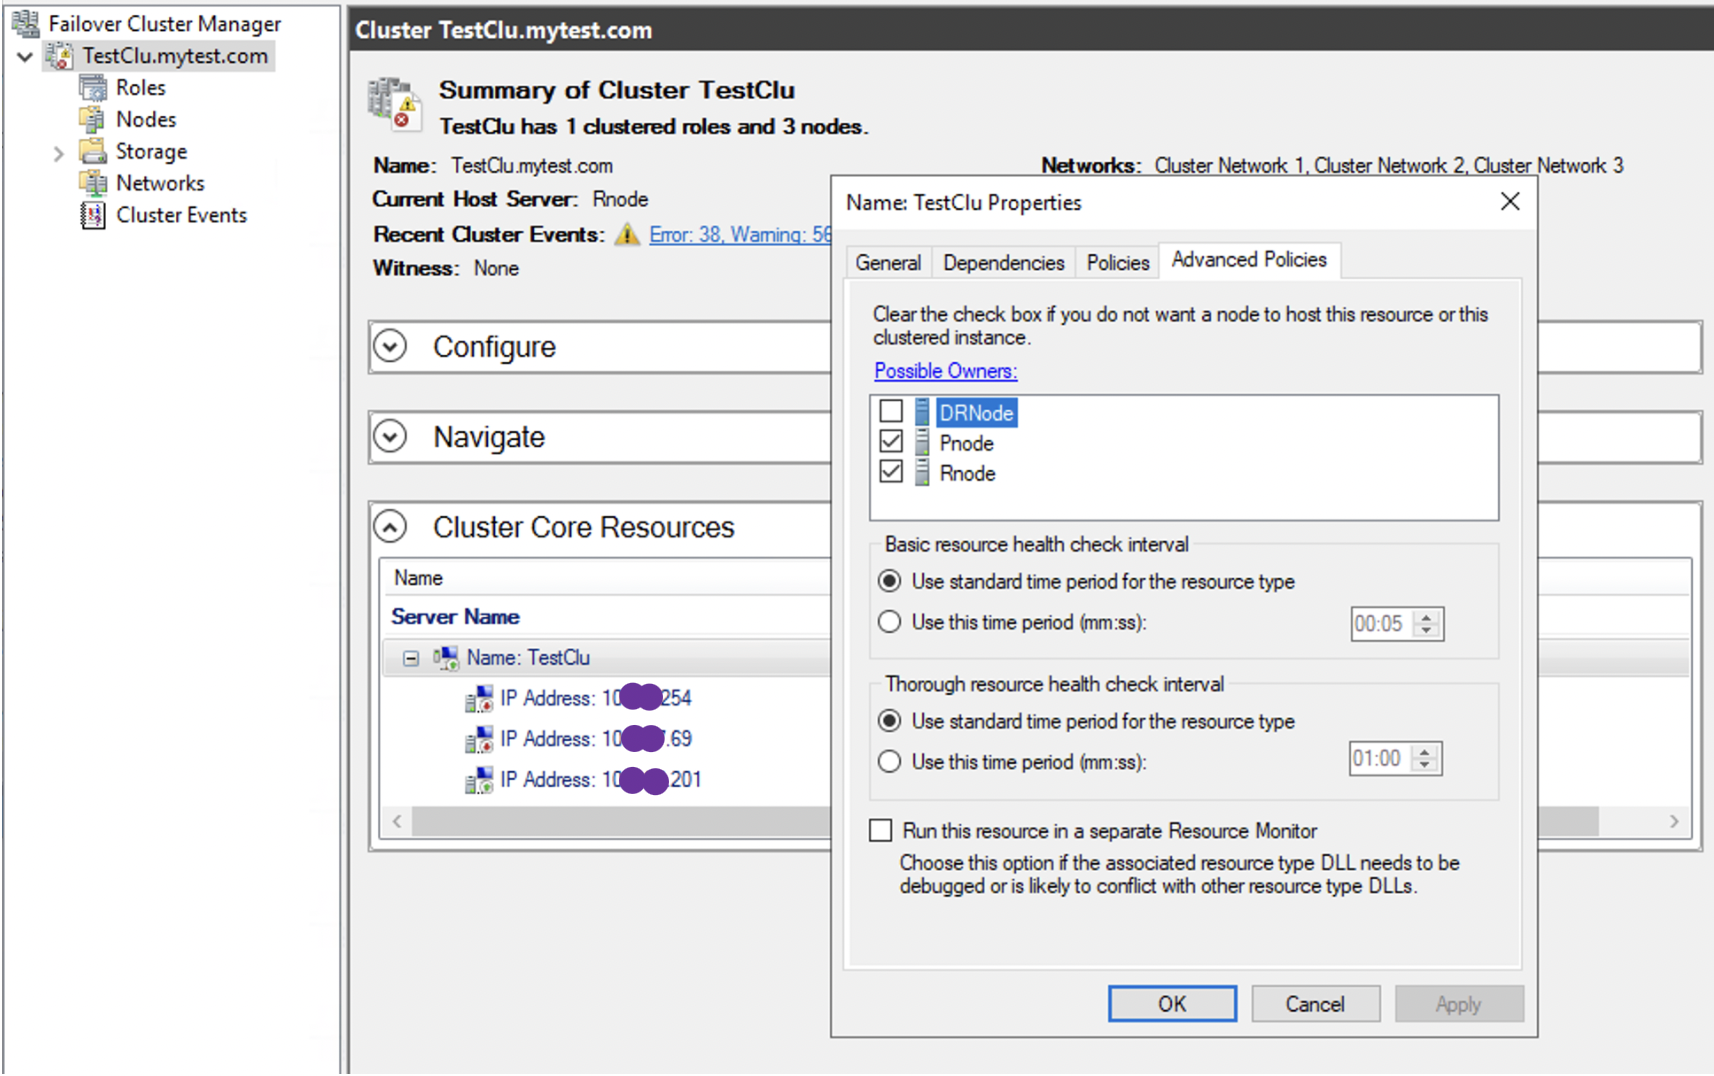
Figure 5.5 – Removing DR node as possible owners from failover cluster
Note: The screenshot represents the following replica roles:
- Pnode refers to primary replica in the on-premises environment
- Rnode refers to secondary replica in the on-premises environment
- DRnode refers to secondary replica in Amazon EC2
6. Verify the failover and fail back tests
6.a.Initial State Verification:
Verify the health status of primary and secondary replicas in AOAG dashboard as shown in figure 6 (DR in Asynchronous commit mode).
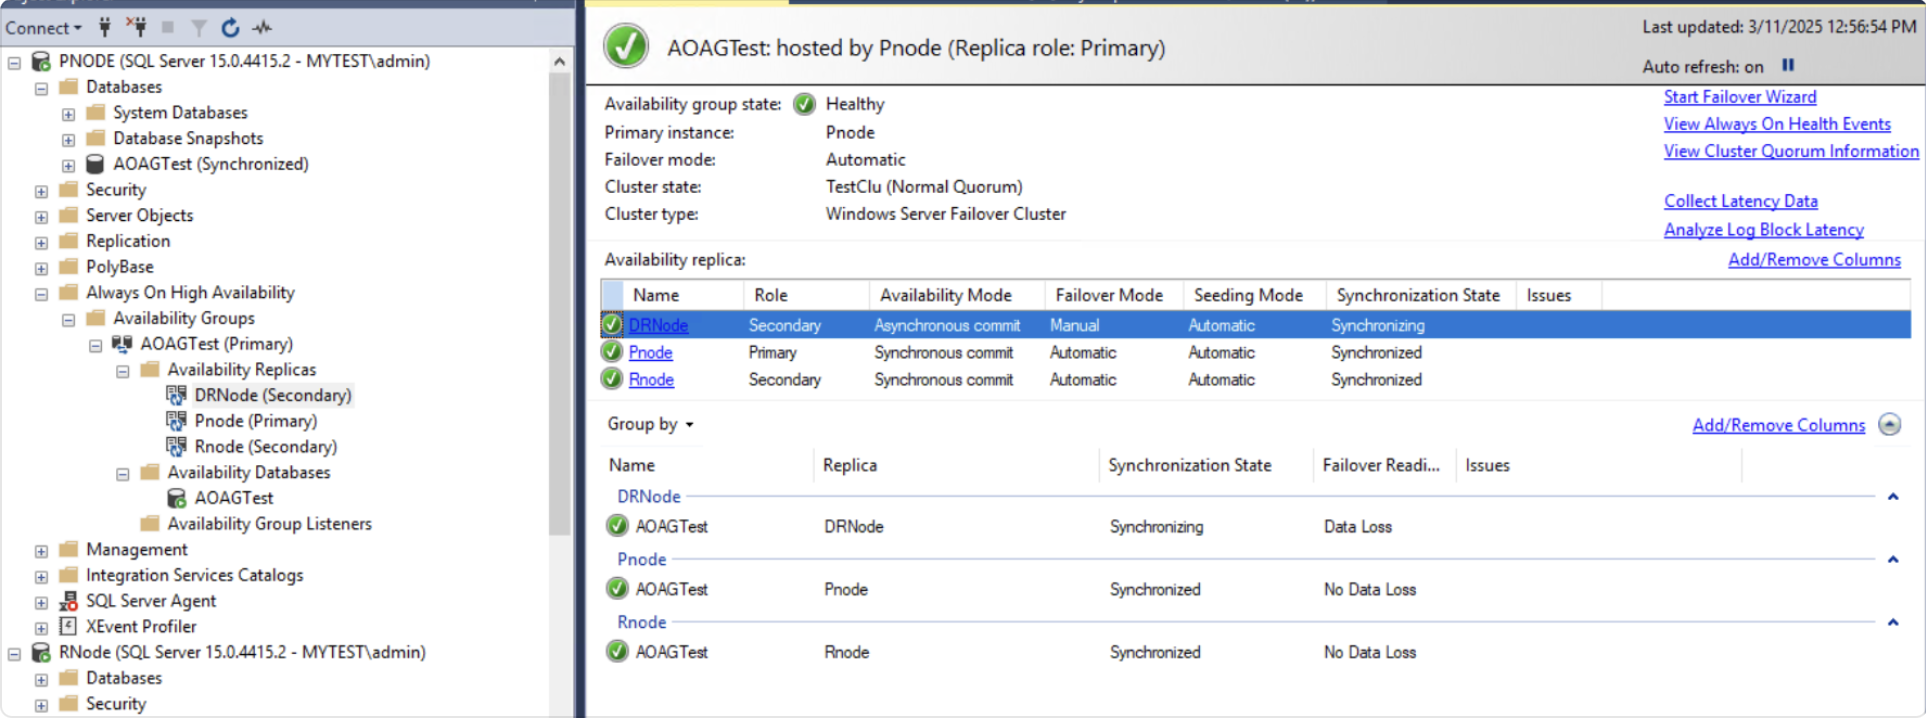
Figure 6 – AOAG Dashboard Health Status
6.b.Pre-Failover Checks:
Before initiating failover, verify the health status of WSFC components (Cluster Object, Nodes and Roles) from CLU as shown in figure 6.1.

Figure 6.1 – Failover Cluster Manager Dashboard
6.c.Failover Types :
AOAG supports both planned and unplanned failovers as part of a comprehensive business continuity strategy. This dual approach enables organizations to test their DR strategy effectively.
Planned Failover Validation steps
- Verify the database synchronization status.
- Change the DR node replication mode from asynchronous to synchronous.
- Confirm that all databases are SYNCHRONIZED.
- In SSMS, navigate to the availability group (named “AOAGTest”) , right-click, and select “Failover” to DR node (Amazon EC2 instance) replica.
- Validate application connectivity after the failover.
- Test application functionality on the DR node (Amazon EC2 instance) for required duration.
Unplanned Failover Validation steps
- Simulate disaster scenarios and test failover responses.
- Validate database consistency and evaluate any potential data loss.
- Execute manual failover from your on-premises environment to the Amazon EC2 instance.
- Verify application connectivity to SQL Server on Amazon EC2 instance.
To perform the failover:
- Launch the Failover wizard using either:
a. SSMS > Navigate to AOAG > right-click the Availability Group > select Failover
b. AOAG dashboard - The wizard will:
a. Validate replica states
b. Execute safety checks (verify data synchronization state, quorum status, and connectivity between replicas)
c. Guide you through the failover process - Review the SQL Server error logs to confirm successful completion
For visual guidance on adding the Amazon EC2 instance with synchronous commit mode and completing the failover wizard, see:
Figure 6.2: DR node failover (Synchronous commit)
Figure 6.3: DR node failover connection prompt window
Figure 6.4: DR node failover status wizard
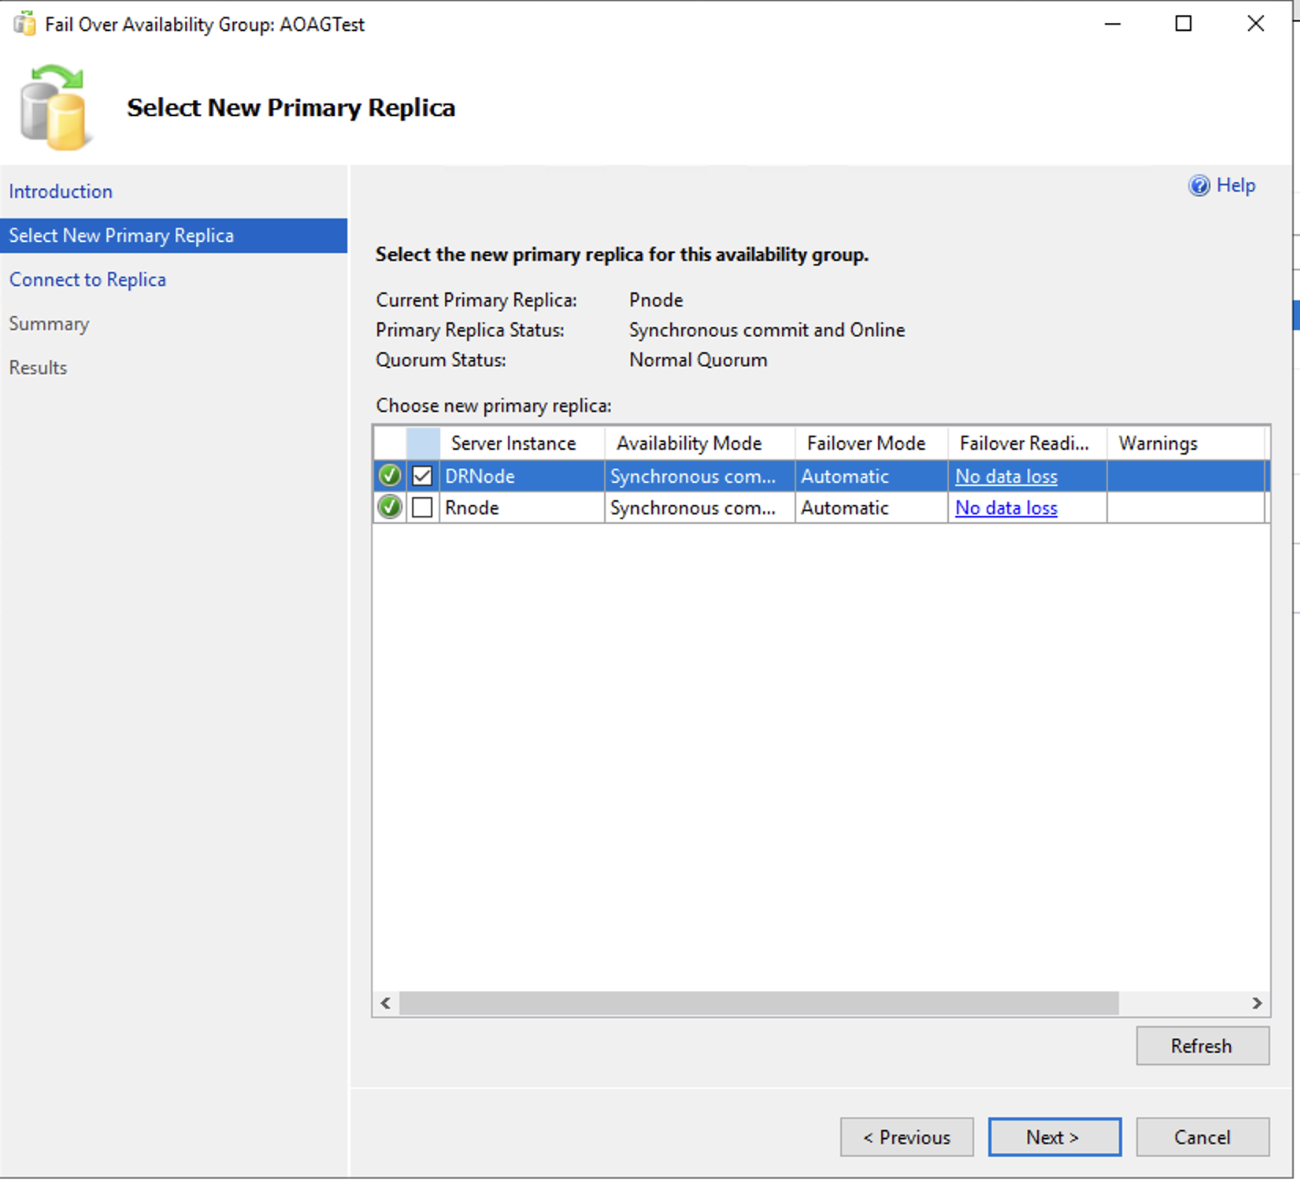
Figure 6.2 – DR node failover (Synchronous commit)
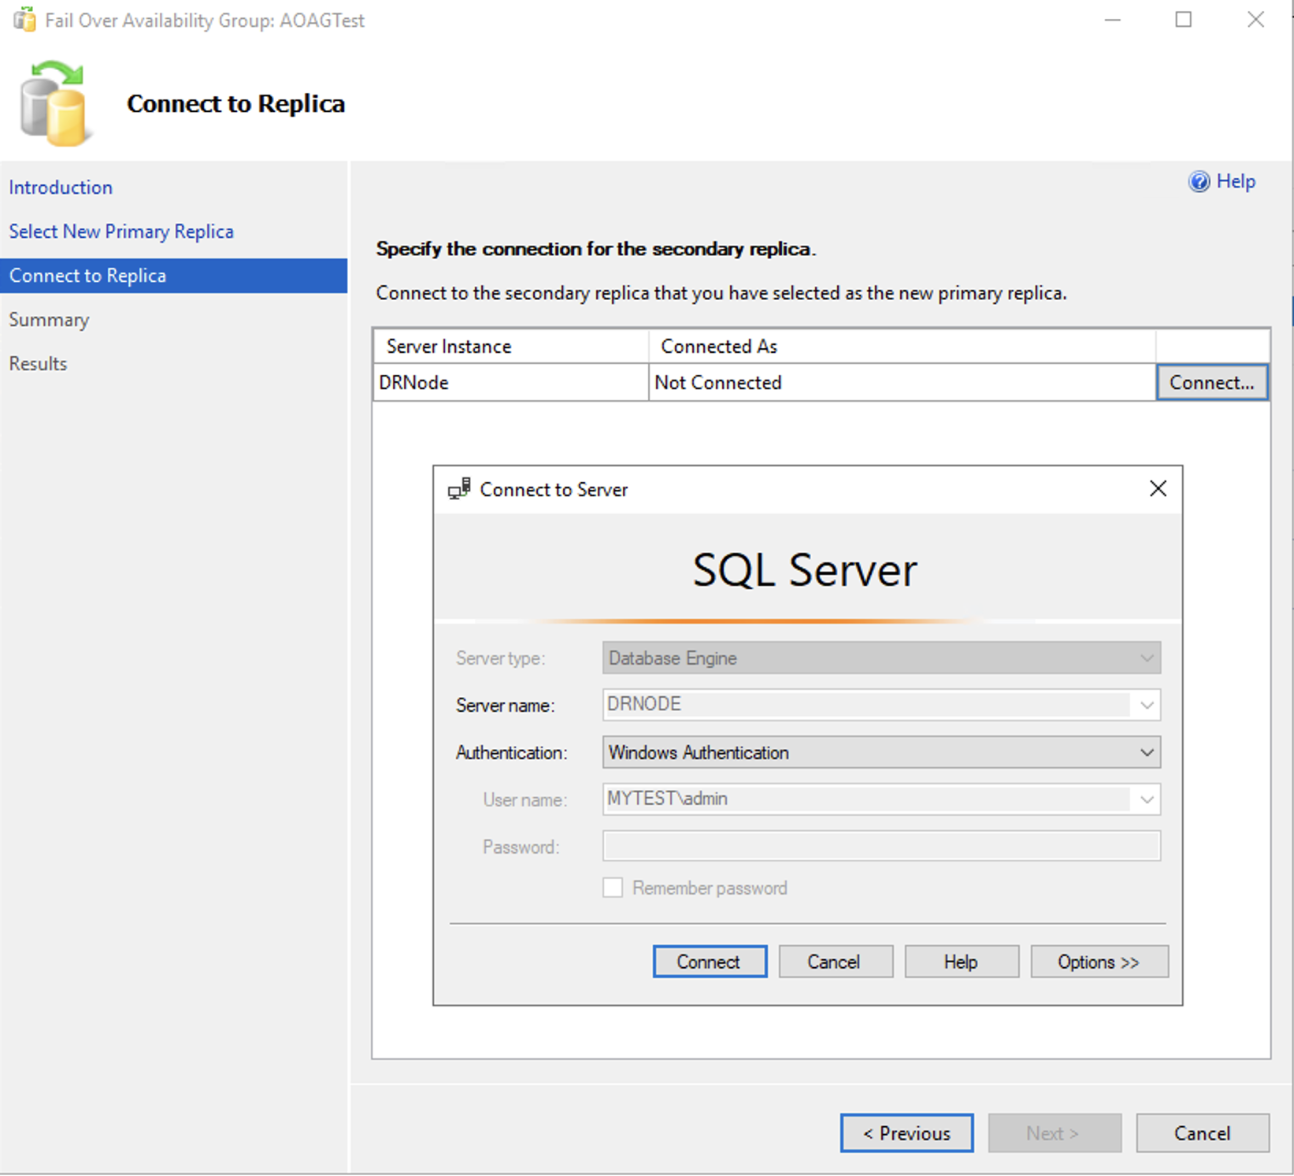
Figure 6.3 – DR node failover connection prompt window
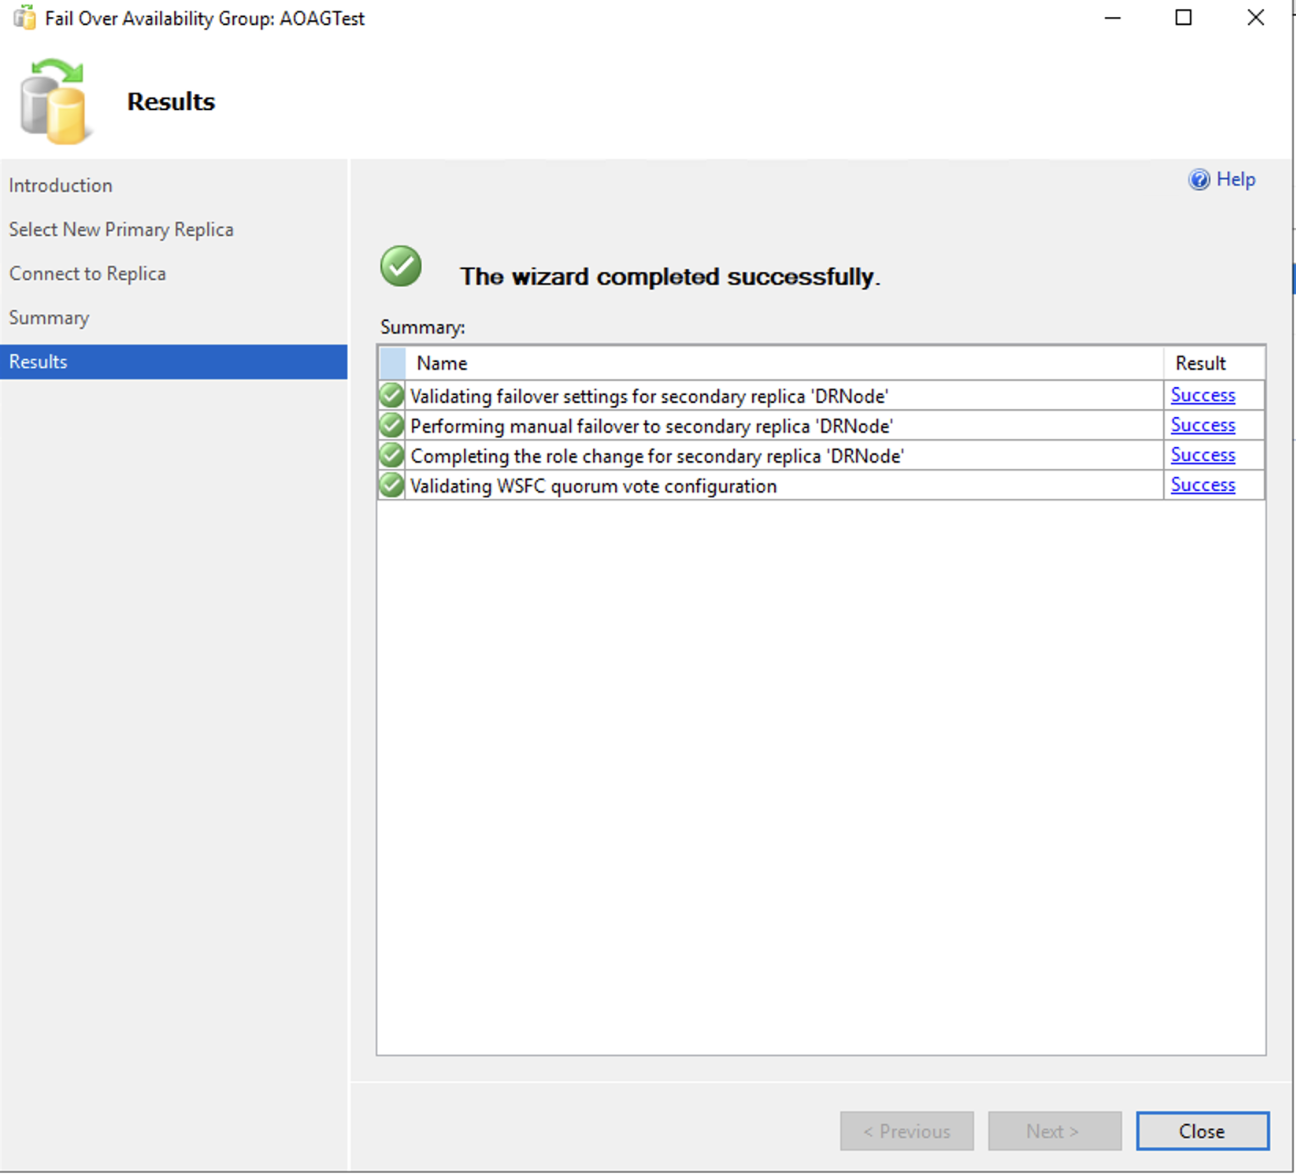
Figure 6.4 – DR node failover status wizard
6.d.Post-Failover Verification:
After successful failover to Amazon EC2 instance, verify the active role of Amazon EC2 instance is primary in:
- Check that the EC2 instance shows as the primary node in the Windows Server Failover Clustering (WSFC) dashboard
- Confirm the EC2 instance appears as the primary replica in the SQL Server Always On Availability Group dashboard
See Figures 6.5 (WSFC Dashboard with DR node(10.x.x.69) as primary) and 6.6 (Availability group with DR node as primary replica) for verification examples.

Figure 6.5 – WSFC Dashboard with DR node(10.x.x.69) as primary
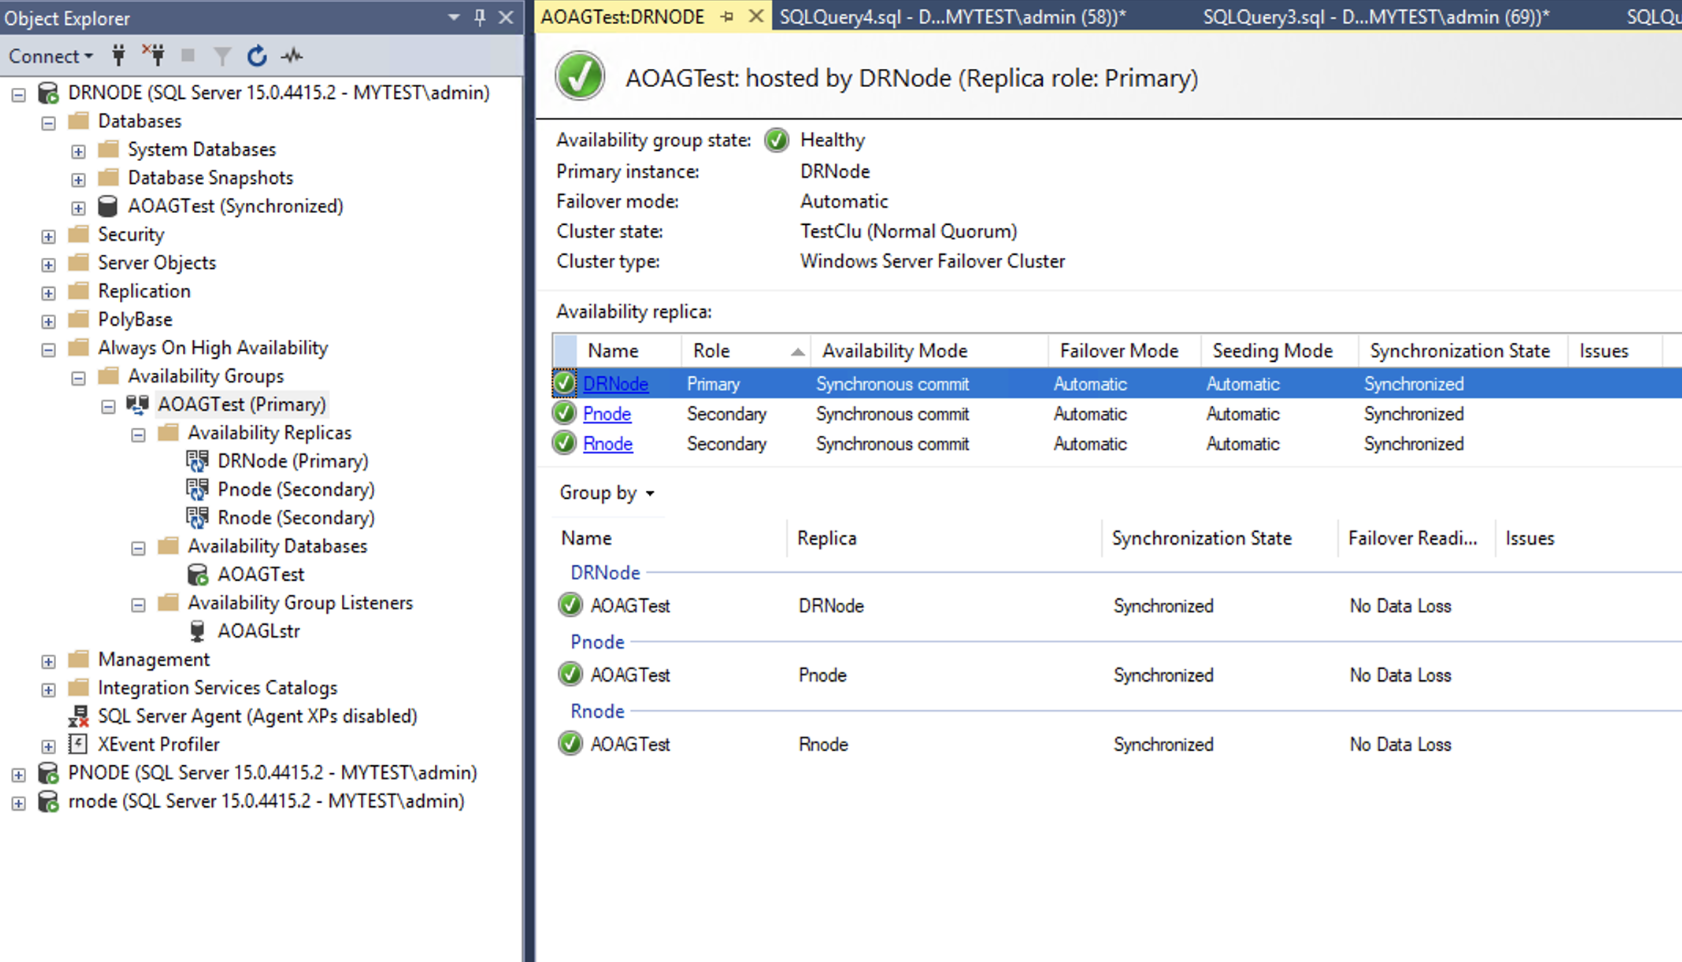
Figure 6.6 – Availability group with DR node as primary replica
Run the following T-SQL query to verify that all AOAG replicas:
- Show SYNCHRONIZED status
- Have an is_commit_participant value of 1
- Display matching last_hardened_lsn values
See figure 6.7 for example results.
SELECT
ar.replica_server_name,
adc.database_name,
ag.name AS ag_name,
dhdrs.synchronization_state_desc,
dhdrs.is_commit_participant,
dhdrs.last_sent_lsn,
dhdrs.last_sent_time,
dhdrs.last_received_lsn,
dhdrs.last_hardened_lsn,
dhdrs.last_redone_time
FROM sys.dm_hadr_database_replica_states AS dhdrs
INNER JOIN sys.availability_databases_cluster AS adc
ON dhdrs.group_id = adc.group_id AND
dhdrs.group_database_id = adc.group_database_id
INNER JOIN sys.availability_groups AS ag
ON ag.group_id = dhdrs.group_id
INNER JOIN sys.availability_replicas AS ar
ON dhdrs.group_id = ar.group_id AND
dhdrs.replica_id = ar.replica_id
WHERE database_name='AOAGTest';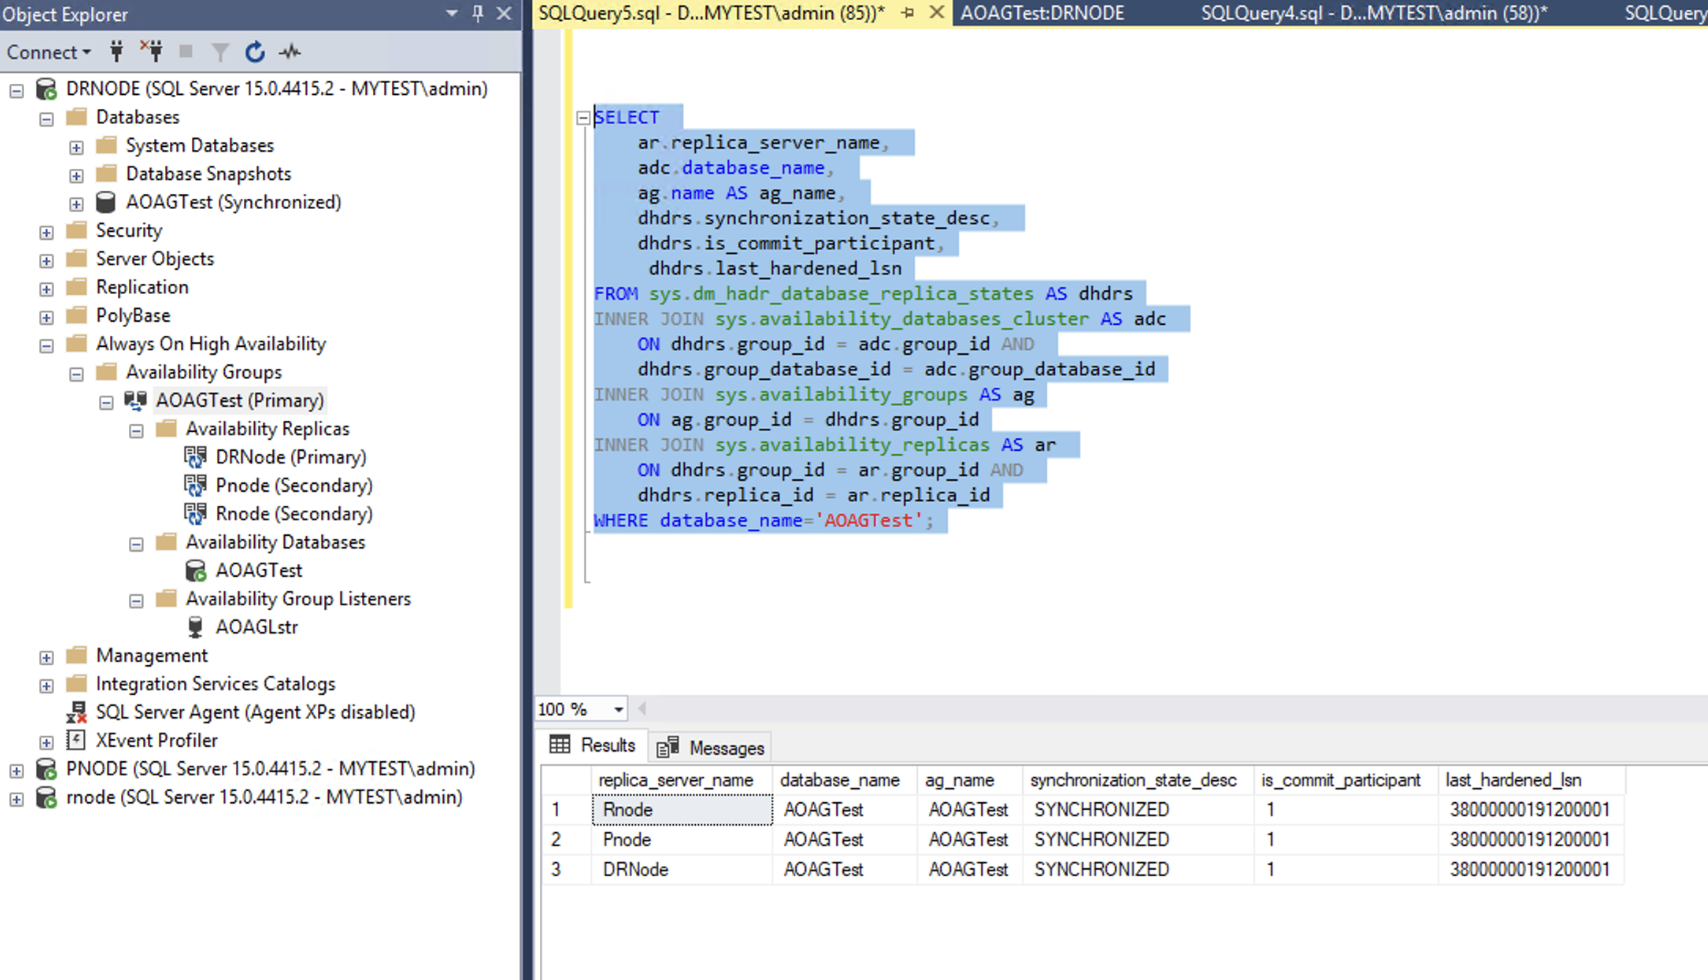
Figure 6.7 – Synchronization state, LSN details of Pnode, Rnode and DRnode
Important Considerations
- Ensure network connectivity and latency between on-premises and AWS environments
- Regularly test failover scenarios to validate RTO/RPO objectives
- Monitor replication lag and implement proactive alerts
- Plan for failover delays: Set short DNS TTLs (see [AWS re:Post]) and communicate the users about expected downtime.
- Maintain consistent SQL Server versions and patch levels across all AOAG nodes
- Conduct comprehensive post-failover validation, including application connectivity, functionality, dependencies, performance metrics, and user access to ensure complete business continuity.
Clean up
To prevent ongoing AWS billing charges, delete all provisioned resources using these cleanup steps:
- Remove Amazon EC2 instance from AOAG
- Remove/evict the newly added node (Amazon EC2) from WSFC.
- Terminate Amazon EC2 instance
- Clean up networking components:
- Disassociate Amazon VPC from Amazon Route 53
- Delete Amazon Route 53 rules
- Verify all AWS resources are terminated
Conclusion
This post showed how to extend your Microsoft SQL Server Always On Availability Groups (AOAG) to Amazon EC2 for an existing Windows Server Failover Cluster. To get started, refer the detailed documentation. Share your experience through AWS support or on the SQL Server on Amazon EC2 forum. Your feedback helps improve our services.
AWS helps you migrate applications to the cloud and build new solutions cost-effectively. Our infrastructure supports Microsoft workloads and improves business results. Visit the .NET on AWS and AWS Database blogs for technical guidance. Contact an AWS Solutions Architect to start your cloud migration.