Microsoft Workloads on AWS
How to deploy a SQL Server Failover Cluster Instance across three Availability Zones using Storage Spaces Direct
In this blog, we’ll demonstrate how to architect and implement a high-availability Windows Server Failover Cluster (WSFC) with SQL Server using Amazon Elastic Compute Cloud (Amazon EC2) and Amazon Elastic Block Storage (Amazon EBS) across three Availability Zones (AZs). This approach transcends the traditional two-AZ limitations of Amazon FSx and one-AZ limitation of EBS multi-attach. It uses Amazon EBS volumes to deploy Storage Spaces Direct on EC2 Windows instances, making it more resilient compared to Amazon FSx-based clusters. Unlike FSx for Windows File Server (limited to two AZs) and EBS multi-attach (single AZ only), this approach enables customers to deploy SQL Server Failover Cluster Instances across three Availability Zones, providing true geographic resilience for mission-critical databases.
This is particularly valuable for mission-critical databases requiring maximum resilience without the complexity of third-party solutions.
Solution Overview
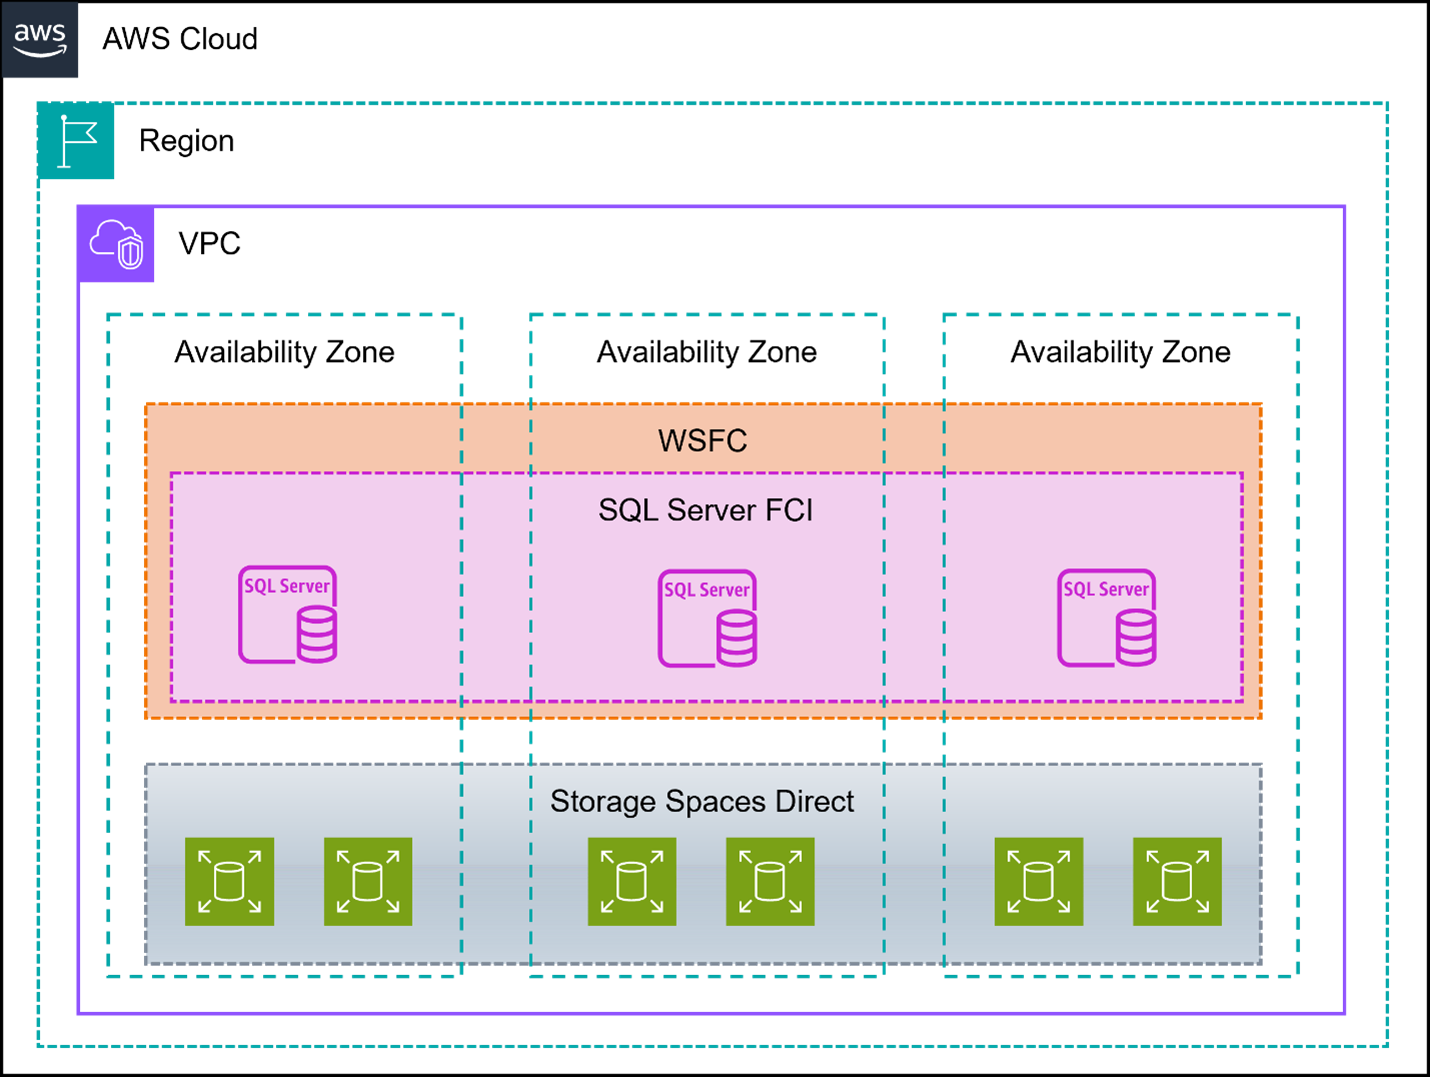
Figure 1: Three-node WSFC with SQL Server using Storage Spaces Direct
SQL Server Failover Cluster Instances (FCI) provide high availability through redundant servers with shared storage, where one node actively runs the SQL Server instance while others serve as standby. SQL Server Enterprise Edition is required when building Failover Cluster Instances (FCI) with more than 2 nodes. The solution uses Windows Cluster Service for automatic failover and virtual IP addressing for transparent client connectivity. Storage Spaces Direct (S2D) offers a cost-effective, software-defined storage solution by pooling direct-attached storage. Storage Spaces Direct (S2D) replicates data by creating multiple copies across different nodes in the cluster, with each copy stored on different physical drives. When data is written, it’s synchronized across nodes using SMB Direct (RDMA), ensuring all copies are consistent and available even if a node or drive fails.
AWS Partners like SIOS DataKeeper and Zadara Cloud Storage offer additional disk sharing solutions for SQL Server, making it easier to build high-availability solutions in the cloud.
This solution implements a three-node Windows Failover Cluster with SQL Server FCI, utilizing Storage Spaces Direct (S2D) to pool locally attached EBS volumes for shared storage.
Below are example configurations – replace the Node names and IPs with values from your environment.
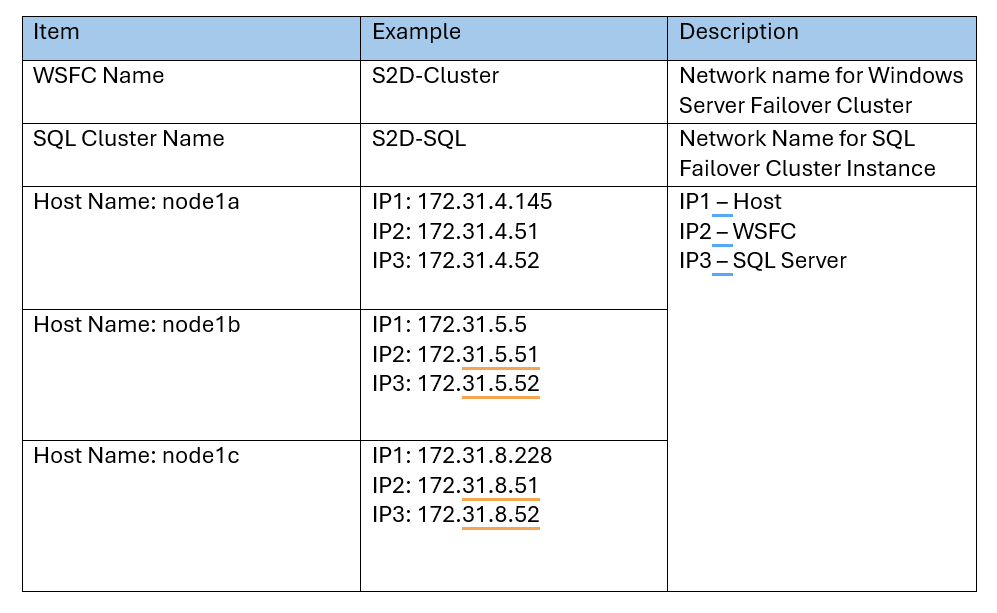
Table 1: WFSC Cluster and Node configuration
Prerequisites
- Launch three Amazon EC2 Windows Server 2022 instances across three different Availability Zones, in separate subnets, inside a VPC.
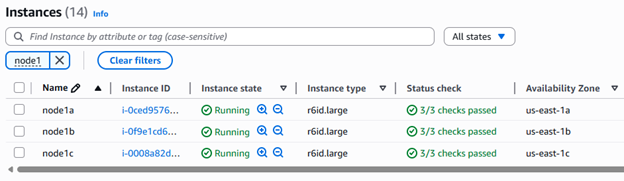
Figure 2 : Three Amazon EC2 instances on three AZs
- Assign 2 additional secondary IPs for these EC2 instances.
- Domain join the EC2 instances to Active Directory.
- Configure RDP to connect from a bastion server or use AWS Systems Manager Fleet Manager.
- Configure security group inbound rules and Windows Firewall exceptions to allow the nodes to communicate in a restrictive environment.
- Provide right Active Directory permissions to create computer objects.
- Create and attach a minimum of 2 EBS volumes to each EC2 instance for the Storage Spaces Direct pool; for this blog, we used two 100GB GP3 volumes per instance.
- Install PowerShell 5.0 (or later) on each node.
- Download the SQL Server media. For this blog, we used SQL Server 2022 Developer Edition (Developer Edition should not be used for production workloads).
Note: This guide uses SQL Server 2022 Developer Edition for testing purposes only. For production deployments, use SQL Server Enterprise Edition (required for
three + node FCIs). Licensing costs should be factored into your TCO analysis.
Solution Walkthrough
Once all the prerequisites are completed, we can start building the Windows Server Failover Cluster.
- Connect to your EC2 instance using an Active Directory (AD) user account that has been granted Administrator privileges.
- Execute the following PowerShell script on each node to allow Windows Remote Management between the cluster nodes by adding your domain or individual cluster nodes to the Trusted Hosts list.
Set-Item WSMan:\localhost\Client\TrustedHosts "node1a.domain.com, node1b.domain.com, node1c.domain.com" -Force
- Install Windows Failover Clustering feature from the local node, listing remote nodes first and local node last in the command sequence (as shown below where Node A is the local node) to prevent connection disruption that would occur if the local node restarts before completing installation on remote nodes..
$servers="node1c","node1b","node1a"
$Servers | ForEach { Install-WindowsFeature -ComputerName $_ "RSAT-Clustering-PowerShell", "Failover-Clustering" –IncludeManagementTools -restart }
- Run the cluster validation tool (Test-Cluster), on one of the nodes, before creating your Cluster to verify proper configuration. When running the tool, make sure to use the -Include parameter and specify the appropriate test categories to include Storage Spaces Direct specific tests in your validation.
Test-Cluster -Node "node1a","node1b","node1c" -Include "Storage Spaces Direct", "Inventory", "Network", "System Configuration"
Review the output and report; warnings might be present but proceed with creating the cluster if there is no error.
- Initiate new Windows Failover Cluster creation from one of the nodes, incorporating all three nodes and assigning one secondary IP (IP2 in this example) from each node as a Static IP to enable multi-subnet clustering across three AZs.
$WSFCClusterName = "S2D-Cluster"
$ClusterNodes = ("node1a","node1b","node1c")
$ClusterIPs = ("172.31.4.51", "172.31.5.51","172.31.8.51")
# Create a Cluster
New-Cluster -Name $WSFCClusterName -Node $ClusterNodes -StaticAddress $ClusterIPs
Once the cluster build is successful, you will get output as shown in Figure 3
- Validate the status of all nodes using PowerShell command Get-ClusterNode. You will get node status as shown in Figure 4.
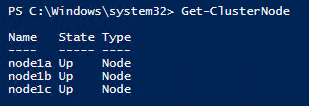
Figure 4: Cluster Node State
- Configure a Site and add nodes to it using the following PowerShell command (required from Windows Server 2022 onwards) – you can replace ‘Site1’ with your preferred name.
New-ClusterFaultDomain -Name "Site1" -FaultDomainType Site
Set-ClusterFaultDomain -Name "node1a" -Parent "Site1"
Set-ClusterFaultDomain -Name "node1b" -Parent "Site1"
Set-ClusterFaultDomain -Name "node1c" -Parent "Site1"
Update-ClusterFunctionalLevel
- Enable Storage Spaces Direct by running Enable-ClusterStorageSpacesDirect PowerShell cmdlet from any cluster node – this automatically creates a storage pool, configures caches if drives of multiple types exist, and sets up Capacity and Performance tiers (see output example in Figure 5).
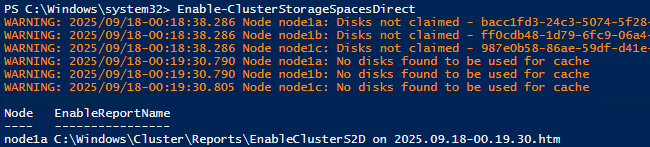
Figure 5: Enable Storage Space Direct
- Verify Storage Spaces Direct configuration through Failover Cluster Manager, which must be used for all storage management tasks instead of Windows Disk Manager. Review Storage Pool and Disks as shown in Figure 6 and 7.

Figure 6: Storage Pool in Failover Cluster Manager
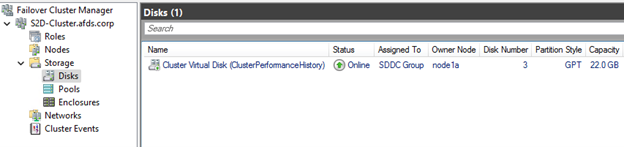
Figure 7: Cluster Performance Clustered Disk
- Create Virtual disks for Data and Log using below PowerShell script. Make sure to change cluster name and Disk size.
# Connect to the cluster
$ClusterName = "S2D-Cluster"
$StoragePoolName = (Get-StoragePool -CimSession $ClusterName | Where-Object IsPrimordial -eq $false).FriendlyName
# Create System DB disk
New-Volume -CimSession $ClusterName -StoragePoolFriendlyName $StoragePoolName -FriendlyName "SQLSystemDB" -FileSystem CSVFS_REFS -Size 25GB
# Create Data disk
New-Volume -CimSession $ClusterName -StoragePoolFriendlyName $StoragePoolName -FriendlyName "SQLData" -FileSystem CSVFS_REFS -Size 75GB
# Create Log disk
New-Volume -CimSession $ClusterName -StoragePoolFriendlyName $StoragePoolName -FriendlyName "SQLLog" -FileSystem CSVFS_REFS -Size 25GB
New Volumes will be listed in Failover Cluster manager as shown in Figure 8, and can be accessed in C:\Clusterstorage\ as shown in Figure 9.
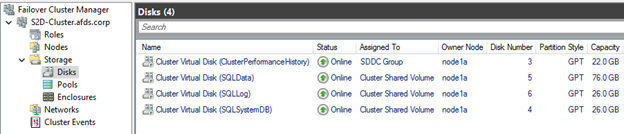
Figure 8: New Volumes in Failover Cluster Manager
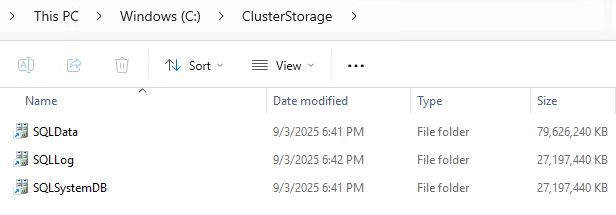
Figure 9: New shared Cluster volumes
- Create subfolders in each new volume on one of the nodes
New-Item -Path "C:\ClusterStorage\SQLData\MSSQL\" -ItemType Directory
New-Item -Path "C:\ClusterStorage\SQLLog\MSSQL\" -ItemType Directory
New-Item -Path "C:\ClusterStorage\SQLSystemDB\MSSQL\" -ItemType Directory
- Install SQL Server failover cluster using the downloaded SQL Server 2022 Developer Edition as mentioned in prerequisites,
- On the first node, run the SQL Server installer and select “New SQL Server failover cluster installation”
- In the Instance configuration page, provide the SQL Server Network Name “S2D-SQL” from table 1. The SQL Server Network Name is a virtual name resource in a Failover Cluster Instance that clients use to connect to SQL Server, regardless of which cluster node is currently hosting the instance
- In the Cluster Disk Selection page, select Data, Log Disk, and SystemDB disks as shown in Figure 10.
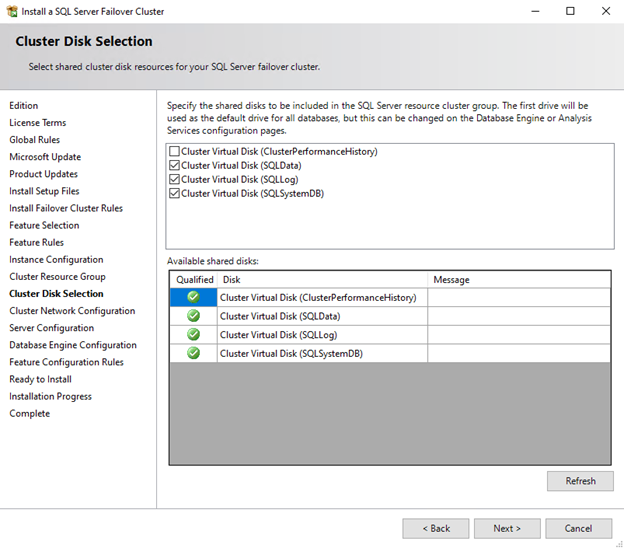
Figure 10: Cluster Disk Selection
- On the Cluster Network Configuration page, enter the secondary IP (the IP3 address of node1a from Table 1) for this node’s network, uncheck DHCP, and select IPv4 as shown in Figure 11.
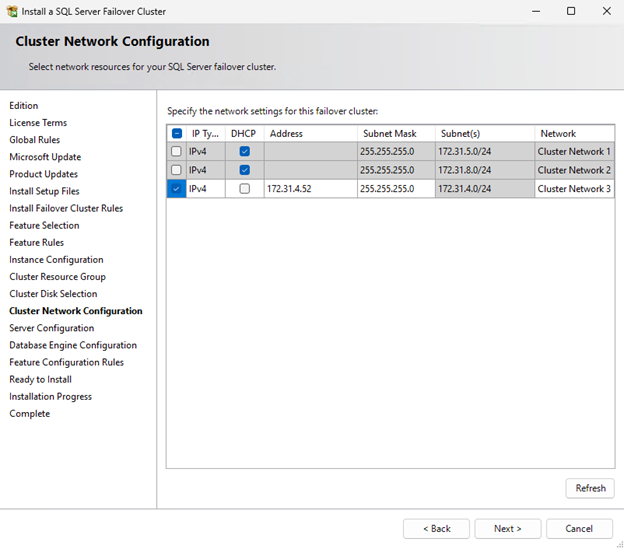
Figure 11: Cluster Network Configuration
- In the Database Engine Configuration configure the correct directory locations:
- Data root directory > C:\ClusterStorage\SQLSystemDB\MSSQL
- User database directory > C:\ClusterStorage\SQLData\MSSQL
- User database log directory > C:\ClusterStorage\SQLLog\MSSQL
Note: TempDB does not need to, and for performance reasons we recommend not to, reside on the Storage Spaces Direct volumes. Update TempDB to locally attached NVMe or other EBS volume(s).
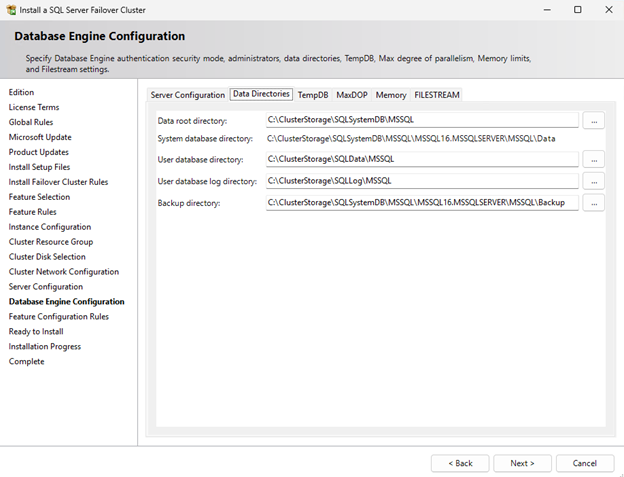
Figure 12 : SQL Server Cluster Resource and database engine configuration
- In the Ready to Install page, click Install to begin installation process. Wait for Completion and verify the SQL Server instance appears as a cluster role.
- On Node 2 and Node 3, select “Add node to a SQL Server failover cluster” option during SQL Server installation.
- In the Cluster Node configuration page ensure the correct SQL Server Network Name is showing.
- On the Cluster Network Configuration page, enter IP3 (from Table 1) address for each node and proceed with installation.
13. After completing the cluster installation, only the IP address of the current owner node will show as online, while the IP addresses of the other two nodes will appear offline, as demonstrated in Figure 13.
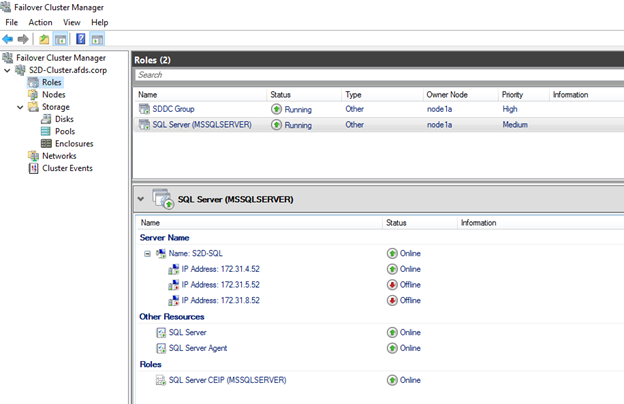
Figure 13 : SQL Server Cluster Resource Status
- Validate the SQL Server FCI and Storage Spaces Direct configuration by creating a test user database. Failover SQL Server to another node and confirm that the test database comes online.
Cleanup
After testing, you should delete this solution and any example resources you deployed if you do not need them, to avoid incurring unwanted charges. You can achieve this by executing the following PowerShell script to any node. This will stop SQL Server, disable Storage Spaces Direct, remove SQL Server from the cluster, and destroy the Failover Cluster.
// update names as needed.
Stop-ClusterGroup "SQL Server (MSSQLSERVER)"
Disable-ClusterStorageSpacesDirect
Remove-ClusterGroup "SQL Server (MSSQLSERVER)" -RemoveResources
Remove-Cluster "S2D-Cluster" -Force -CleanupAD
After this, don’t forget to terminate Amazon EC2 instances and delete Amazon EBS volumes.
Conclusion
This guide demonstrates the implementation of a highly available SQL Server Failover Cluster Instance across three AWS Availability Zones using Storage Spaces Direct. The solution overcomes traditional two-AZ limitations while providing an alternative to FSx or EBS multi-attach options. Deploying Storage Spaces Direct with local EBS volumes across three AZs provide enhanced resilience.
To learn more about best practices of running SQL Server on AWS, check best practices of running SQL Server on EC2.