Microsoft Workloads on AWS
Migrating SQL Server FCI Storage from Amazon FSx for NetApp ONTAP Gen 1 to Gen 2
Introduction
A common approach to implementing SQL Server Always On Failover Cluster (FCI) on Amazon EC2 is using Amazon FSx for NetApp ONTAP (FSxN).
The general approach for migrating an FSxN file systems from first to second generation is using NetApp SnapMirror. That approach works well for NAS workloads (NFS/SMB file shares) where you can change the clients to new mount points with minimal disruption. But what about workloads that use iSCSI block storage, like SQL Server FCI? SQL Server FCI presents unique challenges for storage migration. You must account for the following constraints:
- Database files reside on iSCSI LUNs presented as shared disks to Windows Server Failover Clustering (WSFC) nodes.
- SQL Server requires exclusive access to its data files, meaning you can’t redirect storage while the database is running.
- The WSFC cluster must recognize the new disks and maintain quorum.
- All FCI nodes need iSCSI connectivity to the new storage before SQL Server can start.
- You must reconfigure MPIO (Multipath I/O) paths on every node.
In this post, I walk through the complete procedure for migrating a SQL Server FCI from a Gen 1 to a Gen 2 FSx for ONTAP file system, including how to quiesce SQL Server safely, reconfigure iSCSI on all cluster nodes, and bring the FCI back online with zero data loss. I will also cover how to estimate and minimize the required maintenance window.
Architecture overview
The following diagram (Figure 1) shows the reference architecture for this migration. Both the source (Gen 1) and destination (Gen 2) FSx for ONTAP file systems live in the same VPC, spanning two Availability Zones for high availability.
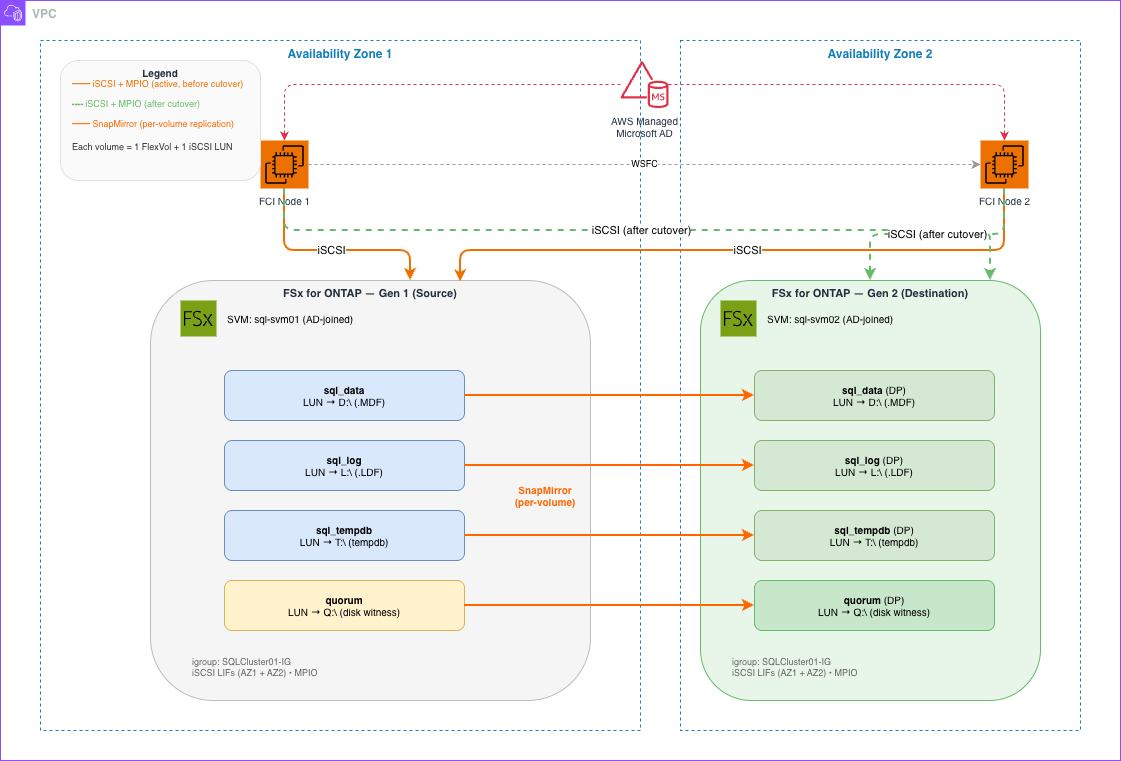
Figure 1 – SQL Server FCI migration architecture with SnapMirror replication from FSx for ONTAP Gen 1 to Gen 2
Key components:
- Active Directory (AWS Managed Microsoft AD): Both SVMs join the same AD domain. The WSFC cluster and SQL Server FCI use AD for authentication and cluster node membership.
- WSFC Cluster Nodes (Amazon EC2): Two Windows Server instances, one in each AZ, form the Windows Server Failover Cluster. Each node connects to the storage via iSCSI with MPIO for path redundancy.
- Gen 1 FSx for ONTAP (Multi-AZ 1): The source file system hosts an AD-joined SVM with four volumes, each containing one iSCSI LUN: SQL data, SQL log, tempDB, and quorum (one LUN per volume following best practices). Both cluster nodes have active iSCSI sessions to this file system during normal operation.
- Gen 2 FSx for ONTAP (Multi-AZ 2): The destination file system hosts a new AD-joined SVM with four DP (data protection) volumes. SnapMirror replicates data from Gen 1 to Gen 2 at the block level. During cutover, the nodes disconnect iSCSI from Gen 1 and reconnect to Gen 2.
- SnapMirror Replication: Runs between inter-cluster LIFs on both file systems. It keeps the Gen 2 volumes synchronized with Gen 1 until you break the relationship during the maintenance window.
- iSCSI with MPIO: Each node maintains two iSCSI paths (one per AZ) to the active file system. After cutover, the paths point to Gen 2’s iSCSI LIF IPs instead of Gen 1’s.
Data flow during migration (before cutover):
- Both WSFC nodes read/write to Gen 1 via iSCSI.
- SnapMirror replicates volume changes from Gen 1 to Gen 2 on an hourly schedule.
- Gen 2 volumes remain read-only (DP type) until SnapMirror break.
Data flow after cutover:
- Both WSFC nodes read/write to Gen 2 via iSCSI.
- Gen 1 is idle (kept for rollback until validation completes).
Prerequisites
The cutover procedure requires running commands on three execution environments:
- The SQL Server FCI. Run SQL commands with SSMS, sqlcmd, or any other client tool.
- The NetApp ONTAP SVM using its CLI. To run these commands, connect to the ONTAP environment by opening an SSH session using the FSxN management endpoint.
- On each WSFC node, either by connecting with an RDP client, SSM Session Manager, or the EC2 serial console, run PowerShell commands with elevated permissions.
Verify you have all three before starting the maintenance window. Here are the prerequisites:
- igroup pre-created on Gen 2. Collect the iSCSI Qualified Name (IQN) from every FCI node and create the igroup on the Gen 2 SVM before cutover:
# Run on each node with PowerShell (use elevated UAC):
(Get-InitiatorPort).NodeAddress
# Run on ONTAP Gen 2: igroup create -igroup SQLCluster01-IG -ostype windows -protocol iscsi -vserver sql-svm02 -initiator <node1-iqn>,<node2-iqn> - Scheduled maintenance window. This migration requires SQL Server downtime. A general estimate is 30-60 minutes with proper preparation. See the Downtime Estimation section for more details on how to calculate the downtime.
- Documented rollback plan. If issues arise, you can reconnect iSCSI to Gen 1 and restart the FCI.
Walkthrough
Step by step, complete the procedure for migrating a SQL Server FCI from a Gen 1 to a Gen 2 FSx for ONTAP file system with zero data loss.
Phase 1: Establish SnapMirror replication
Follow the steps in the article Migrating to FSx for ONTAP using NetApp SnapMirror to establish SnapMirror between Gen 1 and Gen 2:
- Create the destination DP volumes.
- Record inter-cluster LIFs.
- Establish cluster peering.
- Create SVM peering.
- Create and initialize SnapMirror.
- Schedule incremental updates.
Key consideration for iSCSI LUNs: SnapMirror replicates at the volume level, which includes all LUNs within the volume. The LUNs, their data, and their snapshots are all replicated to the destination. However, the LUN mappings (igroup associations) are not replicated. You’ll configure those during cutover.
Let SnapMirror run until the destination is nearly in sync with the source. The smaller the delta at cutover time, the shorter your maintenance window.
Phase 2: Cutover, the maintenance window
This is the critical section of the migration. You must follow the following steps in order.
Step 1: Quiesce SQL Server
On the active FCI node, run the following SQL commands. Note that you will need to run the first command for each of the databases.
-- Prevent new connections on your database (SSMS, sqlcmd, or other client)
ALTER DATABASE [YourDB] SET RESTRICTED_USER WITH ROLLBACK IMMEDIATE;

-- Verify there are no active transactions (SSMS, sqlcmd, or other client)
DBCC OPENTRAN;

-- Check for active sessions (SSMS, sqlcmd, or other client)
SELECT session_id, login_name, status, program_nameFROM sys.dm_exec_sessions WHERE is_user_process = 1;
Step 2: Stop the FCI (graceful shutdown)
Run the following PowerShell (use elevated UAC) commands on the active FCI node:
# Stop SQL Agent
Stop-Service SQLSERVERAGENT -Force

# Stop the entire FCI role — this flushes dirty pages, checkpoints, and releases disks:
Stop-ClusterGroup -Name "SQL Server (MSSQLSERVER)"

# Verify everything is offline:
Get-ClusterGroup -Name "SQL Server (MSSQLSERVER)"

# State: Offline
Get-ClusterResource | Where-Object { $_.ResourceType -eq "Physical Disk" } | Select Name, State

# SQL data and log disks: Offline
# Note: The Quorum disk may remain "Online" — expected because it belongs
# to the "Cluster Group", not the SQL Server group. Handled in Step 5.
Why Stop-ClusterGroup instead of Stop-Service? The cluster command performs a graceful SQL shutdown and releases the shared disk resources. Stopping just the service leaves the cluster holding the disks, which will prevent a clean iSCSI disconnect.
Step 3: Final SnapMirror sync and break
On the ONTAP Gen 2 file system:
# Final sync (only the delta since last update — typically seconds to minutes)
FSx-Gen2::> snapmirror update -destination-path sql-svm02:sql_data
FSx-Gen2::> snapmirror update -destination-path sql-svm02:sql_log
FSx-Gen2::> snapmirror update -destination-path sql-svm02:sql_tempdb
FSx-Gen2::> snapmirror update -destination-path sql-svm02:quorum

# Quiesce the SnapMirror relationships to halt the replication schedule and prevent new transfers from starting during the break.
FSx-Gen2::> snapmirror quiesce -destination-path sql-svm02:sql_data
FSx-Gen2::> snapmirror quiesce -destination-path sql-svm02:sql_log
FSx-Gen2::> snapmirror quiesce -destination-path sql-svm02:sql_tempdb
FSx-Gen2::> snapmirror quiesce -destination-path sql-svm02:quorum
Verify that the Relationship Status has changed to Quiesced using snapmirror show.
# Break the relationship (destination becomes read-write)
FSx-Gen2::> snapmirror break -destination-path sql-svm02:sql_data
FSx-Gen2::> snapmirror break -destination-path sql-svm02:sql_log
FSx-Gen2::> snapmirror break -destination-path sql-svm02:sql_tempdb
FSx-Gen2::> snapmirror break -destination-path sql-svm02:quorum
Step 4: Reconfigure volume settings and map LUNs on Gen 2
Also, on the ONTAP Gen 2 file system:
# Reconfigure volume settings
FSx-Gen2::> volume modify -vserver sql-svm02 -volume sql_data -fractional-reserve 0 -space-guarantee none
FSx-Gen2::> volume modify -vserver sql-svm02 -volume sql_log -fractional-reserve 0 -space-guarantee none
FSx-Gen2::> volume modify -vserver sql-svm02 -volume sql_tempdb -fractional-reserve 0 -space-guarantee none
FSx-Gen2::> volume modify -vserver sql-svm02 -volume quorum -fractional-reserve 0 -space-guarantee none

FSx-Gen2::> volume snapshot autodelete modify -vserver sql-svm02 -volume sql_data -delete-order oldest_first -enabled true
FSx-Gen2::> volume snapshot autodelete modify -vserver sql-svm02 -volume sql_log -delete-order oldest_first -enabled true
FSx-Gen2::> volume snapshot autodelete modify -vserver sql-svm02 -volume sql_tempdb -delete-order oldest_first -enabled true
FSx-Gen2::> volume snapshot autodelete modify -vserver sql-svm02 -volume quorum -delete-order oldest_first -enabled true

#Map LUNs to the igroup
FSx-Gen2::> lun map -vserver sql-svm02 -volume sql_data -lun sql_data -igroup SQLCluster01-IG
FSx-Gen2::> lun map -vserver sql-svm02 -volume sql_log -lun sql_log -igroup SQLCluster01-IG
FSx-Gen2::> lun map -vserver sql-svm02 -volume sql_tempdb -lun sql_tempdb -igroup SQLCluster01-IG
FSx-Gen2::> lun map -vserver sql-svm02 -volume quorum -lun quorum -igroup SQLCluster01-IG
Step 5: Disconnect iSCSI from Gen 1 (all nodes)
The following set of commands will be executed on the Gen 1 SVM. Retrieve the Gen 1 iSCSI LIF IPs:
FSx-Gen1::> network interface show -data-protocol iscsi -vserver sql-svm01
These are also available in the FSx console under SVM > Endpoints > iSCSI. Bring the LUNs offline as a safety measure. This will help prevent them from coming online and do an OS scan.
FSx-Gen1::> lun offline -vserver sql-svm01 -path /vol/sql_data/sql_data
FSx-Gen1::> lun offline -vserver sql-svm01 -path /vol/sql_log/sql_log
FSx-Gen1::> lun offline -vserver sql-svm01 -path /vol/sql_tempdb/sql_tempdb
FSx-Gen1::> lun offline -vserver sql-svm01 -path /vol/quorum/quorum
Run on every FCI node the following PowerShell (use elevated UAC) commands:
# Disconnect all iSCSI sessions
Get-IscsiTarget | Disconnect-IscsiTarget -Confirm:$false
Alternatively, you can unmap the LUNs from the igroup on Gen 1 (lun unmap) instead of disconnecting iSCSI sessions. This simplifies rollback (re-mapping the igroup) but requires cleanup during Gen 1 decommissioning.
# Remove old target portals — include -InitiatorPortalAddress for reliable removal
Remove-IscsiTargetPortal -TargetPortalAddress "<GEN1_ISCSI_IP_1>" -InitiatorPortalAddress "<THIS_NODE_IP>" -Confirm:$false -ErrorAction SilentlyContinue
Remove-IscsiTargetPortal -TargetPortalAddress "<GEN1_ISCSI_IP_2>" -InitiatorPortalAddress "<THIS_NODE_IP>" -Confirm:$false -ErrorAction SilentlyContinue

# Verify portals were removed
Get-IscsiTargetPortal | Select-Object TargetPortalAddress
Important: The -InitiatorPortalAddress parameter (the node’s local IP) is required for reliable portal removal. Without it, Remove-IscsiTargetPortal may silently fail even though the entry still exists.
Troubleshooting: “The session cannot be logged out since a device on that session is currently being used”
This error occurs on the node that owns the cluster quorum disk. The quorum disk remains online because it belongs to the “Cluster Group”, not the SQL Server group.
Resolution: switch quorum to Node Majority before disconnecting:
Set-ClusterQuorum -NodeMajority

Get-ClusterResource "Quorum" | Stop-ClusterResource

Get-IscsiTarget | Disconnect-IscsiTarget -Confirm:$false

Remove-IscsiTargetPortal -TargetPortalAddress "<GEN1_ISCSI_IP_1>" -InitiatorPortalAddress "<THIS_NODE_IP>" -Confirm:$false -ErrorAction SilentlyContinue
Remove-IscsiTargetPortal -TargetPortalAddress "<GEN1_ISCSI_IP_2>" -InitiatorPortalAddress "<THIS_NODE_IP>" -Confirm:$false -ErrorAction SilentlyContinue
After migration, reconfigure the disk witness (see Step 9).
Step 6: Connect iSCSI to Gen 2 (ALL nodes)
Run on every FCI node the following PowerShell (use elevated UAC) commands:
# Gen 2 iSCSI endpoints (from FSx console > SVM > Endpoints)
$TargetPortals = @("x.x.x.x", "y.y.y.y") # Preferred + Standby

$LocalIP = "z.z.z.z" # This node's primary IP

Foreach ($tp in $TargetPortals) {
   New-IscsiTargetPortal -TargetPortalAddress $tp -TargetPortalPortNumber 3260 -InitiatorPortalAddress $LocalIP
}

# Establish 8 iSCSI sessions per target portal (AWS recommended)
1..8 | % {
   Foreach ($tp in $TargetPortals) {
      Get-IscsiTarget | Connect-IscsiTarget -IsMultipathEnabled $true -TargetPortalAddress $tp -InitiatorPortalAddress $LocalIP -IsPersistent $true
   }
}
Step 7: Bring disks online and start the FCI cluster
On the node that will be the active FCI owner (typically the node that owned the cluster group before cutover) run the following PowerShell (use elevated UAC) commands:
Important: Run this only on the intended active owner node. The second node will access the disks through the cluster once the FCI role starts.
# Rescan
Update-HostStorageCache

# Bring disks online
Get-Disk | Where-Object { $_.FriendlyName -eq 'NETAPP LUN C-MODE' -and $_.IsOffline } | Set-Disk -IsOffline $false

# Verify drive letters
Get-Volume | Where-Object { $_.FileSystemLabel -in @('SQL-Data', 'SQL-Log', 'Quorum') }
Note: The Set-Disk command might fail with: “The specified object is managed by the Microsoft Failover Clustering component.” This is safe to ignore. It means the cluster already recognizes and owns these disks (SnapMirror preserved the disk signatures). Bring the disks online through the cluster instead:
# Check cluster disk resources
Get-ClusterResource | Where-Object { $_.ResourceType -eq "Physical Disk" }

# Bring SQL disks online (NOT the quorum disk yet)
Resume-ClusterResource -Name "SQL-DATA"Resume-ClusterResource -Name "SQL-LOG"

# If disks remain offline after Resume, use Start-ClusterResource instead:
Start-ClusterResource -Name "SQL-DATA"Start-ClusterResource -Name "SQL-LOG"
Note on tempDB: If your FCI uses local storage for tempDB (a recommended practice for performance), it is not a clustered disk resource and requires no action in this step. SQL Server recreates tempDB automatically on each startup. If your deployment places tempDB on shared iSCSI storage, bring it online as a cluster resource the same way you do for the data and log disks.
# If you have a clustered disk for tempDB do this:
Resume-ClusterResource -Name "TEMPDB"

# If the cluster doesn't recognize disks (signature changed):
Get-ClusterAvailableDisk | Add-ClusterDisk

# Start SQL Server FCI
Start-ClusterGroup -Name "SQL Server (MSSQLSERVER)"
Step 8: Validate
The following are PowerShell (use elevated UAC) commands. Each LUN should show 16 paths total: 8 Active/Optimized (through the preferred LIF) and 8 Active/Unoptimized (through the standby LIF).
# List MPIO-claimed disks and note the disk numbers
mpclaim -s -d

# For each disk, verify the path count (expect 8 Active/Optimized + 8 Active/Unoptimized)
Mpclaim -s -d <disk_number>
Troubleshooting: MPIO path count is lower than expected
If you see fewer than 16 paths per LUN, verify the session distribution across both iSCSI LIFs:
# Using PowerShell on every FCI node:
Get-IscsiSession | Group-Object TargetAddress | Select-Object Name, Count
Both target portal IPs should show 8 sessions each. If one is missing or shows fewer, re-run Connect-IscsiTarget for that portal address. If the disk appears as a duplicate in Disk Management instead of a multipath device, confirm MPIO claimed it with mpclaim -s -d and rescan: Update-HostStorageCache.
# Test the failover
Move-ClusterGroup -Name "SQL Server (MSSQLSERVER)" -Node "SQLNode2"
The following are SQL commands. Run in SSMS, sqlcmd, or any sql client:
-- Verify database integrity
DBCC CHECKDB ([YourDB]) WITH NO_INFOMSGS;

-- Restore multi-user access (do this on all of your databases)
ALTER DATABASE [YourDB] SET MULTI_USER;
Step 9: Reconfigure quorum disk witness
After validating SQL Server is running and failover works, run the following PowerShell (use elevated UAC) commands:
# Bring the quorum disk online
Resume-ClusterResource -Name "Quorum"

# If it remains offline, use:
Start-ClusterResource -Name "Quorum"

# Restore disk witness quorum
Set-ClusterQuorum -DiskWitness "Quorum"

# Verify
Get-ClusterQuorum
Downtime estimation
During my tests, I collected the following metrics on every step. Make sure you practice this procedure in a lower environment and collect your own metrics to estimate the required downtime for your environment.
| Step | Estimated Duration |
| Quiesce SQL + Stop FCI | 2-5 minutes |
| Final SnapMirror sync | 1-5 minutes (depends on delta) |
| Break SnapMirror + reconfigure volume + map LUNs | 2-5 minutes |
| Disconnect iSCSI from Gen 1 (all nodes) | 2-5 minutes (includes quorum handling) |
| Connect iSCSI to Gen 2 (all nodes) | 5-10 minutes |
| Rescan + bring disks online | 2-5 minutes |
| Start FCI + validate + reconfigure quorum | 5-10 minutes |
| Total estimated downtime | 20-45 minutes |
Tips to minimize downtime:
- Script steps 5 and 6 (iSCSI disconnect/reconnect). Run in parallel on all nodes.
- Keep SnapMirror syncs frequent (around every 5 minutes) in the hours before cutover.
- Validate that the Gen 2 iSCSI endpoints are reachable from all nodes before starting.
Rollback procedures
If issues arise during cutover and you need to revert:
- Stop any partially started SQL services.
- Disconnect iSCSI from Gen 2 on all nodes.
- Reconnect iSCSI to Gen 1 on all nodes (using the original endpoint IPs).
- Rescan disks and bring cluster resources online.
- Start the FCI.
Since the Gen 1 volumes were not modified (SnapMirror only reads from the source), your data is intact on Gen 1. The only risk window is between stopping the FCI and completing the final SnapMirror sync. If you break SnapMirror and then need to roll back, you will lose any writes made to Gen 2 after the break (but in this procedure, no writes occur between break and FCI start, so rollback is safe). If you need to revert after SQL Server has been running on Gen 2 (new data exists), use a reverse SnapMirror resync to bring Gen 1 up to date:
- Stop the FCI on Gen 2.
- Resync SnapMirror in reverse (Gen 2 as source, Gen 1 as destination):
FSx-Gen1::> snapmirror resync -destination-path sql-svm01:sql_data FSx-Gen1::> snapmirror resync -destination-path sql-svm01:sql_log FSx-Gen1::> snapmirror resync -destination-path sql-svm01:sql_tempdb FSx-Gen1::> snapmirror resync -destination-path sql-svm01:quorum - After the synchronization is complete, break the relationship on Gen 1.
FSx-Gen1::> snapmirror break -destination-path sql-svm01:sql_data FSx-Gen1::> snapmirror break -destination-path sql-svm01:sql_log FSx-Gen1::> snapmirror break -destination-path sql-svm01:sql_tempdb FSx-Gen1::> snapmirror break -destination-path sql-svm01:quorum - Map the LUNs to the igroup on Gen 1
FSx-Gen1::> lun map -vserver sql-svm01 -volume sql_data -lun sql_data -igroup SQLCluster01-IG FSx-Gen1::> lun map -vserver sql-svm01 -volume sql_log -lun sql_log -igroup SQLCluster01-IG FSx-Gen1::> lun map -vserver sql-svm01 -volume sql_tempdb -lun sql_tempdb -igroup SQLCluster01-IG FSx-Gen1::> lun map -vserver sql-svm01 -volume quorum -lun quorum -igroup SQLCluster01-IG - Disconnect iSCSI from Gen 2 on all nodes.
- Reconnect iSCSI to Gen 1 on all nodes.
- Bring the disks online and start the FCI.
Important: If the SnapMirror relationship no longer exists, a reverse resync is not possible. In that case, you will need to establish a new SnapMirror relationship from Gen 2 to Gen 1 (full baseline transfer) or restore from SQL Server backups.
Key considerations to remember
Disk Signatures and Cluster Recognition
When LUNs appear on the new iSCSI targets, Windows may see them as “Foreign” disks if the disk signature changed during replication. Use Get-ClusterAvailableDisk | Add-ClusterDisk to re-add them to the cluster.
More commonly, SnapMirror preserves disk signatures, and the cluster recognizes the disks immediately. In this case, Set-Disk -IsOffline $false will fail with “The specified object is managed by the Microsoft Failover Clustering component”. This error is expected and is safe to ignore. Bring the disks online through the cluster using Start-ClusterResource instead.
Quorum Witness
If your WSFC uses a disk witness on the same FSx volume, it migrates with the data. However, during cutover, you must temporarily switch to Node Majority quorum (Set-ClusterQuorum -NodeMajority) because the quorum disk blocks iSCSI disconnection. After you validate the migration, restore the disk witness (Set-ClusterQuorum -DiskWitness "Quorum"). If you use a file share witness hosted elsewhere, you don’t need to take any action.
Volume Space Management
FSx for ONTAP volumes default to autosize-mode grow_shrink, which conflicts with setting space-mgmt-try-first snap_delete. If you encounter this error during volume reconfiguration, it’s safe to ignore. The grow_shrink mode already handles space management by automatically expanding and contracting the volume.
Storage Efficiency
SnapMirror preserves deduplication and compression. After cutover, verify efficiency is active on all volumes:
FSx-Gen2::> volume efficiency show -vserver sql-svm02
Cleanup
Configuring AWS services from this post will provision resources that incur costs. It is a best practice to delete configurations and resources that you are no longer using so that you do not incur unintended charges. Once you’ve validated the migration and are confident Gen 2 is operating correctly, clean up the Gen 1 resources:
- Delete the SnapMirror relationship metadata on Gen 2:
FSx-Gen2::> snapmirror delete -destination-path sql-svm02:sql_data FSx-Gen2::> snapmirror delete -destination-path sql-svm02:sql_log FSx-Gen2::> snapmirror delete -destination-path sql-svm02:sql_tempdb FSx-Gen2::> snapmirror delete -destination-path sql-svm02:quorum - Release the SnapMirror relationship on Gen 1 (freeing the base snapshot):
FSx-Gen1::> snapmirror release -destination-path sql-svm02:sql_data -relationship-info-only true FSx-Gen1::> snapmirror release -destination-path sql-svm02:sql_log -relationship-info-only true FSx-Gen1::> snapmirror release -destination-path sql-svm02:sql_tempdb -relationship-info-only true FSx-Gen1::> snapmirror release -destination-path sql-svm02:quorum -relationship-info-only true - Offline and unmap LUNs on Gen 1 (if not already done in Step 5):
FSx-Gen1::> lun offline -vserver sql-svm01 -path /vol/sql_data/sql_data FSx-Gen1::> lun offline -vserver sql-svm01 -path /vol/sql_log/sql_log FSx-Gen1::> lun offline -vserver sql-svm01 -path /vol/sql_tempdb/sql_tempdb FSx-Gen1::> lun offline -vserver sql-svm01 -path /vol/quorum/quorum - Delete the Gen 1 FSx for ONTAP file system through the AWS console or CLI when ready.
Tip: Keep Gen 1 running for a validation period (1–2 weeks or what your internal policy dictates) before deleting. This preserves your rollback option until you’re fully confident.
Conclusion
In this post, we walked through the complete procedure for migrating SQL Server FCI storage from a Gen 1 to a Gen 2 Amazon FSx for NetApp ONTAP file system. Unlike standard NAS migrations where clients can simply remount new file shares, iSCSI-based workloads like SQL Server FCI require careful orchestration: quiescing the database, reconfiguring iSCSI connectivity and MPIO on every cluster node, and managing the WSFC quorum transition, all within a tightly controlled maintenance window.
I showed that by leveraging NetApp SnapMirror to keep the destination volumes synchronized before cutover, you can minimize the actual downtime to 20–45 minutes. Also, I covered the critical sequencing requirements, common troubleshooting scenarios (such as the quorum disk blocking iSCSI disconnection and cluster-managed disk errors), and a complete rollback strategy that ensures zero data loss throughout the process.
Second-generation FSx for ONTAP delivers significant improvements in performance (higher IOPS, increased throughput) and cost efficiency (the ability to right-size SSD capacity). For SQL Server FCI workloads that demand consistent, low-latency block storage, migrating to Gen 2 unlocks these benefits while maintaining the high-availability guarantees that FCI provides.
A well-rehearsed runbook is key. The key differences from a standard NAS migration are:
- Downtime is required. iSCSI LUNs cannot be live-migrated.
- You need to reconfigure all FCI nodes. iSCSI disconnect/reconnect on every node.
- Order matters. Stop SQL Server before making any iSCSI changes, and the cluster must release the disks.
- Quorum handling. The disk witness blocks iSCSI disconnect; temporarily switch to Node Majority during cutover.
- Use
-InitiatorPortalAddresswhen removing iSCSI portals for reliable cleanup
With SnapMirror keeping the destination nearly in sync, the actual maintenance window can be kept to 20-45 minutes, as I found in my tests. I recommend collecting your own metrics to determine the maintenance window that works for your environment and rehearsing the procedure in a test environment before executing it in production.
References
- SQL Server HA Deployments Using FSx for ONTAP
- Implementing HA and DR for SQL Server FCI using FSx for ONTAP
- Migrating to FSx for ONTAP using NetApp SnapMirror
- Always On Failover Cluster Instances (AWS Prescriptive Guidance)
- NetApp TR-4590: SQL Server Best Practices with ONTAP
- Availability, durability, and deployment options