Microsoft Workloads on AWS
Zero-downtime multi-tenant IIS deployments on AWS Elastic Beanstalk
Introduction
If you host multiple ASP.NET web applications on a single AWS Elastic Beanstalk (Elastic Beanstalk) Windows Server environment, you face a common operational challenge: every deployment restarts Microsoft Internet Information Services (IIS), which takes down all sites on the instance, even the ones that did not change. For multi-tenant workloads where each IIS site serves a different customer, a routine update to one tenant causes downtime for all tenants.
This post walks you through building a multi-tenant Elastic Beanstalk environment where you can update individual tenant sites independently. You will use the skipIISReset flag in the deployment manifest to prevent IIS from restarting, dedicated IIS application pools to isolate each tenant, and content-hash change detection in the PowerShell deployment scripts to skip unchanged tenants entirely. The result is true zero-downtime deployments for unaffected tenants.
The complete source code is available in the sample-beanstalk-multiple-IIS-websites repository on GitHub.
Solution overview
The solution consists of three ASP.NET Razor Pages tenant applications, a static health check page for the Elastic Beanstalk load balancer, per-application PowerShell deployment scripts, and an AWS CloudFormation (CloudFormation) template that provisions the environment.
The key components are:
- A deployment manifest with skipIISReset: true to skip during deployment operations.
- Dedicated IIS application pools per tenant that isolate each site’s worker process.
- Content-hash change detection in the uninstall, install, and restart scripts that skips the deployment cycle for tenants whose files have not changed.
- An Amazon Route 53 (Route 53) private hosted zone for subdomain resolution within the Amazon Virtual Private Cloud (VPC).
Architecture
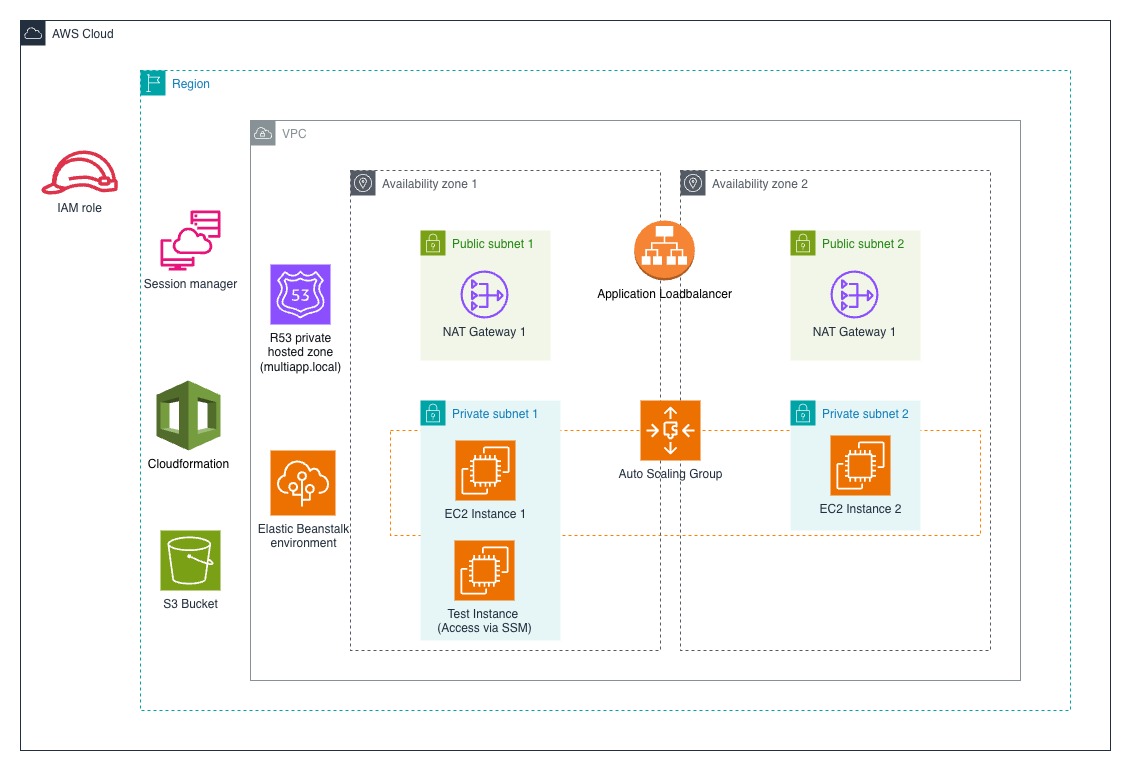
Figure 1: High-level architecture
Figure 1 presents the high-level architecture of the solution. The workload is deployed within a single AWS Region and resides in a VPC that spans two Availability Zones to ensure high availability. An Application Load Balancer in the public subnets distributes incoming traffic to Amazon EC2 (EC2) instances in the private subnets, which are managed by an Auto Scaling group and provisioned through Elastic Beanstalk and CloudFormation. Network Address Translation (NAT) gateways provide controlled outbound connectivity, while a Route 53 private hosted zone (multiapp.local) enables internal DNS resolution. Application artifacts are stored in Amazon S3 (S3), access is governed by an AWS Identity and Access Management (IAM) role, and a private test instance is accessed securely through AWS Systems Manager Session Manager (Session Manager).
Prerequisites
To follow along with this walkthrough, you will need:
- An AWS account with permissions to create Elastic Beanstalk, CloudFormation, Route 53, IAM, and EC2 resources.
- .NET 8 SDK or later.
- PowerShell 7+.
- AWS Command Line Interface (AWS CLI) configured with appropriate credentials.
- A VPC with public and private subnets across at least two Availability Zones, with a NAT gateway for outbound internet from private subnets.
Walkthrough
How Elastic Beanstalk custom deployments work
With Elastic Beanstalk, you can host multiple applications on a single Windows Server environment through a deployment manifest file named aws-windows-deployment-manifest.json. The manifest defines custom deployment entries, each referencing three PowerShell scripts: install, uninstall, and restart. During a deployment, Elastic Beanstalk runs the uninstall script for each application using the scripts from the previous deployment. Then runs the install script for each application using the scripts from the new deployment and finally runs the restart script for each application. By default, the Elastic Beanstalk also performs a full iisreset between these steps. The skipIISReset flag prevents this.A key detail: Elastic Beanstalk runs all three scripts for every application in the manifest on every deployment, regardless of which application changed. This is why content-hash change detection in the scripts is essential.
The deployment manifest
The manifest sets skipIISReset: true and declares each application with its three scripts:
{
  "manifestVersion": 1,
  "skipIISReset": true,
  "deployments": {
    "custom": [
      {
        "name": "Tenant1Site",
        "scripts": {
          "install": { "file": "scripts/Tenant1Site/install.ps1" },
          "uninstall": { "file": "scripts/Tenant1Site/uninstall.ps1" },
          "restart": { "file": "scripts/Tenant1Site/restart.ps1" }
        }
      }
    ]
  }
}
Tenant2Site and Tenant3Site follow the same pattern.
Content-hash change detection
Each script computes a content-based fingerprint of the incoming bundle files by hashing each file’s bytes with SHA256, concatenating the results, and producing a single SHA256 fingerprint. This fingerprint is stored in a .deploy-hash file on the instance. On the next deployment, the scripts compare the new fingerprint against the stored one. If they match, the script exits immediately. We use content hashing rather than timestamps because dotnet publish regenerates files with new timestamps on every build, even when the source has not changed. The three scripts coordinate in the following steps:
Step 1: The uninstall script compares hashes and skips teardown if unchanged.
Step 2: The install script compares hashes and skips file copy if unchanged; if changed, it stops the app pool, replaces files, creates the IIS site, writes the new hash, and drops a .needs-restart marker.
Step 3: The restart script checks for the marker and recycles only that tenant’s app pool if present.
When you deploy a bundle where only Tenant1Site changed, the flow looks like the following table.
| Step | Tenant1Site | Tenant2Site | Tenant3Site |
| Uninstall | Hash mismatch, tears down | Hash matches, exits | Hash matches, exits |
| Install | Deploys new files, writes hash | Hash matches, exits | Hash matches, exits |
| Restart | Marker found, recycles pool | No marker, exits | No marker, exits |
Dedicated application pools
ASP.NET Core default In-process hosting model is used, so each tenant site needs its own pool. The install script creates one using appcmd.exe:
$appcmd = "$env:SystemRoot\system32\inetsrv\appcmd.exe"
& $appcmd add apppool /name:$TenantName /managedRuntimeVersion:""
& $appcmd add site /name:$TenantName /physicalPath:$TargetPath /bindings:"http/*:80:${HostHeader}"
& $appcmd set app "$TenantName/" /applicationPool:$TenantName
We use appcmd.exe instead of the WebAdministration PowerShell module because Elastic Beanstalk runs deployment scripts with 32-bit PowerShell, which cannot load the 64-bit-only module.
Deploying the infrastructure
The CloudFormation template provisions the Elastic Beanstalk application and environment, an S3 bucket for deployment bundles, and IAM roles. It also creates a Route 53 private hosted zone with CNAME records for each tenant subdomain, and a test EC2 instance for verification using Session Manager. Elastic Beanstalk instances run in private subnets, and the load balancer sits in public subnets.
aws cloudformation deploy \
  --template-file infrastructure/template.yaml \
  --stack-name multisite-demo-stack \
  --parameter-overrides \
      EnvironmentName=multisite-demo \
      VpcId=<YOUR_VPC_ID> \
      PublicSubnets=<PUBLIC_SUBNET_1>,<PUBLIC_SUBNET_2> \
      PrivateSubnets=<PRIVATE_SUBNET_1>,<PRIVATE_SUBNET_2> \
      TestInstanceSubnetId=<PRIVATE_SUBNET_1> \
  --capabilities CAPABILITY_IAM
Before deploying the bundle
This step applies if you are deploying a new application version to an already existing environment. To prove that content-hashing and iisResetSkip is working, get the PIDs of the w3wp processes on the instances.
EB_INSTANCE_ID=$(aws elasticbeanstalk describe-environment-resources \
  --environment-name multisite-demo \
  --query "EnvironmentResources.Instances[0].Id" --output text)

aws ssm send-command \
  --instance-ids $EB_INSTANCE_ID \
  --document-name "AWS-RunPowerShellScript" \
  --parameters 'commands=["& \"$env:SystemRoot\\system32\\inetsrv\\appcmd.exe\" list wp"]' \
  --output json --query "Command.CommandId"
After deployment, we will run the Session Manager command again and compare the PIDs.
Building and deploying the bundle
The PackageBundle.ps1 script runs dotnet publish for each tenant app, assembles the manifest, scripts, and published output, and compresses everything into bundle.zip. Upload it to S3 and deploy:
pwsh PackageBundle.ps1
aws s3 cp bundle.zip s3://<BUCKET_NAME>/bundle-v1.zip
aws elasticbeanstalk create-application-version \
  --application-name multisite-demo-app --version-label v1 \
  --source-bundle S3Bucket=<BUCKET_NAME>,S3Key=bundle-v1.zip
aws elasticbeanstalk update-environment \
  --environment-name multisite-demo --version-label v1
Verifying zero-downtime behavior
To verify that updating one tenant does not disrupt the others, follow these steps.
Step 1: Make a change to one tenant. On your workstation, edit src/Tenant1Site/Pages/Index.cshtml to change the heading text, for example adding a (v2) marker.
Step 2: Rebuild and deploy. Build a new bundle and deploy it:
pwsh PackageBundle.ps1
aws s3 cp bundle.zip s3://<BUCKET_NAME>/bundle-v2.zip
aws elasticbeanstalk create-application-version \
  --application-name multisite-demo-app --version-label v2 \
  --source-bundle S3Bucket=<BUCKET_NAME>,S3Key=bundle-v2.zip
aws elasticbeanstalk update-environment \
  --environment-name multisite-demo --version-label v2
Step 3: Verify w3wp process PIDs. From your workstation, run the following command on EB instance(s).
aws ssm send-command \
  --instance-ids $EB_INSTANCE_ID \
  --document-name "AWS-RunPowerShellScript" \
  --parameters 'commands=["& \"$env:SystemRoot\\system32\\inetsrv\\appcmd.exe\" list wp"]' \
  --output json --query "Command.CommandId"
Example output:
WP "4840" (applicationPool:Tenant1Site)    <-- new PID, Tenant1Site was recycled
WP "2812" (applicationPool:Tenant2Site)    <-- same PID, never restarted
WP "3380" (applicationPool:Tenant3Site)    <-- same PID, never restarted
Tenant2Site and Tenant3Site kept the same PIDs they had before the deployment, which means their worker processes were never recycled. Only Tenant1Site’s PID changes. That is the evidence that skipIISReset and content-hash detection left the unaffected tenants running untouched.
Step 4: Check deployment logs. Elastic Beanstalk records the output of each custom deployment script. Pull the change-detection lines from the most recent log
aws ssm send-command \
  --instance-ids $EB_INSTANCE_ID \
  --document-name "AWS-RunPowerShellScript" \
  --parameters 'commands=["$f = Get-ChildItem \"C:\\Program Files\\Amazon\\ElasticBeanstalk\\logs\\AWS.DeploymentCommands.*.log\" | Sort-Object LastWriteTime -Descending | Select-Object -First 1; Select-String -Path $f.FullName -Pattern \"unchanged - skipping|changed - running\" | ForEach-Object { $_.Line }"]' \
  --output json --query "Command.CommandId"
For a deployment that changed only Tenant1Site, the log shows:
[INFO] Tenant1Site changed - running install
[INFO] Tenant2Site unchanged - skipping install
[INFO] Tenant3Site unchanged - skipping install
Things to know
- The first deployment to a new instance touches all tenants because no hash files exist yet. This is a one-time cost; subsequent deployments correctly skip unchanged tenants.
- Build from a consistent directory. If you switch build directories, the .NET compiler may embed different path metadata in the DLLs, causing hash mismatches. In a CI/CD pipeline, builds always run from the same checkout path, so this is not an issue. You may use DotNet.ReproducibleBuilds to enhance the build reproducibility.
- Stop the app pool before replacing files. Running ASP.NET Core processes hold locks on DLLs. The install script must stop the app pool and wait before removing files.
- The restart script will recycle only the individual tenant’s app pool, not run iisreset. A full IIS reset would defeat the purpose of skipIISReset: true.
- Single-instance environments and environments with all-at-once deployment strategy can further benefit from the skipIISReset option and content hashing strategy, as you can achieve faster deployments and zero-downtime for unaffected tenants.
- For Monitoring and troubleshooting the Elastic Beanstalk environment, refer to the following AWS documentation:
Cleanup
To avoid ongoing charges, empty the S3 bucket and delete the CloudFormation stack:
BUCKET=$(aws cloudformation describe-stacks --stack-name multisite-demo-stack \
  --query "Stacks[0].Outputs[?OutputKey=='DeploymentBucketName'].OutputValue" --output text)
aws s3 rm s3://$BUCKET --recursive
aws cloudformation delete-stack --stack-name multisite-demo-stack
aws cloudformation wait stack-delete-complete --stack-name multisite-demo-stack
Conclusion
In this post, you learned how to achieve zero-downtime deployments for multi-tenant ASP.NET applications on Elastic Beanstalk by combining skipIISReset: true with content-hash change detection and dedicated IIS application pools. Elastic Beanstalk redeploys only the tenants that changed, while all other tenants continue serving requests without interruption.
To get started, clone the source code from GitHub, deploy the CloudFormation template, and follow the walkthrough to verify the zero-downtime behavior in your own environment. For more information about Elastic Beanstalk custom deployments, refer to the deployment manifest documentation.