AWS Cloud Operations Blog
Cross-Region application monitoring using Amazon CloudWatch Synthetics and AWS CloudFormation
Customers need a way to find problems with their application before the real end users encounter them. They need to predict how their application will perform in supported geographies and isolate the root cause of any detected bottlenecks. Synthetic monitoring allows customers to emulate business processes or user transactions from different geographies and monitor their performance and availability.
In this blog post, I will explain how to deploy a global synthetic monitoring solution across multiple geographic regions using Amazon CloudWatch Synthetics and AWS CloudFormation StackSets. I will also show how to monitor the website performance results using Amazon CloudWatch cross-region dashboards in a centralized location.
Overview
Amazon CloudWatch Synthetics is a fully managed synthetic monitoring service that allows developers and DevOps engineers to ensure availability of their application endpoints and URLs using configurable scripts called canaries that run 24×7. Canaries alert you as soon as an API, URL, or endpoint does not work as expected, as defined by the canary script. CloudWatch Synthetics canaries can be customized to check for availability, latency, transactions, broken or dead links, step-by-step task completions, page load errors, load latencies for UI assets, complex wizard flows, or checkout flows in your applications.
Amazon CloudWatch cross-region dashboards enable customers to create high-level operational dashboards and use one click to drill down into more specific dashboards in different AWS Regions, without having to switch Regions. The ability to visualize, aggregate, and summarize performance and operational data across accounts and Regions helps reduce friction and time to resolution.
AWS CloudFormation StackSets extends the functionality of CloudFormation stacks by enabling customers to create, update, or delete stacks across multiple accounts and Regions with a single operation.
Solution architecture
The solution includes creating an Amazon CloudWatch Synthetics canary for monitoring a website and deploying the same canary across multiple AWS Regions using AWS CloudFormation StackSets. I am using Amazon CloudWatch cross-region dashboards to build the visualizations to get insights into availability and latency for the website across Regions.
To illustrate this feature, I have used https://www.amazon.com/ as the target URL to monitor from AWS Regions like N.Virginia, N.California, Europe (London), Asia Pacific (Mumbai), and Asia Pacific (Sydney).
Implementing the solution
To implement this solution, you must:
- Complete the prerequisites for AWS CloudFormation StackSets operations.
- Create and deploy a CloudWatch Synthetics canary in different Regions using CloudFormation StackSets.
- Create a CloudWatch cross-region dashboard.
- Deploy the canary to additional AWS Regions. (Optional)
- Edit the canary centrally and redeploy it to all Regions. (Optional)
Step 1: Complete prerequisites for AWS Cloudformation Stack Sets operations
If you are using AWS Organizations and want to enable CloudFormation StackSets using Trusted Access, see Enable trusted access with AWS Organizations in the AWS CloudFormation User Guide.
Follow these steps to set up permissions for StackSets operations. If you already have permissions for StackSets operations, you can skip this step.
- In your AWS account, check whether you already have an AWS Identity and Access Management (IAM) role named
AWSCloudFormationStackSetAdministrationRole, if not create the IAM role. You must use this name. You can do this by creating a stack from the following AWS CloudFormation template, available online at https://s3.amazonaws.com/cloudformation-stackset-sample-templates-us-east-1/AWSCloudFormationStackSetAdministrationRole.yml. - In your AWS account, check whether you already have service role named
AWSCloudFormationStackSetExecutionRolethat trusts the administrator account, if not create the service role. You must use this name. You can do this by creating a stack from the following AWS CloudFormation template, available online at https://s3.amazonaws.com/cloudformation-stackset-sample-templates-us-east-1/AWSCloudFormationStackSetExecutionRole.yml.
When you use this template, you are prompted to provide the name of the administrator account with which your target account must have a trust relationship. (If you are using the administrator account for this exercise, provide the current account ID).
For additional information, see Grant self-managed permissions in the AWS CloudFormation User Guide.
Step 2: Create and deploy a CloudWatch Synthetics canary in different AWS Regions
Description: "This template creates an Amazon Cloudwatch Synthetics Canary with inline Canary script and required resources"
Parameters:
  CanaryName:
    Type: String
    Default: mycanary
    Description: Name of your Canary. A name consists of up to 21 lowercase letters, numbers, hyphens or underscores with no spaces.
  CanarySuccessLowAlarmName:
    Type: String
    Default: mycanary-successlowalarm
    Description: Name of your CW Alarm for Success Percent.
  CanaryDurationAlarmName:
    Type: String
    Default: mycanary-durationalarm
    Description: Name of your CW Alarm for Duration.
  URLToMonitor:
    Type: String
    Default: "https://www.amazon.com/"
    Description: URL of your application to monitor in the canary script.
Resources:
  SyntheticsLambdaExecutionRole:
    Type: "AWS::IAM::Role"
    Properties:
      AssumeRolePolicyDocument:
        Version: "2012-10-17"
        Statement:
          - Sid: ""
            Effect: "Allow"
            Principal:
              Service: "lambda.amazonaws.com"
            Action: "sts:AssumeRole"
  SyntheticsLambdaExecutionRolePolicies:
    Type: "AWS::IAM::Policy"
    Properties:
      PolicyName: "SyntheticsLambdaExecutionRolePolicy"
      PolicyDocument:
        Version: "2012-10-17"
        Statement:
          - Action:
              - "s3:PutObject"
              - "s3:GetBucketLocation"
            Resource:
              - !Sub "arn:aws:s3:::${ArtifactS3LocationBucket}/*"
            Effect: "Allow"
          - Action:
              - "s3:ListAllMyBuckets"
              - "xray:PutTraceSegments"
            Resource: "*"
            Effect: "Allow"
          - Action:
              - "cloudwatch:PutMetricData"
            Resource: "*"
            Effect: "Allow"
          - Action:
              - "logs:*"
            Resource:
              Fn::Sub: "arn:${AWS::Partition}:logs:*:*:*"
            Effect: "Allow"
      Roles:
        - !Ref "SyntheticsLambdaExecutionRole"

  ArtifactS3LocationBucket:
    Type: "AWS::S3::Bucket"
    Properties:
      BucketName: !Join [ '', ['cw-syn-results-', !Ref 'AWS::Region', '-', !Ref 'AWS::AccountId' ] ]
      BucketEncryption:
        ServerSideEncryptionConfiguration:
          - ServerSideEncryptionByDefault:
              SSEAlgorithm: AES256

  LambdaWaiter:
    Type: "AWS::Lambda::Function"
    Properties:
      Handler: "index.handler"
      Runtime: "nodejs12.x"
      Timeout: 900
      Role: !GetAtt SyntheticsLambdaExecutionRole.Arn
      Code:
        ZipFile:
          exports.handler = function(e,r) {
            var response = require('cfn-response');
            var waitTimeSeconds = e.ResourceProperties.WaitSeconds;
            var waitTime = waitTimeSeconds * 1000;
            setTimeout(function(){
              response.send(e, r, response.SUCCESS, {}, "Waiter-" + waitTimeSeconds + "-Seconds")
            }, waitTime);
          };

  SyntheticsCanary:
    Type: AWS::Synthetics::Canary
    DependsOn:
      - SyntheticsLambdaExecutionRole
      - SyntheticsLambdaExecutionRolePolicies
    Properties:
      Name: !Ref CanaryName
      Code:
        Handler: "pageLoadBlueprint.handler"
        Script: !Sub
          - "var synthetics = require('Synthetics');\nconst log = require('SyntheticsLogger');\n\nconst pageLoadBlueprint = async function () {\n\n    // INSERT URL here\n    const URL = \"${URLToMonitor}\";\n\n    // Set screenshot option\n    const takeScreenshot = true;\n\n    let page = await synthetics.getPage();\n    //You can customize the wait condition here. For instance,\n    //using 'networkidle2' may be less restrictive.\n    const response = await page.goto(URL, {waitUntil: 'domcontentloaded', timeout: 30000});\n    if (!response) {\n        throw \"Failed to load page!\";\n    }\n    //Wait for page to render.\n    //Increase or decrease wait time based on endpoint being monitored.\n    await page.waitFor(15000);\n\n    if (takeScreenshot) {\n        await synthetics.takeScreenshot('loaded', 'loaded');\n    }\n    let pageTitle = await page.title();\n    log.info('Page title: ' + pageTitle);\n\n    //If the response status code is not a 2xx success code\n    if (response.status() < 200 || response.status() > 299) {\n        throw \"Failed to load page!\";\n    }\n};\n\nexports.handler = async () => {\n    return await pageLoadBlueprint();\n};"
          - { URLToMonitor: !Ref URLToMonitor }
      ExecutionRoleArn:
        Fn::GetAtt: SyntheticsLambdaExecutionRole.Arn
      ArtifactS3Location: !Join [ '', ['s3://', !Ref ArtifactS3LocationBucket] ]
      RuntimeVersion: "syn-nodejs-2.0"
      Schedule: {Expression: 'rate(5 minutes)', DurationInSeconds: '3600'}
      RunConfig: {TimeoutInSeconds: 60}
      FailureRetentionPeriod: 30
      SuccessRetentionPeriod: 30
      StartCanaryAfterCreation: true

  CanarySuccessLowCWAlarm:
    Type: AWS::CloudWatch::Alarm
    Properties:
      AlarmName: !Ref CanarySuccessLowAlarmName
      AlarmDescription: The CloudWatch Synthetics Canary that monitors the Application
      Namespace: CloudWatchSynthetics
      MetricName: SuccessPercent
      Dimensions:
        - Name: CanaryName
          Value: !Ref CanaryName
      Statistic: Average
      ComparisonOperator: LessThanOrEqualToThreshold
      Threshold: 0
      Period: 300 # 5-min
      EvaluationPeriods: 2 # Alarm if the canary is not running/failing for 10 minutes
      TreatMissingData: breaching # Catch if the canary is not running

  CanaryDurationCWAlarm:
    Type: AWS::CloudWatch::Alarm
    Properties:
      AlarmName: !Ref CanaryDurationAlarmName
      AlarmDescription: The CloudWatch Synthetics Canary that monitors the Application
      Namespace: CloudWatchSynthetics
      MetricName: Duration
      Dimensions:
        - Name: CanaryName
          Value: !Ref CanaryName
      Statistic: Average
      ComparisonOperator: GreaterThanOrEqualToThreshold
      Threshold: 60000 # 1-min
      Period: 300 # 5-min
      EvaluationPeriods: 2 # Alarm if the canary is not running/failing for 10 minutes
      TreatMissingData: breaching # Catch if the canary is not running

  WaiterCustomResource:
    Type: "AWS::CloudFormation::CustomResource"
    DeletionPolicy: Retain
    UpdateReplacePolicy: Retain
    Properties:
      ServiceToken: !GetAtt LambdaWaiter.Arn
      WaitSeconds: 120

Outputs:
  CanaryName:
    Value: !Ref "SyntheticsCanary"
This CloudFormation script will create the following resources:
- A Synthetics canary with inline code.
- Amazon Cloudwatch alarms for
SuccessPercentandDurationmetrics. - An Amazon Simple Storage Service (Amazon S3) bucket to store the canary results.
- An AWS Lambda function to execute the canary and associated IAM roles.
To use StackSets to deploy the canary in different AWS Regions:
- Use the preceding code block to save the template as a local file (for example,
aws-synthetics-stackset.yml) on your computer. - Navigate to AWS CloudFormation console.
- For Region, choose N.Virginia (us-east-1).
- From the left navigation pane, choose StackSets, and then choose Create StackSet.
- Under Specify template, choose Upload a template file, and then choose the AWS CloudFormation template file you saved (
aws-synthetics-stackset.yml). Choose Next. - Enter a name for the StackSet (for example,
aws-synthetics-stackset). - In Parameters, provide the following and then choose Next.
- CanaryDurationAlarmName: The CloudWatch alarm name for Canary Duration (for example,
mycanary-durationalarm). - CanaryName: The name of your canary (for example,
mycanary). - CanarySuccessLowAlarmName: The CloudWatch alarm name for Canary Success Percent (for example,
mycanary-successlowalarm). - URLToMonitor: URL of your application to monitor in the canary script.(for example,
https://www.amazon.com/)
- CanaryDurationAlarmName: The CloudWatch alarm name for Canary Duration (for example,
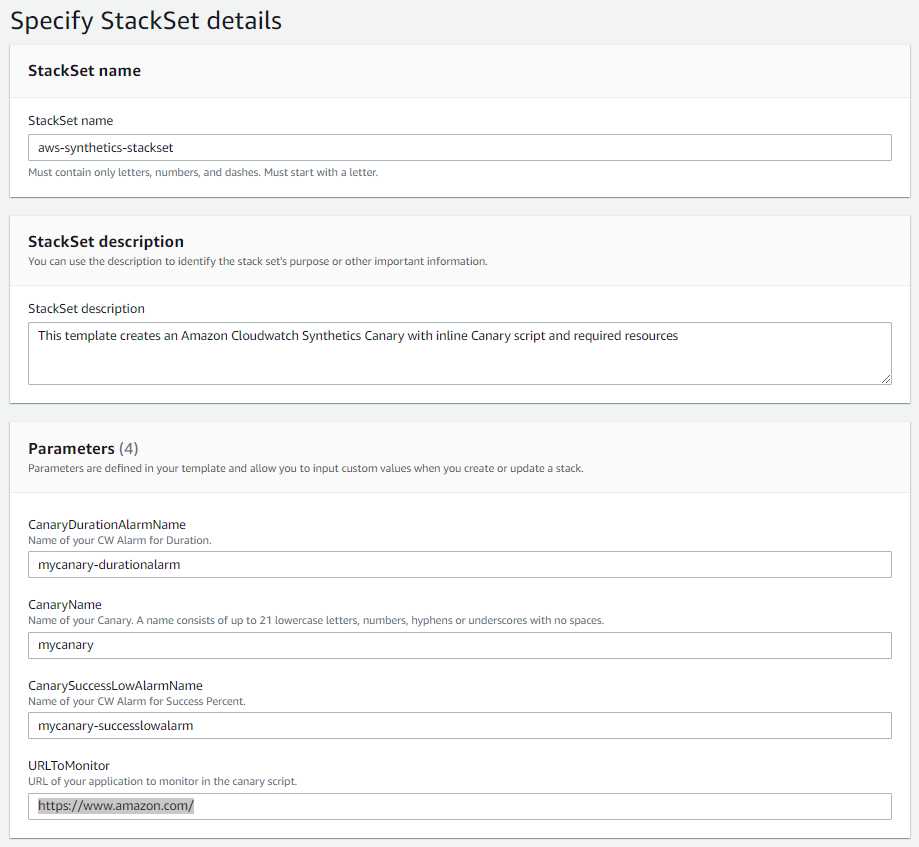
Figure 1: Creation of an AWS CloudFormation stack set
- In Permissions, use AWSCloudFormationStackSetAdministrationRole for the IAM role name. Use AWSCloudFormationStackSetExecutionRole for the IAM execution role name. Choose Next.
- Choose Deploy stacks in accounts, and enter the current AWS account ID.
- In Specify regions, choose US East (N.Virginia), US West (N.California), EU (London), Asia Pacific (Mumbai), and Asia Pacific (Sydney).
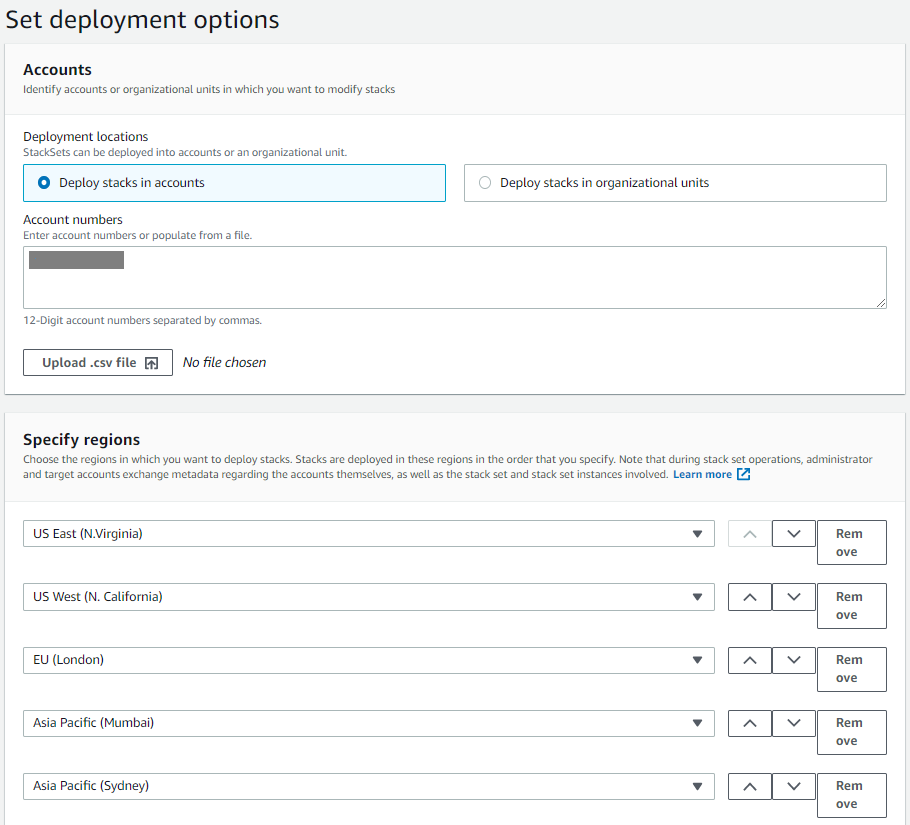
Figure 2: Specifying accounts and Regions
- Keep the deployment options as default, and then choose Next.
- On the Create StackSet Review page, be sure to select the Capabilities check box, and then choose Submit.
Note: This operation can take up to five minutes. Wait until status of all stacks in selected AWS Regions change to CURRENT .
Step 3: Create a cross-region dashboard to visualize the results
To enable cross-region functionality to CloudWatch:
- Navigate to Amazon CloudWatch console
- Choose the Region where you want to create the dashboard.(N.Virginia (us-east-1).
- From the left navigation pane, choose Settings.
- In Cross-account cross-region, choose Configure.
- In View cross-account cross-region, choose Enable.
- In Enable account selector section, Choose account settings or keep them at default.
- Choose Enable.
For additional information, see Enabling Cross-Account Functionality in CloudWatch in the Amazon CloudWatch User Guide.
To create a cross-region dashboard to view your canaries:
- In the left navigation pane, choose Dashboards, and then choose Create dashboard.
- Enter a name for the dashboard (for example,
aws-synthetics-dashboard), and then choose Create dashboard. - Select a widget type to configure (for example,
Linegraph), click Next, choose Metrics, and then choose Configure. - In All metrics, scroll down and search for Synthetics. From Custom Namespaces, choose CloudWatchSynthetics.
- Choose By Canary and then choose
mycanaryanddurationto be visualized in the dashboard. - From the Choose region dropdown list, choose the AWS Regions where the canary is deployed and choose
mycanaryandduration. - Choose Create widget.
- Choose Add widget and repeat steps 5 through 8 for the
SuccessPercentmetric. - Add more widgets of different types and metrics and edit the name of the widget, if needed.
- Choose Save dashboard.
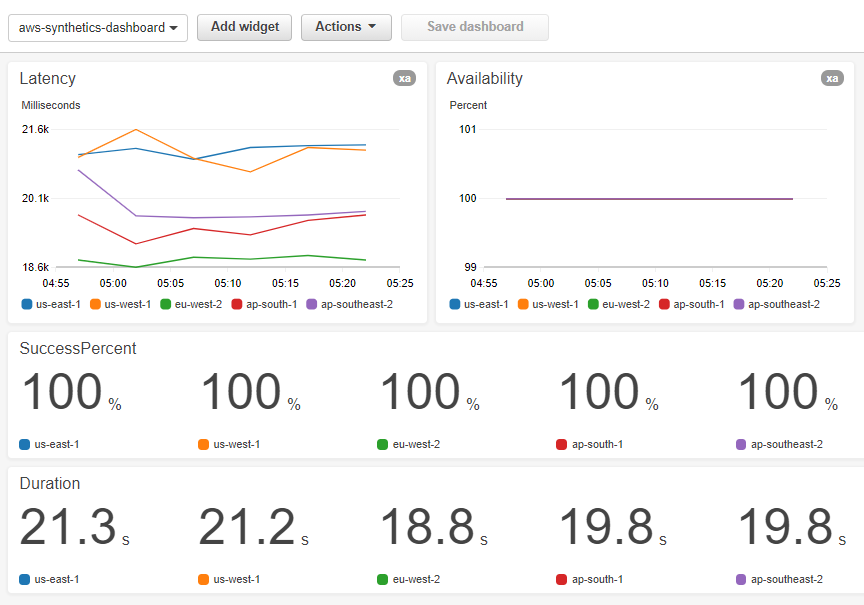
Figure 3: CloudWatch cross-region dashboard
Step 4: Deploy the canary to additional AWS Regions (Optional)
You can use StackSets to deploy the same canary to other AWS Regions, too.
- In the AWS CloudFormation console, choose N.Virginia (us-east-1).
- From the left navigation pane, choose StackSets, and then choose the Stackset you created.
- From Actions, choose Add new stacks to the StackSet.
- Choose Deploy stacks in accounts, and enter the AWS account ID.
- In Specify regions, choose other Regions (for example, Canada (Central), EU (Frankfurt), and Asia Pacific(Singapore)).

Figure 4: Specifying accounts and other AWS Regions
- Keep the deployment options as default, and then choose Next.
- In Specify Overrides, you can optionally override the parameters like
CanaryName,CanarySuccessLowAlarmName,CanaryDurationAlarmNameandURLToMonitor. Skip this step and choose Next. - Click Submit.
Note: This operation can take up to five minutes. Wait until status of all stacks in selected AWS Regions change to CURRENT .
Step 5: Change the canary centrally and redeploy to all Regions (Optional)
In this section, I am going to edit the CloudFormation template to change the schedule of the canary to run every 10 minutes instead of 5 minutes. This is to illustrate that you can change this canary centrally, in a single place, and then deploy the changes to multiple Regions at once.
- Open the
aws-synthetics-stackset.ymllocal file in a text editor and change the following line:
Schedule: {Expression: 'rate(5 minutes)', DurationInSeconds: '3600'}
to:
Schedule: {Expression: 'rate(10 minutes)', DurationInSeconds: '3600'}
- Open the AWS CloudFormation console.
- For Region, choose N.Virginia (us-east-1).
- From the left navigation pane, choose StackSets, and then choose the Stackset you created.
- From Actions, choose Edit Stackset details.
- On the Choose a template page, choose Replace current template.
- Under Specify template, choose Upload a template file, and then use the CloudFormation template file you just edited (
aws-synthetics-stackset.yml). - Choose Next, keep all fields as default, and then choose Next again.
- Keep all the fields as default, and then choose Next.
- Choose Deploy stacks in accounts and enter the AWS account ID.
- In Specify regions, choose Add all regions, and then choose Next.
- Review the options, make sure the Capabilities check box is checked, and then choose Submit.
Note: This operation can take up to five minutes. Wait until status of all stacks in selected AWS Regions change to CURRENT .
Once the CloudFormation StackSet operation is complete, the canary deployed in the selected regions will run every 10 minutes instead of 5 minutes. This way, you can edit the canary code in a central place and deploy it to all the regions.
Cleanup
To avoid ongoing charges, delete all the resources in all the Regions.
- Open the Amazon CloudWatch console.
- Choose the dashboards you created, and from Actions, choose Delete dashboard.
- Choose the canaries you created and from Actions, choose Stop. Repeat this step for all regions. This step is needed only if there are active canaries which are in Running state.
- Open the Amazon S3 console, and choose all the buckets that start with cw-syn-results. Delete the content in the buckets.
- Open the AWS CloudFormation console, choose StackSets from left navigation menu, choose the stack set you created and click on Actions. Choose Delete stacks from StackSet.
- Provide the Account ID in the Accounts Section, Click Add all regions, keep the Deployment actions as default and click Next.
- Click Submit.
- Once the stacks are deleted, choose Delete StackSet from Actions to delete the stackset.
Conclusion
In this post, I showed how you can use CloudWatch Synthetics to monitor your website from various geographic locations by simulating the global customer experience. I also showed how you can create centralized dashboards to monitor the latency of your web applications from various Regions at a single place. This way, customers can check their application performance from various geographies and address performance issues, if any, before their real end users encounter them.
You can read more about Amazon CloudWatch Synthetics in the documentation.
About the author

Venugopalan Vasudevan is a Senior Technical Account Manager with AWS based in Denver, Colorado. Venu works with AWS customers to solve architectural, operational, and cost optimization challenges and help them build on AWS. In his spare time, he enjoys playing with his two kids.