AWS Public Sector Blog
Modernizing evidence management in Salesforce public sector solutions with Amazon S3
Public sector agencies manage increasing volumes of digital evidence within casework, inspections, investigations, and enforcement operations. This evidence often includes large unstructured files such as body camera footage, surveillance video, photographs, audio interviews, and document scans. Although Salesforce Public Sector Solutions (PSS) provides a structured case management and chain-of-custody framework, storing high-volume evidence directly inside Salesforce can create scalability, cost, and retention challenges.
To address these needs, Salesforce PSS now supports external file storage with Amazon Simple Storage Service (Amazon S3). Agencies can store digital evidence in Amazon S3 while maintaining a seamless investigation workflow inside Salesforce. This post outlines the architecture, configuration model, and operational patterns for using Amazon S3 with Salesforce PSS for scalable evidence management.
Solution overview
With this integration, you can use Salesforce to upload or associate evidence files within standard PSS objects (such as Case, Custody Item, and Custody Chain Entry) while the underlying file is stored in Amazon S3. Salesforce retains metadata and security context, and S3 handles file durability, cost-efficient storage tiers, legal hold, and lifecycle retention. For configuring legal hold and retention policies, see Locking objects with Object Lock, and for setting up automatic file lifecycle policies, see Managing the lifecycle of objects. Figure 1 illustrates the integration architecture between Salesforce and AWS, showing how IAM Roles Anywhere authenticates requests and enables file uploads to Amazon S3.

Figure 1: Salesforce PSS and Amazon S3 integration
When an investigator uploads evidence to a case, Salesforce writes the file to Amazon S3 using the configured integration. Salesforce stores the object key and metadata on the custody item, and the user continues to access the evidence through the standard PSS interface.
Evidence flow
- An investigator uploads body camera footage to a case Investigator selects Upload Evidence within the PSS case UI.
- Salesforce routes the file upload through the external file storage connector
- Salesforce assumes the configured AWS Identity and Access Management (IAM) role
- Salesforce performs PutObject into S3
- Salesforce records the S3 key and metadata on the custody item and updates the chain of custody log
- Investigators later select the evidence file and retrieve it through Salesforce, which fetches the object from S3
Technical implementation guide
This section provides detailed, step-by-step instructions for implementing the Amazon S3 and Salesforce PSS integration. We use Amazon Web Services (AWS) Identity and Access Management Roles Anywhere (IAM Roles Anywhere) for certificate‑based authentication, which provides enhanced security over traditional access keys through short-lived credentials and automatic rotation.
Prerequisites
Before beginning, the following should be in place:
A Salesforce PSS enabled org with Files Connect enabled
- An AWS account with appropriate permissions
- Administrative access to both Salesforce and AWS
- A certificate authority (CA) or access to AWS Private Certificate Authority (AWS Private CA)
Step 1: Create an S3 bucket
- Navigate to the Amazon S3 console.
- Create a new bucket with a unique name.
- Configure the bucket settings according to your organization’s security requirements.
- Note the bucket name and Region for later use.
- Add Cross-Origin Resource Sharing (CORS) configuration to your S3 bucket. The following is an example of CORS that would allow the Salesforce origin. Please modify as needed for your organization:
Step 2: Create a trust anchor
- Navigate to the IAM Roles Anywhere console
- Select Create a trust anchor
- Choose one of the following options:
- AWS Private Certificate Authority: Select an existing private CA
- External certificate bundle: Upload your organization’s CA certificate
- Name your trust anchor (for example,
Salesforce-S3-Integration-CA) - Select Create trust anchor
- Note the trust anchor Amazon Resource Name (ARN) for later use
Step 3: Create S3 access policy
1. Navigate to the IAM console and select Policies
2. Select Create policy
3. Select the JSON tab and enter the following policy. Please modify as needed for your organization:
4. Replace YOUR_BUCKET_NAME with your actual bucket name
5. Name your policy (for example, Salesforce-S3-Access-Policy)
6. Select Create policy
Step 4: Create an IAM role for IAM Roles Anywhere
1. In the IAM console and select Roles
2. Select Create role
3. Select Custom trust policy
4. Enter the following trust policy. Please modify as needed for your organization:
5. Select Next
6. On the Add permissions page, attach the policy created in step 3 by searching for Salesforce-S3-Access-Policy (or the name you provided)
7. Name your role (for example, Salesforce-S3-RolesAnywhere-Role)
8. Click Create role
Note the role ARN for later use
Step 5: Create an IAM Roles Anywhere profile
- In the IAM Roles Anywhere console, select Profiles
- Select Create a profile
- Configure the following:
- Profile name:
Salesforce-S3-Profile - Roles: Select the IAM role created in Step 4
- Session duration: 3,600 seconds (adjust as needed)
- Profile name:
- Select Create profile
- Note the profile ARN for later use
Step 6: Create certificate in Salesforce
- Log in to Salesforce
- Navigate to Setup through the gear icon
- Search for Certificate and Key Management in the Quick Find box
- Select Create CA-Signed Certificate
- Configure the certificate with the following details:
- Label: A descriptive label that conforms to your team naming conventions
- Unique name: Provide a unique name that will be used by the API Common name: Provide a unique name that identifies the certificate in your organization
- Company: Your company name
- State/Province: State or province of your team
- Key size: 2048
- City: City of your team
- Country code: Country code of your team
- Select Save
- Select Download Certificate Signing Request (CSR)
Step 7: Sign the certificate with AWS
Note: The following steps (Steps 7 and 8) apply only if your Certificate Authority is AWS Private Certificate Authority. If you are using a different Certificate Authority, sign the CSR using that CA’s signing process and then skip to Step 9 to continue.
After downloading the CSR from Salesforce, have it signed by the CA registered with IAM Roles Anywhere with the AWS Command Line Interface (AWS CLI):
Output looks like this:
Note: A common error received would be if validity value is higher than what the CA allows.
Step 8: Retrieve signed certificate
Run the following command to get the signed certificate:
Example input:
Figure 2 provides a sample of what the output may look like in your command line interface:
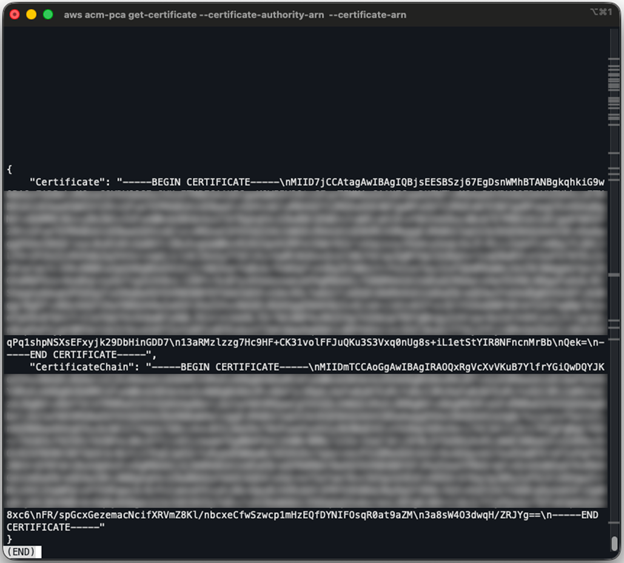
Figure 2: Sample output from AWS Private Certificate Authority get-certificate request
Take the output from “Certificate”, and format it to fit the structure that is expected of a certificate file by doing the following in a text editor:
- Replace all \n with a new line (enter key)
- Your certificate file should have a
.crtextension
Figure 3 shows how the certificate file should be formatted after replacing the \n with a new line.
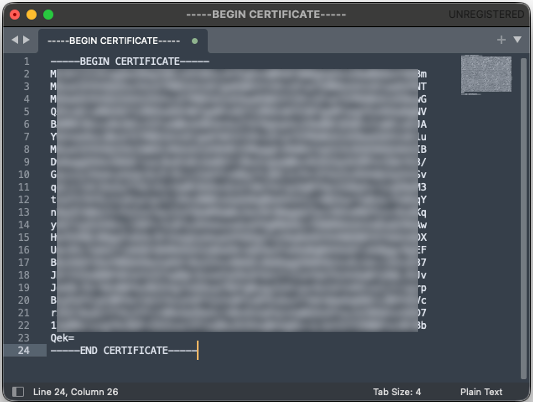
Figure 3: Example of a formatted signed certificate file
Step 9: Upload the signed certificate to Salesforce
- Open Salesforce setup page
- Return to Certificate and Key Management
- Find your certificate (it shows as Awaiting Signing)
- Select Upload Signed Certificate
- Upload the signed certificate file (
salesforce-roles-anywhere.crt) - Select Save
Important notes:
- The private key remains stored within Salesforce and is not exposed
- You only need to upload the signed certificate back to Salesforce
- The certificate will be used automatically when configuring the external credential in the following steps
Step 10: Create and configure permission set
- From Setup, enter Permission Sets in the Quick Find box
- Select New and create a permission set named
AmazonS3 Admin Access, or a name matching your organization’s naming convention
Configure system permissions:
- Select System Permissions
- Select Edit
- Enable Files Connect Cloud
- Enable Upload Files to Amazon S3
- Save your changes

Figure 4: Permission Changes Confirmation prompt
Assign users:
- Select Manage Assignments
- Select Add Assignments
- Select users who need access to Amazon S3 files, then select Next
- Select Assign
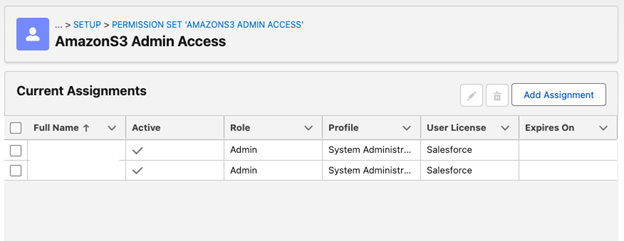
Figure 5: AmazonS3 Admin Access, Current Assignments screen
Step 11: Enable Files Connect
- From Setup, enter External Storage Settings in the Quick Find box
- Turn on Access files in Amazon S3
- From Setup, enter Files Connect in the Quick Find box
- Select Edit and select Enable Files Connect
- For file sharing, select Reference
- Save your changes
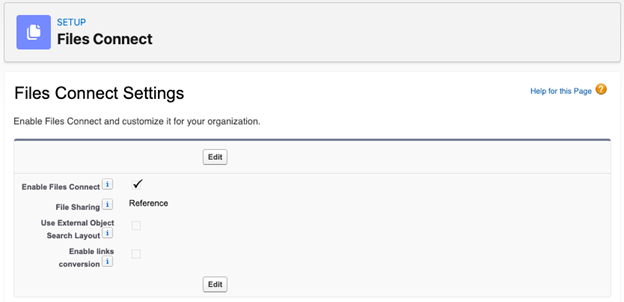
Figure 6: Files Connect Settings screen
Step 12: Configure external credential with IAM Roles Anywhere
Create external credential:
- From Salesforce setup, search for Named Credentials in the Quick Find box
- Select the External Credentials tab
- Select New
- Configure the following:
- Label: S3 External Storage Roles Anywhere (or your preferred name)
- Name: S3_External_Storage_Roles_Anywhere (or your preferred name)
- Authentication protocol: AWS Signature Version 4
- Service: S3
- Region: us-east-1 (or your bucket’s Region)
- AWS account ID: Your 12-digit AWS account ID
- Obtain temporary IAM credentials using STS: Checked
- Credential type: Roles Anywhere
- Trust anchor ARN: Your trust anchor ARN from Step 3.1
- Profile ARN: The ARN of the IAM Roles Anywhere profile created in Step 5
- Signing certificate: Select the certificate you created in the Salesforce certificate and key manager
- Callout options: Set additional status codes for token refresh to 403
- Select Save
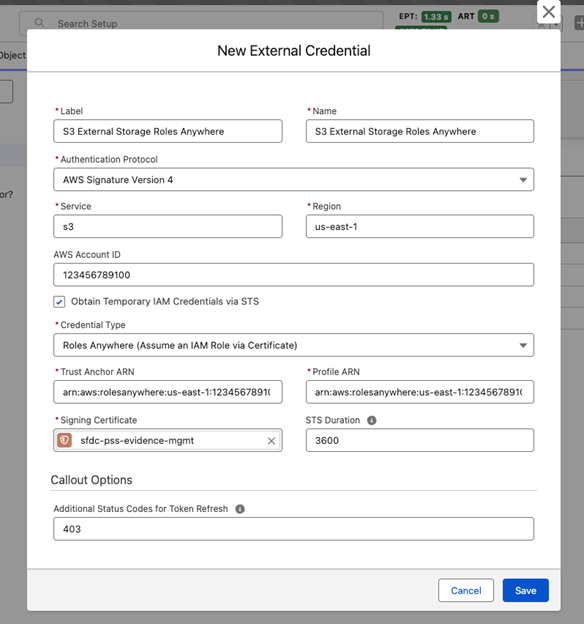
Figure 7: New External Credential screen
Configure principal:
- In the Principal section of the external credential page, select New
- Configure the following:
- Parameter name: Main
- IAM role ARN: Enter the ARN of the IAM role created in Step 3.2
- Select Save
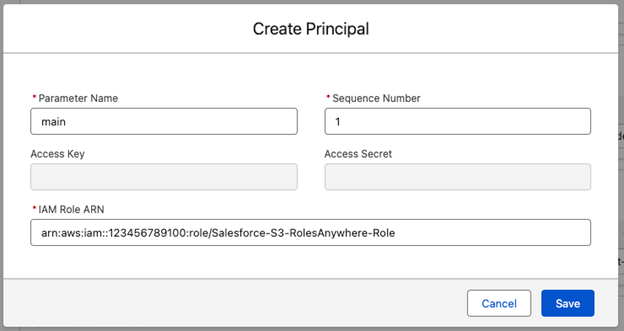
Figure 8: Create Principal screen
Assign credential:
- Navigate to Permission Sets.
- Select your Permission Set created in step 10.
- Go to External Credential Principal Access.
- Enable
[Name_of_your_credential] – main.
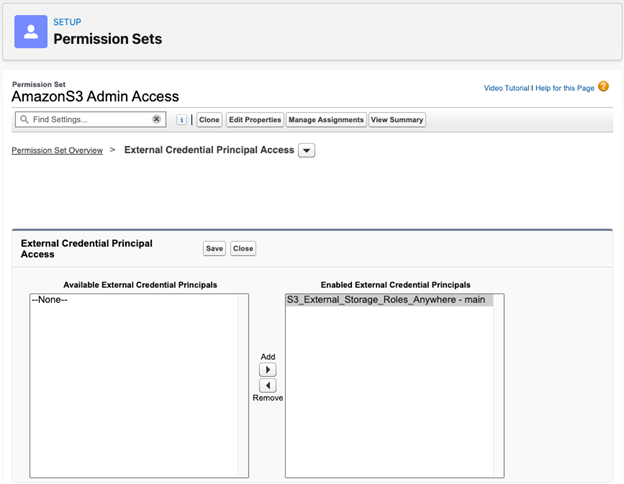
Figure 9: Permission Sets, AmazonS3 Admin Access, External Credential Principal Access screen
Step 13: Create named credential
- From the named credentials page, select New
- Configure the following:
- Label:
pss evidence mgmt s3 - Name:
pss_evidence_mgmt_s3 - URL:
https://YOUR_BUCKET_NAME.s3.YOUR_REGION.amazonaws.com - Authentication protocol: AWS Signature Version 4
- External credential:
S3_External_Storage_Roles_Anywhere, external credential created in Step 12
- Label:
- Save your changes
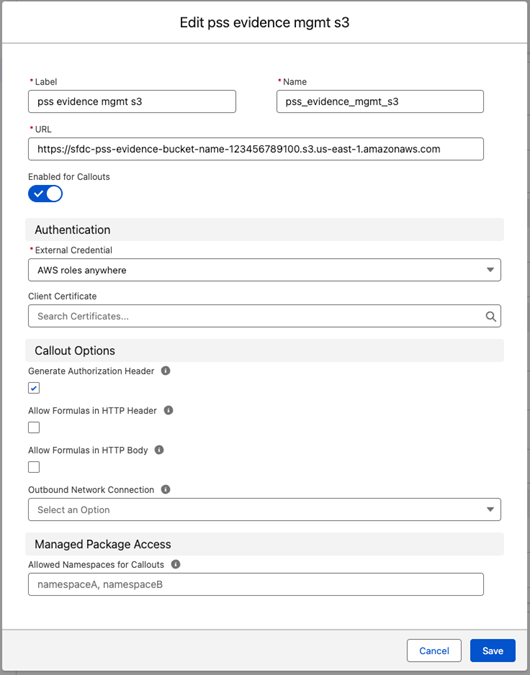
Figure 10: Edit pss evidence mgmt s3 screen
Step 14: Define external data source
- From Setup, enter External Data Sources in the Quick Find box
- Click New External Data Source
- Configure the following:
- Label: Amazon S3 Files
- Name: Amazon_S3_Files
- Type: Files Connect: Amazon S3
- Named credential: Select the Named Credentials Lookup and find named credentials created in step 13: pss_evidence_mgmt_s3
- Presigned URL timeout: 1–60 minutes (5 minutes is the default)
- Save your changes
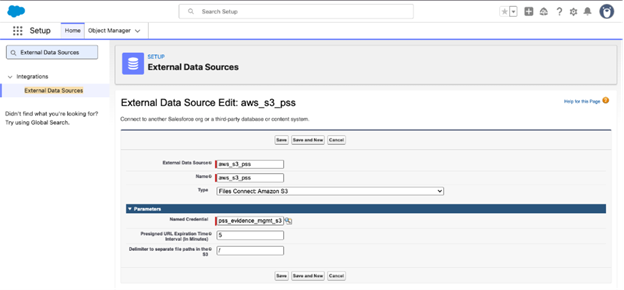
Figure 11: External Data Sources, External Data Source Edit screen
Step 15: Add trusted URL
- From Setup, enter CORS in the Quick Find box
- Select CORS
- Add your S3 bucket URL as a trusted site:
https://YOUR_BUCKET_NAME.s3.YOUR_REGION.amazonaws.com - Save your changes
Step 16: Enable file upload to Amazon S3
- From Setup, enter External Storage in the Quick Find box
- Select External Storage Settings
- Turn on Upload files to Amazon S3
- In File Storage Settings, select Standard Configuration
- Add your external data source (
Amazon_S3_Files) - Save your changes

Figure 12: External Storage Settings screen
Step 17: Create and configure Salesforce permission set
- From Setup, enter Permission Sets in the Quick Find box
- Find the permission set created in Step 10
- Configure external data source access:
- Select External Data Source Acces
- Select Edit
- Add
Amazon_S3_Filesas an enabled external data source - Save your changes
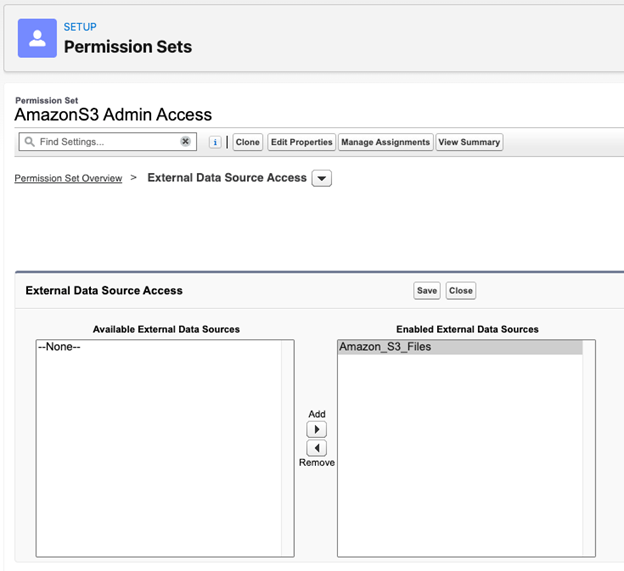
Figure 13: Permission Sets, AmazonS3 Admin Access, External Data Source Access screen
Verify users have access:
- Select Manage Assignments
- Select Add Assignments
- Select users who need access to Amazon S3 files
- Select Assign
Testing your configuration
- Navigate to any Salesforce record (for example, Account, Case)
- In the Files related list, select Add Files
- Select Upload Files to test the upload functionality
- To access existing S3 files, select Attach from External Source and select your Amazon S3 data source
Conclusion
By integrating Amazon S3 with Salesforce PSS using IAM Roles Anywhere, organizations can achieve a modern, more secure approach to external file storage. Salesforce PSS delivers comprehensive case management, chain of custody tracking, and investigative workflows, and Amazon S3 complements these strengths with enterprise-scale storage infrastructure. This setup provides a production-ready foundation for efficient document management that meets modern security requirements and can scale with your organization’s needs. Amazon S3 provides enterprise-grade security with encryption at rest and in transit, fine-grained access controls through IAM policies, and intelligent tiering capabilities. Available in AWS GovCloud (US) and commercial AWS Regions, these features enable public sector agencies to meet strict regulatory requirements while optimizing storage costs as evidence volumes grow.